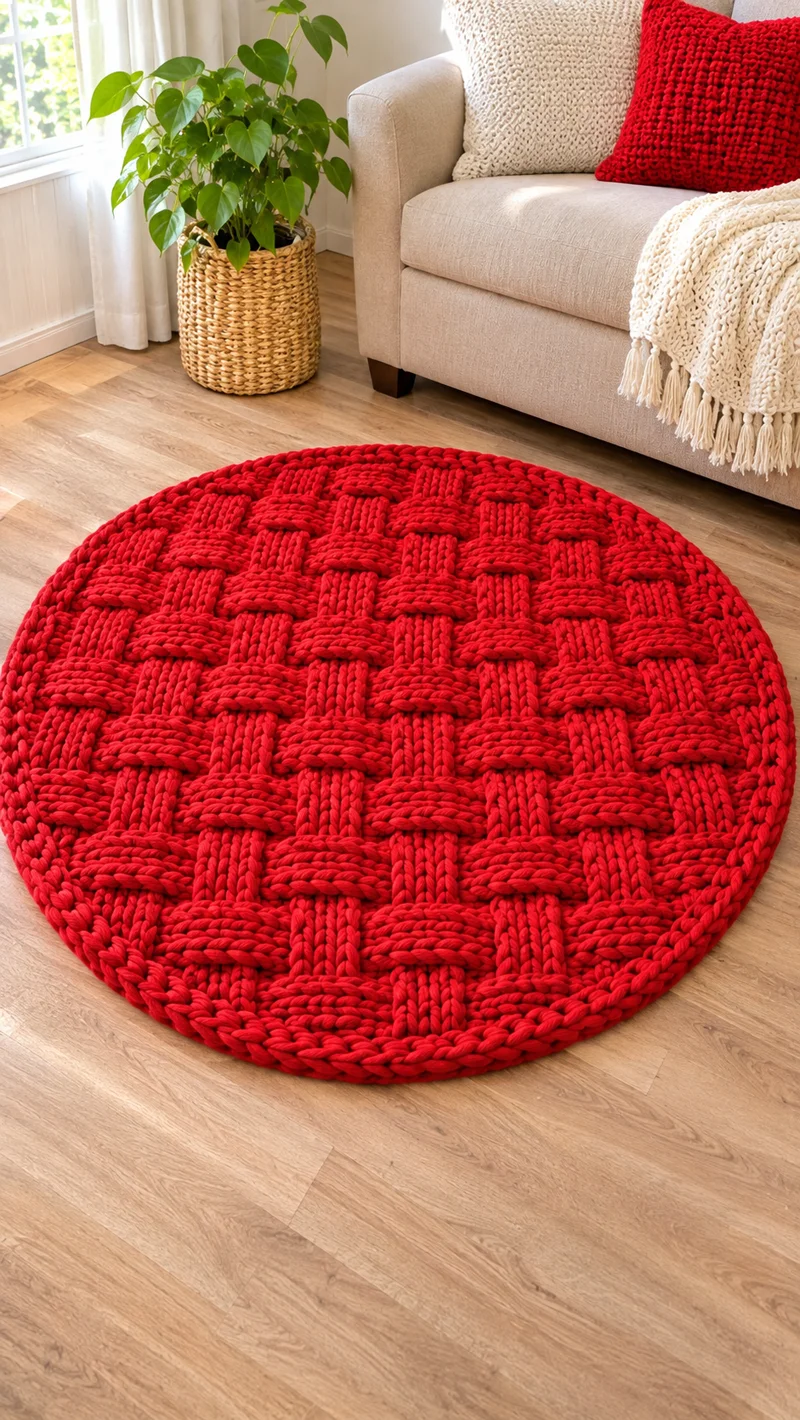
A circular basketweave rug must accommodate an expanding circumference without breaking its raised stitch pattern. This round basketweave crochet rug pattern uses super bulky red yarn, a 12 mm crochet hook, and alternating post stitches to create a textured floor covering. The proposed design targets approximately 90–100 cm in diameter, subject to gauge testing. It is an intermediate project suited to making a substantial decorative rug with a reinforced outer edge.
The Design: What Makes This Round Basketweave Rug Different
The main feature of this chunky crochet rug is the combination of a circular outline and raised, alternating stitch sections. Traditional basketweave crochet stitch patterns are usually worked in straight rows, where the stitch count remains constant. A circular rug behaves differently. Its circumference expands with every increase round.
The proposed construction uses twelve increase sectors to maintain the circle, while front-post and back-post stitches create surface relief. Plain double crochet stitches at increase points interrupt the texture slightly but reduce crowding.
The second structural decision concerns the outer border. A dense single-crochet edge helps control stretching and provides a defined finish.
A common mistake with a textured crochet rug is adding increases at a fixed position in every round. This can produce visible corners instead of a smooth circle. Staggered increase positions distribute the shaping more evenly.
Project Info at a Glance
| Detail | Specification |
|---|---|
| Skill Level | Intermediate |
| Estimated Time | 12–18 hours |
| Target Diameter | 90–100 cm (estimated) |
| Crochet Hook | 12 mm |
| Yarn Weight | Super Bulky (6) |
| Main Color | Cherry Red |
| Construction | Center outward, joined rounds |
| Main Techniques | DC, FPdc, BPdc, increases |
| Best For | Living rooms and decorative floor accents |
Note: This is an original photo-inspired design, not a reproduction of the exact rug in the photograph. Size, time, and material quantities are estimates. The pattern has not been physically sample-tested.
Materials and Tools
Yarn
- Cherry red super bulky yarn (6) – approximately 800–1,200 g as an initial purchasing allowance. Lion Brand Wool-Ease Thick & Quick is one possible yarn to test.
- Matching red yarn for edging – reserve approximately 50–100 g from the main yarn allowance.
- Accent yarn – none required.
The reference rug appears to use thick, rounded yarn. Tubular yarn can create a similar smooth appearance, while chenille may produce a softer texture with less defined basketweave stitches.
Yarn weight labels alone do not determine the total quantity required. Two super bulky yarns can have different lengths per 100 g. Check the total meterage before purchasing.
Tools
- 12 mm crochet hook – adjust after testing gauge.
- Large-eye tapestry needle – for securing thick yarn ends.
- 12 locking stitch markers – for increase sectors.
- Measuring tape – for checking diameter and gauge.
- Sharp scissors – for cutting thick yarn.
- Non-slip rug underlay – recommended for smooth floors.
- Flat blocking surface – for checking the circular shape.
Gauge and Yarn Testing
Before beginning the full rug, work a 15 cm square sample using the selected yarn and hook.
Make one section in ordinary double crochet and another in alternating front-post and back-post double crochet. Compare their widths and heights.
The textured section may pull inward because post stitches wrap around the stitch below rather than entering its top loops. A hook that produces a flat ordinary double-crochet circle may not produce the same dimensions in basketweave fabric.
Record the stitch count over 10 cm, row height, and yarn weight consumed by the sample.
If the fabric is excessively stiff, increase the hook size by 1–2 mm. If the stitches are too loose for a floor covering, test a smaller hook.
Crochet Abbreviations
All instructions use US crochet terminology.
| Abbreviation | Meaning |
|---|---|
| MR | Magic ring |
| ch | Chain |
| sc | Single crochet |
| dc | Double crochet |
| FPdc | Front-post double crochet |
| BPdc | Back-post double crochet |
| inc | Two stitches worked into one stitch |
| sl st | Slip stitch |
| st(s) | Stitch(es) |
| rnd | Round |
| rep | Repeat |
| BLO | Back loop only |
| RS | Right side |
Front-post double crochet: Yarn over, insert the hook from front to back and back to front around the post of the stitch below, then complete a double crochet.
Back-post double crochet: Yarn over, insert the hook from back to front and back to back around the post below, then complete a double crochet.
Invisible decreases are not used in this rug because the circular construction expands rather than contracts.
Round Basketweave Crochet Rug Pattern – Step by Step
This photo-inspired circular post-stitch pattern creates basketweave-like texture in concentric sections. It does not reproduce the exact rectangular woven blocks visible in the reference photograph.
Construction: Work in joined rounds, not a continuous spiral. Chain 2 at the beginning of each double-crochet round; the chain does not count as a stitch. Join with a slip stitch to the first stitch at the end of each round.
Part 1: Circular Center
Yarn: Cherry red. Construction: standard double-crochet circle shaping.
Begin with a magic ring.
R1: Ch 2, work 12 dc into MR. Join. (12)
R2: Ch 2, work 2 dc in each stitch around. Join. (24)
R3: Ch 2, repeat [1 dc, 2 dc in next stitch] 12 times. Join. (36)
R4: Ch 2, repeat [2 dc, 2 dc in next stitch] 12 times. Join. (48)
At this stage, the circle should lie flat without pronounced folds.
The center uses ordinary double crochet because adding post stitches immediately around a very small circumference can produce excessive thickness.
Place a marker at the beginning of each of the twelve shaping sectors. These markers help maintain the increase distribution in later rounds.
Part 2: First Basketweave Section
Yarn: Cherry red. Technique: alternating front-post and back-post double crochet.
The next rounds introduce the textured surface.
R5: Ch 2, work 4 FPdc, then 4 BPdc. Repeat this eight-stitch sequence six times. Join. (48)
R6: Ch 2, repeat [3 dc, 2 dc in next stitch] 12 times. Join. (60)
R7: Ch 2, repeat [4 dc, 2 dc in next stitch] 12 times. Join. (72)
R8: Ch 2, work [4 BPdc, 4 FPdc] nine times. Join. (72)
The FPdc and BPdc sections produce raised and recessed areas. Switching their positions creates the impression of crossing strips.
Because R8 is worked without increases, inspect the fabric immediately afterward. The circle may begin to cup if the yarn is stiff or the post stitches are unusually tight.
A single increase-free textured round is a design choice, not a universal shaping rule. Adjustments may be needed after measuring the fabric.
Part 3: Expanding the Textured Rug
Yarn: Cherry red. Construction: circular double-crochet shaping with textured rounds.
R9: Ch 2, repeat [5 dc, 2 dc in next stitch] 12 times. Join. (84)
R10: Ch 2, repeat [6 dc, 2 dc in next stitch] 12 times. Join. (96)
R11: Ch 2, repeat [4 FPdc, 4 BPdc] 12 times. Join. (96)
R12: Ch 2, repeat [7 dc, 2 dc in next stitch] 12 times. Join. (108)
R13: Ch 2, repeat [8 dc, 2 dc in next stitch] 12 times. Join. (120)
R14: Ch 2, repeat [4 BPdc, 4 FPdc] 15 times. Join. (120)
R15: Ch 2, repeat [9 dc, 2 dc in next stitch] 12 times. Join. (132)
R16: Ch 2, repeat [10 dc, 2 dc in next stitch] 12 times. Join. (144)
At the end of R16, measure the diameter across the widest point.
The increase rounds expand the circle, while the textured rounds establish visible stitch groups. This creates concentric basketweave bands rather than a continuous square checkerboard.
For a closer match to the photograph, the finished surface would require additional woven rectangular elements or a separately engineered square-block layout.
Part 4: Outer Basketweave Section
Yarn: Cherry red.
R17: Ch 2, repeat [4 FPdc, 4 BPdc] 18 times. Join. (144)
R18: Ch 2, repeat [11 dc, 2 dc in next stitch] 12 times. Join. (156)
R19: Ch 2, repeat [12 dc, 2 dc in next stitch] 12 times. Join. (168)
R20: Ch 2, repeat [4 BPdc, 4 FPdc] 21 times. Join. (168)
R21: Ch 2, repeat [13 dc, 2 dc in next stitch] 12 times. Join. (180)
R22: Ch 2, repeat [14 dc, 2 dc in next stitch] 12 times. Join. (192)
R23: Ch 2, repeat [4 BPdc, 4 FPdc] 24 times. Join. (192)
This is the end of the principal textured section.
The final diameter is not guaranteed by the stitch count alone. At a hypothetical average radial round height of 2 cm, 23 rounds would produce a diameter near 92 cm before edging. Actual post-stitch round heights will differ, so measure the rug rather than relying on that projection.
Part 5: Thick Outer Border
Yarn: Cherry red. Finish: dense single crochet.
The border should reinforce the outer edge without drawing the rug inward.
R24: Ch 1, work 1 sc in every stitch around. Join. (192)
R25: Ch 1, work 1 sc in BLO of every stitch around. Join. (192)
R26: Ch 1, work 1 sc in every stitch around. Join. (192)
Fasten off, leaving a 20 cm tail for weaving.
For a more rounded edge, an optional reverse-single-crochet finishing round can be added. Its stitch count remains 192 if one stitch is worked into each stitch of R26.
The photograph’s border appears thicker than a standard single-crochet edging. Using a doubled strand for the final round may approximate that appearance, but it should be tested first because the additional thickness can cause rippling.
How to Keep a Round Crochet Rug Flat
Flatness is the most important construction test for a circular rug.
A traditional double-crochet circle often uses approximately twelve increases per round. However, that rule assumes relatively consistent stitch and round dimensions.
Basketweave texture changes those dimensions.
Front-post stitches can draw fabric inward. Back-post stitches create different surface tension. A combination of the two may alter the circumference enough that standard increase spacing no longer produces a flat circle.
The pattern therefore uses increase-free texture rounds between shaping rounds. This is a design framework that requires testing with the selected yarn.
If the rug develops a raised bowl shape, the circumference may be too small relative to its radius. Consider adding a limited number of extra increases in a following plain round.
If the edge forms waves, the circumference may be excessive. Try a round without increases before continuing.
Make adjustments gradually. Adding or removing twelve stitches at once can change the shape noticeably.
Assembly and Finishing
Because the rug is worked as one piece, no separate panels need to be sewn together.
- Place the completed rug on a clean, flat surface with the textured side facing upward.
- Check the diameter in two perpendicular directions and record both measurements.
- Inspect the center for puckering or an opening that has not been closed securely.
- Examine every increase round for missed stitches or accidental extra increases.
- Check the FPdc and BPdc sections for loose loops that could catch on footwear.
- Thread the finishing tail through a large tapestry needle.
- Weave the tail through several adjacent stitches, reverse direction, and secure it within the dense border.
- Shape the rug into a circle without pulling the outer edge beyond its natural circumference.
- Allow the rug to relax flat, using blocking only if the yarn manufacturer’s care instructions permit it.
- Position the rug over a properly sized non-slip underlay before placing it on a hard floor.
The completed rug has a circular base, raised post-stitch texture, and a reinforced outer edge.
7 Technical Tips for a Better Basketweave Rug
- Stitch marker placement: Missing one increase sector can shift the shaping and produce an uneven edge. Place markers at twelve evenly distributed sector boundaries and recount at the end of each shaping round.
- Control the center opening: A magic ring that remains 5 mm or wider may become more visible as the rug is handled. Pull the starting tail firmly closed and weave it through several stitches in opposing directions.
- Watch for cupping: If the rug’s outer edge rises more than approximately 2 cm when placed on a flat surface, check whether the circumference is too tight. Add a small number of increases in a plain round and assess the result before continuing.
- Maintain post-stitch tension: Pulling FPdc stitches more tightly than BPdc stitches can distort the raised sections. Compare the widths of neighboring four-stitch groups and adjust the working loop height.
- Avoid excessive edge thickness: A border that is substantially tighter than the main fabric can curl inward. Test 10–15 cm of edging and check whether it contracts before completing the full circumference.
- Pin before blocking: Uneven pin spacing can turn a circular rug into a scalloped shape. Use eight or twelve evenly spaced reference points and measure from the center to each point.
- Secure yarn tails against abrasion: Short tails can work loose when the rug is vacuumed or moved. Leave approximately 20 cm for finishing and weave through multiple stitches, changing direction at least once.
Choosing the Right Yarn for a Crochet Floor Rug
The yarn determines how the rug behaves under furniture, foot traffic, and cleaning.
Super bulky acrylic-blend yarn is accessible and creates visible stitch definition, but some fibers compress under repeated pressure. Cotton-based rug yarn can produce a firmer surface, although it may require more effort to work with a large hook.
Tubular yarn creates rounded stitches similar to those in the reference photograph. Its structure may be more resistant to splitting than loosely twisted multi-ply yarn.
Chenille and velvet-style yarns can create substantial thickness, but the pile may obscure the basketweave definition. Some chenille yarns also shed or develop loose loops under abrasion.
For a floor rug, check the yarn’s washing instructions and suitability for repeated contact with footwear. A yarn intended primarily for blankets may not tolerate the same use.
The finished rug also needs a suitable non-slip backing. A thick crochet fabric can still slide on polished wood, laminate, or tile.
How to Resize the Round Basketweave Crochet Rug
The proposed pattern finishes its principal textured section at R23 with 192 stitches. That number is a construction endpoint, not a fixed diameter.
For a smaller rug, stop after an earlier complete texture section and add the border. R17, with 144 stitches, is one possible stopping point.
For a larger rug, continue adding shaping rounds while maintaining the sector-based increase structure. Add twelve stitches on a standard increase round, but check flatness after each round.
Texture rounds should be planned at stitch counts divisible by eight when using the four-FPdc/four-BPdc repeat. For example, 216, 240, and 264 stitches all accommodate complete eight-stitch repeats.
Do not force the repeat onto a round with an incompatible stitch count. Work an additional shaping round first, or redesign the textured repeat to fit the available stitches.
To estimate yarn requirements, weigh a completed section of known area. Divide its weight by its area, then multiply by the planned finished area. Add a separate allowance for edging.
This method is more dependable than assuming every 100 cm rug consumes the same number of skeins.
Common Crochet Rug Problems and Fixes
| Problem | Likely Cause | Correction |
|---|---|---|
| Rug forms a bowl | Too few increases or tight post stitches | Add measured increases in a plain round |
| Outer edge ripples | Too many increases | Work a round without increases |
| Texture looks uneven | Inconsistent FPdc/BPdc tension | Check post-stitch loop height |
| Rug becomes polygonal | Increases aligned vertically | Stagger increase locations |
| Border curls inward | Edge stitches too tight | Use a larger hook for edging |
| Rug slides on floor | No friction backing | Add suitable non-slip underlay |
| Yarn ends become visible | Insufficient weaving | Reweave tails in opposing directions |
Conclusion
This round basketweave crochet rug pattern combines a circular double-crochet foundation with alternating post-stitch sections and a dense outer border. The construction provides a practical starting point for making a textured red floor rug, although the final size and flatness require gauge testing.
Before beginning the full project, complete a post-stitch sample, measure its dimensions, and confirm that the selected yarn produces stable fabric. Record the finished diameter and yarn consumption for future adjustments.
Share a photograph of your completed rug on Pinterest or Instagram using #RoundBasketweaveCrochetRug.
Would you keep the entire rug cherry red, as shown in the reference photograph, or use a contrasting color for the thick outer border?








