Introduction
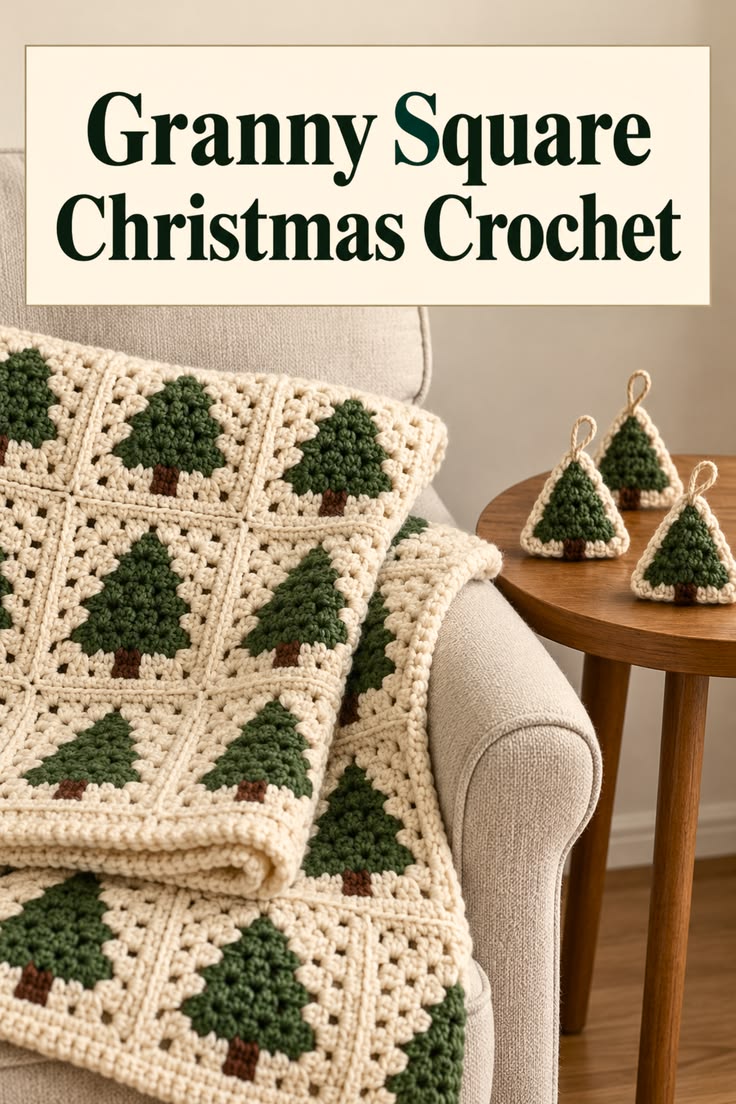
A Christmas tree motif has one geometric problem: three sloping branches must finish inside a square without losing the pointed silhouette. This Christmas tree granny square crochet pattern uses forest green trees, small brown trunks, and warm cream backgrounds to create a modular holiday blanket inspired by the photographed design. Work the squares separately, join them with cream yarn, then add a compact border. The same tree motif can also become ornaments, cushions, or festive table decorations.
The Design: What Makes the Christmas Tree Square Different
The tree is treated as the focal shape rather than a color change inside an ordinary granny square. A narrow brown trunk anchors the motif, while successive green rows widen toward the bottom to produce the recognizable triangular Christmas-tree profile. Cream stitches then fill the spaces around that triangle and convert the motif into a stable square.
The second structural decision is the raised cream frame. It separates neighboring trees and gives the finished blanket the paneled appearance visible in the photo. Finally, the palette is intentionally limited to cream, forest green, and brown. Too many colors would compete with the repeated tree geometry.
A common failure is making the green section too wide. When the branches reach the square corners, the tree stops reading as a separate motif and becomes a green triangle filling the entire block.
Project Information
| Skill Level | Construction | Square Size | Hook | Best For |
|---|---|---|---|---|
| Intermediate | Individual motifs joined into rows | Approx. 15–18 cm | 4.5–5.0 mm | Christmas blankets, cushions and holiday décor |
Materials and Tools
Yarn
- Warm cream — worsted weight #4 — main background and joining color
- Forest green — worsted weight #4 — Christmas trees
- Chocolate brown — worsted weight #4 — tree trunks
A washable wool blend, acrylic, or cotton-acrylic yarn works well. Use the same yarn line for all three colors so stitch thickness remains consistent.
Tools
- 4.5–5.0 mm crochet hook
- Yarn needle
- Scissors
- Stitch markers
- Measuring tape
- Blocking mats and pins
Abbreviations
- ch — chain
- sc — single crochet
- hdc — half double crochet
- dc — double crochet
- tr — treble crochet
- sl st — slip stitch
- sp — space
- st/sts — stitch/stitches
- RS — right side
- WS — wrong side
- BLO — back loop only
Finished Square and Gauge
Make one complete square before beginning the blanket. A practical target is approximately 15–18 cm square after blocking.
Exact stitch gauge is less important than identical finished dimensions. Every motif should match the master square within approximately 3–5 mm.
If the square is too small, change hook size only after checking yarn tension. If it is too large, use a smaller hook or remove one background round rather than shrinking the tree disproportionately.
Christmas Tree Granny Square
The square is constructed in three stages: brown trunk, green tree, and cream background.
Brown Tree Trunk
With brown yarn, ch 5.
Row 1: Sc in second ch from hook and in each remaining ch. (4 sc)
Rows 2–4: Ch 1, turn, sc across. (4 sc)
Fasten off, leaving a sewing tail.
The trunk should remain compact. A trunk that is too long shifts the tree upward and reduces the cream space below the motif.
Green Christmas Tree
The tree can be worked as a separate triangular appliqué. This method makes it easier to control the silhouette before converting the motif into a square.
Tree Tip
With forest green, ch 2.
Row 1: Work 2 sc in second ch from hook. (2)
Row 2: Ch 1, turn, 2 sc in first st, 2 sc in last st. (4)
Row 3: Ch 1, turn, 2 sc in first st, sc across to last st, 2 sc in last st. (6)
The basic increase adds two stitches per row and creates the triangular structure.
First Branch Section
Row 4: Ch 1, turn, 2 sc in first st, sc across, 2 sc in last st. (8)
Row 5: Repeat the increase row. (10)
Row 6: Repeat the increase row. (12)
Fasten off.
Second Branch Section
Join green yarn approximately one stitch inside each outer edge of the previous section.
Work across the row while placing an increase at both ends.
Continue for approximately 3 rows, increasing twice per row.
This slight reset produces the stepped branch profile rather than one uninterrupted triangle.
Lower Branch Section
Repeat the same principle once more.
Begin slightly inside the outermost edges, then increase toward both sides over 3–4 rows.
The lower branches should be the widest section of the tree.
For a square measuring 16–17 cm, a finished tree width of approximately 9–11 cm is a useful target.
Optional Textured Tree
The trees in the reference image have a dense, slightly raised surface. Texture can be added without changing the overall construction.
On alternate rows, work selected stitches in BLO. Another option is to replace every third sc with a compact puff stitch.
For a small puff:
Yarn over, insert hook, pull up a loop three times in the same stitch, yarn over and pull through all loops, then ch 1 to secure.
Do not place a puff in every stitch. Excessive texture makes the tree heavy and can distort the surrounding cream square.
Joining the Trunk to the Tree
Position the brown rectangle centrally behind the lower edge of the green tree.
Approximately one-half of the trunk should remain visible.
Sew the hidden section to the wrong side of the tree using matching yarn.
Keep the seam flat. A thick seam at this stage will create a bump after the motif is attached to the cream background.
Cream Background Foundation
The safest way to reproduce the photographed look is to place the completed tree over a cream granny-style square rather than trying to calculate multiple irregular color changes.
Cream Square — Round 1
With cream yarn, ch 4 and join to form a ring.
Ch 3, work 2 dc into ring, ch 2.
Repeat (3 dc, ch 2) three more times.
Join to the top of the beginning ch 3.
You now have four corners.
Round 2
Sl st to the first corner.
In each corner work:
(3 dc, ch 2, 3 dc)
Ch 1 between corner groups.
Join.
Round 3
Work (3 dc, ch 2, 3 dc) in every corner.
Work 3 dc in each ch-1 side space, with ch 1 between groups.
Join.
Rounds 4–5
Continue the granny-square structure, maintaining four corners and adding one additional side cluster on each side per round.
Stop when the square measures approximately 1–2 cm smaller than the desired finished motif.
Solid Cream Frame
Change from open granny construction to a denser outer frame.
Frame Round 1: Work sc around. In each corner work (sc, ch 2, sc).
Frame Round 2: Work hdc around. In each corner work (2 hdc, ch 2, 2 hdc).
Frame Round 3: Work sc around with (sc, ch 2, sc) at each corner.
This frame creates a cleaner joining edge and gives the blanket the raised cream grid visible between the trees.
Attaching the Christmas Tree
Block the cream square first.
Place the tree centrally on the square. Leave approximately equal cream space on the left and right sides.
The bottom of the trunk should sit approximately 1–2 cm above the inner edge of the cream frame.
Pin the tree at the tip, lower corners, and trunk.
Sew around the outer green edge with forest-green yarn using small stitches.
Attach the trunk with brown yarn.
For additional stability, add two or three hidden stitches through the center of the tree.
Alternative Integrated Tree Square
If you prefer fewer sewn pieces, crochet the tree directly onto the cream square using tapestry crochet or intarsia.
The center tree can be charted as a triangle:
       G
      GGG
     GGGGG
    GGGGGGG
   GGGGGGGGG
  GGGGGGGGGGG
      BBB
      BBB
G represents green stitches, B represents brown stitches, and the remaining stitches are cream.
This method creates a flatter blanket. The appliqué method creates more relief and more closely matches the dimensional appearance in the photograph.
How Many Squares to Make
Choose the finished blanket size only after blocking the master square.
The following examples assume a blocked square measuring approximately 17 cm before joining.
| Layout | Squares | Approximate Motif Area |
|---|---|---|
| 4 × 5 | 20 | 68 × 85 cm |
| 5 × 6 | 30 | 85 × 102 cm |
| 6 × 8 | 48 | 102 × 136 cm |
| 8 × 10 | 80 | 136 × 170 cm |
The joining seams and final border will increase these measurements.
Planning the Blanket Layout
Place all completed squares on a flat surface before joining.
Turn every Christmas tree in the same direction for the traditional layout shown in the photograph.
A second option is to rotate selected squares by 90 or 180 degrees for a more geometric arrangement.
Check that the green trees are visually centered. Small positioning differences become much easier to see when dozens of motifs are arranged together.
Joining the Granny Squares
Use cream yarn for the seams.
Slip-Stitch Join
Place two squares with wrong sides together.
Working through the corresponding outer loops, sl st evenly from one corner to the next.
Do not pull the slip stitches tightly.
Join the squares into horizontal rows first. Then join the completed rows together.
Flat Single Crochet Join
For a more pronounced grid, place two squares with wrong sides together and sc through corresponding stitches.
The raised seam will emphasize the modular construction.
This option works particularly well with the cream-on-cream framework because the joining lines become part of the design.
Blanket Border
After all squares are joined, work around the entire blanket in cream.
Border Round 1
Sc evenly around all four sides.
At each blanket corner work:
(sc, ch 2, sc)
Where two square seams meet, avoid adding unnecessary stitches. Too many stitches along the border cause ruffling.
Border Round 2
Hdc in each stitch around.
At each corner work:
(2 hdc, ch 2, 2 hdc)
Border Round 3
Work sc in BLO around.
This creates a subtle raised line.
Final Border
For a compact decorative edge, repeat:
*sl st in next st, 3 hdc in next st, sl st in next st*
Continue around, adjusting the final repeat near each corner if necessary.
Christmas Tree Ornament Version
The small hanging trees shown beside the blanket can be made from the same motif without the square background.
Use forest-green yarn and make a miniature triangular tree approximately 7–10 cm tall.
Add a small brown trunk.
Work one round of cream sc around the outer edge.
At the top point, create the hanging loop:
ch 18–24, sl st back into the same top stitch.
Fasten off and weave in the ends.
Making the Ornament Firmer
A hanging ornament needs more structure than a blanket appliqué.
Use a hook approximately 0.5 mm smaller than the hook used for the blanket, or crochet two identical trees and join them together around the edges.
For the double-layer version, place the wrong sides together and sc around both layers with cream yarn.
Add the hanging loop at the top before closing the final stitches.
Christmas Tree Cushion
The same squares can be used for a matching cushion cover.
For a 45 cm cushion, three 15 cm motifs across provide a useful starting point.
Join nine tree squares for the front panel.
The back can be made from another nine motifs or worked as two overlapping cream crochet rectangles to form an envelope closure.
Add the same compact cream edging around the completed cushion so it coordinates with the blanket.
Yarn Estimation
Because square size, yarn thickness, and blanket dimensions vary, weighing one finished motif is more accurate than relying on a fixed yarn quantity.
Make and block one complete Christmas tree square.
Weigh it.
Multiply that weight by the total number of squares.
Then add yarn for seams and border.
For example, if one finished motif weighs 45 g and the blanket requires 48 squares:
45 × 48 = 2160 g
Add approximately 10% for joining, border, swatching, and finishing:
2160 + 216 = approximately 2376 g total
This is a calculation example rather than a fixed yarn requirement.
Color Distribution
The photographed palette relies on strong contrast.
Warm cream occupies most of the blanket surface. Forest green forms the repeated focal motif, while brown appears only in the trunks.
A useful starting distribution is approximately:
- 65–70% cream
- 25–30% forest green
- 3–5% brown
Purchase additional cream because it is also needed for joining and the outer border.
Alternative Christmas Colorways
- Traditional: cream, forest green and brown
- Snowy: white, pine green and charcoal
- Vintage: oatmeal, olive and rust
- Nordic: ivory, deep red and natural brown
- Modern: beige, sage green and taupe
Keep the background light if the goal is to preserve the clear tree silhouette.
Adding Snow to the Trees
For a snowy variation, embroider small cream French knots or short straight stitches over the green tree after the square has been blocked.
Use only a few stitches per tree.
Another option is to crochet the final row of each branch section in cream. This creates narrow snow-covered branch tips while retaining the triangular structure.
Optional Star Topper
A tiny gold or mustard star can be sewn to the tip of each tree.
Start with a small ring.
Work 5 sc into the ring.
For each point, work:
ch 3, sl st in second ch from hook, sc in next ch, sl st into next center stitch.
Repeat five times.
Keep the star small so it does not cover the cream background surrounding the tree tip.
Blocking the Squares
Block every square to the same measurement before joining.
Pin the four corners first.
Measure both diagonals. They should be equal or within approximately 5 mm.
Then pin the centers of the four sides.
Do not stretch only the corners. That produces concave side edges and makes the joining seams uneven.
Allow every square to dry completely before removing it from the blocking surface.
Assembly
- Make one complete Christmas tree motif and use it to establish the required tree dimensions.
- Crochet one cream background square and block it to the selected finished measurement.
- Position the brown trunk and forest-green tree centrally on the cream square.
- Sew the tree securely to the background while keeping the outer cream frame flat.
- Repeat the process until the required number of identical squares has been completed.
- Block all motifs to the master-square dimensions and check both diagonals.
- Arrange the squares into the planned blanket layout with every tree facing the intended direction.
- Join the motifs with cream yarn, completing the horizontal seams before the vertical seams.
- Work the cream outer border around the assembled blanket and shape all four corners consistently.
- Weave in every yarn end, wash or damp-block the blanket, and dry it flat to its final dimensions.
7 Technical Tips
- Failure mode: tree tilts inside the square. Mark the vertical center of the cream block and align the tree tip, trunk center, and lower square midpoint before sewing.
- Failure mode: finished squares have different dimensions. Block every motif against one master measurement and keep the variation below approximately 3–5 mm.
- Failure mode: branch edges lose their stepped shape. Count both edge increases on every tree row; missing one increase shifts the tip away from the center.
- Failure mode: cream joining seams become tight. Use a hook 0.5 mm larger for slip-stitch joining if the seam shortens the square edges.
- Failure mode: blanket border ruffles. Reduce excess stitches where four motif corners or multiple joining seams create additional fabric.
- Failure mode: appliqué puckers the background. Pin the tree at intervals of approximately 2–3 cm and sew without pulling the attachment yarn tighter than the crochet fabric.
- Failure mode: hanging ornaments fold at the center. Make them with a hook approximately 0.5 mm smaller than the blanket hook or join two identical tree layers together.
Care and Finishing
Follow the care instructions supplied with the selected yarn.
For a large blanket, gentle machine washing may be suitable when the yarn label permits it. Hand washing is another option for fibers that require limited agitation.
Support the weight of the wet blanket when removing it from the water. Do not lift a saturated crochet blanket by one corner because the weight can stretch the joining seams.
Reshape the blanket while damp and dry it flat whenever practical.
Conclusion
The repeating tree silhouette is what gives this Christmas tree granny square crochet pattern its graphic holiday appearance. Begin with one master square, block it carefully, and use that measurement for every remaining motif before assembly. Once the blanket squares are complete, the same green tree can be reduced for hanging ornaments or repeated across a matching cushion. Keep the cream joining grid consistent so the individual motifs remain clearly separated. Share the finished blanket or ornaments on Pinterest and Instagram with #ChristmasTreeGrannySquare. For your version, would you keep every tree forest green or alternate green, burgundy, and snowy white trees across the blanket?








