Introduction
A maple leaf loses its identity when the center point is no taller than the four surrounding lobes. This crochet maple leaf coaster pattern builds a broad five-lobed silhouette with deep valleys, raised-looking center ribs and a compact stem. Use cotton yarn and a 3.5–4.5 mm hook for crisp points. The finished motif works as an autumn coaster, table accent or small decorative leaf and suits intermediate crochet skills.
The Design: What Makes This Maple Leaf Different
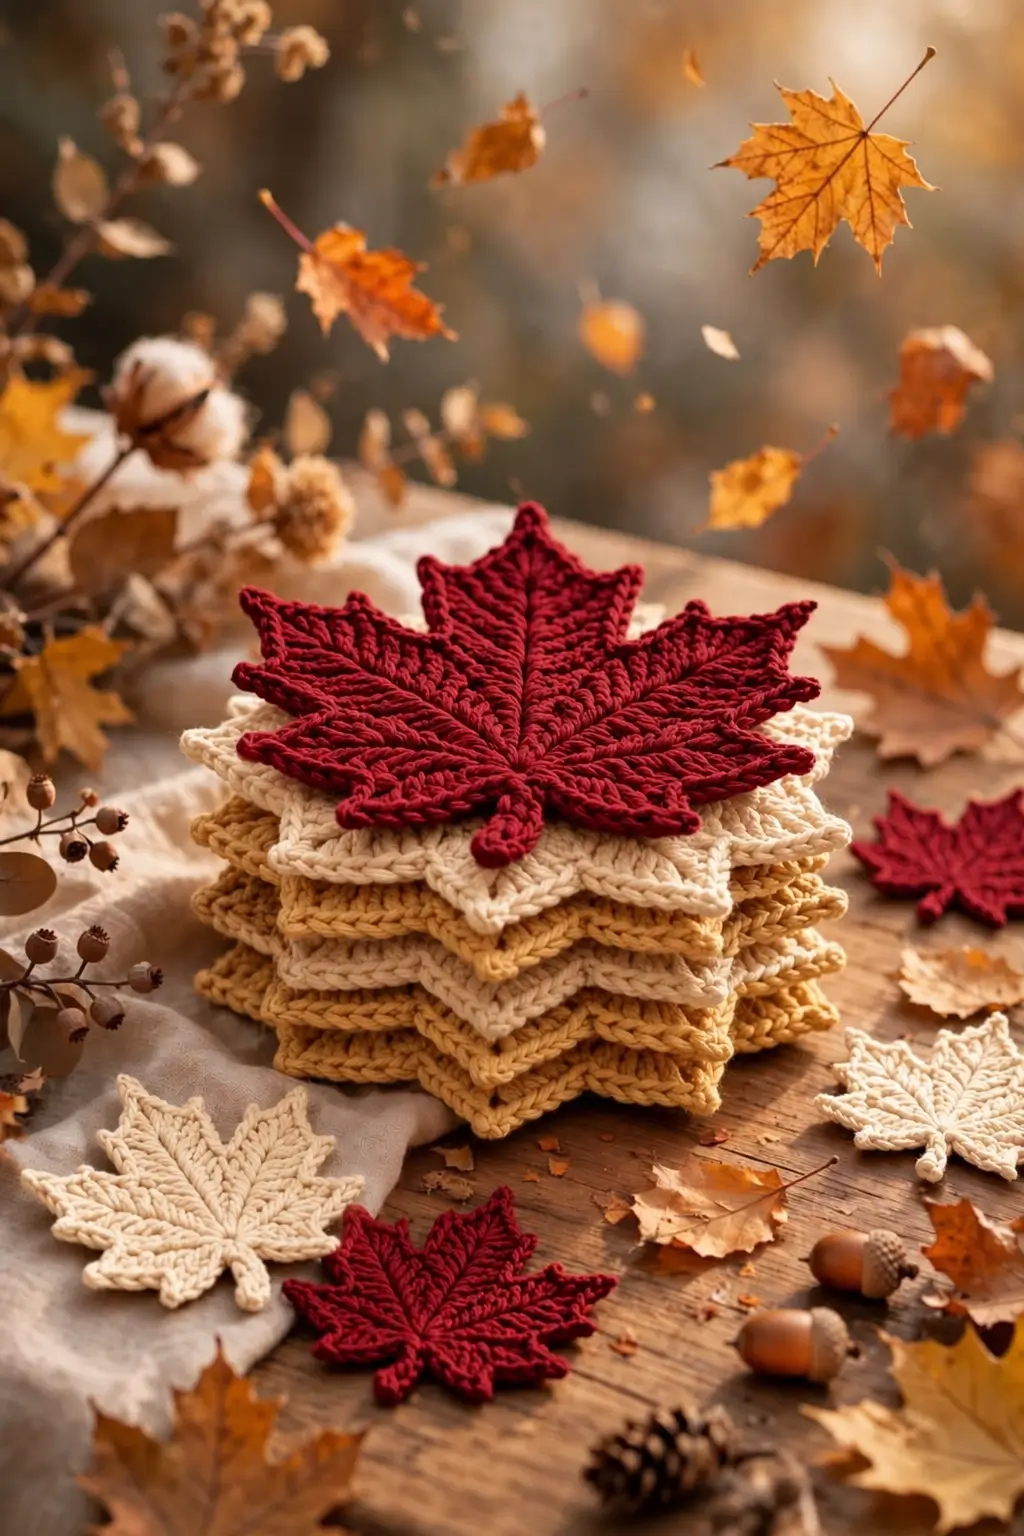
The photographed set uses the same strongly defined maple silhouette in burgundy, cream and warm golden tan. Five principal lobes radiate from a compact lower center, but they are deliberately unequal: the central lobe is tallest, the upper side lobes are slightly shorter, and the lower lobes are broader and reduced. Deep valleys separate those sections so the perimeter does not become a generic star.
Texture provides the second structural feature. Rows of stitches travel toward the points and visually imitate leaf veins without requiring a contrasting surface-crochet color. A short stem extends below the central junction and finishes with a rounded tip.
Comparable published maple leaf crochet patterns range from approximately 14 × 11.5 cm for a weight-4 cotton coaster to 21.6 × 19 cm for a larger Aran version. Hook sizes around 3.5–4.5 mm are common for coaster-scale leaves.
Project Info at a Glance
| Skill Level | Construction | Finished Size | Hook | Best For |
|---|---|---|---|---|
| Intermediate | One-piece shaped motif | Approx. 14–16 cm wide | 3.5–4.0 mm | Coasters, autumn table decor and garlands |
A published cotton DK maple leaf coaster uses a 3.5 mm hook and approximately 30–50 m of yarn. Another weight-4 cotton version uses a 4.5 mm hook and measures approximately 14 × 11.5 cm. A larger Aran maple leaf measures 21.6 × 19 cm with a 4.25 mm hook. These references establish a practical size range rather than an exact measurement of the photographed leaves.
Materials and Tools
Yarn
- Burgundy — DK or light worsted cotton — approximately 15–25 g per leaf
- Warm cream — DK or light worsted cotton — approximately 15–25 g per leaf
- Golden tan — DK or light worsted cotton — approximately 15–25 g per leaf
The photographed collection uses one solid color per motif. Cotton is particularly suitable because it produces defined points and lies relatively flat after blocking. For actual drink coasters, select a washable cotton and follow its care instructions.
Tools
- 3.5–4.0 mm crochet hook
- DK or light worsted cotton yarn
- Yarn needle
- Scissors
- Locking stitch markers
- Tape measure
- Blocking mat
- Rust-resistant pins
Abbreviations
- MR — magic ring
- ch — chain
- sl st — slip stitch
- sc — single crochet
- hdc — half double crochet
- dc — double crochet
- tr — treble crochet
- dtr — double treble crochet
- sp — space
- st/sts — stitch/stitches
An invisible decrease is worked through the front loops of two adjacent stitches before completing one single crochet, reducing the gap that a conventional decrease can leave.
Crochet Maple Leaf Coaster Pattern
This is an original photo-inspired construction rather than a transcription of a published pattern. The goal is to reproduce the visible characteristics of the reference: five dominant lobes, smaller serrated points, a ribbed surface and a short stem.
Work one test motif before making the complete set. Block it, record the finished dimensions and adjust the hook if a larger or smaller coaster is required.
Leaf Center
Yarn: burgundy, cream or golden tan.
Round 1: Make a MR. Ch 2 and work 12 dc into the ring. Pull closed and join with sl st to the first dc. (12 dc)
Round 2: Ch 1. Work 2 hdc in every stitch around. Join with sl st. (24 hdc)
The 24-stitch foundation supplies attachment positions for the five lobes and the valleys between them.
Shaping the Five Maple Lobes
The shaping sequence is:
small lower lobe → large side lobe → center lobe → large side lobe → small lower lobe
Do not make all five points identical. The graduated heights create the maple silhouette.
First Lower Lobe
Ch 5.
Beginning in the second chain from the hook work:
sl st, sc, hdc, dc.
Sl st into the next available foundation stitch.
Ch 3. Beginning in second chain from hook work:
sl st, sc.
Sl st into the next foundation stitch.
This short secondary point adds the first serration near the lower edge.
First Large Side Lobe
Ch 8.
Beginning in the second chain from the hook work:
sl st, sc, hdc, dc, tr, dc, hdc.
Sl st into the next available foundation stitch.
Ch 4.
Beginning in second chain from hook work:
sl st, sc, hdc.
Sl st into the next foundation stitch.
Ch 7.
Beginning in second chain from hook work:
sl st, sc, hdc, dc, tr, dc.
Sl st into the next foundation stitch.
The two points together form the serrated outer profile of the first large side lobe.
Center Lobe
The center lobe must extend farther than every other section.
Ch 10.
Beginning in second chain from hook work:
sl st, sc, hdc, dc, tr, dtr, tr, dc, hdc.
Sl st into the next foundation stitch.
Ch 5.
Beginning in second chain work:
sl st, sc, hdc, dc.
Sl st into the next foundation stitch.
Ch 10.
Work back along the chain:
sl st, sc, hdc, dc, tr, dtr, tr, dc, hdc.
Anchor with sl st.
The central area now contains the tallest points of the motif. Keep the chains relaxed so the points remain flat after blocking.
Second Large Side Lobe
Mirror the first side.
Ch 7 and work:
sl st, sc, hdc, dc, tr, dc.
Sl st into the foundation.
Ch 4 and work:
sl st, sc, hdc.
Anchor with sl st.
Ch 8 and work:
sl st, sc, hdc, dc, tr, dc, hdc.
Sl st into the next available stitch.
Second Lower Lobe
Ch 3.
Beginning in second chain work:
sl st, sc.
Anchor with sl st.
Ch 5.
Beginning in second chain work:
sl st, sc, hdc, dc.
Sl st into the foundation.
Compare the two sides before continuing. The large side lobes should sit at approximately equal angles from the central point.
Building the Ribbed Leaf Surface
The photographed motifs have strong stitch lines running from the center toward the tips. Add a second pass around the lobe structures to make the points broader and more substantial.
Work along the side of the first lower lobe with sc.
As the stitches increase in height toward a point, use:
sc → hdc → dc
At the tip work:
(dc, ch 2, sl st into second ch from hook, dc)
Work back toward the valley using:
dc → hdc → sc
In the deepest valley, work one tight sl st.
For each large side lobe, graduate the stitch height:
sc → hdc → dc → tr
At its major tip work:
(tr, ch 2, sl st into second ch from hook, tr)
Then reverse the stitch heights toward the next valley.
For the central lobe, use:
sc → hdc → dc → tr → dtr
At the tallest point work:
(dtr, ch 2, sl st into second ch from hook, dtr)
Reverse the sequence on the opposite side.
Continue around all five principal lobes and join near the lower center.
Creating the Deep Valleys
A maple silhouette depends as much on its indentations as its points.
When moving from one major lobe to another, use sl st, sc, sl st through the lowest section of the valley.
Do not substitute multiple double crochet stitches in these positions. Taller stitches fill the indentation and turn the perimeter into a broad fan.
If a valley remains too shallow after the motif is finished, it can be emphasized during blocking by pinning the indentation toward the center while pulling the neighboring points outward.
Crochet Stem
Continue from the lower center without fastening off.
Stem: Ch 7.
Beginning in second chain from hook work:
sl st, sc, sc, hdc, hdc, sc.
Work 2 sc into the lower center of the leaf.
Turn slightly and work along the opposite side of the stem foundation:
sc, hdc, hdc, sc, sc, sl st.
At the bottom tip work:
ch 2, sl st into second ch from hook.
Fasten off and weave the tail through the back of the stem.
The finished stem should remain short. A long stem reduces the usable flat area when the motif functions as a coaster.
Optional Raised Central Vein
The stitch construction already creates directional texture, but a more pronounced center rib can be added with surface crochet in the same color.
Place the leaf right side up.
Insert the hook near the base of the center lobe and pull a loop through from the back.
Work surface slip stitches along the center line toward the tallest point.
Stop approximately 5–8 mm before the tip.
Fasten off on the wrong side.
Use relaxed loops. A tight surface vein contracts the motif along its center and can lift the two side lobes away from the table.
Optional Side Veins
Add four shorter ribs if a more botanical texture is required.
Join matching yarn near the center junction.
Surface slip stitch diagonally toward the first large side lobe.
Stop before reaching its outer point.
Repeat toward the opposite side.
Add shorter veins toward the two lower lobes.
All five lines should appear to radiate from approximately the same lower-center position.
Blocking the Maple Leaf
Blocking converts the newly crocheted motif from a slightly irregular cluster of points into a defined leaf.
Dampen the motif according to the yarn manufacturer’s instructions.
Place it on a blocking mat.
Pin the central point first.
Pull the first large side lobe outward and pin its highest point.
Measure from the center to the corresponding point on the opposite side and pin it at approximately the same distance.
Pin both lower lobes.
Push the valleys inward and secure them individually.
Finally, straighten the stem.
For this version, target approximately 14–16 cm across. Allow the motif to dry fully before removing the pins.
Making the Burgundy Maple Leaf
The deep burgundy version creates the strongest silhouette because shadows between the ribbed stitches remain visible against the dark yarn.
Use the same pattern without color changes.
If the yarn is slightly heavier than the cream or tan yarn, move down 0.25–0.5 mm in hook size rather than accepting a noticeably larger motif.
Compare the first blocked burgundy leaf with the other colors before making multiples. All coasters in a stacked set should remain within approximately 5 mm of the same width.
Making the Cream Maple Leaf
Light yarn makes individual stitches highly visible, so inconsistent tension shows more readily.
Keep the foundation chains for all five lobes relaxed and uniform.
After blocking, inspect the center lobe. If the stitches open substantially at the dtr sections, reduce the hook size slightly for the next motif rather than pulling individual stitches tighter.
The cream leaf can also be used beneath darker leaves in a stacked autumn table display because its perimeter remains visible between burgundy or tan layers.
Making the Golden Tan Maple Leaf
Warm tan, camel, mustard and ochre all work for the golden layer shown in the photograph.
Use the same yarn weight as the other motifs.
Do not change hook sizes simply because the yarn color changes unless the physical yarn thickness also differs.
When several tan leaves are stacked, rotate each motif slightly. The staggered points create the layered appearance visible in the reference image.
How Much Yarn Does One Leaf Need?
Yarn consumption depends strongly on size and fiber. A published DK cotton maple leaf coaster lists approximately 30–50 m of yarn, while a larger Aran Canadian maple leaf lists approximately 46–55 m.
For the 14–16 cm photo-inspired version, reserve approximately 15–25 g of DK or light worsted cotton per motif. This is a project allowance rather than a measured quantity from the photographed pieces.
For the most accurate estimate, weigh one completed and blocked leaf. Multiply that weight by the number of coasters required, then add approximately 10% for gauge variation and tails.
Making a Set of Six Maple Leaf Coasters
A balanced six-piece collection can use:
| Color | Quantity | Approx. Yarn Allowance |
|---|---|---|
| Burgundy | 2 | 30–50 g |
| Warm cream | 2 | 30–50 g |
| Golden tan | 2 | 30–50 g |
Make one leaf in each color first. Block all three simultaneously and compare their dimensions before producing the second set.
How to Make a Smaller Maple Leaf
For appliqués rather than coasters, use sport-weight cotton and a 2.75–3.0 mm hook.
Retain the five-lobe structure but shorten the lobe chains:
- Lower lobe: reduce by 1 chain
- Large side lobe: reduce by 1–2 chains
- Center lobe: reduce by 2 chains
Do not reduce every point to the same chain count. The center still needs to remain longest.
A smaller version can be sewn to a bag, incorporated into a wreath or connected to a crochet chain for an autumn garland.
How to Make a Larger Maple Leaf
For a decorative table mat, use worsted or Aran cotton and approximately a 4.25–4.5 mm hook.
A published Aran maple leaf reference measures 21.6 × 19 cm using a 4.25 mm hook, demonstrating how substantially a heavier yarn can increase the motif.
Work one sample before producing a complete set. A larger leaf requires more careful blocking because additional fabric between the points can ripple.
For a placemat rather than a coaster, the center should remain broad enough to support tableware without resting entirely on the raised lobes.
Using Cotton for Crochet Coasters
Cotton is a practical choice for drink coasters because it is absorbent and creates defined stitch texture. Published maple leaf coaster patterns specifically recommend cotton, including worsted cotton and DK cotton constructions.
Avoid adding beads, wire or thick knots to the center of a coaster. The base of a cup should contact a reasonably level surface.
Check the care label before laundering. Different cotton yarns can shrink or release dye differently, particularly saturated burgundy shades.
If colorfastness is uncertain, wash a yarn swatch before combining dark and light coasters in the same load.
Assembly and Finishing
- Crochet the 24-stitch central foundation in the selected solid color.
- Build the first small lower lobe and the taller side lobe.
- Make the longest central point, keeping its foundation chains relaxed.
- Mirror the large side lobe and lower lobe on the opposite half.
- Work around the perimeter to broaden the points and sharpen the valleys.
- Add the short stem directly from the lower center.
- Work the optional center and side surface-crochet veins before blocking.
- Weave every yarn tail through matching stitches on the wrong side.
- Block all five principal points and each deep valley individually.
- Measure the dried motif and use that dimension as the standard for the remaining coaster set.
The finished leaf should lie flat with a dominant central point, matching side lobes, two smaller lower lobes and a short stem aligned with the center rib.
7 Technical Tips for Better Maple Leaf Coasters
- Keep the central point approximately 15–20% taller than the large side points. Making all five lobes the same height changes the silhouette from a maple leaf into a five-point star.
- Use slip stitches in every deep valley. Replacing them with tall stitches fills the indentation and makes neighboring lobes merge into one broad section.
- Measure matching side points from the center before the motif dries. A difference greater than approximately 5 mm becomes obvious when several coasters are stacked.
- Keep surface-crochet veins loose enough for the leaf to remain flat. Tight slip stitches shorten the center axis and can lift the lower lobes off the table.
- Pin every major point separately during blocking. Pinning only the center and stem allows the side lobes to curl inward as the cotton dries.
- Keep the stem around 2–3 cm long on coaster-scale leaves. A much longer stem can sit beneath neighboring tableware or prevent a stacked set from aligning cleanly.
- Compare yarn thickness before changing colors. Two yarns carrying the same DK or worsted label can still produce leaves differing by more than 5 mm at identical stitch counts.
Creating the Stacked Autumn Display
The photograph uses multiple leaves stacked with their points rotated. This creates depth without requiring any additional crochet components.
Place a golden-tan leaf at the bottom. Rotate the next cream leaf approximately 15–25 degrees so its points fall between the lower layer’s points.
Add another tan or cream motif using the opposite rotation.
Finish with burgundy on top for the strongest contrast.
Do not permanently sew the stack together if the leaves will be used as individual coasters. Simply arrange them as a centerpiece between uses.
For a permanent decoration, tack the layers together only at the center so the outer points remain dimensional.
Turning the Leaves into a Garland
The same motifs can be converted into a horizontal autumn garland.
Crochet a long foundation chain in cream, tan or burgundy. Return along the chain with slip stitches to strengthen the cord.
Position finished leaves approximately 12–15 cm apart.
Sew each leaf to the cord through the upper stem area rather than through a pointed lobe.
Alternate burgundy, cream and tan throughout the length.
For a fuller garland, insert smaller leaves between the coaster-size motifs instead of reducing the spacing between large leaves.
Washing and Reshaping
Follow the washing temperature and drying method specified for the selected cotton yarn.
After washing, place each leaf flat while damp.
Pull the center lobe into position first.
Arrange the two large side lobes at matching angles.
Shape the two lower points and press the valleys inward with your fingers.
Straighten the stem last.
Allow the leaf to dry flat. Hanging a wet cotton motif from its stem can stretch the lower section and alter the relationship between the stem and lobes.
Conclusion
The central point sets the proportions for this crochet maple leaf coaster pattern, so make one complete 14–16 cm sample before producing the full autumn set. Keep the side lobes slightly shorter, use compact stitches in the valleys and block every point independently for a defined silhouette. Burgundy, warm cream and golden tan reproduce the layered palette visible in the photograph without requiring color changes inside individual motifs. Your next step is to crochet one test leaf, block it and record its finished width and yarn weight. Save the project to Pinterest or share the completed set on Instagram with #AutumnMapleLeafCoasters. Which color would you place on top of the stack: burgundy, cream or golden tan?









