Introduction
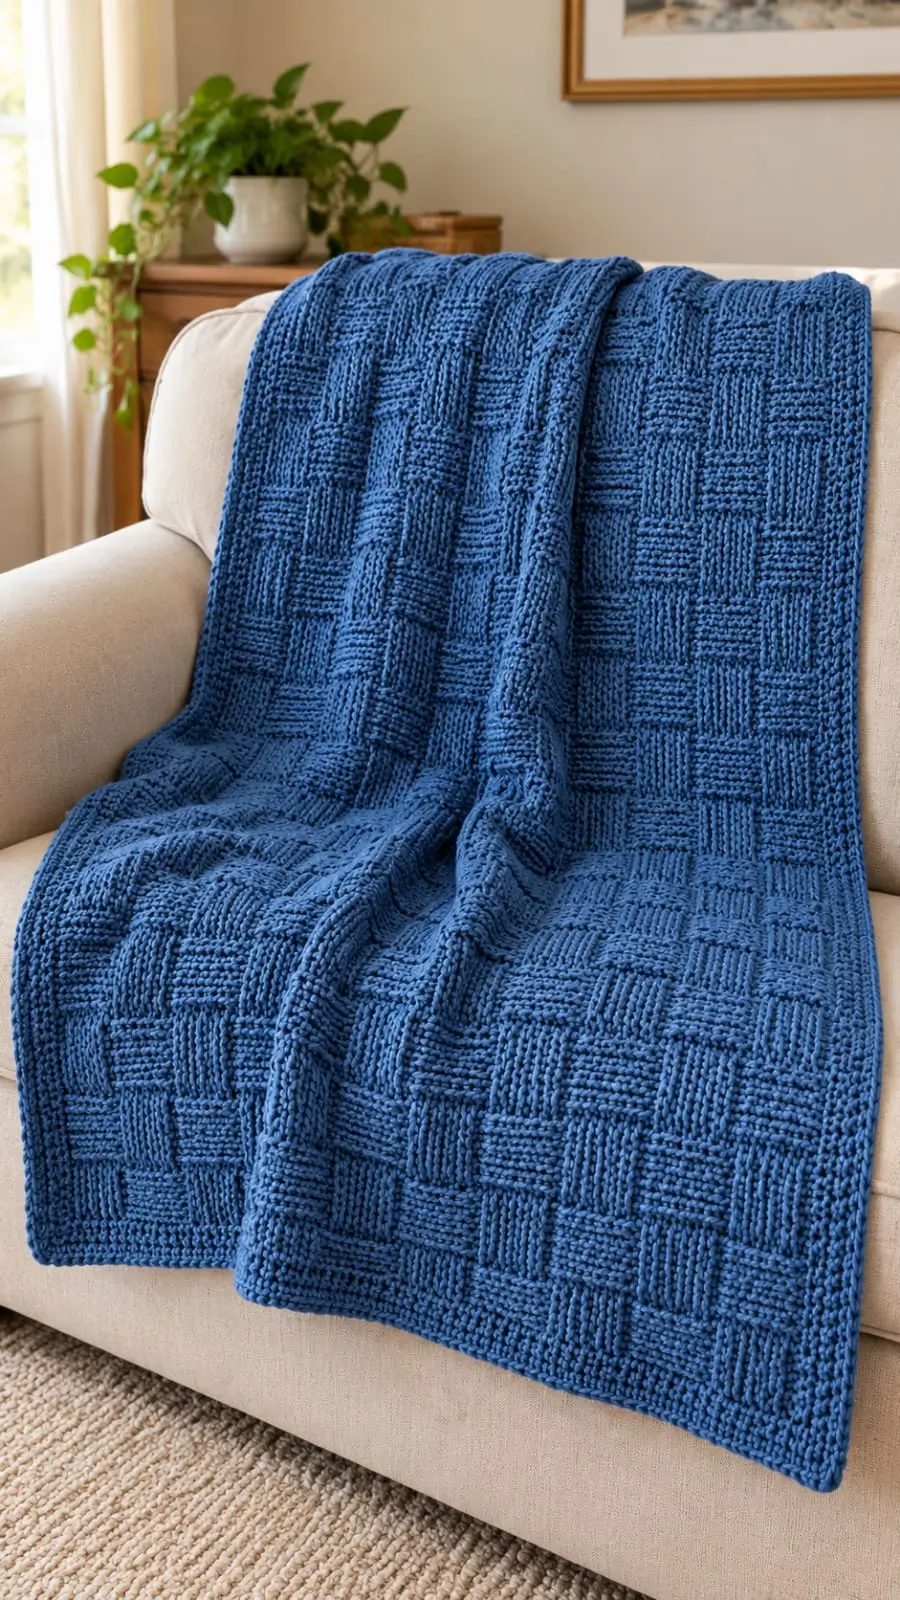
A denim-blue basketweave throw works because six raised stitches alternate with six recessed stitches in the same blue yarn. This basketweave crochet blanket pattern creates a sofa throw using worsted-weight acrylic, a 5.5 mm hook, and a narrow single-crochet border. It suits intermediate crocheters who can work around stitch posts. Its continuous rows make it useful when you want a woven-looking surface without joining individual squares.
The Design: What Makes This Blue Throw Different
Unlike a pieced patchwork, this blue crochet blanket builds every visual tile inside one continuous panel. Six front-post double crochets create a raised strip; six back-post double crochets push the adjacent strip behind it. Switch their positions after six rows and the surface reads as interlaced blocks rather than stripes. The second decision is a plain double-crochet stitch at each outside edge. Those edge stitches provide a stable channel for the border and make accidental increases easier to identify. Third, a matching border frames the texture without interrupting the blue field in the photograph. A textured crochet blanket can contract because post stitches wrap columns instead of entering top loops. Makers sometimes measure the loose foundation chain, then discover that the body is narrower. Work a basketweave swatch before choosing the final width.
Project Info at a Glance
| Skill Level | Time | Finished Size | Hook | Best For |
|---|---|---|---|---|
| Intermediate | Varies; not independently timed | Approximately 125 × 155 cm, provisional | 5.5 mm, adjust after swatching | Sofa throw, layered bedding, textured home décor |
Construction: One flat rectangular panel worked in turned rows, followed by two continuous border rounds. Yarn weight: Category 4, worsted. Color: One medium or deep blue. Terminology: US crochet terms. Joining: No square seams and no separate motifs.
This design uses a planning gauge of 12 body stitches and eight textured rows per 10 cm. It has not been physically crocheted or measured, so the stated size is a calculated target rather than an observed result. At that gauge, 146 stitches project to about 122 cm before edging, and 121 worked rows project to about 151 cm before edging. Border width and blocking account for the approximate finished dimensions. Measure your own swatch; post-stitch tension varies noticeably between crocheters.
For context, a published basketweave throw lists 127 × 165 cm. That measurement belongs to the linked example, not this new design.
Materials and Tools
Yarn
- Denim or cobalt blue — worsted / category 4 — purchase three 454 g skeins (1,362 g total) — Suggested yarn: Lion Brand Pound of Love, Cadet or a comparable solid blue. Each Pound of Love skein contains 1,020 yards, so three provide 3,060 yards. Check dye lots before beginning. Manufacturer specifications
- Accent yarn — none — 0 g. All panels and the edging use the same blue yarn.
A comparable worsted-weight basketweave throw reference budgets about 2,600–3,000 yards. That range informed the purchase allowance, but the quantity consumed by this exact row layout is untested. Weigh the yarn before and after a representative swatch to refine your estimate. Yardage matters more than comparing skein weights across different yarn brands.
Tools
- 5.5 mm crochet hook (US I/9), or the size that produces your selected gauge.
- Two locking stitch markers to identify the first and last working stitches.
- Tapestry needle with an eye large enough for worsted yarn.
- Sharp scissors, flexible measuring tape, and a notebook or row counter.
- Rustproof blocking pins and a flat drying surface, optional for the final edge.
No safety eyes, stuffing, or sewn-on accessories belong to this blanket design.
Abbreviations
| Abbreviation | Meaning |
|---|---|
| ch | Chain |
| sc | Single crochet |
| dc | Double crochet |
| FPdc | Front-post double crochet |
| BPdc | Back-post double crochet |
| sl st | Slip stitch |
| st / sts | Stitch / stitches |
| RS / WS | Right side / wrong side |
| rep | Repeat |
| sp | Space |
FPdc: Yarn over, pass the hook from front to back and out to the front around the post of the indicated stitch, then finish a double crochet. BPdc: Yarn over, pass the hook from back to front and out to the back around the indicated post, then complete a double crochet. Neither post stitch is placed under the two top loops of the stitch below.
Turning chain: Chain two at the start of each textured row; in this pattern it counts as the first edge double crochet. Work the final ordinary double crochet into the top of the previous row’s turning chain, not around its post. These edge instructions are part of the 146-stitch count.
Invisible decreases are not used because the throw has no shaping.
Gauge, Dimensions, and Stitch Mathematics
The working interior contains 144 post stitches, arranged as twelve repeats of twelve stitches. Each repeat is six FPdc followed by six BPdc, or their positions reversed. Two ordinary double-crochet edge stitches bring the total to 146 stitches per row.
The foundation needs two additional chains beyond the working stitch count when the first three chains stand in for a double crochet: 146 + 2 = 148 chains. Working a double crochet into the fourth chain gives one counted turning chain plus 145 worked double crochets, totaling 146. Do not count the chain on the hook as a foundation chain.
At the planning gauge, a twelve-stitch repeat occupies roughly 10 cm. To resize the blanket, use 12 × the number of repeats + 4 for the foundation chain. Ten repeats require 124 chains and form 122 working stitches; fourteen repeats require 172 chains and form 170 working stitches. Those widths are estimates, not guaranteed finished measurements.
Height changes by full twelve-row basketweave cycles. Eight cycles make 96 textured rows plus the foundation row; ten cycles make 120 textured rows plus the foundation row; twelve cycles make 144 textured rows plus the foundation row. Completing both six-row block directions creates a balanced finish at the top.
Pattern — Step by Step
Construction note: This blanket is worked flat in turned rows, not in an amigurumi spiral. The pictured item has no head, body, ears, limbs, or stuffed features. Work with the same blue yarn throughout, and keep the starting side marked as the RS.
Foundation Chain and Base Row
Foundation: Ch 148 loosely.
Row 1 (RS): Dc in the fourth chain from the hook; the three skipped chains count as the first dc. Dc in every remaining chain across. (146 sts)
Turn the work. Identify the first and last stitches with removable markers, and check that the foundation lies flat before working around the stitch posts. If the chain draws inward, remake it with a hook 0.5–1 mm larger, then return to the main hook for Row 1. Only the foundation changes; the body stitch count stays fixed.
Basketweave Block A — Raised and Recessed Strips
Row 2 (WS): Ch 2 (counts as the first dc); skip the first stitch directly below it. [FPdc around each of the next 6 stitches, BPdc around each of the following 6 stitches]. Work the bracketed twelve-stitch pair twelve times total. Dc in the last edge stitch. (146 sts: 1 + 144 + 1)
Row 3 (RS): Repeat Row 2, including the turning chain and final edge dc. (146 sts)
Row 4 (WS): Repeat Row 2. (146 sts)
Row 5 (RS): Repeat Row 2. (146 sts)
Row 6 (WS): Repeat Row 2. (146 sts)
Row 7 (RS): Repeat Row 2. (146 sts)
Because the fabric turns after every row and the number of twelve-stitch repeats is even, the same stitch-order instruction keeps the intended six-stitch sections aligned on the reference side. Check the surface after Row 4: each apparent rectangle should occupy six neighboring stitches.
Basketweave Block B — Reverse the Texture
Row 8 (WS): Ch 2 (counts as the first dc); skip the first stitch. [BPdc around each of the next 6 stitches, FPdc around each of the following 6 stitches]. Work the bracketed twelve-stitch pair twelve times total. Dc in the last edge stitch. (146 sts)
Row 9 (RS): Repeat Row 8. (146 sts)
Row 10 (WS): Repeat Row 8. (146 sts)
Row 11 (RS): Repeat Row 8. (146 sts)
Row 12 (WS): Repeat Row 8. (146 sts)
Row 13 (RS): Repeat Row 8. (146 sts)
The six raised-stitch sections now change relative to the first block. This direction change is what makes the continuous fabric resemble an interlocking grid rather than repeated vertical ribbing. Do not change color at Row 8; one blue tone makes the shadow pattern visible.
Continue the Full Blanket Body
Repeat Rows 2–13 nine more times, for ten complete twelve-row cycles in total. Every listed row retains 146 stitches.
| Rows | Stitch arrangement | Row count |
|---|---|---|
| 14–19 | Block A: FPdc 6, BPdc 6 | 146 each |
| 20–25 | Block B: BPdc 6, FPdc 6 | 146 each |
| 26–37 | Block A, then Block B | 146 each |
| 38–49 | Block A, then Block B | 146 each |
| 50–61 | Block A, then Block B | 146 each |
| 62–73 | Block A, then Block B | 146 each |
| 74–85 | Block A, then Block B | 146 each |
| 86–97 | Block A, then Block B | 146 each |
| 98–109 | Block A, then Block B | 146 each |
| 110–121 | Block A, then Block B | 146 each |
Row 121 is the final textured row. Stop after this row if your swatch predicts the intended length; otherwise, add or subtract complete twelve-row cycles rather than stopping halfway through a texture reversal. Do not fasten off before the border unless you need to attach a fresh skein.
Narrow Blue Border — Two Rounds
Border Round 1: Ch 1 and work sc evenly around the blanket. Across the top and bottom, place one sc in each working stitch, with 3 sc in each corner; down the two long sides, begin with approximately three sc for every two row ends and adjust the spacing until the edge lies flat. Join with sl st in the first sc. The exact total depends on side-edge spacing; there is no defensible fixed round count before checking the actual row height.
Border Round 2: Ch 1, sc into each sc from Round 1, and place 3 sc in the middle stitch of each previous three-stitch corner. Join with sl st to the first sc. The stitch total increases by eight relative to Round 1 because each of the four corners adds two stitches. Fasten off, leaving a 15 cm tail for weaving.
The narrow border reflects the relatively plain edge visible in the photograph. It is deliberately not scalloped, striped, or fringed. If the border waves, remove excess side stitches from Round 1; if it pulls the body inward, add evenly spaced side stitches.
Assembly and Finishing — 10 Steps
- Confirm the panel count. Count 146 stitches across the final body row before adding the border, and inspect both vertical edges for a skipped turning-chain stitch.
- Check the rectangle. Lay the fabric on a flat surface and measure its width at the top, middle, and bottom without stretching it.
- Identify the right side. Keep the removable RS marker attached until the border is finished, even though the woven pattern appears on both faces.
- Complete the first border round. Distribute side-edge single crochets so that neither long edge gathers nor forms a loose ripple.
- Work the second border round. Add the specified corner increases and check that all four corners still make right angles.
- Secure the last stitch. Cut a 15 cm yarn tail, draw it completely through the final loop, and snug the loop without distorting the corner.
- Weave the starting tail. Thread the needle through at least 8 cm of nearby stitches, reverse direction, and thread back through a different path.
- Hide every join. Work yarn ends along stitch columns of the same color, leaving no loose loop where a hand or laundry item could catch.
- Block only as needed. Pin to an even rectangle without stretching the panels wider than the gauge sample; dry completely before lifting the fabric.
- Measure and record the result. Write down the finished width, length, number of skeins consumed, and any hook-size adjustment for your next blanket.
The finished object is one bordered, woven-texture crochet throw with no sewn seams.
7 Technical Tips
- Stitch-marker drift: Put one marker in the first counted edge stitch and one in the final dc so a missing turning-chain stitch does not reduce the next row to 145. Recount after every six-row block.
- Width contraction: A post-stitch fabric can be narrower than the initial chain, making a nominal 125 cm throw unexpectedly small. Measure a washed or relaxed 20 × 20 cm sample rather than relying on chain length.
- Missed posts: Passing the hook through the top loops instead of around a vertical post creates a visibly flat spot within a six-stitch block. Unpick to that location and remake the FPdc or BPdc before the error is buried.
- Block-transition offset: Changing the stitch order on Row 7 instead of Row 8 makes one rectangle a row shorter than its neighbors. Mark Rows 8, 20, 32, and each following twelve-row transition on a row counter.
- Inconsistent yarn tension: Pulling tightly on back-post stitches can shorten recessed strips and make the outside edge curve inward. Keep the working loop on the 5.5 mm hook at a consistent height through all twelve stitches of each repeat.
- Corner flare: Too many side-edge single crochets make a border ripple after the second round. Lay the first round flat before adding the final round, and move or remove crowded stitches near each corner.
- Loose woven-in ends: A 2 cm tail may work free after laundering, especially in acrylic yarn with smooth fibers. Leave 15 cm when fastening off and thread at least 8 cm through the completed fabric with a change of direction.
Resizing and Troubleshooting
Why does the blanket look ribbed instead of woven?
The basket effect depends on changing the FPdc and BPdc order after every set of six textured rows. If the same arrangement continues past Row 7, the next section remains a rib rather than reversing the apparent block. Compare Rows 2 and 8 directly, and keep a paper marker at the beginning of each new six-row section. A second issue is measuring blocks while the fabric is stretched across your lap. Lay at least twelve worked rows flat before deciding the pattern is wrong.
What if the blanket is too narrow?
First check your post-stitch gauge across the middle of the fabric. If twelve stitches occupy only 8 cm rather than the planned 10 cm, a 146-stitch panel will be substantially narrower than the target. Try a larger hook and remeasure, or increase the width by another full twelve-stitch repeat. Do not add an isolated single stitch in the center; that breaks the alternating six-stitch panels.
Can the same construction become a baby blanket?
Yes, but calculate from your own swatch. Ten twelve-stitch repeats give 122 working stitches and require a chain of 124; this makes a shorter-width variation, not a guaranteed infant-sized measurement. Reduce the height to a whole number of twelve-row cycles and keep the same two-round border. For infant use, avoid attached tassels and long decorative cords.
Can I substitute chunky or velvet yarn?
You can adapt the counts after measuring a new swatch, but do not expect the same finished dimensions or yarn consumption. Chunkier fibers enlarge each block and can make the six-stitch squares appear too wide for their six-row height. Velvet also makes the stitch posts harder to distinguish and may expose uneven tension. The solid blue photo is better matched with a yarn that shows individual stitch ridges clearly.
Conclusion
The critical measurements for this blue throw are 146 stitches across the body, six stitches in each textured panel, and six rows before each change in direction. Once the ten twelve-row cycles are complete, a two-round single-crochet edge frames the entire rectangle. Before making the full blanket, work a post-stitch swatch and record its measured width and height; this is the next practical step for matching your intended dimensions. Save this basketweave crochet blanket pattern to Pinterest and share a clear detail photo of your finished throw on Instagram with #BlueBasketweaveThrow. When you compare it with the reference photo, would six-row squares or taller eight-row squares match the blue woven grid more closely?









