Introduction
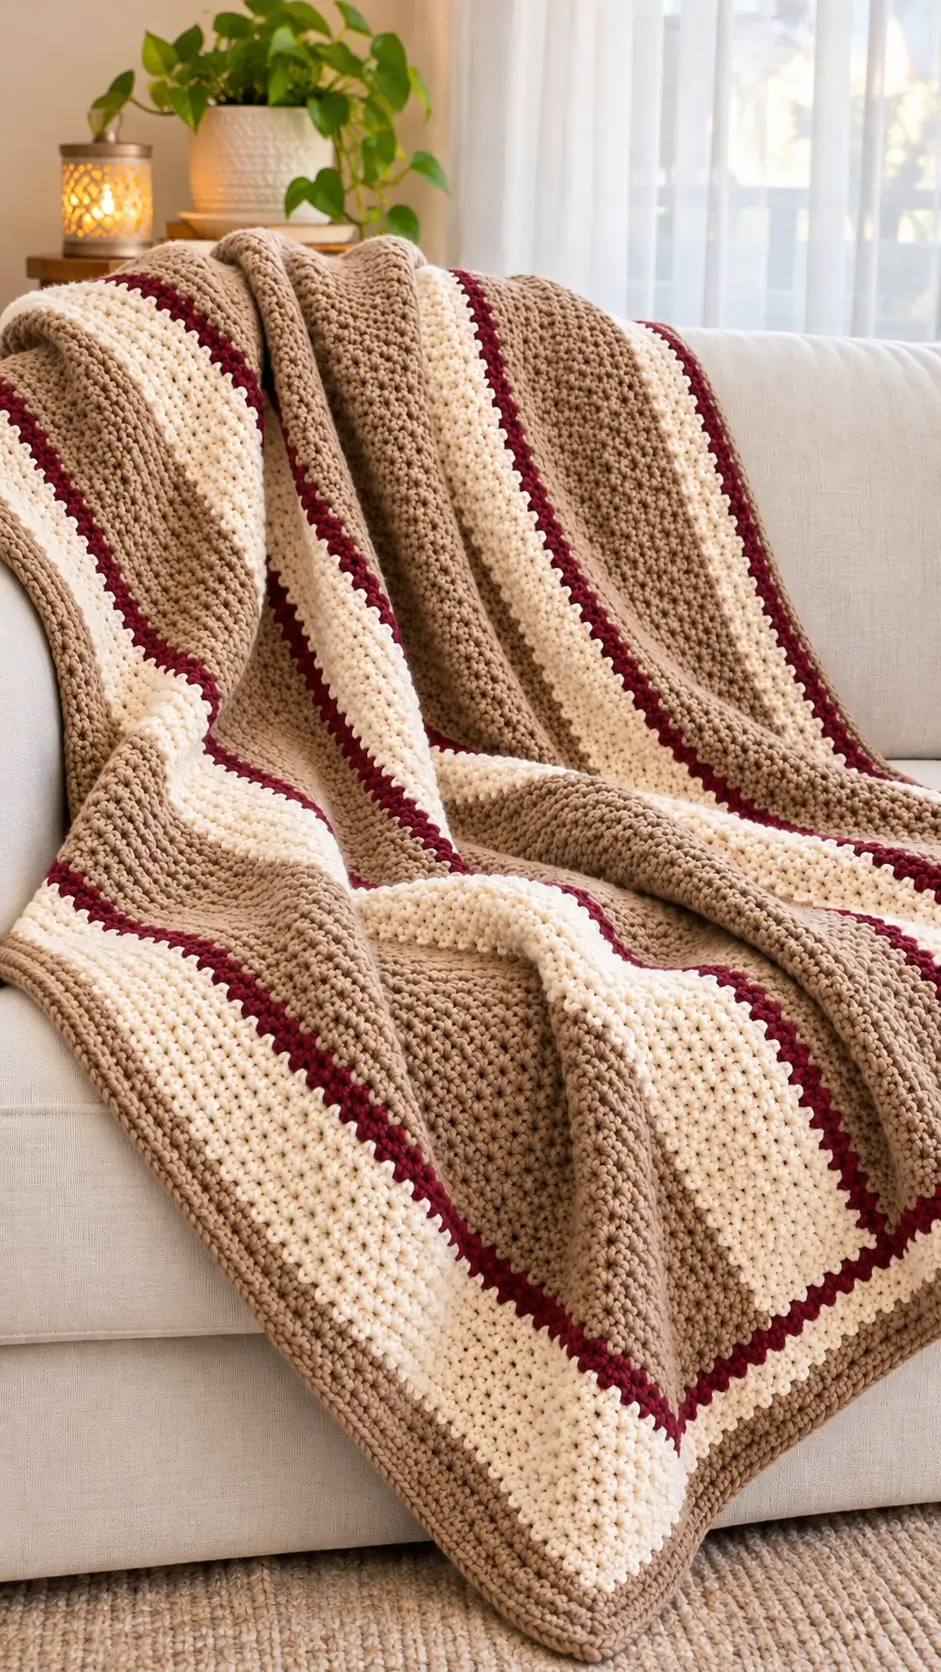
Burgundy does not form a wide stripe in this throw; it frames the cream instead. This chunky striped crochet blanket pattern translates that arrangement into a dense lemon peel stitch fabric worked with super bulky acrylic yarn and an 8 mm hook. The planned size is approximately 124 × 151 cm, subject to gauge. An advanced beginner can follow the fixed color schedule to make a durable sofa throw without joining separate panels.
The Design: What Makes This Three-Color Throw Different
Three structural choices control this blanket’s appearance. First, lemon peel stitch alternates single and double crochet across each row, producing compact raised texture without cables or separate motifs. That matters because the photograph shows a dense surface rather than openwork. Second, ivory appears in eight-row sections, bordered on both sides by two burgundy rows. The narrow dividers keep adjacent taupe and ivory blocks distinct without allowing the dark color to dominate. Third, a two-round taupe single-crochet border creates a consistent frame around the rectangle. It also offers space to conceal color-change tails, although every tail still needs to be secured separately. When making a textured crochet throw blanket, a common mistake is counting turning chains as stitches; this design excludes them. For a three-color crochet blanket, another frequent problem is pulling burgundy tails too tightly and shrinking the edge.
Project Info at a Glance
| Specification | Working plan |
|---|---|
| Skill level | Advanced beginner: sc, dc, color changes |
| Time | Depends on individual speed; no verified duration |
| Planned finished size | Approx. 124 × 151 cm (49 × 59 in), conditional on gauge |
| Hook | 8 mm (US L/11) |
| Yarn | #6 super bulky acrylic |
| Target stitch gauge | 8 stitches × 6 rows / 10 cm in lemon peel stitch |
| Construction | 96 stitches × 88 rows, worked flat |
| Best for | Sofa throw, lap blanket, textured living-room accent |
The sizing and gauge are a design target, not a measurement of the photographed blanket. A published super-bulky lemon peel throw reports 8 stitches and 6 rows per 10 cm with an 8 mm hook. The Bernat yarn label lists 8 single crochets and 9 rows per 10 cm; the row gauges differ because the stitches differ. Make a lemon peel swatch before judging the final length.
Materials and Tools
Yarn
Use Bernat Softee Chunky, a #6 super bulky, 100% acrylic yarn, or a substitute that meets the textured-stitch gauge. Each standard ball contains 100 g / 99 m (108 yd). These purchase quantities include a working allowance, not an independently tested amount for this original design.
- Warm taupe (A) — #6 super bulky — 1,300 g / 13 balls — Bernat Softee Chunky, Soft Taupe. Used for the four broad sections and both border rounds.
- Cream (B) — #6 super bulky — 600 g / 6 balls — Bernat Softee Chunky, Natural. Cream fills three eight-row color sections.
- Burgundy (C) — #6 super bulky — 300 g / 3 balls — Bernat Softee Chunky, Wine. Burgundy marks six two-row separators.
Total purchase allowance: 2,200 g / 22 standard balls, equivalent to approximately 2,178 m of yarn. Actual usage may be lower. Keep the labels and dye-lot numbers until the blanket is complete. A 20 cm swatch can improve the estimate: weigh it, divide its mass by its area, and multiply by the projected blanket area, then add allowance for the border and color changes.
Tools
- 8 mm crochet hook, plus an optional 9 mm hook for a tight foundation chain.
- Locking stitch markers: four for corners and extras for checking every 24 stitches.
- Blunt yarn needle, scissors, measuring tape, and digital kitchen scale for yarn estimates.
- Flat blocking surface; use gentle handling suitable for acrylic, without direct ironing.
Abbreviations and Stitch Notes
US crochet terms: ch = chain; sc = single crochet; dc = double crochet; st(s) = stitch(es); sl st = slip stitch; RS = right side; WS = wrong side; rep = repeat. The turning ch 1 never counts as a stitch. All main rows are worked flat and turned, not in continuous rounds. Lemon peel stitch alternates sc and dc, then positions each new sc over a dc from the preceding row. There are no increases or decreases in the main panel.
Pattern — Step by Step
Gauge Test: Make This Before the Foundation
With A and an 8 mm hook, chain 19. Sc in the second chain from the hook, dc in the next chain, and rep [sc, dc] to the end: 18 stitches. Ch 1, turn, and work [sc, dc] across each following row. Continue for at least 12 rows, then measure the center of the swatch without stretching it. The target is 8 stitches across and 6 rows vertically in 10 cm. If stitches are narrower, try a larger hook; if wider, try a smaller one. Row gauge has a substantial effect on an 88-row blanket, so record both measurements.
Foundation and Main Stitch (96 Stitches)
With A, ch 97. For Row 1, sc in the second chain from hook; dc in the next. Repeat [sc in next chain, dc in next chain] across: 48 sc + 48 dc = 96 stitches. Ch 1 and turn.
Row 2 and every later row: Sc in the first dc from the row below, dc in the next sc, and repeat [sc, dc] to the end (96 stitches). Ch 1 and turn after Rows 2–87. For Row 88, finish the final dc, then fasten off with a 15 cm tail. Change color on the final yarn-over of the last dc before each new stripe. Never add stitches at a color boundary.
Complete Row-by-Row Color Schedule
Work the Row 2 stitch instructions for every row below unless it is Row 1. Each row has 96 stitches throughout; the cumulative schedule totals 88 rows.
| Rows | Yarn color | Rows in band | Stitches per row |
|---|---|---|---|
| 1–12 | A — warm taupe | 12 | 96 |
| 13–14 | C — burgundy | 2 | 96 |
| 15–22 | B — cream | 8 | 96 |
| 23–24 | C — burgundy | 2 | 96 |
| 25–38 | A — warm taupe | 14 | 96 |
| 39–40 | C — burgundy | 2 | 96 |
| 41–48 | B — cream | 8 | 96 |
| 49–50 | C — burgundy | 2 | 96 |
| 51–64 | A — warm taupe | 14 | 96 |
| 65–66 | C — burgundy | 2 | 96 |
| 67–74 | B — cream | 8 | 96 |
| 75–76 | C — burgundy | 2 | 96 |
| 77–88 | A — warm taupe | 12 | 96 |
| TOTAL | A 52 / B 24 / C 12 rows | 88 | 96 |
At each transition, join the incoming color as the final loop of the outgoing row’s last dc. Leave a 15 cm tail from both colors, rather than knotting their ends together. Wind the ball for the next section away from the working edge to prevent accidental carry-along strands. The taupe bands surround the central ivory-and-burgundy sequence; the outer taupe rows create a visual transition into the border.
The Two-Round Taupe Border
Fasten off the last main row and lay the rectangle flat before adding the border. Join A at any corner gap. Round 1 will contain four straight sections and four groups of three corner stitches; the joining slip stitch is not counted.
Round 1: Across the top work 96 sc, one into every stitch. In the corner gap work 3 sc. Along the long side, work 117 sc: one in each of the 88 row ends plus one additional sc at row ends 3, 6, 9, and so on through 87 (29 extras). At the next corner work 3 sc. Across the foundation edge work 96 sc, and at the third corner work 3 sc. Repeat 117 sc along the second long side, work 3 sc in the fourth corner, then sl st to the first border sc. Total: 438 sc.
Round 2: Ch 1 (does not count), sc in each stitch of Round 1, but work 3 sc in the middle stitch of each corner group. Sl st to first sc. Total: 446 sc. Fasten off with a 20 cm tail. If Round 1 ripples or cups, adjust side spacing before starting Round 2; the count of 438 applies only to the specified side-edge distribution.
Finishing and Assembly — 10 Steps
- Verify the panel. Count 96 stitch tops on its final row and confirm exactly 88 completed rows.
- Inspect the color order. There should be four taupe blocks, three cream blocks, and six narrow burgundy dividers.
- Check the edges. Set the panel on a large flat surface and compare the two long sides before proceeding.
- Mark the corners. Place a locking marker in each corner gap to separate the side edging from the short-edge stitches.
- Attach the taupe edging yarn. Join at a corner and work Round 1 using the 96/117-stitch distribution.
- Confirm the first border count. The arithmetic is 96 + 117 + 96 + 117 + 12 corner stitches = 438.
- Complete Round 2. Place three sc in each corner center and check the resulting 446 total.
- Secure every yarn tail. Thread ends through stitches on the WS for at least 10–15 cm, reverse direction, and trim only after testing their hold.
- Shape gently. Lay the blanket flat, square the four corners, and follow the yarn label’s care directions; avoid direct heat on acrylic fibers.
- Measure and document. Record width, length, remaining yarn, and any deviation from the swatch gauge.
The blanket is complete after the ends are secured and the two-round edge lies flat.
Seven Technical Tips That Prevent Common Errors
- Lost stitches at the ends: Place a marker in the first and 96th stitch of each row. A turning chain incorrectly counted as a stitch can shift the outer edge by one column.
- Wrong texture alignment: A sc worked over another sc can interrupt the alternating relief. Check that every sc sits over a dc in the row directly underneath.
- Tight starting chain: A foundation that is 2 cm shorter than the first worked row may pull in the bottom edge. Try a 9 mm hook only for the original 97 chains if that happens.
- Uneven burgundy lines: Count exactly two burgundy rows before changing to cream or taupe. Three rows rather than two noticeably change the stripe proportions.
- Ruffled side border: The planned 117 sc per long side is a starting distribution tied to the design gauge. Remove a few spaced stitches if the edge waves; add them if it cups.
- Visible yarn tails: A 5 cm woven tail may work loose during washing. Leave at least 15 cm when changing color and weave backward through the WS after the border is finished.
- Incorrect finished length: A difference of one row per 10 cm grows across 88 rows. Measure a washed or relaxed test swatch and use the recorded row gauge before buying all the yarn.
Sizing, Substitutions, and Care
How to Recalculate a Wider Blanket
The repeat needs an even number of worked stitches, because every row ends with a dc. To widen the panel by roughly 10 cm at the target gauge, add eight worked stitches to the 96-stitch panel and add eight chains to its foundation. Thus ch 105 creates 104 worked stitches, excluding the turning chain. Leave the 88-row stripe sequence unchanged if the current length suits your room. The added width also changes the two short edges of the border and increases yarn usage. To make a longer blanket, add equal numbers of rows to the large taupe blocks while keeping the two-row burgundy borders intact.
What if the Fabric Is Too Stiff?
Super bulky yarn compressed into a dense stitch often produces a firm fabric. Make a second swatch with a 9 mm hook and compare width, length, and drape while holding it vertically. Larger hooks reduce stitch density but alter both finished dimensions and likely yarn use. Choose the hook based on the swatch, not solely on the package recommendation. Do not increase only the hook size halfway through the blanket, because that creates a visible width change.
Can I Use Chenille or Velvet Yarn?
A smooth, plied acrylic shows the alternating raised stitches more clearly. Chenille can mask the contrast between sc and dc and can shed at cut ends; a sample is important before buying blanket quantities. Velvet also behaves differently when color-change tails are woven under the border. If substituting either yarn, follow its label for washing and recalculate materials from the swatch rather than assuming equal grams.
Washing and Storing
For the suggested Bernat Softee Chunky yarn, the manufacturer’s care guidance permits machine washing in cool water and tumble drying on low, gentle heat. A large wet blanket is heavy, so support it fully while moving it. Store folded rather than suspended from one narrow corner to reduce stretching. If you mix fiber types, follow the gentlest care directions among them.
Related Patterns
- Striped Chunky Crochet Blanket — Ned & Mimi: A free bulky-yarn blanket with a size-adjustment chart. View the striped blanket. [INTERNAL LINK NEEDED: beginner striped throws]
- Chunky Textured Crochet Blanket — Stitchberry: Combines ribbing and texture in a single throw. Read the textured blanket pattern. [INTERNAL LINK NEEDED: textured blanket stitches]
- Striped Moss Blanket — Jewels and Jones / Ravelry: Uses bulky yarn and simpler stripe textures for a comparable throw size. See the listing. [INTERNAL LINK NEEDED: moss stitch blankets]
- Lemon Peel Stitch Tutorial — Mary Maxim: Explains the two-stitch repeat used in this reconstruction. Review the stitch instructions. [INTERNAL LINK NEEDED: crochet stitch tutorials]
Conclusion
Before placing the blanket into regular use, measure the finished piece on a flat surface and record the actual width, length, yarn consumption, and hook size. Those numbers make it easier to reproduce the color spacing in a second throw or adjust the next version for a wider sofa. Keep a photograph of the completed stripe sequence with the project notes. For sharing, pin a full-length image to Pinterest and post a close-up of the lemon peel texture on Instagram using #TaupeBurgundyThrow. Include the finished measurements in the caption. Which works better beside your burgundy dividers: the warm taupe sections shown here or a darker charcoal substitute? This chunky striped crochet blanket pattern can be recalculated from the same gauge.









