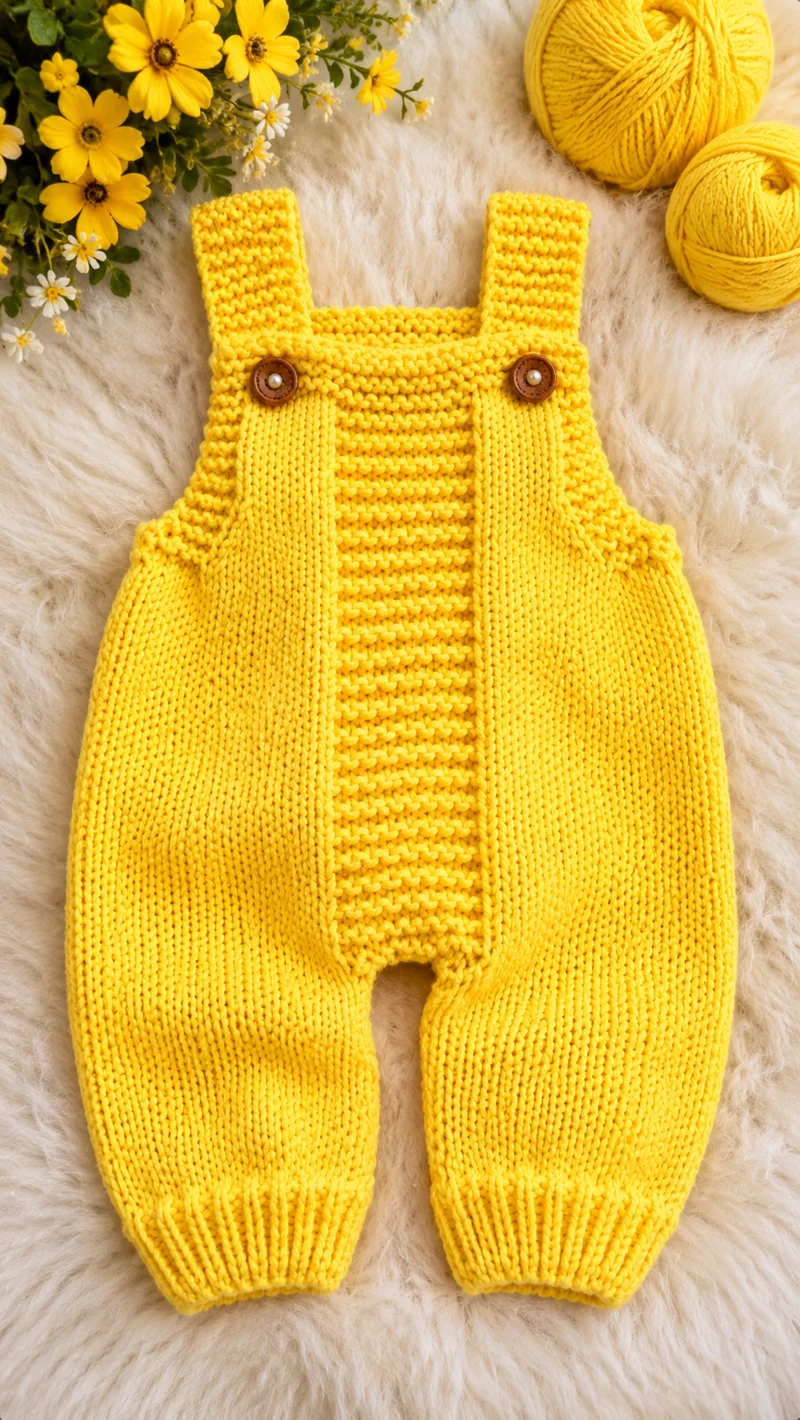
Two brown buttons secure the shoulder straps of these yellow dungarees, while the long legs finish in narrow ribbed cuffs. This baby overalls knitting pattern reconstructs those features using DK yarn, 4 mm needles, and a textured garter-stitch bib. The proposed 0–3-month size is intended for intermediate knitters familiar with shaping and seaming. Its separate front and back panels make the garment’s construction accessible for inspection and alteration before final assembly.
The Design: What Makes These Yellow Baby Overalls Different
The first defining feature is the rectangular bib. Rather than extending the full width of the garment, it narrows above the waist, leaving space around the arms. Garter stitch gives this section a visible horizontal texture and reduces curling along its upper edge.
The second feature is the contrast between the textured upper section and smooth stockinette legs. This arrangement keeps the lower garment flexible while giving the front panel a distinct appearance. The baby dungarees knitting pattern also uses a narrower ribbed cuff to create the tapered ankle shape shown in the photograph.
Finally, two straps extend from the back and button onto the front bib. Their placement must correspond to the front button positions. A common mistake in a knitted baby romper pattern is attaching the straps before checking their length against the finished garment.
Project Info at a Glance
| Skill Level | Intermediate |
|---|---|
| Estimated Time | 8–12 hours (untested) |
| Proposed Size | 0–3 months |
| Target Hip Circumference | Approximately 56 cm |
| Main Needles | 4 mm (US 6) |
| Cuff Needles | 3.5 mm (US 4) |
| Yarn | DK / light worsted |
| Gauge | 22 stitches and 30 rows = 10 cm in stockinette |
| Construction | Flat panels, seamed |
| Fastening | Two buttons |
Important: This is an original reconstruction inspired by the photograph. It has been checked for basic stitch arithmetic but has not been sample-knitted, washed, independently graded, or fit-tested. Finished measurements are estimates.
Materials and Tools
Yarn
- Sunshine-yellow DK yarn — 200 g purchase allowance: Smooth, washable baby yarn, such as Bernat Softee Baby or a comparable DK yarn. Actual consumption is not yet measured.
- Matching yellow yarn — 5–10 g reserve: Taken from the main allowance for seams and finishing.
A washable cotton-acrylic blend is suitable if it meets the stated gauge. Pure cotton can change dimensions after laundering, so measure the swatch after washing.
Tools
- 4 mm knitting needles for the main fabric.
- 3.5 mm knitting needles for ribbed cuffs.
- Two 10–12 mm buttons, smooth and washable.
- Tapestry needle for seaming.
- Stitch markers for shaping.
- Stitch holders or waste yarn.
- Measuring tape and scissors.
- Matching sewing thread for secure button attachment.
Infant safety: Buttons can become choking hazards if detached. Check all fastenings before each use. Do not use the garment with loose buttons, long ties, or unsecured decorations.
Knitting Gauge and Preparation
Make a swatch measuring at least 15 × 15 cm using 4 mm needles. Work stockinette stitch, wash according to the yarn label, and dry flat. Measure the central 10 cm without stretching.
Target gauge: 22 stitches × 30 rows = 10 × 10 cm.
If more than 22 stitches fit across 10 cm, try larger needles. If fewer stitches fit, try smaller needles. Repeat the swatch after changing needle size.
At this gauge, a 62-stitch panel measures approximately 28.2 cm before seams. Two panels provide a calculated combined width of approximately 56.4 cm, reduced slightly by seam take-up.
Garter stitch has a different row gauge. Measure the bib and straps directly rather than relying on the stockinette row gauge.
Knitting Abbreviations
| CO | Cast on |
|---|---|
| BO | Bind off |
| K | Knit |
| P | Purl |
| St(s) | Stitch(es) |
| RS | Right side |
| WS | Wrong side |
| K2tog | Knit two stitches together |
| SSK | Slip, slip, knit |
| M1 | Make one increase |
| KFB | Knit into front and back of a stitch |
| St st | Stockinette stitch |
| Garter st | Knit every row |
| Rep | Repeat |
| PM | Place marker |
For a left-leaning SSK decrease, slip two stitches knitwise one at a time, return them to the left needle, and knit them together through the back loops.
Pattern – Step by Step
Work the pieces flat, turning after each row. Stitch counts appear in parentheses. The following instructions describe one proposed 0–3-month size.
Part 1: Front Left Leg
Yarn: sunshine yellow DK. Start at the ankle.
Using 3.5 mm needles:
- R1: CO 22 sts. Work K1, P1 rib across. (22)
- R2–R12: Continue K1, P1 rib, working stitches as they appear. (22)
Change to 4 mm needles.
- R13 (RS): Knit. (22)
- R14 (WS): Purl. (22)
- R15: K1, KFB, knit to last 2 sts, KFB, K1. (24)
- R16–R20: Work in stockinette. (24)
- R21: Increase one stitch at each end as on R15. (26)
- R22–R26: Work in stockinette. (26)
- R27: Increase one stitch at each end. (28)
- R28–R32: Work in stockinette. (28)
- R33: Increase one stitch at each end. (30)
- R34–R48: Work in stockinette. (30)
Place the 30 live stitches on a holder without binding off.
Part 2: Front Right Leg
Repeat R1–R48 of the front left leg. Keep all 30 stitches live and the working yarn attached. Arrange the two legs with their inner edges adjacent.
Part 3: Join the Front Legs
- R49: Knit across 30 right-leg stitches, CO 2 stitches using a knitted cast-on, then knit across 30 left-leg stitches. (62)
- R50: Purl. (62)
- R51–R78: Continue stockinette. (62)
The two added stitches form the crotch bridge. Keep the join flat and avoid pulling the new stitches too tightly.
Part 4: Front Upper Body Shaping
- R79 (RS): K1, SSK, knit to last 3 sts, K2tog, K1. (60)
- R80: Purl. (60)
- R81: Repeat the decrease row. (58)
- R82: Purl. (58)
- R83: Repeat the decrease row. (56)
- R84: Purl. (56)
- R85: Repeat the decrease row. (54)
- R86: Purl. (54)
- R87: BO 10 sts at the beginning of the row, knit 34 sts, then bind off the final 10 sts separately. (34 bib stitches retained)
Note: R87 uses a simplified bind-off description. The exact boundary stitch handling must be confirmed in a sample knit before publication as a tested pattern.
Part 5: Textured Front Bib
Yarn: sunshine yellow DK. Work in garter stitch.
- R88–R119: Knit every row. (34)
- R120: BO all 34 stitches loosely. (0)
Measure the bib height before finishing. Garter-stitch row gauge varies with yarn and needle tension. Keep the upper edge level and avoid a tight bind-off.
Part 6: Back Left Leg
Repeat the front left leg, R1–R48. Hold all 30 stitches.
Part 7: Back Right Leg
Repeat the front right leg, R1–R48. Keep the 30 stitches live.
Part 8: Back Body
- R49: Knit 30, CO 2, knit 30. (62)
- R50: Purl. (62)
- R51–R78: Continue stockinette. (62)
- R79: K1, SSK, knit to last 3 sts, K2tog, K1. (60)
- R80: Purl. (60)
- R81: Repeat decrease row. (58)
- R82: Purl. (58)
- R83: Repeat decrease row. (56)
- R84: Purl. (56)
- R85: Repeat decrease row. (54)
- R86: Purl. (54)
- R87–R100: Continue stockinette without shaping. (54)
- R101: Knit. (54)
- R102: BO all 54 stitches loosely. (0)
This proposed back panel rises above the front bib transition and provides the attachment area for both shoulder straps.
Part 9: Left Shoulder Strap
Yarn: sunshine yellow DK. Use 4 mm needles.
- R1: CO 8 sts. (8)
- R2–R27: Knit every row. (8)
- R28: K3, bind off 2 sts, knit remaining 2 sts. (6 live stitches)
- R29: K3, CO 2 over the buttonhole gap, K3. (8)
- R30–R34: Knit every row. (8)
- R35: BO all 8 sts. (0)
Test the buttonhole with the selected button. The strap must lie flat when fastened and must not pull the bib upward.
Part 10: Right Shoulder Strap
Repeat the left shoulder strap, R1–R35. Check that both straps have equal lengths and matching buttonhole positions.
Part 11: Optional Textured Front Detail
The photographed garment has horizontal ridges through the center of its upper front. For a decorative reverse-stockinette ridge, replace one right-side knit row with a purl row, then resume the regular stockinette sequence.
Test this modification on a separate swatch. It is optional and not included in the base row counts.
Assembly – 10 Steps
- Block the panels. Wash and dry the front and back pieces according to the yarn label. Measure them after drying.
- Align the legs. Place the front and back panels right sides together. Match cuffs, shaping, and crotch joins.
- Sew the outer leg seams. Join the outer edges using mattress stitch or another flat seam. Continue upward along the sides, leaving the upper openings free.
- Join the inseams. Sew each inner leg from ankle to crotch. Connect the two crotch bridges without creating a bulky knot.
- Check the circumference. Measure the finished hip area and compare it with the target and the intended wearer’s measurements.
- Position the straps. Pin both straps near the upper back corners and check their reach to the bib.
- Sew the strap bases. Attach them securely using matching yarn and reinforced stitching.
- Attach the buttons. Mark symmetrical positions on the front bib and sew each button firmly with suitable thread.
- Test the fastenings. Button the straps and inspect their tension, alignment, and attachment strength.
- Finish the garment. Weave in yarn ends, inspect seams, trim tails, and measure the final dimensions.
The completed garment consists of two shaped leg-and-body panels, one front bib, and two buttoned shoulder straps.
Seven Technical Tips for Better Results
- Mark the crotch join. Place a removable marker at the center of each two-stitch bridge. Misaligned bridges can twist the crotch seam.
- Measure the ribbed cuffs. Each cuff begins with 22 stitches. If the cuff is restrictive, adjust its stitch count and retest the transition.
- Count every increase row. Each leg increases from 22 to 30 stitches in four two-stitch increase rows. Missing an increase makes the leg panels uneven.
- Check washed gauge. The target is 22 stitches and 30 rows per 10 cm. A gauge difference changes the finished circumference and length.
- Pin both straps first. Check that both straps reach the front bib evenly. Unequal positioning can pull the bib to one side.
- Inspect the buttonholes. Each strap has a two-stitch opening. Reject a fastening that slips free easily or has a loose button.
- Weave tails in multiple directions. Short straight tails may loosen during washing. Secure them through several centimeters of stitches.
Sizing Adjustments
This draft supplies one proposed size and is not a graded, fit-tested pattern. To adapt it, measure the child’s hip circumference over the intended clothing layer, inseam, crotch rise, and shoulder-to-bib distance.
Stitch calculation: Desired width in centimeters × 22 ÷ 10.
For example, a 60 cm target circumference corresponds to approximately 132 stitches distributed across both panels before seam adjustments, or 66 stitches per panel.
Increasing the hip circumference alone is insufficient. Recalculate the leg widths, crotch rise, bib width, total length, and strap positions as well. Check fit while the child is awake and supervised.
Washing and Care
Follow the yarn manufacturer’s washing instructions. Wash the completed overalls before first use and inspect all seams after drying.
Cotton-rich yarn may lengthen when wet, while some wool blends can shrink under unsuitable washing conditions. Dry flat when recommended and avoid stretching the straps.
Check the buttons after every wash. Repair any loose fastening before the garment is worn again.
Frequently Asked Questions
Can beginners knit these yellow baby overalls?
The basic knit and purl stitches are accessible, but the pattern also includes shaping, joining legs, buttonholes, and seaming. It is best classified as intermediate until independently tested.
What yarn is suitable for knitted baby dungarees?
A washable DK-weight yarn that produces the required gauge is appropriate. Cotton blends and washable acrylic blends are possible choices, although their elasticity and drape differ.
Can the shoulder straps be made adjustable?
Additional reinforced buttonholes may provide limited adjustment. Each fastening must be tested carefully, and loose buttons should never remain on an infant garment.
Why are the bib and legs knitted in different stitches?
Garter stitch produces horizontal texture and reduces curling on the bib. Stockinette creates a smoother fabric for the legs and supports consistent shaping.
How much yarn is required?
The proposed purchase allowance is 200 g of DK yarn. Actual consumption has not been measured on a finished sample, so the figure should not be presented as a tested requirement.
Conclusion
This yellow baby overalls design combines stockinette legs, ribbed ankle cuffs, a garter-stitch bib, and two buttoned shoulder straps. The construction uses separate front and back panels, making it possible to measure the garment before final assembly. Because the instructions are an original reconstruction, knit a gauge swatch and test the fit before treating the pattern as a finished size standard. Save the baby overalls knitting pattern for reference, then share a photograph of the completed project on Pinterest or Instagram with #YellowBabyOveralls. Before knitting the straps, decide whether the bib should retain its full garter texture or include additional horizontal ridges like those visible in the reference photograph.








