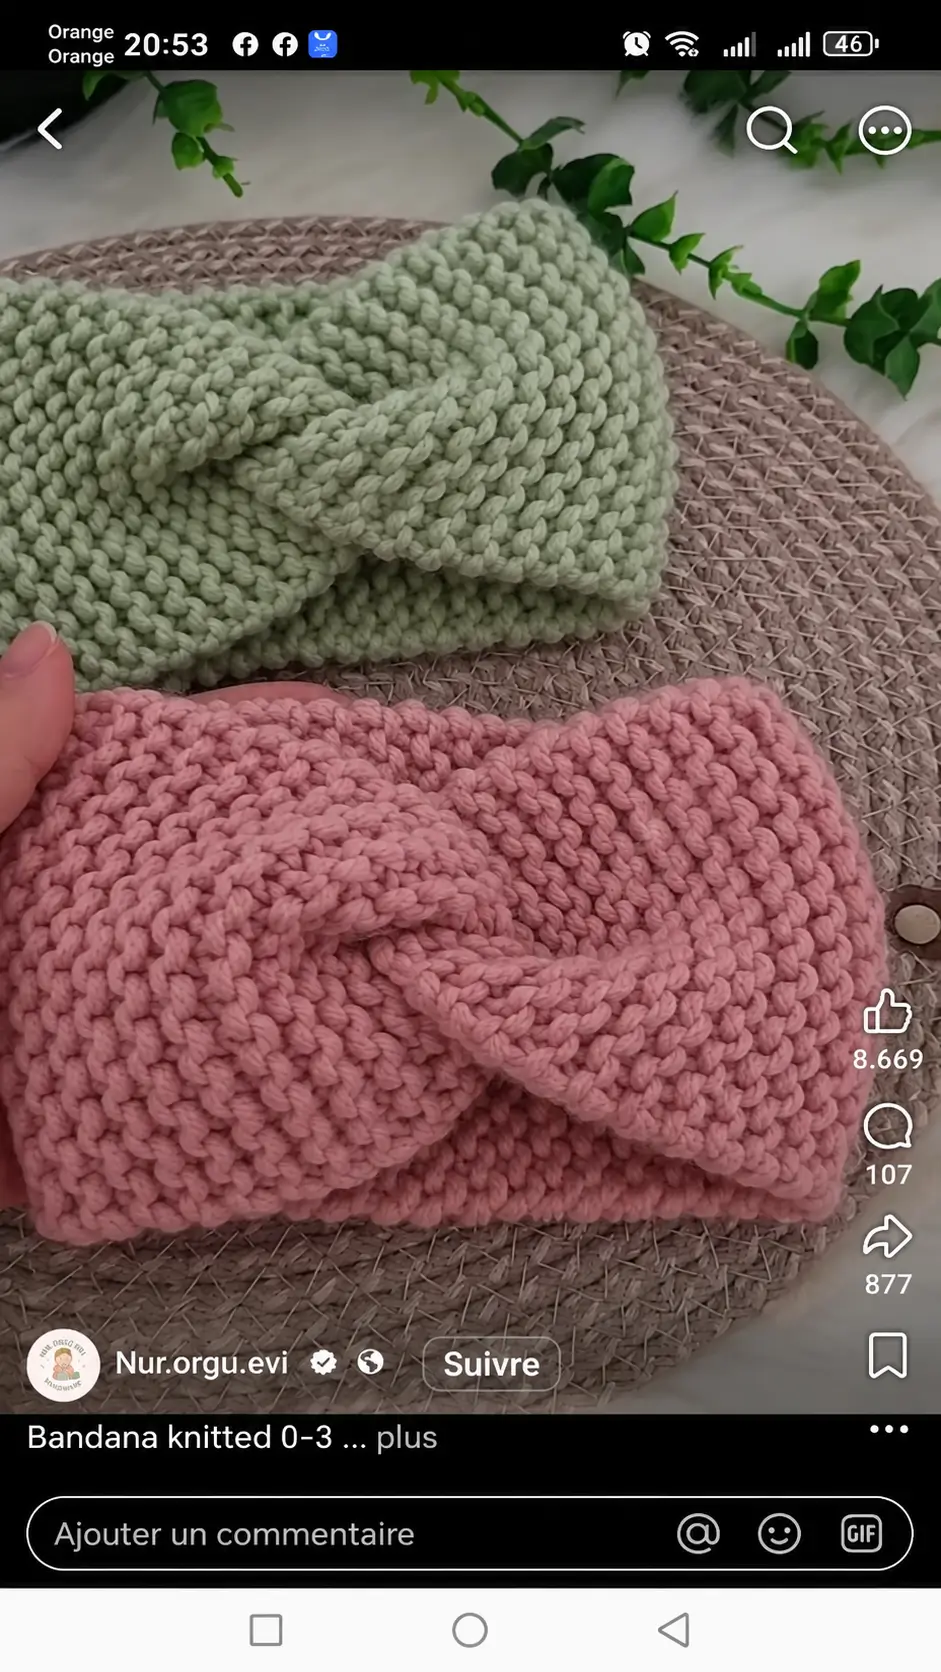
The center of this headband is not a bow: four folded fabric edges interlock to create the thick twist visible at the forehead. This twist knit headband pattern uses a simple rectangular construction, chunky yarn, and a concealed seam. The finished band is approximately 9–11 cm wide and is easy to resize from baby through adult measurements.
Design Details
The photographed design uses a dense knitted fabric with a pronounced horizontal texture and substantial thickness. Two examples are shown: dusty pink and soft sage green. Both use the same construction.
The headband begins as one long rectangle. Instead of sewing the short ends directly together, each end is folded in half and the four resulting layers are interlocked. Sewing through all four layers creates the characteristic turban-style twist when the band is turned right side out.
This construction matters. Simply crossing two ends and sewing them together produces a flatter knot, while the interlocking method creates the compact central pinch seen in the reference design.
Project Information at a Glance
| Skill Level | Construction | Yarn Weight | Needle Size | Finished Width |
|---|---|---|---|---|
| Beginner | Flat rectangle with twist seam | Chunky / Bulky #5 | 6–8 mm | Approx. 9–11 cm |
Materials and Tools
Yarn
- Dusty Pink — chunky/bulky yarn — approximately 70–100 g for an adult headband
- Sage Green — chunky/bulky yarn — approximately 70–100 g for an adult headband
The yarn amount is a project estimate. Actual consumption depends on fiber, gauge, head circumference, and finished band width.
Tools
- 6–8 mm knitting needles
- Large-eye yarn needle
- Scissors
- Measuring tape
- Stitch marker, optional
Abbreviations
- CO — cast on
- k — knit
- p — purl
- st/sts — stitch/stitches
- RS — right side
- WS — wrong side
- BO — bind off
Recommended Finished Measurements
A knitted headband should normally be slightly smaller than the actual head circumference because the fabric stretches during wear. Measure the intended wearer before selecting the final length.
| Size | Approx. Head Circumference | Suggested Band Length Before Seaming | Suggested Width |
|---|---|---|---|
| Baby | 40–44 cm | 35–39 cm | 6–7 cm |
| Toddler | 45–49 cm | 40–44 cm | 7–8 cm |
| Child | 50–53 cm | 45–48 cm | 8–9 cm |
| Teen / Small Adult | 54–56 cm | 48–51 cm | 9–10 cm |
| Adult | 56–59 cm | 50–54 cm | 9–11 cm |
| Large Adult | 59–62 cm | 53–57 cm | 10–12 cm |
These are starting measurements rather than fixed sizing rules. Stretch the finished swatch gently before deciding how much negative ease the selected yarn requires.
Gauge Swatch
Make a swatch at least 12 × 12 cm using the selected yarn and needles.
The fabric should be dense enough to cover the ears without becoming rigid. The headband in the photograph has compact stitches and substantial thickness, so an excessively loose gauge will change its appearance.
If the fabric is too stiff, increase the needle size. If large gaps appear between stitches, reduce the needle size.
Main Headband Rectangle
Step 1: Cast On
Cast on enough stitches to produce a band approximately 9–11 cm wide for an adult size.
The exact number depends on your gauge. For example, if the swatch measures 1.8 stitches per centimeter and you want a 10 cm band:
1.8 × 10 = 18 stitches
Cast on 18 stitches for that specific gauge.
Step 2: Work the Textured Fabric
A simple garter stitch provides the dense horizontal texture required for this design.
Row 1: Knit every stitch.
Row 2: Knit every stitch.
Repeat Row 2 until the rectangle reaches the required length.
For an average adult headband, begin checking the fit when the rectangle measures approximately 49–50 cm.
Continue only until the band can stretch comfortably around the head. The seam adds very little additional length.
Alternative Texture
If a smoother version is preferred, work a simple rib instead of garter stitch.
Row 1: *K1, p1; repeat from * across.
Row 2: Work each stitch as it appears.
Repeat Row 2 to the required length.
Ribbing produces considerably more stretch than garter stitch. Recalculate the finished length from the ribbed swatch rather than using the same measurements automatically.
Bind Off
Bind off without pulling the working yarn tightly.
The cast-on and bind-off edges will become the center twist, so they should have similar elasticity and thickness.
Leave a yarn tail approximately 35–45 cm long for sewing.
How to Make the Twist
This is the defining construction step.
Step 1
Lay the finished rectangle flat with the preferred side facing upward.
Step 2
Bring the two short ends together.
Step 3
Fold the first short end in half so its two corners meet. It should now resemble a narrow U shape when viewed from above.
Step 4
Fold the opposite short end in the same way.
Step 5
Slide the two folded ends together so they interlock.
The four layers should alternate in this order:
First end → second end → first end → second end.
Do not stack one complete folded end on top of the other. Alternating the layers is what produces the central twist.
Step 6
Align all four raw edges carefully.
The edges do not need to look decorative at this stage because the seam will turn toward the inside.
Sewing the Twist Seam
Thread the long yarn tail through a large-eye needle.
Sew through all four layers from one side to the other.
Return across the seam a second time if the yarn is very soft or loosely spun.
Do not pull the seam so tightly that the center becomes hard. The four layers need to remain compressed but flexible.
Secure the yarn and weave the tail through the inside of the knitted fabric.
Turning the Headband
Turn the headband so the sewn edge rolls toward the inside.
Pull the two sides gently away from the center.
The interlocked seam will rotate automatically and form the characteristic knot-like twist.
Shape the center with your fingers so the left and right folds have similar width.
The completed front should have two broad overlapping sections rather than a narrow hard knot.
Adjusting the Width
The photograph shows a relatively wide ear-warmer style band.
For adults, a finished width of approximately 9–11 cm creates similar coverage.
A narrower 7–8 cm band looks more like a fashion headband. A 11–12 cm version provides more ear coverage but also creates a thicker center because four layers meet at the twist.
How to Calculate a Custom Size
Measure around the head where the headband will sit.
Next, determine the stretch of the knitted swatch.
For example, suppose a 20 cm section stretches comfortably to 22 cm.
The stretch factor is:
20 ÷ 22 = 0.91
If the wearer’s head circumference is 57 cm:
57 × 0.91 = approximately 52 cm
A rectangle around 52 cm long would therefore be a useful starting point for that yarn and gauge.
Always test the band around the head before sewing the permanent twist seam.
Dusty Pink Version
The dusty pink version in the reference image works particularly well because the solid color keeps attention on the central construction.
Use one yarn throughout the rectangle and avoid unnecessary color changes. With chunky yarn, even small knots or joins can create visible bumps.
If another skein is required, make the join several centimeters away from the future center twist.
Sage Green Version
The sage green version uses the same measurements and construction.
When making several headbands from different yarn colors, do not assume equal yardage means equal sizing. Two bulky yarns carrying the same weight classification can produce noticeably different gauges.
Make a short swatch whenever the yarn brand or fiber changes.
Making a Two-Color Headband
A color-blocked version can be produced by dividing the rectangle into two equal sections.
Work the first half in one color and the second half in another.
Place the color transition away from the center seam if a clean twist is required.
Another option is to use a contrasting yarn only for the final 8–10 cm at each end. Once the ends are interlocked, the contrasting sections become part of the center knot.
Child Size Version
For a child’s headband, reduce both the length and width.
A width around 8–9 cm is usually more proportional than copying the adult width.
Make the rectangle according to the child’s measured head circumference and the stretch of the swatch.
Because children vary significantly in head size, age alone should not determine the finished length.
Baby Size Considerations
For a baby version, select a soft washable yarn and keep the band considerably narrower.
A width around 6–7 cm creates less bulk at the center seam.
Check that the band stretches easily and does not leave pressure marks. Avoid attaching beads, buttons or other small decorative pieces.
Making the Twist Flatter
If the completed center feels excessively thick, the problem usually comes from the yarn thickness combined with the four-layer seam.
Three adjustments are possible:
- Reduce the band width by approximately 1 cm.
- Use a slightly lighter yarn.
- Use a thinner stitch pattern at the final 3–4 cm of each end.
Do not trim knitted fabric after completion. Cutting the ends can release the stitches.
Making the Twist More Pronounced
For a larger central knot, increase the band width rather than adding additional folds.
A wider rectangle naturally creates a deeper overlap when the four layers are interlocked.
Keep the finished length unchanged unless the gauge also changes.
Finishing
- Measure the intended wearer’s head circumference.
- Make a gauge swatch using the selected chunky yarn.
- Calculate the number of stitches required for the desired band width.
- Cast on and knit a rectangular strip to the calculated length.
- Test the rectangle around the head before binding off permanently.
- Bind off with moderate elasticity and leave a 35–45 cm sewing tail.
- Fold both short ends in half and interlock the four layers alternately.
- Sew securely through all four layers across the complete short edge.
- Turn the seam inward and shape the central twist with your fingers.
- Weave in all yarn tails and measure the finished circumference before wearing.
The finished headband should lie flat around the back of the head while forming one symmetrical, raised twist at the center front.
7 Technical Tips
- Headband becomes too loose: knitted fabric can relax after repeated wear. Test the swatch under gentle stretch and use approximately 5–10 percent negative ease as a starting range rather than matching the head circumference exactly.
- Center twist looks flat: the four end layers may have been stacked instead of interlocked. Arrange them alternately—A, B, A, B—before sewing.
- Twist becomes bulky: four layers of chunky knitting meet at the seam. If the center exceeds the desired thickness, reduce the band width by approximately 1 cm rather than pulling the seam tighter.
- Edges flare outward: a loose cast-on or bind-off can become wider than the body. Compare both short edges before sewing and remake an edge if the difference exceeds approximately 1 cm.
- Band narrows while knitting: count the stitches every 10–15 rows. Accidentally dropping one edge stitch changes both the width and the symmetry of the finished twist.
- Seam opens during wear: sewing through only two layers leaves the folded sections unsecured. Pass the needle through all four layers and reinforce the seam once before weaving in the tail.
- Twist sits off-center: unequal folded ends shift the knot to one side. Align all four short edges to within approximately 3–5 mm before beginning the seam.
Washing and Care
Follow the care instructions supplied with the selected yarn.
Hand washing is useful for headbands made with fibers that can stretch significantly when wet.
After washing, press out excess water without twisting the fabric.
Lay the headband flat and reshape the center twist while damp.
Do not stretch the circumference during drying because the finished band relies on negative ease to remain securely positioned.
Conclusion
This twist knit headband pattern is built from one rectangular strip, making sizing dependent mainly on accurate gauge, controlled stretch, and the final interlocking seam. Start with a 12 cm swatch, calculate the rectangle from the wearer’s actual head measurement, and test the length before sewing. For the photographed look, use chunky yarn, a 9–11 cm adult width, and a single dusty pink or sage green color. Save the pattern to Pinterest or share your finished version on Instagram with #TwistKnitHeadband. Which version would you make first: dusty pink or sage green?









