Introduction
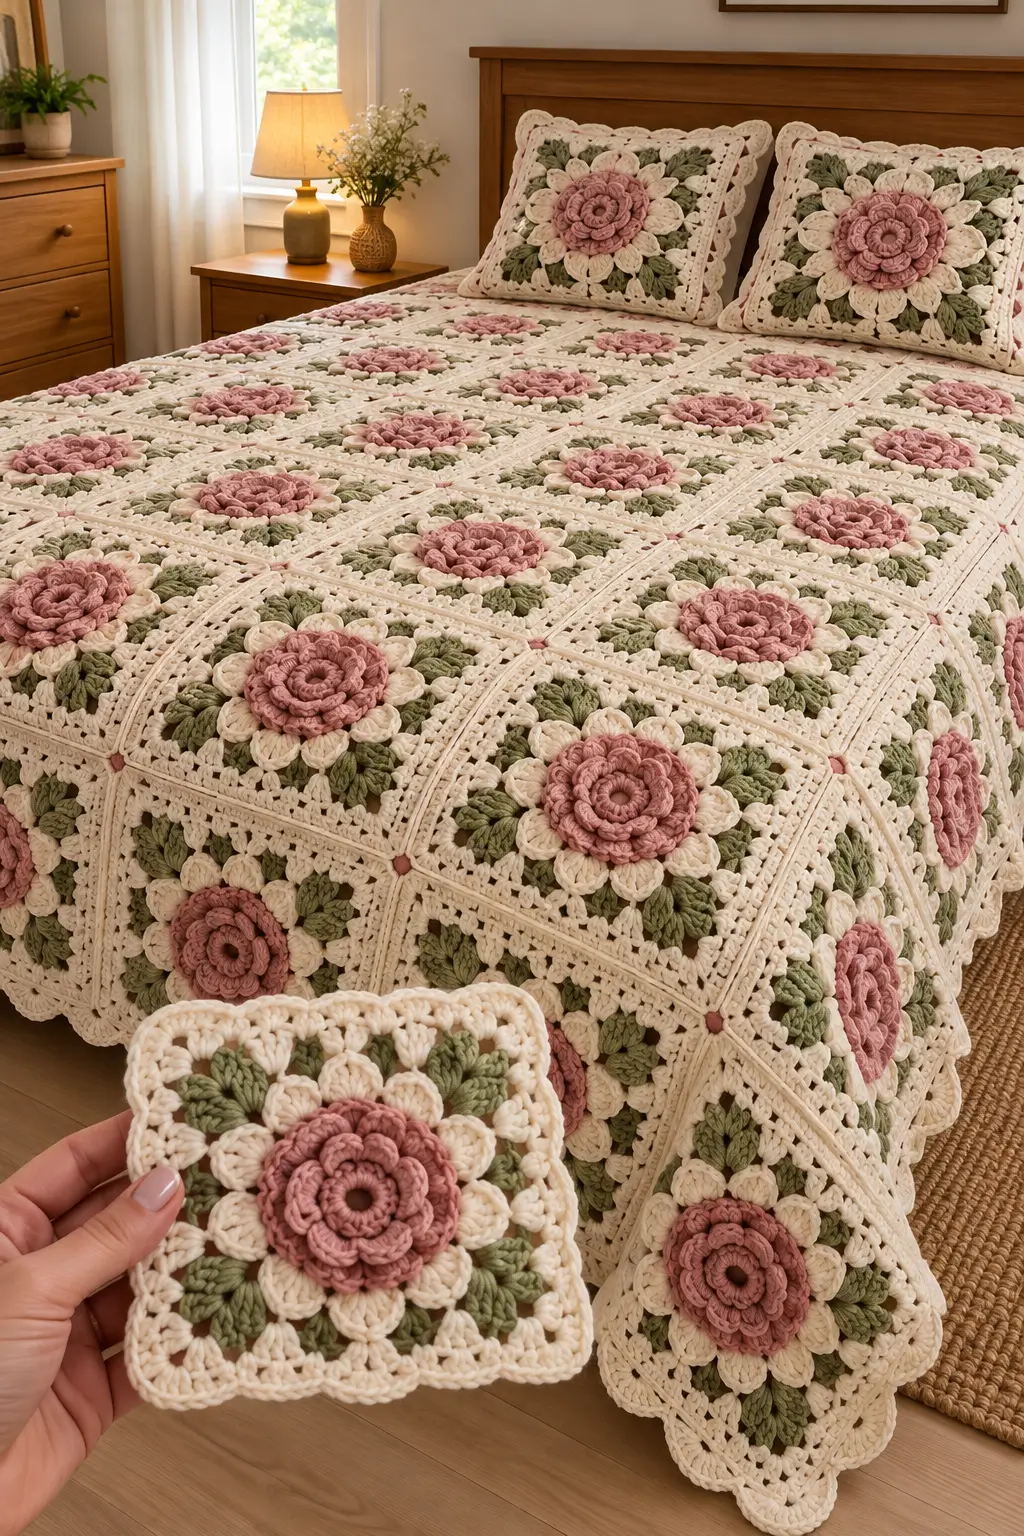
A rose this deep cannot carry the seam tension of the square beneath it. This 3D rose granny square crochet bedspread pattern therefore separates the raised dusty-pink flower from its structural cream frame, adding ivory petals and sage leaves between the two layers. Worked with medium-weight yarn and a 5.0 mm hook, the intermediate construction produces large floral blocks for a bedspread and matching pillow shams.
The Design: What Makes This Rose Bedspread Different
The photographed block has four distinct levels: a layered pink rose, an ivory petal ring, sage foliage, and a cream square with open corner details. Keeping those elements structurally separate prevents the heavy flower from pulling the corners inward. The rose is attached mainly through its foundation, leaving the upper petals free to overlap. Sage leaves occupy the spaces between ivory petals and square corners, while the cream perimeter supplies the joining surface.
Published 3D flower squares vary considerably in scale. Examples range from roughly 10 cm squares to approximately 16 cm with worsted or Aran yarn. For the oversized bedspread proportions shown here, this photo-inspired version targets approximately 20–22 cm after blocking. A frequent failure is sewing every rose petal flat; doing that removes the layered structure and concentrates tension in the center.
Project Info at a Glance
| Skill Level | Construction | Target Square | Hook | Best For |
|---|---|---|---|---|
| Intermediate | Layered flower over structural square | 20–22 cm | 5.0 mm | Bedspreads, throws and pillow shams |
Materials and Tools
Yarn
- Dusty rose pink — worsted/Aran #4 — layered rose centers
- Warm ivory — worsted/Aran #4 — outer flower petals
- Sage green — worsted/Aran #4 — leaves
- Cream — worsted/Aran #4 — square backgrounds, joining and border
A smooth cotton blend or premium acrylic gives the raised petals clearer stitch definition than a heavily brushed yarn. Use the same yarn line for all four colors where possible so the squares block consistently.
Tools
- 5.0 mm crochet hook
- 4.5 mm crochet hook for firmer flowers if needed
- Yarn needle
- Scissors
- Locking stitch markers
- Blocking mats
- Rust-resistant pins
- Tape measure
- Digital kitchen scale
Abbreviations
- MR — magic ring
- ch — chain
- sl st — slip stitch
- sc — single crochet
- hdc — half double crochet
- dc — double crochet
- tr — treble crochet
- sp — space
- st/sts — stitch/stitches
- FO — fasten off
Pattern — Step by Step
This is an original photo-inspired construction. Make one complete block before beginning the full bedspread. The master block determines final gauge, yarn consumption, rose height and joining tension.
Dusty Pink Layered Rose
The central rose is made from three separate petal strips. Rolling the strips gives predictable overlap and allows the flower to be attached securely without sewing down every petal.
Rose Inner Strip
With dusty rose yarn, ch 25.
Row 1: Starting in the second chain from the hook, sc across. (24)
Row 2: Ch 1, turn.
Work:
*sl st in next st, 4 hdc in next st* ×12.
FO leaving approximately 50 cm for assembly.
Rose Middle Strip
With dusty rose, ch 33.
Row 1: Sc in second chain from hook and across. (32)
Row 2: Ch 1, turn.
Work:
*sl st in next st, 5 dc in next st* ×16.
FO leaving a 60 cm tail.
Rose Outer Strip
Ch 41.
Row 1: Sc in second chain and across. (40)
Row 2: Ch 1, turn.
Work:
*sl st in next st, (2 dc, 3 tr, 2 dc) in next st* ×20.
FO leaving approximately 70 cm.
Assembling the Rose
Begin with the 24-stitch inner strip.
Roll it from one end into a compact spiral.
After every two petals, pass the yarn tail through the foundation edge to hold the coil.
Do not sew through the upper petal edges.
Wrap the middle strip around the first coil. Offset its petals so they sit between the petals of the inner layer.
Add the outer strip last.
Allow the outer petals to open farther away from the center.
Sew through the three foundation strips several times at the back.
The completed rose should measure approximately 9–11 cm across before the ivory petal ring is added.
Ivory Petals — Make 12
With ivory yarn, ch 10.
Beginning in the second chain from hook work:
sc, hdc, dc, 3 tr, dc, hdc, sc.
Ch 2.
Work down the unused side of the foundation chain:
sc, hdc, dc, 3 tr, dc, hdc, sc.
Join at the base.
FO leaving a 20 cm sewing tail.
Make twelve identical petals.
Shaping the Ivory Petals
Lay all twelve petals around the pink rose before sewing.
The pointed ends face outward.
Overlap neighboring petal bases by approximately 5–8 mm.
The ring should remain circular.
If twelve petals create excessive crowding with your gauge, reduce the width of each petal rather than removing random petals.
Sage Leaf — Make 8
With sage yarn, ch 12.
Starting in the second chain from hook work:
sl st, sc, hdc, dc, 2 tr, 2 dc, hdc, sc.
In the final chain work:
5 sc.
Rotate and work down the unused side:
sc, hdc, 2 dc, 2 tr, dc, hdc, sc, sl st.
FO leaving a 25 cm tail.
Optional Raised Leaf Vein
Join sage yarn at the base of the leaf.
Work surface slip stitches along the original foundation chain toward the point.
Stop approximately 5 mm before the tip.
FO.
Repeat on all eight leaves.
Cream Structural Square
The square is worked separately. This keeps the joining seams independent from the weight of the layered rose.
With cream yarn, make a MR.
Round 1
Ch 3.
Work:
(3 dc, ch 3) ×4
into the ring.
Join.
Round 2
Sl st into the first corner space.
Work:
(3 dc, ch 2, 3 dc)
in each corner.
Ch 1 between corner groups.
Join.
Round 3
In each corner work:
(3 dc, ch 2, 3 dc).
In each side ch-1 space work:
3 dc.
Ch 1 between groups.
Join.
Round 4
Continue the same expansion.
Work:
(3 dc, ch 2, 3 dc)
at every corner.
Work 3 dc in each side space with ch 1 between groups.
Round 5
Repeat Round 4.
Lay the flower assembly over the square.
The ivory petal tips and sage leaves should remain inside the structural perimeter.
Openwork Cream Frame
The photographed blocks contain a light lace section between the floral center and the denser outer edge.
Round 6
Ch 1.
Sc in the first stitch.
Work:
ch 3, skip 2 sts, sc in next st.
Repeat across each side.
At each corner work:
(sc, ch 4, sc).
Round 7
Sl st into the first ch-3 space.
Work:
(2 hdc, ch 1, 2 hdc)
in each side space.
At each corner ch-4 space work:
(3 hdc, ch 2, 3 hdc).
Join.
Structural Outer Frame
Round 8
Ch 1.
Work sc evenly around.
At each corner work:
(2 sc, ch 2, 2 sc).
Join.
Round 9
Ch 2.
Hdc in each stitch.
At each corner work:
(2 hdc, ch 2, 2 hdc).
Join.
Round 10
Ch 1.
Sc in each stitch.
At every corner work:
(sc, ch 2, sc).
FO.
Target Square Size
Block the completed structural square to approximately 20–22 cm.
Measure all four edges.
Then measure both diagonals.
Keep the difference between the two diagonals below approximately 5 mm.
Do not attach the rose until the square has been blocked and measured.
Positioning the Sage Leaves
Place two sage leaves toward each corner.
Angle the pair apart to form a shallow V.
The leaf points should stop approximately 1.5–2 cm inside the outer cream edge.
Sew the lower half of each leaf to the square.
Leave the pointed upper section slightly raised.
Attaching the Ivory Petal Ring
Arrange the twelve ivory petals in a circle over the leaves.
The bases should sit beneath the future pink rose.
Sew each petal through its lower 2–3 cm.
Leave the outer portion free.
Check the flower diameter after every third petal.
Attaching the Pink Rose
Place the assembled rose directly over the ivory petal bases.
Pin the center.
Check the distance from the rose center to all four square edges.
Sew through the rose foundation and cream square several times.
Add four additional anchoring stitches around the outer rose foundation at approximately quarter-circle intervals.
Do not sew through the upper edges of the outer petals.
Checking the Completed Floral Square
Lay the block on a hard flat surface.
All four cream edges should touch the surface.
The rose may project approximately 2–3 cm above the square.
If one corner lifts, inspect the leaf and flower attachment stitches nearest that corner.
Loosen any stitch pulling the background toward the center.
Making a Master Block
Complete one entire motif before starting production.
Record:
- Blocked width
- Blocked height
- Both diagonal measurements
- Rose diameter
- Rose height
- Total motif weight
Use those measurements rather than an unblocked work-in-progress square when planning the bedspread.
Planning the Bedspread
If each blocked block measures approximately 21 cm, the following grids provide practical starting points:
| Grid | Squares | Approximate Motif Field |
|---|---|---|
| 5 × 6 | 30 | 105 × 126 cm |
| 6 × 8 | 48 | 126 × 168 cm |
| 8 × 10 | 80 | 168 × 210 cm |
| 9 × 11 | 99 | 189 × 231 cm |
| 10 × 12 | 120 | 210 × 252 cm |
The border adds additional width and length. Measure the mattress plus the desired side and foot drop before choosing the final grid.
Estimating Yarn from the Master Square
Weigh the completed master block.
Suppose one floral square weighs 75 g.
An 80-square bedspread would use:
75 g × 80 = 6,000 g
That calculation covers the motifs only.
Add yarn for joining and the outer border, then add approximately 10% for gauge variation, sampling and future repairs.
The 75 g value is an example. Replace it with the measured weight of your own block.
Estimating Yarn by Color
For more accurate purchasing, weigh each yarn ball before and after making one master square.
For example, if a sample consumes:
- Dusty rose — 20 g
- Ivory — 15 g
- Sage — 12 g
- Cream — 28 g
For 80 motifs:
Dusty rose: 1,600 g
Ivory: 1,200 g
Sage: 960 g
Cream: 2,240 g plus joins and border
These figures demonstrate the calculation method rather than fixed material requirements.
Arranging the Bedspread
Lay every blocked square on the floor before joining.
Check that the sage leaf pairs point toward corresponding corners.
View the arrangement from several meters away.
The dusty-pink rose centers should form straight horizontal and vertical lines.
Rotate or replace any square that breaks the visual grid.
Flat Slip-Stitch Join
Use cream yarn.
Place two squares beside each other with right sides facing upward.
Insert the hook through corresponding edge loops.
Work relaxed slip stitches from corner to corner.
Open the seam after every 5–7 cm.
The joined squares must remain flat.
Alternative Mattress-Stitch Join
Place two squares side by side.
Thread a yarn needle with cream yarn.
Pass through corresponding outer loops along both edges.
Pull the yarn until the edges meet.
Do not tighten beyond that point.
This creates a flatter seam when the raised roses already provide substantial surface texture.
Joining the Complete Grid
Join squares into horizontal rows first.
Return each finished row to the planned layout.
Confirm flower and leaf orientation.
After all rows are complete, connect the rows vertically.
Measure the width after every second long seam.
Outer Border — Foundation
Join cream at one corner of the assembled bedspread.
Work sc evenly around the complete perimeter.
At each corner work:
(2 sc, ch 2, 2 sc).
Join.
Border Round 2 — Openwork
Ch 1.
Sc in the first stitch.
Work:
ch 3, skip 2 sts, sc in next st.
Repeat around.
At each corner create a ch-5 space.
Border Round 3 — Lace Fans
Sl st into the first ch-3 space.
Work:
(sc, hdc, 3 dc, hdc, sc)
into each space.
At every corner ch-5 space work:
(sc, hdc, 5 dc, hdc, sc).
Border Round 4 — Large Scallops
Move to the center of the first small fan.
Work:
7 dc
into the selected space.
Sc between fans.
Repeat around.
Use 9 dc in each corner scallop if additional width is needed.
FO.
Matching Square Pillow Sham
The pillow shams in the reference repeat the same large floral structure.
For a single-flower cushion, make one enlarged square by continuing cream framing rounds until it matches the pillow insert.
For a 45 × 45 cm insert, continue the square evenly until the blocked front measures close to the insert size.
Keep the rose centered.
Multi-Square Pillow Option
Join four smaller rose blocks in a 2 × 2 arrangement.
Add cream rounds around the completed panel until the required pillow measurement is reached.
This option repeats the bedspread grid more directly than a single oversized flower.
Solid Pillow Back
With cream yarn, chain to the required width.
Row 1: Hdc in third chain from hook and across.
Row 2: Ch 2, turn, hdc across.
Repeat Row 2 until the panel matches the blocked floral front.
FO.
Joining the Pillow
Place the front and back with wrong sides together.
Sc through both layers along three edges.
Insert the pillow form.
Close the fourth edge or add buttons to make the cover removable.
Keep the rose petals away from the joining stitches.
Reducing the Flower Height
For a bedspread used daily rather than primarily as a decorative cover, reduce the rose from three strips to two.
Use the inner and middle strips only.
Attach every second outer petal lightly at its base.
This reduces bulk while retaining a visibly layered flower.
Making a More Dimensional Rose
Keep all three strips and use the 4.5 mm hook for the flower only.
The firmer gauge makes the petals stand more distinctly.
Do not add stuffing beneath the rose.
The flower should obtain its height from overlapping crochet layers rather than an internal filling.
Keeping the Cream Grid Flat
The outer cream rounds perform the structural work.
Do not attach leaves over the final 1.5–2 cm of the square.
Keep flower sewing threads inside the central area.
The joining edge should contain only cream stitches.
This produces a more consistent seam across a large bedspread.
Assembly
- Make the three dusty-pink rose strips, roll them into a layered flower and secure only their foundation edges.
- Crochet twelve ivory petals and eight sage leaves, then block those components before assembling the floral center.
- Make one complete cream structural square and block it to approximately 20–22 cm with both diagonals within about 5 mm.
- Position two sage leaves toward each corner, keeping every leaf point at least 1.5 cm inside the joining edge.
- Arrange the twelve ivory petals in a circular ring and sew only their lower sections to preserve the raised outer tips.
- Center the pink rose over the ivory petal bases and secure its foundation to the square without flattening the upper petal layers.
- Use the completed block as the master measurement, then make and block the remaining floral squares to match it.
- Arrange the full bedspread grid before joining, checking rose alignment and leaf orientation across every row.
- Join horizontal rows first, connect those rows vertically, and add the cream openwork and scalloped outer border.
- Make the matching pillow fronts, weave all yarn tails through dense structural stitches and complete a light final blocking.
The finished bedspread should show a regular cream grid supporting raised dusty-pink roses, ivory petal halos and symmetrical sage foliage without distortion at the seams.
7 Technical Tips
- Keep every finished square within 5 mm of the master block. A small difference repeated across ten squares can shift the opposite bedspread edge by several centimeters.
- Keep at least 1.5 cm of clear cream fabric beside every seam. Leaves or petals entering that zone create thick intersections when four squares meet.
- Anchor the rose through its foundation rather than the petal tops. Sewing the complete flower flat removes the 2–3 cm relief that defines the design.
- Measure from the rose center to all four square edges before sewing. A displacement greater than about 5 mm becomes obvious once the pink centers form long rows.
- Block the square before attaching the dimensional flower. Trying to stretch the cream background after the rose is attached can distort the petal ring.
- Open joined squares every 5–7 cm while making a slip-stitch seam. If the seam contracts, remake it before continuing to the next motif.
- Weave structural tails through at least 5 cm of dense crochet. Keep tails out of the open chain spaces and free petal edges where they can become visible after washing.
Care and Final Blocking
Follow the care instructions for the chosen yarn.
Support the complete bedspread when wet because the raised flowers add considerable weight.
Lay the piece flat and straighten the cream seam grid first.
Measure the width at the top, center and bottom.
Shape the scalloped border next.
Arrange the roses and ivory petals by hand last.
Avoid pressing the flowers flat with an iron. If steam is appropriate for the yarn, keep the heat source above the crochet and reshape the petals manually.
Conclusion
The cream framework carries the load in this 3D rose granny square crochet bedspread pattern; the rose, ivory petals and sage leaves supply dimension without becoming part of the seams. Make one 20–22 cm master block first, weigh each color used in that sample, and join four test squares before starting full production. That test reveals seam contraction and flower spacing while corrections are still manageable. Keep the outer joining zones free of leaves and petals, then add the scalloped border only after the complete grid lies flat. Save the finished project to Pinterest or share it on Instagram with #RoseGardenGrannyBedspread. Would you keep the dusty-pink roses shown here or use burgundy for a stronger contrast against the sage leaves?









