Introduction
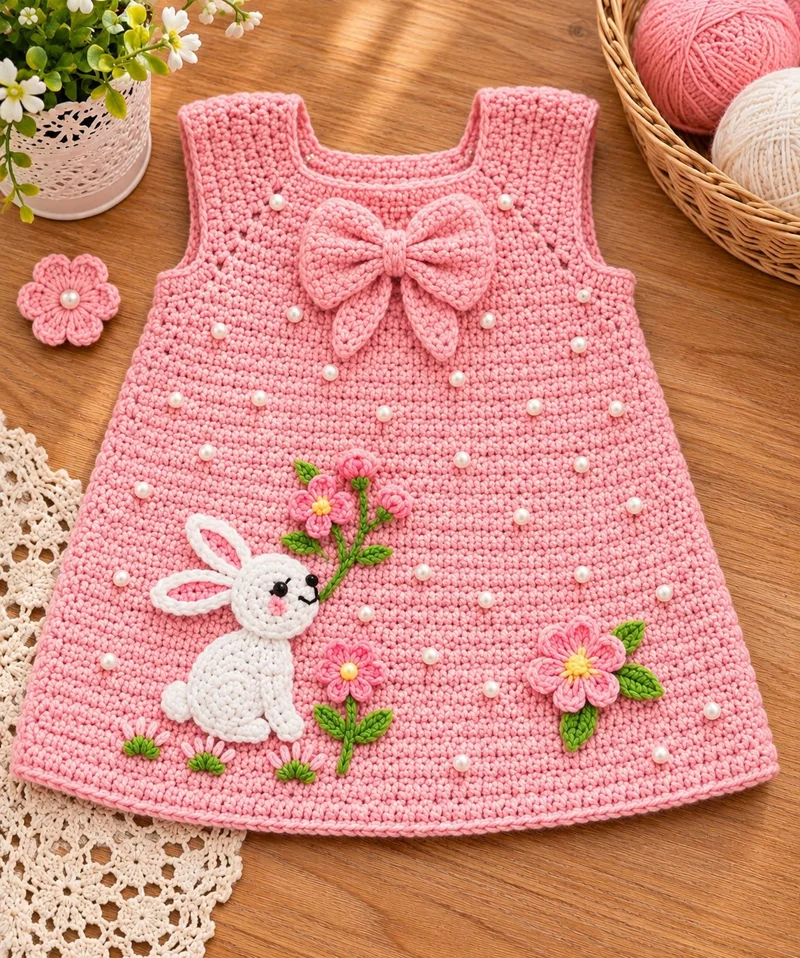
A white rabbit holding pink flowers gives this dress its distinctive lower-front motif. This pink crochet bunny baby dress pattern combines a sleeveless A-line garment, flat bunny appliqué, dimensional flowers, and a large neckline bow. Designed for 12–18 months, it uses DK cotton-blend yarn and a 4 mm hook. The project suits intermediate crocheters and provides a practical way to combine garment construction with decorative crochet techniques.
The Design: What Makes This Bunny Dress Different
The bunny is positioned on the lower-left skirt rather than centered beneath the neckline. This placement preserves the uninterrupted pink bodice and leaves space for separate floral motifs. The bunny crochet appliqué uses flattened circles and elongated ears instead of a stuffed head and body, reducing bulk against the child’s clothing.
The skirt widens through evenly spaced increases. Its gradual flare provides room for movement while maintaining a recognizable pinafore silhouette. A wide square neckline and broad shoulder straps balance the weight of the large bow.
A common mistake in a crochet baby pinafore dress is attaching heavy decorations before checking how the fabric hangs. Concentrated appliqué weight can pull the front panel downward. Lightweight motifs, flat embroidery, and distributed attachment stitches limit that distortion. The original photograph uses pearls; this version substitutes embroidered dots for detachable beads.
Project Info at a Glance
| Detail | Specification |
|---|---|
| Skill level | Intermediate |
| Estimated time | 12–18 hours |
| Age | 12–18 months |
| Finished chest | Approximately 55 cm |
| Finished length | Approximately 34–36 cm |
| Hook | 4 mm for garment; 3 mm for appliqués |
| Yarn | DK cotton or cotton blend |
| Construction | Tube bodice, attached straps, flared skirt |
| Best for | Layered baby or toddler outfit |
Note: These dimensions are design targets, not measurements from a physically tested sample. Check the child’s measurements and make a gauge swatch before starting.
Materials and Tools
Yarn
- Soft pink — DK weight — 200 g allowance — Paintbox Yarns Cotton DK or comparable washable cotton blend.
- White — DK weight — 25 g — Bunny head, body, ears, legs, and tail.
- Medium pink — DK weight — 20 g — Flowers, bow, and cheeks.
- Leaf green — DK weight — 15 g — Leaves and stems.
- Yellow — DK weight — 5 g — Flower centers.
- Black embroidery cotton — small amount — Eyes, nose, and mouth.
These quantities are purchasing estimates rather than measured yarn consumption.
Tools
- 4 mm crochet hook for the dress.
- 3 mm crochet hook for appliqués.
- Tapestry needle for sewing and embroidery.
- Locking stitch markers for round starts.
- Measuring tape for gauge and sizing.
- Scissors for cutting yarn.
- Rustproof pins for positioning motifs.
Child-safety note: Use embroidered eyes and pearl-style stitches instead of plastic safety eyes, detachable beads, or glued decorations. Small components can present choking hazards on baby clothing.
Gauge and Sizing
The working gauge is 16 half-double crochet stitches and 14 rows per 10 × 10 cm, based on a comparable DK baby dress reference.
Make a swatch measuring at least 12 × 12 cm. Wash it according to the yarn label, dry it flat, and measure the central 10 cm. If there are more than 16 stitches, try a larger hook. If there are fewer, try a smaller hook.
At 16 stitches per 10 cm, the 88-stitch bodice circumference calculates to approximately 55 cm. The skirt increases to 136 stitches, giving a theoretical hem circumference of approximately 85 cm.
The finished neckline must also pass comfortably over the child’s head. Adjust the opening or add an appropriately secured back fastening if necessary.
Abbreviations — US Crochet Terms
| Abbreviation | Meaning |
|---|---|
| MR | Magic ring |
| ch | Chain |
| sc | Single crochet |
| hdc | Half double crochet |
| dc | Double crochet |
| tr | Treble crochet |
| inc | Two stitches in one stitch |
| dec | Single crochet two stitches together |
| sl st | Slip stitch |
| BLO | Back loop only |
| st(s) | Stitch(es) |
| FO | Fasten off |
An invisible decrease is worked through the front loops of two adjacent stitches before completing one single crochet.
Pattern conventions: Numbers in parentheses indicate completed stitch counts. Turning chains do not count as stitches. The dress is worked in joined rounds; circular bunny motifs are worked in continuous spirals unless stated otherwise.
Pattern — Step by Step
Part 1: Dress Bodice
Yarn: soft pink. Hook: 4 mm.
The dress begins at the underarm level with a circular foundation. Shoulder straps are added after the tube is complete.
Foundation: Ch 88. Check that the chain is not twisted, then join with a sl st to the first chain.
R1: Ch 1, hdc in each chain, join (88).
R2: Ch 1, hdc around, join (88).
R3: Ch 1, hdc around, join (88).
R4: Ch 1, hdc around, join (88).
R5: Ch 1, hdc around, join (88).
R6: Ch 1, hdc around, join (88).
R7: Ch 1, hdc around, join (88).
R8: Ch 1, hdc around, join (88).
R9: Ch 1, hdc around, join (88).
R10: Ch 1, hdc around, join (88).
R11: Ch 1, hdc around, join (88).
R12: Ch 1, hdc around, join (88).
Fasten off, leaving a 15 cm tail. The bodice measures approximately 8.5–9 cm high at the reference row gauge.
Mark the circumference into two equal sections of 44 stitches: front and back. Place the front center at stitch 22 of its section and the back center at the corresponding opposite point.
Part 2: Shoulder Straps (Make 2)
Yarn: soft pink. Hook: 4 mm.
Each strap is 12 stitches wide. On the front, designate stitches 1–12 as the first strap position and stitches 33–44 as the second. Repeat the same positions on the back.
Row 1: Ch 1, hdc across 12 stitches, turn (12).
Row 2: Ch 1, hdc across, turn (12).
Row 3: Ch 1, hdc across, turn (12).
Row 4: Ch 1, hdc across, turn (12).
Row 5: Ch 1, hdc across, turn (12).
Row 6: Ch 1, hdc across, turn (12).
Row 7: Ch 1, hdc across (12).
Fasten off with a 25 cm tail. Sew the last row to the corresponding 12 back-edge stitches using a flexible seam. Repeat for the second strap.
Fit check: The central neckline opening is nominally 12.5 cm across at gauge, but the completed opening must be tested for head clearance. Widen it or add a properly secured back opening if needed.
Part 3: A-Line Skirt
Yarn: soft pink. Hook: 4 mm.
Attach yarn to the lower edge of the bodice. Work into the 88 foundation stitches. Mark eight evenly spaced shaping points.
R1: Ch 1, hdc around, join (88).
R2: Hdc around, join (88).
R3: Hdc around, join (88).
R4: [10 hdc, 2 hdc in next st] ×8, join (96).
R5: Hdc around, join (96).
R6: Hdc around, join (96).
R7: Hdc around, join (96).
R8: [11 hdc, 2 hdc in next st] ×8, join (104).
R9: Hdc around, join (104).
R10: Hdc around, join (104).
R11: Hdc around, join (104).
R12: [12 hdc, 2 hdc in next st] ×8, join (112).
R13: Hdc around, join (112).
R14: Hdc around, join (112).
R15: Hdc around, join (112).
R16: [13 hdc, 2 hdc in next st] ×8, join (120).
R17: Hdc around, join (120).
R18: Hdc around, join (120).
R19: Hdc around, join (120).
R20: [14 hdc, 2 hdc in next st] ×8, join (128).
R21: Hdc around, join (128).
R22: Hdc around, join (128).
R23: Hdc around, join (128).
R24: [15 hdc, 2 hdc in next st] ×8, join (136).
R25: Hdc around, join (136).
R26: Hdc around, join (136).
R27: Hdc around, join (136).
R28: Hdc around, join (136).
The skirt is approximately 20 cm long at the stated row gauge. Add plain rounds if additional length is needed.
Part 4: Hem Edging
Yarn: soft pink.
R29: Ch 1, sc around, join (136).
R30: Ch 1, sc around, join (136).
Fasten off with a 15 cm tail. Weave the tail into the wrong side, changing direction at least twice.
Part 5: Neckline and Armhole Edging
Yarn: soft pink. Hook: 3 mm.
Work one round of sc around each armhole and the neckline. Place approximately one stitch into each horizontal stitch and adjust spacing along vertical row ends.
At corners, work three sc into a corner stitch where necessary to prevent curling. Join each round with a sl st, fasten off, and weave in the ends.
Bunny Crochet Appliqué
The bunny is made from flat pieces rather than stuffed amigurumi components. Its head and body reach a maximum of 36 stitches before decreasing.
Part 6: Bunny Head (Make 1)
Yarn: white. Hook: 3 mm.
R1: 6 sc in MR (6).
R2: Inc ×6 (12).
R3: [1 sc, inc] ×6 (18).
R4: [2 sc, inc] ×6 (24).
R5: [3 sc, inc] ×6 (30).
R6: [4 sc, inc] ×6 (36).
R7: Sc around (36).
R8: Sc around (36).
R9: Sc around (36).
R10: [4 sc, dec] ×6 (30).
R11: [3 sc, dec] ×6 (24).
R12: [2 sc, dec] ×6 (18).
Fasten off, leaving a 30 cm tail. Do not stuff. Flatten into a rounded oval and block before attaching. The decrease rounds create a slightly cupped shape.
Part 7: Bunny Body (Make 1)
Yarn: white. Hook: 3 mm.
R1: 6 sc in MR (6).
R2: Inc ×6 (12).
R3: [1 sc, inc] ×6 (18).
R4: [2 sc, inc] ×6 (24).
R5: [3 sc, inc] ×6 (30).
R6: [4 sc, inc] ×6 (36).
R7: Sc around (36).
R8: Sc around (36).
R9: Sc around (36).
R10: [4 sc, dec] ×6 (30).
R11: [3 sc, dec] ×6 (24).
R12: [2 sc, dec] ×6 (18).
Fasten off, leaving a 30 cm tail. Flatten into an oval and position beneath the head, leaning slightly backward to create the seated appearance.
Part 8: Bunny Ears (Make 2)
Yarn: white. Hook: 3 mm.
R1: Ch 12; sc in second chain from hook and next 9 chains, 3 sc in last chain; working along the opposite side, sc in next 9 chains and 2 sc in final chain; join (24).
R2: Sc in next 10 stitches, inc in each of next 3 stitches, sc in next 9 stitches, inc in each of final 2 stitches; join (29).
Fasten off with a 20 cm tail. Shape into elongated ovals and embroider a narrow pink line inside each ear. Sew behind the head, angling one ear outward.
Part 9: Bunny Front Legs (Make 2)
Yarn: white. Hook: 3 mm.
Row 1: Ch 7, sc in second chain from hook and across (6).
Row 2: Ch 1, sc across (6).
Row 3: Ch 1, sc across (6).
Fasten off with a 20 cm tail. Fold each piece lengthwise, sew the long edges together, and flatten before attaching.
Part 10: Bunny Back Legs (Make 2)
Yarn: white. Hook: 3 mm.
Row 1: Ch 9, sc in second chain from hook and across (8).
Row 2: Ch 1, sc across (8).
Row 3: Ch 1, sc across (8).
Row 4: Ch 1, sc across (8).
Fasten off with a 20 cm tail. Round the corners slightly while sewing. Position one leg horizontally and the other diagonally beneath the body.
Part 11: Bunny Tail (Make 1)
Yarn: white. Hook: 3 mm.
R1: 6 sc in MR (6).
R2: Inc ×6 (12).
R3: Sc around (12).
R4: [1 sc, dec] ×4 (8).
Fasten off with a 20 cm tail. Flatten without stuffing and attach to the lower-left side of the bunny body.
Part 12: Cheek Patches (Make 2)
Yarn: light pink. Hook: 3 mm.
R1: 6 sc in MR (6).
R2: Inc ×6 (12).
Fasten off with a 15 cm tail. For a less bulky finish, substitute pink satin-stitch embroidery.
Part 13: Bunny Facial Details
Yarn: black and pink embroidery cotton.
Embroider two black eyes approximately 12–15 mm apart, adjusting to the completed head. Add a small inverted triangular nose and two short mouth lines.
Secure every thread on the reverse of the appliqué before sewing the head onto the dress.
Flower and Leaf Appliqués
Part 14: Five-Petal Flowers (Make 3)
Yarn: pink. Hook: 3 mm.
R1: 6 sc in MR (6).
R2: Inc ×6 (12).
R3: [1 sc, inc] ×6 (18).
R4: [2 sc, inc] ×6 (24).
R5: [3 sc, inc] ×6 (30).
R6: [sl st in next st, sc in next st, hdc in next st, 3 dc in next st, hdc in next st, sl st in next st] ×5 (40 worked stitches).
Fasten off with a 25 cm tail. Embroider a compact yellow center. Each petal occupies six base stitches.
Part 15: Green Leaves (Make 8)
Yarn: green. Hook: 3 mm.
R1: Ch 8; sc in second chain from hook, hdc in next chain, dc in next 3 chains, hdc in next chain, 3 sc in last chain; working back along the opposite side, hdc in next chain, dc in next 3 chains, hdc in next chain, sc in final chain; join (15).
Fasten off with a 20 cm tail. Flatten and stitch a central vein along each leaf.
Part 16: Small Embroidered Flowers (Make 3)
Yarn: pink and green embroidery cotton.
Mark five petal positions around a center approximately 8 mm wide. Work five detached-chain stitches in pink, anchoring each petal at the center.
Add three short green satin stitches below each flower to form the calyx. Keep the embroidery flexible.
Part 17: Flower Stems
Yarn: green.
Use surface slip stitches or chain-stitch embroidery to create three stems approximately 4–6 cm long, rising from the bunny’s front paws.
Attach one pink flower near the upper end and two smaller flowers at different heights. Add leaves along the stems and secure the yarn ends on the reverse.
Large Crochet Bow
Part 18: Bow Loops (Make 2)
Yarn: pink. Hook: 3 mm.
Row 1: Ch 17, sc in second chain from hook and across (16).
Row 2: Ch 1, sc across (16).
Row 3: Ch 1, sc across (16).
Row 4: Ch 1, sc across (16).
Row 5: Ch 1, sc across (16).
Row 6: Ch 1, sc across (16).
Row 7: Ch 1, sc across (16).
Row 8: Ch 1, sc across (16).
Row 9: Ch 1, sc across (16).
Row 10: Ch 1, sc across (16).
Row 11: Ch 1, sc across (16).
Row 12: Ch 1, sc across (16).
Fasten off with a 25 cm tail. Fold each rectangle in half, bringing its short edges together. Sew the edges to form a loop and pinch the center.
Part 19: Bow Tails (Make 2)
Yarn: pink. Hook: 3 mm.
Row 1: Ch 9, sc in second chain from hook and across (8).
Row 2: Ch 1, sc across (8).
Rows 3–14: Repeat Row 2 (8 stitches per row).
Fasten off with a 25 cm tail. Fold one end of each tail inward for a pointed appearance and position both beneath the loops.
Part 20: Bow Center Band
Yarn: pink. Hook: 3 mm.
Row 1: Ch 6, sc in second chain from hook and across (5).
Rows 2–8: Ch 1, sc across (5).
Fasten off with a 20 cm tail. Wrap around the pinched loops and upper ends of the tails. Sew the band closed on the reverse.
Position the bow centrally below the neckline.
Decorative Pearl-Style Embroidery
The reference dress contains numerous pearl-style accents. For baby clothing, replace these with securely embroidered white French knots or small satin-stitch circles.
Space the dots approximately 3–5 cm apart over the skirt and upper bodice. Avoid armhole edges where friction is greatest.
Use two or three wraps for each French knot and secure the thread through multiple stitches on the wrong side.
Do not use glued rhinestones, loose pearls, or detachable plastic decorations.
Assembly — 10 Steps
- Complete the dress structure. Join both shoulder straps, finish the skirt hem, and weave in the garment tails.
- Check garment dimensions. Measure chest circumference, shoulder-to-hem length, neckline opening, and armholes against the intended child.
- Position the bunny head and body. Place the bunny on the lower-left front of the skirt, keeping it clear of the hem.
- Finish the bunny’s face. Embroider the eyes, nose, mouth, and cheeks before permanently attaching the head.
- Attach the limbs and ears. Secure both ears behind the head, position the front and back legs, and add the flattened tail.
- Attach the floral stems. Arrange the green stems so they appear to rise from the bunny’s front paws.
- Sew on the flowers and leaves. Distribute the three main flowers and eight leaves without extending motifs beyond the skirt edge.
- Secure the neckline bow. Center it below the square neckline and sew through its center band and the underlying bodice.
- Add embroidered details. Work the small flowers and pearl-style dots without distorting the skirt fabric.
- Finish and inspect. Weave in all ends, wash and dry flat according to the yarn label, and inspect every attachment and opening.
The completed garment consists of a flared crochet dress with a flat bunny motif, floral decorations, and a sewn neckline bow.
7 Technical Tips for Accurate Construction
- Stitch-marker drift: Place a marker at the start of every skirt round and move it after each join. A misplaced marker can shift the eight increase points and create a diagonal flare.
- Stuffing firmness: Do not stuff the bunny head or body. Even 5 g of filling can create an unwanted raised area beneath a garment appliqué.
- Invisible-decrease gaps: Work each invisible decrease through the front loops only. Pulling too tightly can create visible holes or distort the flattened bunny head.
- Eye placement timing: Embroider the eyes before attaching the bunny head. Use a measured 12–15 mm separation as a starting point, then adjust to the actual motif.
- Velvet tension mismatch: Avoid replacing DK cotton with velvet yarn without making a new swatch. The difference in yarn diameter can change the dress circumference and appliqué proportions.
- Pinning distortion: Pin each motif in at least four positions before sewing. If the skirt puckers between pins, reposition the appliqué instead of tightening the thread.
- Tail weaving failure: Leave 15–30 cm sewing tails on separate motifs. Weave each tail through several stitches in two or more directions to reduce the chance of it pulling free.
Washing and Care
Wash the finished dress according to the most delicate yarn used in the project. A washable cotton blend may tolerate gentle machine washing, but the embroidered motifs and large bow benefit from a mesh laundry bag.
Dry the garment flat. Hanging it while wet can stretch the straps and increase the dress length.
Inspect the neckline, armholes, bow attachment, and bunny appliqué before each wear. Repair any loose decorative stitching before the garment is worn again.
Conclusion
This pink crochet bunny baby dress pattern combines a shaped 88-stitch bodice, a gradually widening skirt, and individually sewn decorative motifs. The flat bunny construction keeps the front panel relatively light, while the separate flowers and leaves allow the layout to be adjusted after the garment is finished. Before using the dress, confirm the neckline opening, check the fit, and inspect every sewn attachment. For the next project, make a matching headband using one of the five-petal flowers. Share the completed dress on Pinterest or Instagram using #PinkBunnyCrochetDress and include the finished measurements. Would you position the bunny on the lower-left skirt, as photographed, or move it toward the center?
Pattern note: This is an original, photo-inspired design. Stitch-count arithmetic has been reviewed, but the full garment has not been physically crocheted or fit-tested. Finished dimensions, yarn consumption, and fit should be confirmed with a sample before publication as a tested pattern.









