Introduction
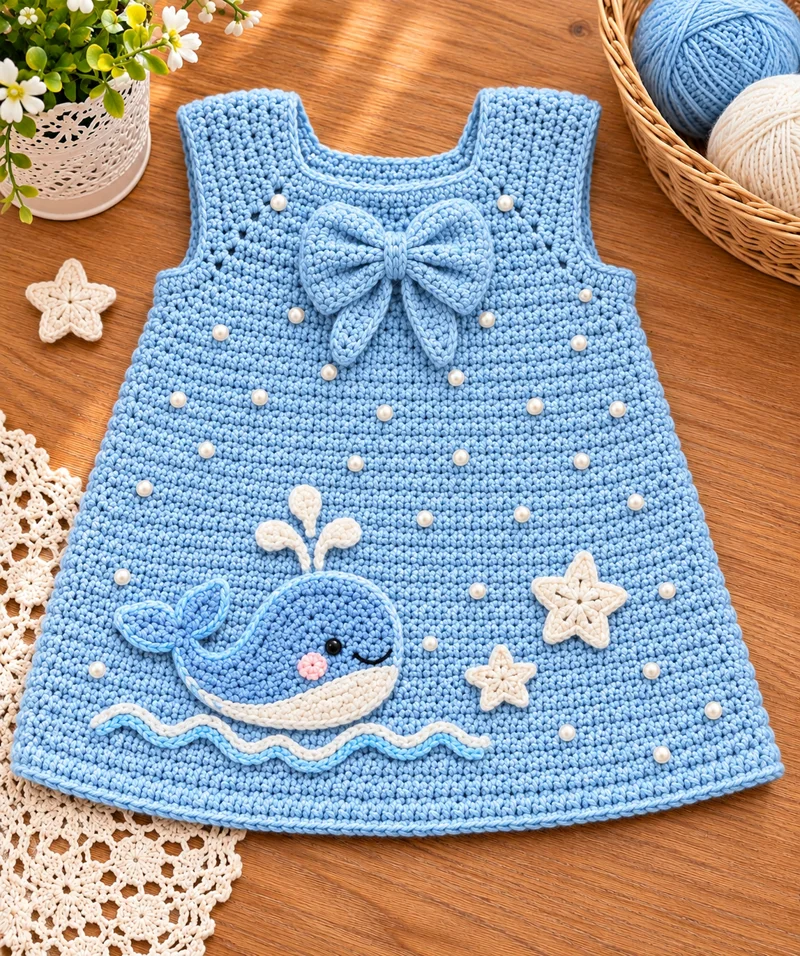
A whale needs a broad, curved body and a raised tail to remain recognizable against a blue crocheted skirt. This sky blue whale crochet baby dress pattern combines a sleeveless A-line garment with an ocean-themed appliqué, starfish, waves, and a large bow. Designed as an intermediate-level project for approximately 6–12 months, it uses DK cotton and a 4 mm hook. The separate decorations allow easier positioning before final attachment.
The Design: What Makes This Whale Baby Dress Different
Three construction decisions define this ocean-themed baby dress.
First, the skirt expands gradually from the chest toward the hem. Instead of attaching a heavily gathered skirt, the panels gain width through paired increases. This creates a controlled A-line silhouette and provides a flat surface for the crochet whale appliqué.
Second, the whale is worked as a flat motif rather than a stuffed toy. Its rounded body, separate tail flukes, cream belly, and embroidered water spout give the character a recognizable outline without adding unnecessary bulk.
Third, the oversized bow sits below the neckline, leaving the armholes unobstructed. The crochet starfish pattern adds smaller shapes near the hem to balance the whale.
A frequent mistake is positioning appliqués before checking garment stretch. Decorations must be pinned while the dress lies at its intended finished dimensions.
Project Info at a Glance
| Feature | Specification |
|---|---|
| Skill level | Intermediate |
| Estimated time | 12–18 hours, untested |
| Intended size | 6–12 months |
| Target chest | 50 cm |
| Target length | 34 cm |
| Hook | 4 mm |
| Yarn | DK cotton or cotton blend |
| Construction | Two bottom-up panels |
| Terminology | US crochet terms |
Important: This original pattern is a prototype based on the reference photograph. The stitch counts have been checked mathematically, but the garment has not been sample-crocheted or fit-tested. The measurements are targets rather than verified finished dimensions.
Materials and Tools
Yarn
- Sky blue DK cotton – 180 g: Main dress, bow, whale body, tail, and wave details. Suggested yarn: Paintbox Yarns Cotton DK or a similar washable cotton.
- Cream white DK cotton – 20 g: Whale belly, starfish, water spout, and embroidered waves.
- Light pink DK cotton – 2 g: Small whale cheek flower.
- Black embroidery cotton – small length: Whale eye and smiling mouth.
These quantities are purchasing estimates rather than measured yarn consumption. Keep additional blue yarn available until all edging and attachments are complete.
Tools
- 4 mm crochet hook
- 3.5 mm crochet hook for firmer appliqués if needed
- Tapestry needle for seams and embroidery
- Stitch markers for shaping
- Measuring tape
- Scissors and blocking pins
- Washable fabric marker for motif placement
Baby garment safety: Use securely anchored embroidery for the whale eye and pearl-style beads. Do not use loose beads, detachable decorations, long cords, or other small parts that could become choking hazards.
Gauge and Size Preparation
The target gauge is 18 half double crochet stitches and 14 rows per 10 × 10 cm, measured after washing and drying a swatch.
Make a swatch at least 15 × 15 cm using the main yarn and 4 mm hook. Measure the central 10 cm, away from the edges.
If 20 stitches occupy 10 cm instead of 18, the dress will finish too narrow. Try a larger hook and repeat the swatch. If only 16 stitches occupy the same distance, try a smaller hook.
The pattern uses 45 stitches across each upper panel, giving a calculated width of 25 cm per panel. Two panels produce the target 50 cm chest circumference before seam take-up.
The lower panels contain 57 stitches each, producing an estimated hem circumference of approximately 63 cm.
These measurements are calculated from the proposed gauge. Physical testing remains necessary before using the dress as a fitted baby garment.
Crochet Abbreviations
| Abbreviation | Meaning |
|---|---|
| MR | Magic ring |
| ch | Chain |
| sc | Single crochet |
| hdc | Half double crochet |
| dc | Double crochet |
| inc | Two stitches in one stitch |
| dec | Single crochet two together |
| hdc2tog | Half double crochet decrease |
| sl st | Slip stitch |
| BLO | Back loop only |
| st / sts | Stitch / stitches |
| RS / WS | Right side / wrong side |
| FO | Fasten off |
For an invisible single crochet decrease, insert the hook through the front loops of the next two stitches, yarn over, draw through both loops, then complete one single crochet.
Pattern convention: Turning chains do not count as stitches unless specifically stated. The dress uses turned rows, while the flat decorations use rows or joined rounds. Each count refers to completed stitches.
Pattern – Step by Step
1. Main Dress Front Panel (Make 1)
Yarn: Sky blue. Construction: bottom-up, turned rows.
The front begins at the wide hem and narrows toward the chest. The decreases are distributed symmetrically so the center remains available for the whale appliqué.
Foundation: Ch 58.
R1: Hdc in second ch from hook and in every remaining ch. (57)
R2–R4: Ch 1, turn, hdc across. (57 each row)
R5: Ch 1, turn, hdc in first 2 sts, hdc2tog, hdc in next 49 sts, hdc2tog, hdc in last 2 sts. (55)
R6–R8: Hdc across. (55 each row)
R9: Hdc in first 2 sts, hdc2tog, hdc in next 47 sts, hdc2tog, hdc in last 2 sts. (53)
R10–R12: Hdc across. (53 each row)
R13: Hdc in first 2 sts, hdc2tog, hdc in next 45 sts, hdc2tog, hdc in last 2 sts. (51)
R14–R16: Hdc across. (51 each row)
R17: Hdc in first 2 sts, hdc2tog, hdc in next 43 sts, hdc2tog, hdc in last 2 sts. (49)
R18–R20: Hdc across. (49 each row)
R21: Hdc in first 2 sts, hdc2tog, hdc in next 41 sts, hdc2tog, hdc in last 2 sts. (47)
R22–R24: Hdc across. (47 each row)
R25: Hdc in first 2 sts, hdc2tog, hdc in next 39 sts, hdc2tog, hdc in last 2 sts. (45)
R26–R34: Hdc across. (45 each row)
At the end of R34, the panel should measure approximately 24 cm in height at the target row gauge. The next section shapes the upper armholes.
2. Front Armholes and Shoulder Straps
Yarn: Sky blue.
R35: Ch 1, turn, sl st into the first 4 sts, ch 1, hdc in the next 37 sts, leaving the last 4 sts unworked. (37)
R36–R42: Ch 1, turn, hdc across. (37 each row)
The shoulder sections are worked separately, leaving 19 center stitches unworked for the neckline.
Left Shoulder
R43: Hdc in first 9 sts, turn. (9)
R44–R47: Ch 1, hdc across, turn. (9 each row)
Fasten off, leaving a 25 cm sewing tail.
Right Shoulder
Rejoin yarn at the opposite outer edge of R42, with the work oriented so the stitches can be worked toward the neckline.
R43: Hdc in first 9 sts. (9)
R44–R47: Ch 1, turn, hdc across. (9 each row)
Fasten off, leaving a 25 cm tail.
The upper center 19 stitches form the neckline opening. Do not crochet across them.
3. Back Dress Panel (Make 1)
Yarn: Sky blue.
Repeat the complete front panel instructions, including R1–R47 and both shoulder sections.
This creates a matching front and back with equal neckline depth. It is a simplified pinafore construction rather than the higher back neckline often used in fitted dresses.
Check that both panels have identical row counts before joining. A difference of even two rows can distort the side seam or produce uneven shoulders.
Lay the panels with right sides facing. Join the shoulder straps with a mattress seam or whipstitch, then sew the side seams from the hem to the beginning of the armhole shaping.
Leave both armholes and the neckline open.
Fit checkpoint: The neckline must pass comfortably over the intended wearer’s head without excessive stretching. If it does not, modify the shoulder construction to include a secure, flat opening before the garment is worn.
4. Neckline and Armhole Edging
Yarn: Sky blue.
Work a continuous round of sc around the neckline, placing extra stitches at corners only where needed to prevent pulling. Join with a sl st and fasten off.
Repeat around each armhole. The stitch total depends on the number of stitches picked up along row ends; keep the edging flat and symmetrical.
For a firmer finish, work a second round of sc around the neckline. Avoid tightening the opening, particularly where the shoulder seams meet the front and back panels.
5. Bottom Hem Edging
Yarn: Sky blue.
Join yarn at one side seam along the bottom edge.
Round 1: Work one sc into each foundation stitch around the hem, approximately 114 sts before adjustment for seams. Join with sl st.
Round 2: Ch 1, work one reverse sc (crab stitch) into each stitch around, or substitute an ordinary sc round for a simpler edge.
Fasten off and weave in the tail. The border should lie flat rather than curl toward the inside of the skirt.
6. Whale Body Appliqué (Make 1)
Yarn: Sky blue. Worked flat in rows.
The whale in the reference photograph has a broad oval body and a slightly raised upper outline. The following motif uses symmetrical increases and decreases to create a compact, rounded shape.
Foundation: Ch 7.
R1: Sc in second ch from hook and across. (6)
R2: Ch 1, turn, inc, sc in next 4 sts, inc. (8)
R3: Inc, sc in next 6 sts, inc. (10)
R4: Inc, sc in next 8 sts, inc. (12)
R5: Inc, sc in next 10 sts, inc. (14)
R6: Inc, sc in next 12 sts, inc. (16)
R7: Inc, sc in next 14 sts, inc. (18)
R8–R11: Sc across. (18 each row)
R12: Dec, sc in next 14 sts, dec. (16)
R13: Dec, sc in next 12 sts, dec. (14)
R14: Dec, sc in next 10 sts, dec. (12)
R15: Dec, sc in next 8 sts, dec. (10)
R16: Dec, sc in next 6 sts, dec. (8)
R17: Dec, sc in next 4 sts, dec. (6)
Fasten off, leaving a 30 cm sewing tail.
Work one round of sc around the outer edge, adding stitches sparingly around curved ends. This edging smooths the stepped outline created by the decreases.
The body is not stuffed. Press or block it flat before attaching the tail and belly.
7. Whale Tail Flukes (Make 2)
Yarn: Sky blue.
Each fluke is a small rounded shape sewn to one end of the whale body.
Foundation: Ch 3.
R1: Sc in second ch from hook and next ch. (2)
R2: Ch 1, turn, inc in both sts. (4)
R3: Inc, sc in next 2 sts, inc. (6)
R4–R5: Sc across. (6 each row)
R6: Dec, sc in next 2 sts, dec. (4)
R7: Dec twice. (2)
Fasten off, leaving a 20 cm sewing tail.
Attach the two flukes at slightly different angles to form the split whale tail. The wider ends face outward, while the narrow ends meet at the body.
8. Cream Whale Belly (Make 1)
Yarn: Cream white.
The belly is a shallow curved strip positioned along the lower third of the whale.
Foundation: Ch 15.
R1: Sc in second ch from hook and across. (14)
R2: Ch 1, turn, inc, sc in next 12 sts, inc. (16)
R3: Sc across. (16)
R4: Dec, sc in next 12 sts, dec. (14)
Fasten off, leaving a 25 cm tail.
Position the strip along the lower curve of the whale. Ease the fabric gently into an arc while stitching it in place. Do not stretch the strip into a straight horizontal line.
9. Whale Face and Water Spout
Yarn: Black embroidery cotton, pink DK cotton, cream DK cotton.
Eye: Embroider one filled black oval approximately 4–5 mm across on the visible side of the whale. Secure the thread ends on the wrong side of the appliqué before attaching it to the dress.
Smile: Use backstitch to form a shallow upward curve approximately 2 cm long. Keep the stitches short enough that fingers cannot catch underneath them.
Pink cheek flower: Make an MR, ch 1, work 6 sc into the ring, and join with sl st. (6) Fasten off. Stitch a small cream center into the flower, then attach it below the eye.
Water spout: Embroider three upward stems in cream yarn. Add three teardrop-shaped loops at their ends, anchoring every loop securely so no free strands remain.
The face should be completed before the whale body is sewn to the dress.
10. Crochet Starfish (Make 2)
Yarn: Cream white. Worked in joined rounds.
The photograph includes two five-pointed starfish in different sizes. The larger one sits toward the right side of the skirt, with a smaller one closer to the whale.
R1: Make an MR, work 10 sc into the ring, join with sl st. (10)
R2: Repeat five times: sl st in next st, ch 5, sc in second ch from hook, hdc in next ch, dc in next ch, hdc in last ch, sl st in next base st. (5 points, 20 stitches worked along the chains, plus anchoring slip stitches)
Fasten off, leaving a 25 cm tail.
For the second, smaller starfish, use ch 4 for each point, followed by sc, hdc, and sc back along the chain. Each point has 3 worked stitches.
Pin both motifs flat. Add a few cream embroidery stitches from the center toward the tips to suggest the raised ridges visible in the photograph.
11. Oversized Crochet Bow
Yarn: Sky blue.
The bow is made from a rectangular central piece and two tapered ribbon ends.
Main Bow Rectangle
Foundation: Ch 25.
R1: Sc in second ch from hook and across. (24)
R2–R12: Ch 1, turn, sc across. (24 each row)
Fasten off, leaving a 30 cm tail.
Fold the rectangle lengthwise into a layered bow shape. Pinch its center firmly, keeping the two sides approximately equal.
Bow Center Wrap
Foundation: Ch 7.
R1: Sc in second ch from hook and across. (6)
R2–R5: Ch 1, turn, sc across. (6 each row)
Fasten off. Wrap this strip around the pinched center and stitch it closed on the back.
Ribbon Ends (Make 2)
Foundation: Ch 9.
R1: Sc in second ch from hook and across. (8)
R2–R7: Ch 1, turn, sc across. (8 each row)
R8: Dec, sc in next 4 sts, dec. (6)
R9: Sc across. (6)
Fasten off, leaving a 20 cm tail.
Attach the two ribbon ends behind the bow center, pointing downward and outward. Sew the bow flat against the upper front of the dress, below the neckline.
12. Ocean Wave Embroidery
Yarn: Cream white and sky blue.
The reference dress has two parallel wave lines underneath the whale.
Mark a gently undulating line across the lower front panel, leaving at least 2 cm between the line and the hem edging.
Work the first wave in cream using surface slip stitches or short chain-stitch embroidery. Make a second line approximately 5 mm below the first in blue.
Keep the wave amplitude near 1 cm and avoid pulling the fabric tight. A wave that is too heavily tensioned will gather the skirt and distort its A-line shape.
13. Embroidered Pearl-Effect Dots
Yarn: Cream white.
The reference photograph shows scattered round pearls over the blue fabric. For baby clothing, replace them with embroidered dots rather than loose beads.
Mark approximately 20–30 positions across the front, leaving the area behind the whale and bow clear. Work a small French knot or several tightly secured satin stitches at each mark.
Keep each dot approximately 3–4 mm across. Anchor every dot individually on the reverse, with no long floating yarn between positions.
Test the embroidery by gently pulling the fabric around each dot. None should loosen or protrude as a detachable element.
Assembly – 10 Steps
- Join the shoulders. Place the front and back panels together with right sides facing. Sew the matching nine-stitch shoulder straps, checking that both shoulder seams are the same length.
- Close the side seams. Join the panels from the hem to the beginning of the armhole shaping. Leave the shaped upper openings free.
- Finish the neckline. Crochet the neckline border and check that the opening remains suitable for dressing.
- Finish the armholes and hem. Work the edging rounds, then check that both armholes are even and the hem lies flat.
- Prepare the whale face. Embroider the eye, smile, cheek flower, and water spout on the whale appliqué before attachment.
- Attach the whale body. Position it on the lower front, slightly left of center. Pin the edges and sew around the perimeter without stretching the skirt.
- Add the whale tail and belly. Secure the two flukes and cream belly, keeping all edges flat against the main appliqué.
- Position the starfish and waves. Place the larger starfish to the right of the whale and the smaller one between the whale and the larger motif. Embroider the wave lines underneath.
- Attach the bow and decorative dots. Center the bow below the neckline and sew it at multiple points. Add the embroidered pearl-effect dots in the remaining open spaces.
- Complete finishing checks. Weave in all yarn tails, inspect the seams, wash according to the yarn label, and dry the dress flat. Check garment dimensions and attachment strength before use.
The completed garment consists of two shaped dress panels, a flat whale motif, two starfish, a bow, wave embroidery, and stitched decorative dots.
7 Technical Tips for Better Results
- Stitch marker placement: Place markers two stitches from each side of the skirt panel before decrease rows. Misplacing a decrease by three or more stitches can make the skirt flare unevenly.
- Gauge variation: A difference of two hdc stitches per 10 cm changes the calculated chest circumference substantially. Wash and dry the swatch before selecting the hook size.
- Invisible decreases: Use invisible sc decreases on the whale where the front loops are accessible. Ordinary decreases can leave visible gaps along the rounded body edge.
- Eye placement: Finish the embroidered eye before attaching the whale to the dress. An eye placed too close to the outer edge can disappear beneath the perimeter stitching.
- Cotton tension: Maintain consistent tension across the 57-stitch starting rows. A tighter foundation chain can cause the lower hem to pull inward even when the skirt decreases are correct.
- Pinning appliqués: Pin the whale at a minimum of six points around its perimeter before sewing. Attaching one side without securing the opposite edge can produce a diagonal tilt.
- Tail weaving and attachment strength: Weave yarn ends through several stitches and reverse direction before trimming. Check that no appliqué corner, embroidered dot, or bow section can be pulled free.
Common Pattern Adjustments
How to Make the Dress Longer
Add plain hdc rows to the lower skirt section before the first decrease row. At the proposed gauge, seven additional rows add approximately 5 cm.
Both panels must receive the same number of additional rows. Move the whale and starfish upward or downward after checking the new proportions.
How to Increase the Chest Width
Do not simply add stitches to the neckline or shoulder straps. A larger chest requires corresponding changes to the upper panel width, armhole shaping, and neckline distribution.
For a larger size, make a fresh gauge swatch and calculate the required number of stitches from the intended finished chest circumference. Draft and test the revised upper body before adding decorative motifs.
How to Make the Whale Smaller
Use a thinner yarn and proportionally smaller hook for the whale body, tail, and belly. Keep the dress itself in DK cotton.
This preserves the shape of the appliqué without changing the garment measurements.
How to Clean the Finished Dress
Use the care instructions for the least washable yarn or component. For washable cotton, a cool gentle wash and flat drying are often suitable, but check the selected yarn label.
Inspect all embroidered decorations after washing. Do not use the garment if any attachment becomes loose.
Conclusion
This sky blue whale crochet baby dress pattern combines a gradually shaped skirt with separate ocean decorations that can be positioned after the garment is assembled. The dress uses basic half double crochet construction, while the whale, starfish, and bow require additional shaping and finishing.
Before making a wearable version, crochet a gauge swatch, check the chest and neckline measurements, and test the strength of every decorative attachment. The next step is to make one complete sample and record the finished dimensions after washing.
Save the project to Pinterest or share the finished sample on Instagram using #SkyBlueWhaleDress.
Would you position the whale’s tail higher than its head, as shown in the reference, or keep both level?









