Introduction
A wide-brimmed sun hat covered with raised blue flowers needs a stable crown before its decorative petals can be attached. This floral crochet sun hat pattern combines cream DK cotton, a 3.5 mm hook, and layered mustard-and-blue appliqués in an adult-size design targeting a 54–56 cm head circumference. The intermediate-level project separates the crown, brim, and flowers so you can adjust the fit before adding the heavier decorative elements.
The Design: What Makes This Floral Sun Hat Different
The first structural decision is the rounded crown. Unlike a flat-topped bucket hat, this cotton crochet sun hat uses progressive increases to create a shallow dome before transitioning into straight sides. The shape follows the head without producing a sharp corner at the crown.
Second, the wide brim expands gradually. A sudden increase can produce excessive rippling, particularly when multiple flower motifs are attached near the outer edge. Distributed increases give the brim a more controlled flare.
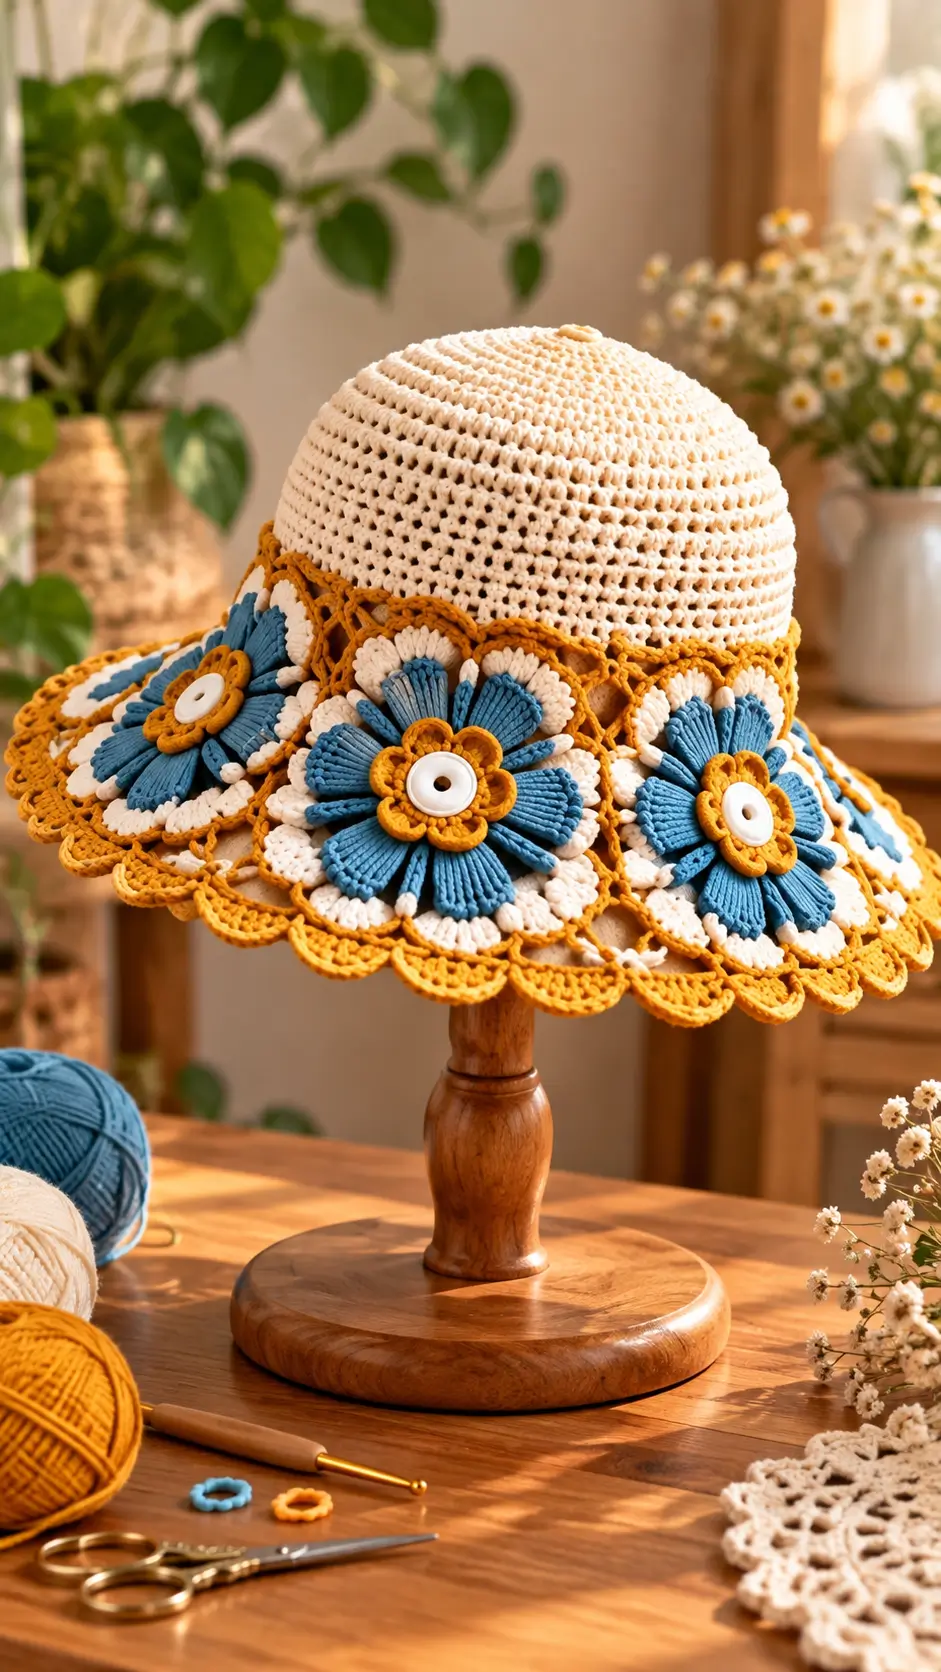
Third, the dimensional flower appliqués are made separately. Each flower combines a cream backing, raised blue petals, mustard edging, and a contrasting center. The separate construction allows the maker to arrange the motifs before stitching them permanently.
A common mistake in a crochet flower sun hat is attaching heavy flowers before checking the brim’s shape. The added weight can pull the edge downward and distort its scallops.
Project Info at a Glance
| Project Detail | Specification |
|---|---|
| Skill Level | Intermediate |
| Estimated Time | 12–18 hours (estimate) |
| Finished Size | Target fit: 54–56 cm |
| Hook | 3.5 mm |
| Yarn | DK cotton or cotton blend |
| Construction | Top-down crown, expanding brim, separate appliqués |
| Best For | Decorative summer wear and handmade accessories |
A published adult sun hat from Yarnspirations uses DK-weight Bernat Softee Cotton with a 3.5 mm hook. Those specifications provide a practical starting point, although the floral construction below has different yarn requirements.
Materials and Tools
Yarn
Select a smooth cotton yarn with clear stitch definition. Mercerized cotton produces crisp petals, while a softer cotton blend creates a more flexible hat.
- Cream or warm ivory — DK cotton — approximately 110–140 g — suggested: Paintbox cotton DK or similar.
- Dusty denim blue — DK cotton — approximately 35–50 g — for raised petals.
- Mustard yellow — DK cotton — approximately 30–45 g — for flower centers, decorative connections, and scallops.
- White — DK cotton — approximately 15–25 g — for flower backings and center details.
These are purchasing estimates for the photo-inspired design, not quantities established by a completed sample. Yarn consumption depends on gauge, petal size, and the number of appliqués.
Tools
- 3.5 mm crochet hook for the crown, sides, and brim.
- 3.0 mm crochet hook for tighter flower centers, optional.
- Stitch markers for round beginnings and increase positions.
- Tapestry needle for sewing and weaving ends.
- Measuring tape for head circumference, crown diameter, and brim width.
- Small scissors for cutting yarn.
- Rust-resistant decorative buttons for flower centers, optional.
- Millinery wire or suitable brim support if the finished brim needs reinforcement.
- Blocking pins and mat for shaping the decorative edge.
Stuffing and safety eyes are not required because the project is a wearable hat rather than a stuffed figure.
Abbreviations
| Abbreviation | Meaning |
|---|---|
| MR | Magic ring |
| sc | Single crochet |
| inc | Two single crochets in one stitch |
| dec | Single crochet decrease |
| sl st | Slip stitch |
| ch | Chain |
| BLO | Back loop only |
| hdc | Half double crochet |
| dc | Double crochet |
| tr | Treble crochet |
| st(s) | Stitch(es) |
| sp | Space |
| rep | Repeat |
An invisible decrease is made by catching the front loops of two adjacent stitches before completing one single crochet, reducing visible bulk.
All terminology follows US crochet conventions.
Gauge and Sizing
Gauge is the controlling measurement for a wearable crochet hat. A stitch count alone does not determine circumference.
For this draft, use a working target of 17.5 single crochet stitches per 10 cm in the round. At that gauge, 96 stitches measure approximately 54.9 cm around the fabric.
Make a circular or tubular gauge sample using the chosen yarn and hook. Measure without stretching.
The crown should approach approximately 17.5 cm in diameter before the sides are completed. If the circle is significantly smaller, use a larger hook or adjust the crown stitch count. If it is larger, reduce the hook size or the final increase rounds.
The proposed 96-stitch circumference is a design calculation, not a tested universal adult size. The fit must be checked against the intended wearer’s measurements.
Pattern — Step by Step
The main hat is crocheted from the top down in continuous spiral rounds. Use a marker to identify the first stitch of every round.
The decorative flowers and scalloped border are worked separately or in joined rounds as indicated.
Crown (Make 1)
Yarn: Cream — Original six-increase crown draft using standard crochet circle mathematics.
R1: 6 sc in MR (6)
R2: inc ×6 (12)
R3: (1 sc, inc) ×6 (18)
R4: (2 sc, inc) ×6 (24)
R5: (3 sc, inc) ×6 (30)
R6: (4 sc, inc) ×6 (36)
R7: (5 sc, inc) ×6 (42)
R8: (6 sc, inc) ×6 (48)
R9: (7 sc, inc) ×6 (54)
R10: (8 sc, inc) ×6 (60)
R11: (9 sc, inc) ×6 (66)
R12: (10 sc, inc) ×6 (72)
R13: (11 sc, inc) ×6 (78)
R14: (12 sc, inc) ×6 (84)
R15: (13 sc, inc) ×6 (90)
R16: (14 sc, inc) ×6 (96)
R17: sc in each stitch (96)
R18: sc in each stitch (96)
R19: sc in each stitch (96)
R20: sc in each stitch (96)
Measure the crown and check its curvature. The increase sequence produces 96 stitches, but the finished diameter depends on stitch height and yarn tension.
Do not fasten off. Continue directly into the sides.
Openwork Hat Sides (Make 1)
Yarn: Cream — Original mesh adaptation.
For each mesh round, work (sc, ch 1, skip 1 stitch) around. Each repeat occupies two base positions, giving 48 sc and 48 chain spaces.
R21: (sc, ch 1, skip 1) ×48 (96 positions)
R22: sc in every sc and chain space (96)
R23: (sc, ch 1, skip 1) ×48 (96 positions)
R24: sc in every sc and chain space (96)
R25: (sc, ch 1, skip 1) ×48 (96 positions)
R26: sc in every sc and chain space (96)
R27: (sc, ch 1, skip 1) ×48 (96 positions)
R28: sc in every sc and chain space (96)
R29: (sc, ch 1, skip 1) ×48 (96 positions)
R30: sc in every sc and chain space (96)
R31: sc in each stitch (96)
R32: sc in each stitch (96)
The alternating mesh creates ventilation while retaining a continuous foundation for the brim.
Measure the vertical depth before proceeding. Add or omit a pair of mesh rounds if needed, keeping the final circumference at 96 stitches.
Wide Brim (Make 1)
Yarn: Cream — Original progressive increase draft.
R33: (7 sc, inc) ×12 (108)
R34: sc around (108)
R35: (8 sc, inc) ×12 (120)
R36: sc around (120)
R37: (9 sc, inc) ×12 (132)
R38: sc around (132)
R39: (10 sc, inc) ×12 (144)
R40: sc around (144)
R41: (11 sc, inc) ×12 (156)
R42: sc around (156)
R43: (12 sc, inc) ×12 (168)
R44: sc around (168)
R45: (13 sc, inc) ×12 (180)
R46: sc around (180)
R47: (14 sc, inc) ×12 (192)
R48: sc around (192)
R49: sc around (192)
R50: sc around (192)
R51: sc around (192)
R52: sc around (192)
Fasten off, leaving a 15 cm tail.
The brim increases by 12 stitches on each increase round. This is appropriate for a broad flare but is not guaranteed to lie flat at every gauge.
If the fabric begins to form excessive waves, omit an increase round and replace it with an even round. If the brim pulls upward, an additional increase round may be required.
Mustard Scalloped Brim Border (Make 1)
Yarn: Mustard — Original 24-scallop edging.
Attach the mustard yarn to any stitch along the brim.
R1: sc around (192)
R2: (sc in next stitch, skip 3 stitches, 7 dc in next stitch, skip 3 stitches) ×24 (192 worked stitches)
R3: Work one sl st into the base of the first scallop, then fasten off.
Each scallop consumes eight foundation stitches. The seven double crochets create a rounded fan between anchoring single crochets.
The edging may need a smaller hook to prevent loose, uneven arches. Test a short section before completing all 24 scallops.
Leave a 15 cm yarn tail for weaving.
Cream Flower Backings (Make 5)
Yarn: White or cream — Original circular motif.
R1: 6 sc in MR (6)
R2: inc ×6 (12)
R3: (sc, inc) ×6 (18)
R4: (2 sc, inc) ×6 (24)
R5: (3 sc, inc) ×6 (30)
R6: (4 sc, inc) ×6 (36)
R7: (5 sc, inc) ×6 (42)
R8: (6 sc, inc) ×6 (48)
R9: (7 sc, inc) ×6 (54)
R10: (8 sc, inc) ×6 (60)
R11: sc around (60)
Fasten off, leaving a 25 cm sewing tail.
These backing circles form the structural bases for the dimensional flowers. They also distribute the weight of the raised petals over a larger area of the brim.
Blue Raised Flower Petals (Make 30)
Yarn: Dusty blue — Original individual-petal construction.
Each flower uses six blue petals.
R1: 6 sc in MR (6)
R2: inc ×6 (12)
R3: (sc, inc) ×6 (18)
R4: sc around (18)
R5: sc around (18)
R6: sc around (18)
R7: (sc, dec) ×6 (12)
R8: sc around (12)
Flatten the piece without stuffing.
Fasten off, leaving a 20 cm sewing tail.
The flattened petal should form a short oval. Stitch the closed end toward the flower center and spread the wider end outward.
Arrange six petals around each cream backing. Slightly overlap their bases so the center remains covered.
Mustard Flower Centers (Make 5)
Yarn: Mustard — Original small center motif.
R1: 6 sc in MR (6)
R2: inc ×6 (12)
R3: (sc, inc) ×6 (18)
R4: sc around (18)
Fasten off, leaving a 20 cm sewing tail.
Place the mustard center over the inner ends of the blue petals.
For a closer resemblance to the photograph, add a second ring of small decorative mustard loops around the center.
Make six loops by attaching yarn around the center and repeating (sl st, ch 4, sl st into the same base position) at evenly spaced attachment points.
These loops are decorative and are not included in the center’s 18-stitch count.
White Center Discs (Make 5)
Yarn: White — Original flat-circle detail.
R1: 6 sc in MR (6)
R2: inc ×6 (12)
R3: (sc, inc) ×6 (18)
Fasten off, leaving a 15 cm tail.
Sew one white disc to each mustard center. A small decorative button may be substituted if the hat is intended for an adult and the button is attached securely.
Do not use detachable buttons on accessories intended for infants or very young children.
Mustard Decorative Lattice (Optional)
Yarn: Mustard — Original openwork connecting detail.
The photograph includes mustard-colored openwork between the larger flowers.
A simplified version can be made using chain loops attached around the lower crown.
Work one foundation round of single crochet around the crown-to-brim transition. Attach the mustard yarn and create repeated chain-5 loops, anchoring each loop approximately six stitches apart.
On the following round, work one single crochet into each loop with five chains between attachment points.
The chain spaces should remain relaxed enough to follow the hat’s circumference without tightening the lower crown.
This lattice is decorative, not load-bearing. The flowers must be attached independently to the brim.
Assembly
- Check the crown. Place the completed hat on a suitable hat form or measure it against the intended wearer’s head circumference. Correct any significant sizing error before adding decorations.
- Shape the brim. Lay the hat on a flat surface and distribute the scallops evenly around the circumference. Check for excessive curling or irregular waves.
- Prepare the flower backings. Block the five cream circles lightly and allow them to dry completely before assembly.
- Arrange the blue petals. Position six flattened petals on each cream backing, overlapping their narrow ends toward the center.
- Sew the flower centers. Attach the mustard centers over the petal bases, then stitch the white discs or secure decorative buttons.
- Position the first flower. Place one complete flower at the front center of the brim, with its outer petals remaining clear of the scalloped edge.
- Arrange the remaining flowers. Space the other four motifs around the brim, adjusting their overlap and angle to match the reference photograph.
- Attach the flowers. Sew through the backing circles and brim stitches rather than through only the raised petals. Keep the stitching concealed on the underside.
- Add the lattice and optional support. Sew the mustard openwork between motifs if desired. Add suitable brim reinforcement if the decorated edge droops excessively.
- Finish and inspect. Weave in every yarn tail, check button attachments, and lightly block the finished brim without flattening the raised petals.
The completed hat consists of a cream crown, expanding scalloped brim, and five separately constructed floral motifs.
7 Technical Tips for a Better Result
- Stitch marker placement: Moving the round marker one stitch early can misalign the crown increases. Count the completed stitches at every increase round and reposition the marker only after finishing the final stitch.
- Crown gauge: A 96-stitch circumference at 17.5 stitches per 10 cm measures approximately 54.9 cm. If the actual measurement differs by more than 2 cm, adjust the hook or stitch count before working the brim.
- Brim rippling: Excess increases can produce pronounced waves before the decorative edging is attached. Spread the brim flat after every second increase round and replace an increase round with an even round if needed.
- Petal firmness: Stuffing the blue petals creates excessive thickness and makes them difficult to arrange. Flatten each petal completely before attaching its narrow end to the cream backing.
- Flower placement: Sewing motifs directly to an unsupported outer edge can cause the brim to sag. Position the flower centers inward from the scallops and pin all five motifs before stitching.
- Button attachment: A single loose thread can allow a flower-center button to detach. Use multiple secure passes of suitable sewing thread and inspect the attachment before wearing.
- Tail weaving: Short yarn tails may work loose when the hat is folded or handled. Leave approximately 15–25 cm for sewing and weave the remaining length through several stitches in different directions.
Care and Maintenance
Cotton crochet hats should be cleaned according to the yarn manufacturer’s washing instructions. Decorative buttons, millinery wire, and other non-yarn components may require hand washing.
Avoid wringing the brim, especially when large flower appliqués have been attached. Press excess moisture out using a towel and reshape the hat on a form of the correct circumference.
Allow the brim to dry with its scallops arranged evenly. The flower petals should be lifted individually so they retain their raised appearance.
Store the finished hat on a stand or in a container large enough to prevent the brim from being crushed. If the hat includes support wire, avoid folding it sharply.
Openwork crochet does not provide a verified ultraviolet protection rating. Wear appropriate sun protection in addition to the hat when spending time outdoors.
Conclusion
The finished design combines a fitted cream crown, an expanding scalloped brim, and five layered blue flowers with mustard centers. Before making another version, record the actual gauge, crown diameter, brim width, and total yarn consumption. Those measurements will make subsequent size adjustments more accurate.
Save this floral crochet sun hat pattern to a Pinterest crochet board, and share a photograph of the completed hat on Instagram using #FloralCrochetSunHat. For the next sample, consider testing a narrower brim or smaller floral appliqués to reduce the weight at the outer edge.
Would six smaller blue flowers distribute the decorative weight more evenly than the five oversized motifs shown here?