Introduction
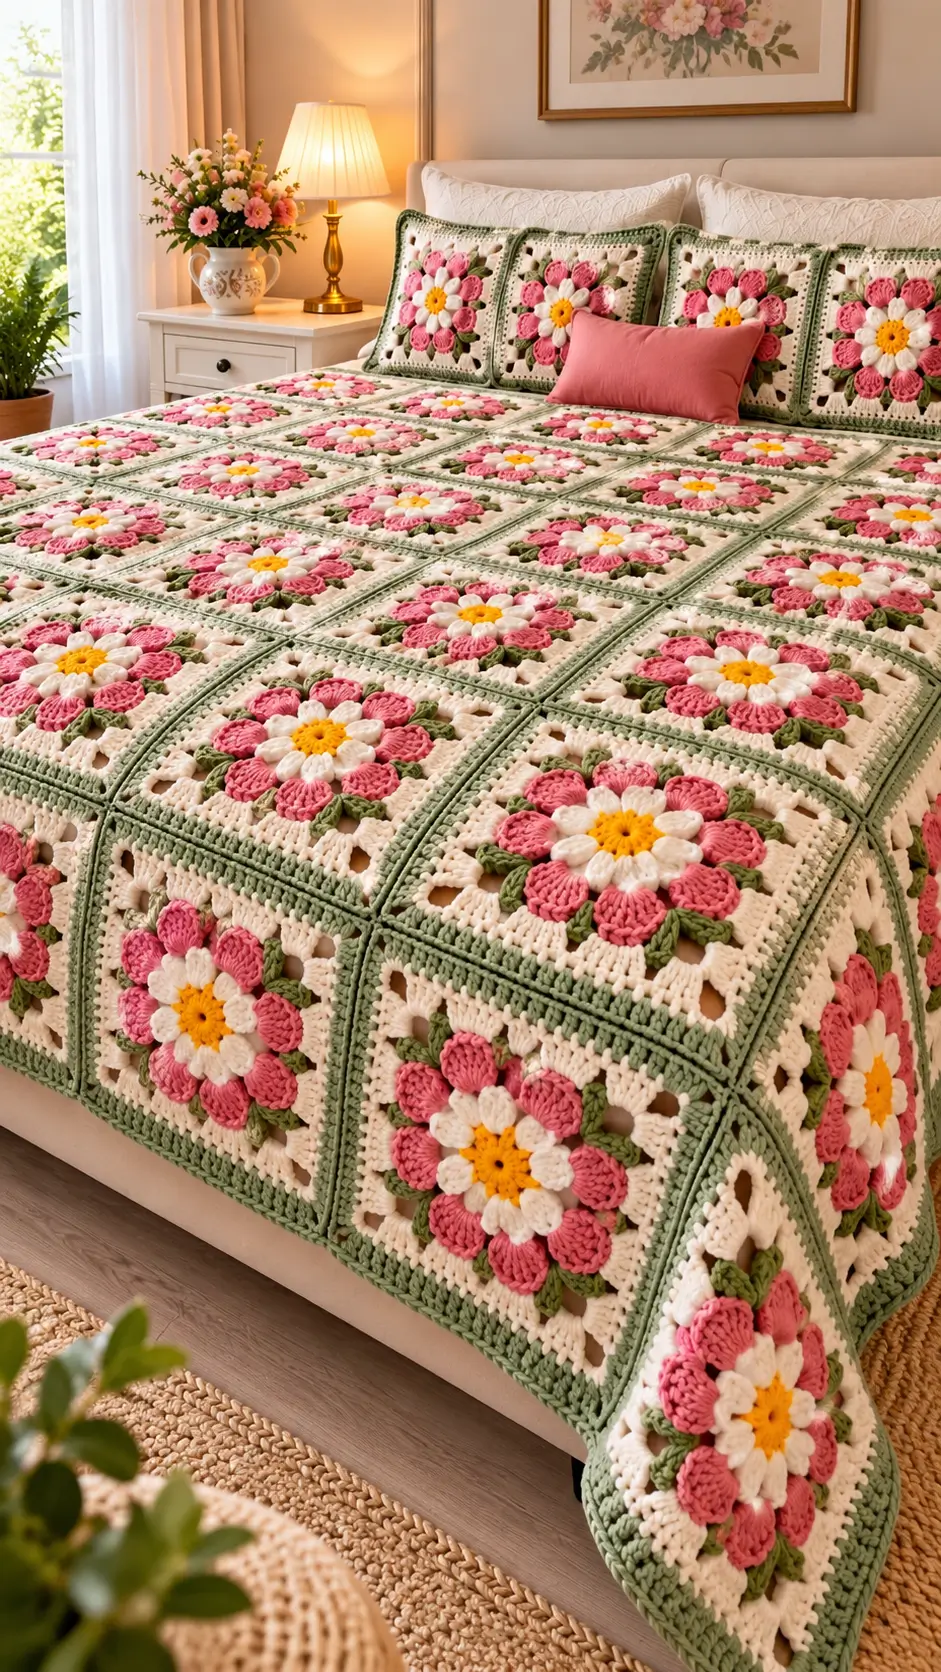
A daisy’s yellow center, white inner petals, and pink outer petals create three distinct layers that must remain visible after the square is joined. This crochet daisy granny square blanket pattern uses raised floral motifs, cream openwork-inspired backgrounds, and sage green borders to reproduce the structure shown in the reference photograph. Designed for intermediate crocheters, the project uses worsted-weight yarn and a provisional 4.5 mm hook. Its modular construction allows you to adjust the bedspread to your mattress.
The Design: What Makes This Floral Blanket Different
The defining feature is a layered flower rather than a flat daisy appliqué. A compact yellow center supports raised white petals, while larger dusty-pink petals form a second ring. Olive-green stitches between the petals suggest leaves and provide a transition into the cream square background.
The cream sections in the reference image include decorative openings near the corners, giving each motif a framed appearance. Sage-green borders separate adjacent flowers and create a visible grid across the finished bedspread.
For a 3D flower granny square, the flower must sit above the background without pulling the corners inward. Excessive tension around the petal bases can distort the square, especially when the crochet floral bedspread contains dozens of repeated motifs. The construction below uses a consistent outer-round method and separate joining seams to control distortion.
Project Information at a Glance
| Feature | Details |
|---|---|
| Skill Level | Intermediate |
| Estimated Time | 45–75 minutes per square |
| Sample Square Size | Target 15 × 15 cm after blocking |
| Example Blanket Size | 150 × 210 cm before outer edging |
| Crochet Hook | 4.5 mm starting size |
| Yarn Weight | Medium / Worsted #4 |
| Construction | Joined floral granny squares |
| Best For | Bedspreads, throws, and matching cushions |
Note: Measurements are design targets rather than exact dimensions taken from the photograph. This is an original, reference-inspired pattern that has not yet been physically crochet-tested. Make one complete sample before beginning the full blanket.
Materials and Tools
Yarn Colors
- Cream – Worsted #4: Square backgrounds and framing.
- Sage Green – Worsted #4: Square borders, joining seams, and outer edging.
- Dusty Pink – Worsted #4: Raised outer flower petals.
- White – Worsted #4: Inner daisy petals.
- Golden Yellow – Worsted #4: Flower centers.
- Olive Green – Worsted #4: Decorative leaves.
Choose yarns with similar fiber content, thickness, and washing instructions. Cotton blends or acrylic worsted-weight yarns are suitable starting options. Mixing substantially different yarn weights can produce uneven squares and distorted joins.
How Much Yarn Will You Need?
The example bedspread uses 140 granny squares arranged in 10 columns and 14 rows. Exact yarn quantities depend on your gauge, flower construction, joining method, and border width.
Make one complete square and weigh the amount of each color used. Multiply those measurements by the total number of squares, then allow approximately 10–15% additional yarn for swatching and variation. Measure joining and outer edging yarn separately.
Tools
- 4.5 mm crochet hook, adjusted after swatching
- Tapestry needle for sewing and weaving ends
- Stitch markers for corners and side midpoints
- Scissors
- Measuring tape
- Digital kitchen scale
- Blocking mats and rust-resistant pins
Crochet Abbreviations
This pattern uses US crochet terminology.
| Abbreviation | Meaning |
|---|---|
| MR | Magic Ring |
| ch | Chain |
| sc | Single Crochet |
| hdc | Half Double Crochet |
| dc | Double Crochet |
| tr | Treble Crochet |
| sl st | Slip Stitch |
| inc | Increase |
| dec | Decrease |
| BLO | Back Loop Only |
| st | Stitch |
| sp | Space |
| rep | Repeat |
| RS | Right Side |
| WS | Wrong Side |
An invisible decrease is worked through the front loops of two adjacent stitches, although this technique is not needed for the flat-square construction.
Crochet Daisy Granny Square Pattern – Step by Step
The flower and cream foundation are worked separately. The dimensional flower is then attached to the front of the square, and the completed squares are joined into the blanket.
Part 1: Golden Yellow Flower Center
Yarn: Golden yellow
Quantity: One center per square
R1: Work 6 sc into MR. Join with sl st. (6)
R2: Ch 1, inc in each stitch around. Join. (12)
R3: Ch 1, (1 sc, inc) × 6. Join. (18)
R4: Ch 1, (2 sc, inc) × 6. Join. (24)
Fasten off and weave the yarn end into the wrong side of the center.
The yellow circle forms the foundation for the white petals. Keep the center flat. If the circle begins to cup upward, check the tension and consider increasing the hook size slightly.
Part 2: Raised White Daisy Petals
Yarn: White
Quantity: 12 petals per flower
Each white petal is worked into two consecutive stitches of the 24-stitch yellow center.
Join white yarn to any stitch of Round 4.
Petal Repeat: Ch 3, work 3 dc into the next stitch, ch 3, sl st into the following stitch.
Repeat this sequence 12 times around the yellow center, using two foundation stitches per petal.
Fasten off after completing the final petal.
The flower should now have a yellow center surrounded by 12 raised white petal groups. Check their spacing before weaving in the remaining yarn ends.
These petals are decorative and do not form the structural edge of the granny square.
Part 3: Dusty Pink Outer Petals
Yarn: Dusty pink
Quantity: Make 8 separate petals per flower
The pink petals create a larger outer ring around the white daisy. Each petal is worked separately and attached beneath the inner flower.
R1: Ch 7. Beginning in the second chain from the hook, work sc, hdc, 2 dc, hdc, sc. (6)
R2: Ch 1 and turn. Work sc, hdc, 2 dc, hdc, sc. (6)
R3: Ch 1 and turn. Work sc, hdc, 2 dc, hdc, sc. (6)
Fasten off, leaving a 20 cm sewing tail.
Repeat until eight pink petals are complete.
Arrange the petals in a circular formation behind the white flower. Their outer edges should extend beyond the white petals, producing a visible second floral layer.
Sew the petal bases together on the wrong side. Use small stitches that do not show through the front surface.
Check the spacing before permanently securing the petals. Uneven placement can make the finished flower appear asymmetrical when mounted onto the square.
Part 4: Olive Green Leaves
Yarn: Olive green
Quantity: Make 4 leaves per square
R1: Ch 7. Beginning in the second chain from the hook, work sc, hdc, 2 dc, hdc, sc. (6)
Fasten off, leaving a 15 cm sewing tail.
Position the leaves between the pink petals at four evenly spaced points around the flower.
The leaf tips should extend slightly beyond the pink petals without covering the cream background excessively.
For a fuller floral arrangement, add two optional leaves in opposite diagonal positions. Use the same number and placement of leaves on every square to maintain visual consistency.
Part 5: Cream Granny Square Foundation
Yarn: Cream
Quantity: One foundation per flower
The cream foundation supports the dimensional flower and forms the structural body of each granny square.
R1: Make MR. Ch 3 (counts as dc), work 11 dc into the ring. Join with sl st to the top of the beginning ch 3. (12 dc)
R2: Ch 3 (counts as dc), dc in the same stitch, then 2 dc in each remaining stitch. Join. (24 dc)
R3: Ch 3 (counts as dc), dc in each of the next 2 stitches, ch 2. (Dc in each of the next 6 stitches, ch 2) three times. Dc in each of the last 3 stitches. Join. (24 dc and four ch-2 spaces)
R4: Sl st to the nearest corner space. Ch 3, (dc, ch 2, 2 dc) in the same corner. Work dc in each stitch along the next side, then (2 dc, ch 2, 2 dc) in the next corner space. Repeat around, omitting the already-worked first corner on the final repeat. Join.
R5: Work dc in each side stitch and (2 dc, ch 2, 2 dc) in each corner space. Join.
R6: Repeat the same square-increase method, adding four dc at every corner and one dc in each side stitch.
R7: Repeat R6.
R8: Repeat R6.
Check the width of the foundation after Round 8. Add additional square rounds if necessary to reach the desired blocked size.
The photographed blanket features more decorative openwork than this foundation. The instructions here produce a more solid background, which is easier to use as a base for separately sewn flowers. Test any decorative chain-space substitutions on one sample square before repeating them throughout the blanket.
Part 6: Sage Green Square Border
Yarn: Sage green
Join sage-green yarn in any corner ch-2 space of the cream foundation.
Border R1: Ch 1. Work (sc, ch 2, sc) into the corner. Work one sc in each stitch along the side. Repeat the corner treatment at all four corners. Join with sl st.
Border R2: Work one sc in every sc along each side, placing (sc, ch 2, sc) into each corner ch-2 space. Join and fasten off.
Block the square to the selected dimensions, using the same measurements for every motif.
Position the layered flower at the center of the cream foundation. Attach the flower by sewing through the pink petal bases and the underlying cream stitches.
Keep the sewing stitches small and avoid pulling the flower tightly against the background. The raised petals should retain their dimensional appearance.
Part 7: Joining the Granny Squares
The reference bedspread has a clearly defined sage-green grid between the floral motifs. A visible single-crochet joining method can create a similar effect.
Place two squares with wrong sides together, aligning their corners and side stitches.
Join sage-green yarn at one corner and work single crochet stitches through corresponding edge stitches of both squares.
Continue across the entire side, matching stitches carefully.
Do not add extra stitches to compensate for uneven edges. If the stitch counts differ, inspect and correct the squares before joining them.
Connect individual squares into complete horizontal rows first. Then join the rows together using the same technique.
Check the alignment of every intersection. Consistent seams create the grid effect that defines the blanket’s overall appearance.
Part 8: Outer Blanket Border
Yarn: Sage green
Once all granny squares have been joined, attach sage-green yarn at an outer corner.
R1: Ch 1. Work sc evenly around the entire blanket perimeter, placing 3 sc at each outer corner. Join.
R2: Ch 1. Work sc in every stitch, placing 3 sc in the middle corner stitch at each corner. Join.
R3: Repeat R2 for a firmer finished edge.
Fasten off and weave in the remaining yarn tail.
Keep the outer border relatively narrow so the raised flower motifs remain the dominant visual feature.
Blanket Size and Granny Square Layout
The number of squares required depends on the blocked size of each motif, mattress dimensions, and desired overhang.
The following examples assume that each joined square contributes approximately 15 cm to the finished blanket, excluding the outer border.
| Blanket Type | Layout | Total Squares | Approximate Size |
|---|---|---|---|
| Baby Blanket | 6 × 8 | 48 | 90 × 120 cm |
| Small Throw | 8 × 10 | 80 | 120 × 150 cm |
| Large Throw | 9 × 12 | 108 | 135 × 180 cm |
| Bedspread | 10 × 14 | 140 | 150 × 210 cm |
| Large Bedspread | 12 × 15 | 180 | 180 × 225 cm |
These are calculated dimensions. Actual measurements will vary with gauge, joining seams, blocking, and outer edging.
For a bedspread that hangs over the mattress edges, measure the mattress width and add the desired drop on both sides. Divide the result by your finished square width to estimate the required number of columns.
Repeat the calculation for the mattress length, including any desired drop at the foot of the bed.
Matching Crochet Daisy Pillow Covers
The reference photograph includes coordinating pillow covers with the same raised flowers, cream backgrounds, and sage-green borders.
For a decorative cushion, make a front panel using a 3 × 3 arrangement of floral granny squares.
If each square measures 15 cm after joining, the resulting panel will measure approximately 45 × 45 cm before seam adjustments.
Create a back panel using plain cream granny squares or a separate crocheted rectangle.
Place the front and back panels together and join three sides using single crochet or a sewn seam.
Insert the cushion pad, then close the final edge. A button closure or overlapping envelope-style back can be used if the cover needs to be removable.
Keep raised flower motifs on the front panel only. A flatter back reduces bulk when the cushion rests against a headboard.
Using the same flower colors and border treatment on both the blanket and pillow covers produces a coordinated bedding set.
Assembly Instructions
- Complete one sample flower using the yellow center, white petals, pink petals, and olive-green leaves.
- Crochet a cream foundation square and add its sage-green border.
- Attach the flower to the center of the foundation and inspect the proportions.
- Block the finished sample and record its exact width and height.
- Weigh the yarn used for each color and calculate the full project requirements.
- Crochet the required number of identical flower squares.
- Arrange all completed squares on a flat surface according to the selected blanket layout.
- Join adjacent squares into horizontal rows using sage-green yarn.
- Connect the rows, checking that the corners and seams remain aligned.
- Add the outer border, weave in all yarn ends, and block the completed bedspread.
The completed project consists of joined floral motifs with a continuous outer border.
7 Technical Tips for Better Results
- Control square dimensions. A difference of only 3 mm between motifs can accumulate across a row of 12 squares. Block every completed square against the same measuring template before joining.
- Check flower placement. An off-center flower makes the surrounding cream background appear uneven. Mark the center of the foundation before sewing the pink petal bases into position.
- Prevent petal curling. Tight stitches along the petal edges can cause the pink petals to roll inward. Test a hook 0.5 mm larger for the petal layer if curling occurs.
- Match joining stitches. Unequal stitch counts on adjacent square edges create puckered seams. Count the border stitches and mark the midpoint of each side before joining.
- Avoid excessive seam tension. Tight single-crochet joins can shorten the finished blanket. Compare a joined pair against two unjoined squares before assembling an entire row.
- Secure yarn ends. Short tails can work loose during repeated washing. Leave at least 15 cm for weaving, reverse direction through the wrong-side stitches, and trim only after securing the ends.
- Measure before adding the outer border. A narrow edging cannot correct a blanket that is substantially too small. Check the assembled width against the mattress and planned side drop before starting the final border.
Care and Washing Instructions
Large floral crochet blankets require careful handling because raised petals, joining seams, and decorative leaves can catch during washing.
Follow the care instructions for the selected yarn. If the yarn is machine washable, use a gentle cycle and place smaller items in a laundry bag. Large bedspreads may require a machine with sufficient capacity to avoid excessive stretching.
Use cool water and avoid aggressive spinning when the blanket contains delicate raised flower elements.
Dry the blanket flat when possible, supporting its full weight to prevent the joined squares from stretching.
Reshape the corners and borders while the fabric is damp. Do not hang a heavy wet bedspread from a narrow line, since the weight can distort the stitches and seams.
Conclusion
This crochet daisy granny square blanket pattern combines layered flowers, cream square foundations, olive-green leaves, and sage-green joining seams into a modular floral bedspread. Its size can be adjusted by changing the number of squares rather than modifying the central flower design. Before purchasing yarn for the complete project, make and block one sample, confirm the measurements, and calculate yarn consumption by color. The reference-inspired instructions have not yet been physically tested, so the sample stage is important.
Save the finished layout to Pinterest or share your completed blanket on Instagram using #DaisyGrannySquareBlanket.
Would you keep the dusty-pink outer petals from the original design, or choose another flower color?








