Introduction
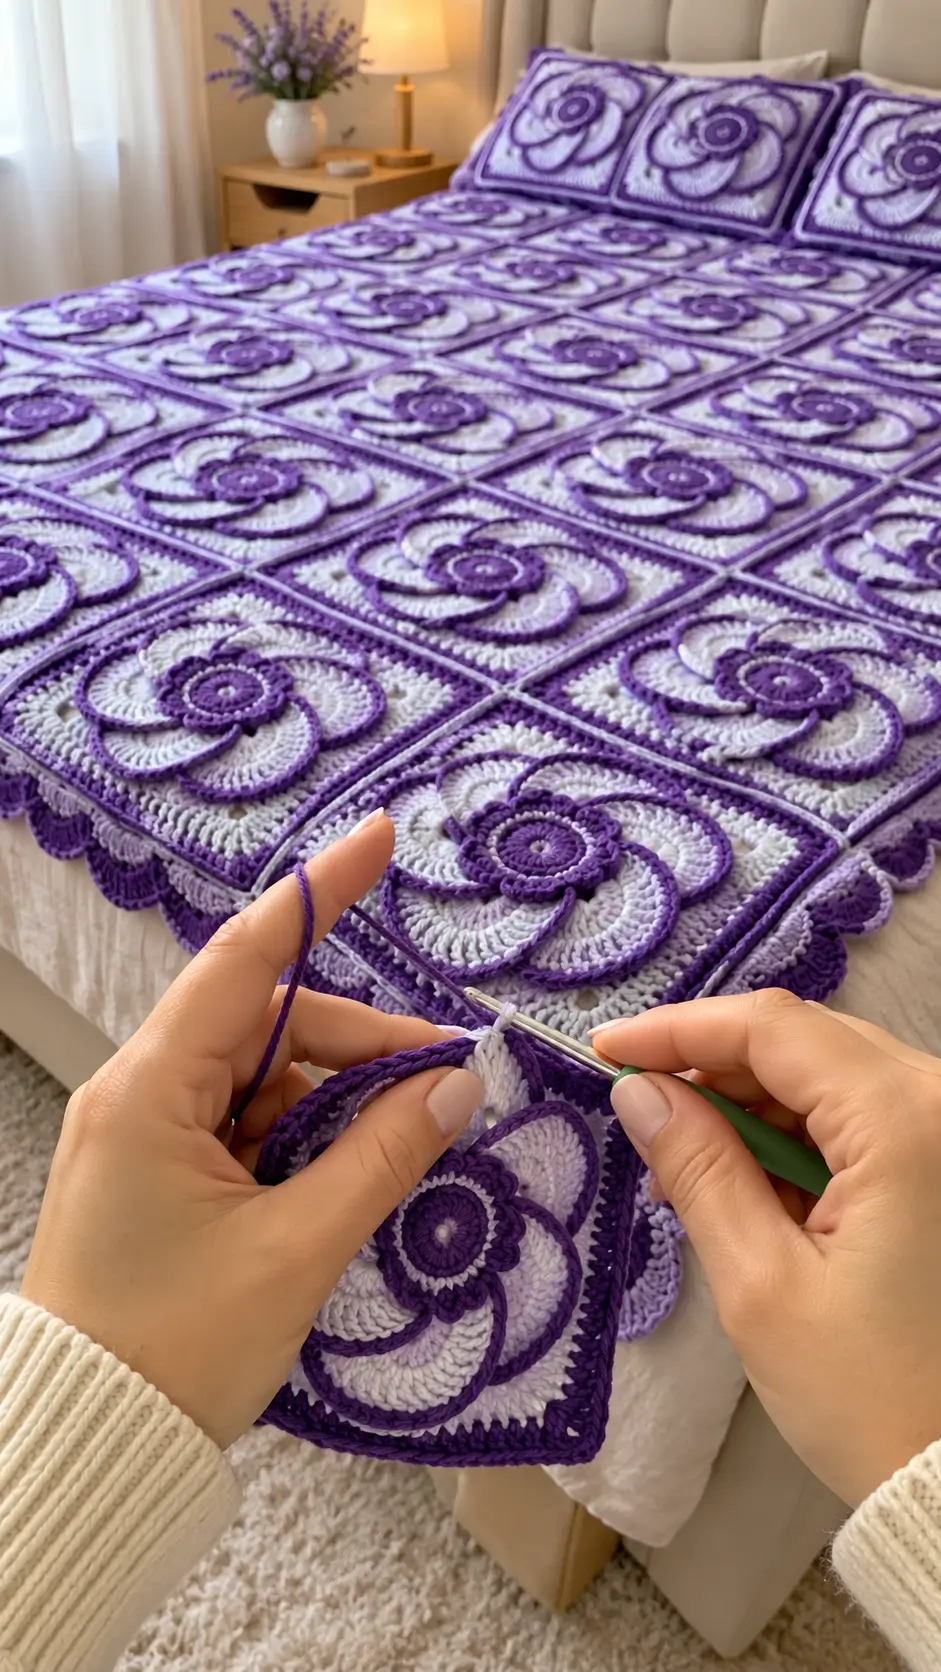
Five oversized petals must spiral around this flower without pulling its four square corners inward. This purple 3D flower granny square crochet bedspread pattern uses ivory, lavender and deep purple yarn to build a raised pinwheel flower over a stable square background. Worked in worsted-weight yarn with a 5.0 mm hook, each photo-inspired block targets approximately 18–20 cm after blocking and is intended for intermediate crocheters.
The Design: What Makes the Pinwheel Flower Different
The flower is deliberately larger than an ordinary granny-square center. A compact purple ring anchors five broad ivory petals, while lavender under-petals add depth and deep-purple edging separates each curved section. The surrounding square remains comparatively flat. That distinction matters because the joining seam should carry the weight of the bedspread rather than the raised petals.
Five petals also create a technical problem: five-fold symmetry has to transition into four square corners. Instead of forcing each petal to correspond with a corner, this construction creates a separate foundation behind the flower and establishes the four corners there. The common failure mode is attaching the square directly to the petal tips, which can distort both the spiral and the outer frame.
Project Info at a Glance
| Skill Level | Construction | Target Square | Hook | Best For |
|---|---|---|---|---|
| Intermediate | Raised 5-petal flower over structural square | 18–20 cm | 5.0 mm | Bedspreads, blankets and pillow shams |
Materials and Tools
Yarn
- Deep purple — worsted #4 — flower center, petal edging and square frame
- Lavender — worsted #4 — inner petals and background
- Warm ivory — worsted #4 — large petals and background highlights
Use yarns from the same range so the three colors have similar thickness and elasticity. Make and weigh one finished square before calculating quantities for a full bedspread.
Tools
- 5.0 mm crochet hook
- Worsted #4 yarn
- Yarn needle
- Scissors
- Locking stitch markers
- Tape measure
- Blocking mats
- Rust-resistant pins
- Digital scale for yarn calculations
Abbreviations
- MR — magic ring
- ch — chain
- sl st — slip stitch
- sc — single crochet
- hdc — half double crochet
- dc — double crochet
- tr — treble crochet
- dtr — double treble crochet
- FLO — front loop only
- BLO — back loop only
- sp — space
- st/sts — stitch/stitches
- FO — fasten off
Pattern — Step by Step
This is an original photo-inspired construction rather than a transcription of a published pattern. Crochet one complete master block first. Adjust only the final framing rounds if necessary to reach the target measurement.
Deep Purple Flower Center
With deep purple, make a MR.
R1: Ch 1, work 10 sc into MR. Join with sl st. (10)
R2: Ch 1, work 2 sc in each stitch around. Join. (20)
R3: Ch 1, sc in every stitch around. Join. (20)
Do not fasten off yet.
Decorative Center Ridge
Work this round in the FLO only.
R4: Sl st loosely in each FLO around. (20 sl sts)
FO deep purple.
The unused back loops remain accessible for the next structural layer.
Lavender Inner Petal Foundation
Join lavender into any unused BLO from R3.
Work:
*sc in next 4 BLO, ch 5*
five times around.
Join to the first sc.
You now have 5 ch-5 petal spaces.
Lavender Inner Petals
Into each ch-5 space work:
(sc, hdc, 3 dc, hdc, sc).
Repeat in all five spaces.
Join and FO.
These petals form the smaller colored layer visible between the center and the large ivory sections.
Large Ivory Petal Foundation
Turn the flower so the reverse is visible.
Join ivory around the base between two lavender petals.
Work:
*ch 12, sl st around the next petal-base junction*
five times.
Join.
There should be 5 large ch-12 loops behind the lavender petals.
Large Ivory Petals — First Pass
Work around the first ch-12 loop:
2 sc, 2 hdc, 3 dc, 4 tr, 3 dc, 2 hdc, 2 sc.
Repeat the same sequence around each remaining loop.
Join.
FO ivory.
Each petal should curve outward without folding sharply at its base.
Purple Petal Outline
Join deep purple at the base of the first large ivory petal.
Work sc evenly around the complete outside edge of the petal.
At the broadest point work:
(sc, ch 1, sc).
Continue down the opposite side.
Sl st into the junction between petals.
Repeat around all five petals.
FO.
Keep the outline relaxed. A tight purple edging will make the ivory petals curl into tubes.
Creating the Pinwheel Direction
Lay the flower face up.
Move the right edge of each large petal slightly over the base of the next petal.
Using ivory or matching sewing yarn, make one small securing stitch approximately 1.5–2 cm from each petal base.
Repeat in the same direction around all five petals.
Do not sew the outer half of the petals down.
This controlled overlap produces the rotating pinwheel effect while leaving the petal tips raised.
Structural Foundation Behind the Flower
Turn the motif over.
Join lavender around one petal-base junction.
Work:
*ch 7, sc around the next petal-base junction*
five times.
Join.
This foundation belongs to the square, not to the visible petal edges.
Background Round 1
Into each ch-7 space work:
(3 dc, ch 2, 3 dc).
Ch 1 between sections.
Repeat around.
Join.
The result remains roughly circular at this stage.
Transition from Five Sections to Four Corners
Place the flower face up.
Mark four evenly spaced positions around the background foundation. Ignore the exact positions of the five petals when placing these markers.
The four markers define the square.
Move a marker by one stitch if necessary to make opposite sides contain equal stitch counts.
Squaring Round 1
Continue in lavender.
Work dc evenly across the first side.
At the first marked corner work:
(2 dc, ch 2, 2 dc).
Repeat across all four sides, keeping the stitch count identical on opposite sides.
Join.
Lay the block flat before continuing.
Squaring Round 2
Ch 1.
Sc in every stitch across each side.
At every corner ch-2 space work:
(2 sc, ch 2, 2 sc).
Join.
Ivory Background Round
Change to warm ivory.
Ch 3.
Dc in every stitch across the first side.
At each corner work:
(2 dc, ch 2, 2 dc).
Continue around.
Join.
Ivory Openwork Round
Ch 1.
Sc in the first stitch.
Across each side repeat:
ch 2, skip 1 st, sc in next st.
At each corner work:
(sc, ch 3, sc).
Join.
Lavender Frame Round
Change to lavender.
Work 2 hdc into each ch-2 side space.
Work one hdc into each intervening sc.
At each corner ch-3 space work:
(2 hdc, ch 2, 2 hdc).
Join.
Deep Purple Definition Round
Change to deep purple.
Ch 1.
Sc in every stitch around.
At each corner work:
(sc, ch 2, sc).
Join.
This narrow line creates the dark frame visible between neighboring squares.
Final Lavender Joining Round
Change to lavender.
Ch 2.
Hdc in every stitch.
At each corner work:
(2 hdc, ch 2, 2 hdc).
Join.
Final Ivory Joining Edge
Change to ivory.
Ch 1.
Sc in every stitch.
At each corner work:
(sc, ch 2, sc).
Join and FO.
The outermost round should remain flat because this is the working edge used for assembly.
Target Square Size
Block the finished motif to approximately 18–20 cm square.
Comparable published 3D flower squares vary considerably with yarn and hook choice: examples range from approximately 16 cm with worsted yarn and a 5 mm hook to much larger 30 cm floral blocks with heavier framing. The target here is therefore a project specification rather than a copied published size.
If your block finishes below 18 cm, add another hdc framing round followed by a final sc round.
Repeat exactly the same extra rounds on every motif.
Blocking the Master Square
Pin the four corners first.
Measure all four sides.
Then measure both diagonals.
Keep the difference between the two diagonals within approximately 5 mm.
Shape the background square before arranging the flower.
Do not pin the large petals flat.
Controlling the 3D Flower
The large ivory petals should rise approximately 1.5–2.5 cm above the background when the square lies flat.
If the flower rises much higher, reduce the overlap between neighboring petals.
If it appears completely flat, increase the overlap slightly near the petal bases rather than folding the tips.
Making the Remaining Squares
Keep the blocked master motif beside your workspace.
Compare every fifth square with it.
Check three measurements:
- Outside width
- Outside height
- Flower diameter
A square can have correct outside dimensions while its flower is noticeably smaller because of tighter petal tension.
Bedspread Layout
For a blocked square measuring 19 cm, approximate motif-field dimensions are:
| Grid | Squares | Approximate Size Before Border |
|---|---|---|
| 5 × 6 | 30 | 95 × 114 cm |
| 6 × 8 | 48 | 114 × 152 cm |
| 8 × 10 | 80 | 152 × 190 cm |
| 9 × 11 | 99 | 171 × 209 cm |
| 10 × 12 | 120 | 190 × 228 cm |
| 11 × 13 | 143 | 209 × 247 cm |
Add the finished border depth to these measurements.
Planning for Mattress Drop
Measure the mattress rather than selecting a grid only from a standard bed label.
If the mattress is 160 cm wide and you want a 30 cm drop on each exposed side:
160 + 30 + 30 = 220 cm.
At 19 cm per square:
220 ÷ 19 = approximately 11.6 squares.
Twelve columns would therefore provide a motif field near 228 cm before the border.
Estimating Yarn
Weigh one completely finished and blocked square.
Suppose the master square weighs 72 g.
For an 80-square blanket:
72 × 80 = 5,760 g.
Add yarn for seams and the outer border, then add approximately 10% for swatching, tension variation and future repairs.
The 72 g figure is only an example. Replace it with the measured weight of your own motif.
Calculating Each Color
For a more accurate purchase estimate, weigh the yarn before and after one complete motif.
For example, if one square uses:
- Deep purple — 18 g
- Lavender — 24 g
- Ivory — 30 g
then 80 squares would require approximately:
- Deep purple — 1,440 g
- Lavender — 1,920 g
- Ivory — 2,400 g
Add separate quantities for joining and the outer border. These numbers demonstrate the calculation method rather than fixed yarn requirements.
Arranging the Squares
Lay all blocked motifs on a large flat surface.
Rotate each flower so the pinwheel moves in the same visual direction.
Check the purple outer lines from a distance.
Photograph the complete arrangement before stacking the motifs into rows.
Flat Joining Method
Use lavender or deep purple according to the desired seam visibility.
Place two squares right sides upward.
Insert the hook through corresponding outer loops.
Work a relaxed slip-stitch join from corner to corner.
After approximately 5 cm, spread both squares flat.
The seam should not shorten either edge.
Joining the Rows
Complete all horizontal rows first.
Measure rows containing the same number of squares.
Keep their total lengths within approximately 1 cm.
Join the rows vertically only after the measurements agree.
Four-Square Intersections
At each four-square intersection, connect the corners with one compact joining stitch.
Do not repeatedly crochet into the same corner space.
Excess yarn at these intersections creates hard raised knots that compete with the flower texture.
Bedspread Border — Foundation Round
Join deep purple at one outer corner.
Work sc evenly around the complete bedspread.
At each corner work:
(2 sc, ch 2, 2 sc).
Join.
Border Round 2 — Lavender
Change to lavender.
Hdc in every stitch.
At each corner work:
(2 hdc, ch 2, 2 hdc).
Join.
Border Round 3 — Ivory Openwork
Change to ivory.
Sc in the first stitch.
Repeat:
ch 3, skip 2 sts, sc in next st.
At each corner work one ch-5 arch.
Join.
Border Round 4 — Ivory Scallops
Into each ch-3 side space work:
(sc, hdc, 4 dc, hdc, sc).
Into each corner ch-5 space work:
(sc, hdc, 7 dc, hdc, sc).
Continue around.
Border Round 5 — Purple Definition
Join deep purple.
Work a relaxed surface slip stitch or sc edging around the outside of the scallops.
Do not tighten this final line.
FO and weave in securely.
Matching Floral Pillow Sham
The pillows in the reference enlarge the same flower language rather than introducing another motif.
For a modular version, join 2 × 2 flower squares for the pillow front.
Add lavender and ivory framing rounds until the panel matches the insert.
For a 45 cm insert, target approximately 44–45 cm before assembly.
Single Oversized Flower Pillow
A closer visual match can be made with one enlarged flower.
Increase the large petal foundation from ch 12 to approximately ch 18–22, depending on yarn gauge.
Add stitches gradually along each loop, keeping the tallest stitches near the broad outer portion.
Build the square background separately behind the flower until the panel reaches the required pillow dimensions.
Pillow Back
For a practical back, crochet a plain rectangle in lavender.
Chain to the width of the finished pillow front.
Row 1: Hdc in third chain from hook and across.
Row 2: Ch 2, turn, hdc across.
Repeat until the panel matches the front.
Join three sides, insert the cushion and close the remaining side or add an envelope opening.
Alternative Purple Layout
For stronger contrast, use deep purple for the complete structural square and reserve lavender for the flower center.
Keep the large petals ivory.
This produces a darker bedspread while retaining the five-petal pinwheel construction.
Lavender-Dominant Version
Use lavender for most background rounds.
Keep deep purple only for the center, petal outlines and one narrow framing round.
The flower will appear lighter while the dark outlines continue to define its spiral movement.
Two-Color Version
Omit lavender.
Work the center and all outlines in deep purple.
Use ivory for the large petals and structural background.
The reduced palette makes the pinwheel silhouette more prominent.
Assembly
- Crochet the deep-purple center, then verify that the foundation contains five evenly spaced attachment sections before adding petals.
- Add the lavender inner petals and five large ivory petals, keeping the decorative layers independent from the later joining edge.
- Outline every ivory petal in deep purple and secure each overlap 1.5–2 cm from its base to establish the same pinwheel direction.
- Build the hidden lavender foundation behind the flower, mark four independent corner positions and complete the square background.
- Add the ivory, lavender and deep-purple framing rounds, then block the master motif to approximately 18–20 cm with diagonals within 5 mm.
- Make the remaining squares, comparing every fifth motif with the master for outside dimensions and flower diameter.
- Arrange all motifs with their pinwheels rotating in the same direction and photograph the complete layout before stacking the rows.
- Join horizontal rows with relaxed slip stitches, then connect those rows vertically while keeping each four-square intersection compact.
- Work the purple, lavender and ivory border rounds only after confirming that the complete motif field lies flat.
- Weave all tails through dense structural stitches, complete a light final blocking and reshape the raised petals without pressing them flat.
The completed bedspread should show a regular square grid, five-petal ivory pinwheels, dark-purple outlines and raised flowers that remain independent from the joining seams.
7 Technical Tips
- Keep the master-square diagonals within 5 mm. Equal side measurements alone do not reveal a square that has shifted into a parallelogram.
- Secure each petal overlap only 1.5–2 cm from its base. Sewing farther toward the tip removes the raised spiral shape and makes the flower look flat.
- Keep petal relief near 1.5–2.5 cm. Excessive height makes a bedspread uncomfortable and increases snagging when the blanket is folded.
- Test every joining seam after approximately 5 cm. A tight seam contracts the structural square even when the individual motifs were blocked correctly.
- Mark all four structural corners before squaring the five-petal flower. Using petal tips as corner references produces uneven sides because five-fold and four-fold symmetry cannot align directly.
- Keep every finished motif within approximately 5 mm of the master square. A repeated 5 mm error across ten motifs can change a bedspread dimension by roughly 5 cm.
- Weave joining tails through at least 6–8 cm of dense frame stitches. Avoid hiding structural tails behind raised petals because movement can pull them into view.
Care and Final Blocking
Follow the care instructions for the chosen yarn. Support the bedspread during washing because a large wet motif blanket can become considerably heavier.
Lay the project flat and align the square grid first. Measure the top, center and bottom widths before shaping the border.
Arrange the scallops next. Shape the flowers last.
Do not place heavy boards or towels directly over the raised petals during drying. Their controlled overlap is part of the construction and should remain visible after blocking.
Conclusion
The five-petal rotation is the defining feature of this purple 3D flower granny square crochet bedspread pattern, but the hidden four-corner foundation is what keeps the finished blanket square. Make one 18–20 cm master motif first, verify both diagonals, and record its yarn weight before beginning production. Keep the petals outside the joining seam and use the lavender, ivory and purple framing rounds to control final dimensions. The next practical step is to crochet one complete flower and test its pinwheel overlap before making additional blocks. Save the project to Pinterest or share it on Instagram with #PurplePinwheelFlowerBedspread. Would you outline the ivory petals in deep purple as shown, or use lavender for a softer edge?








