Introduction
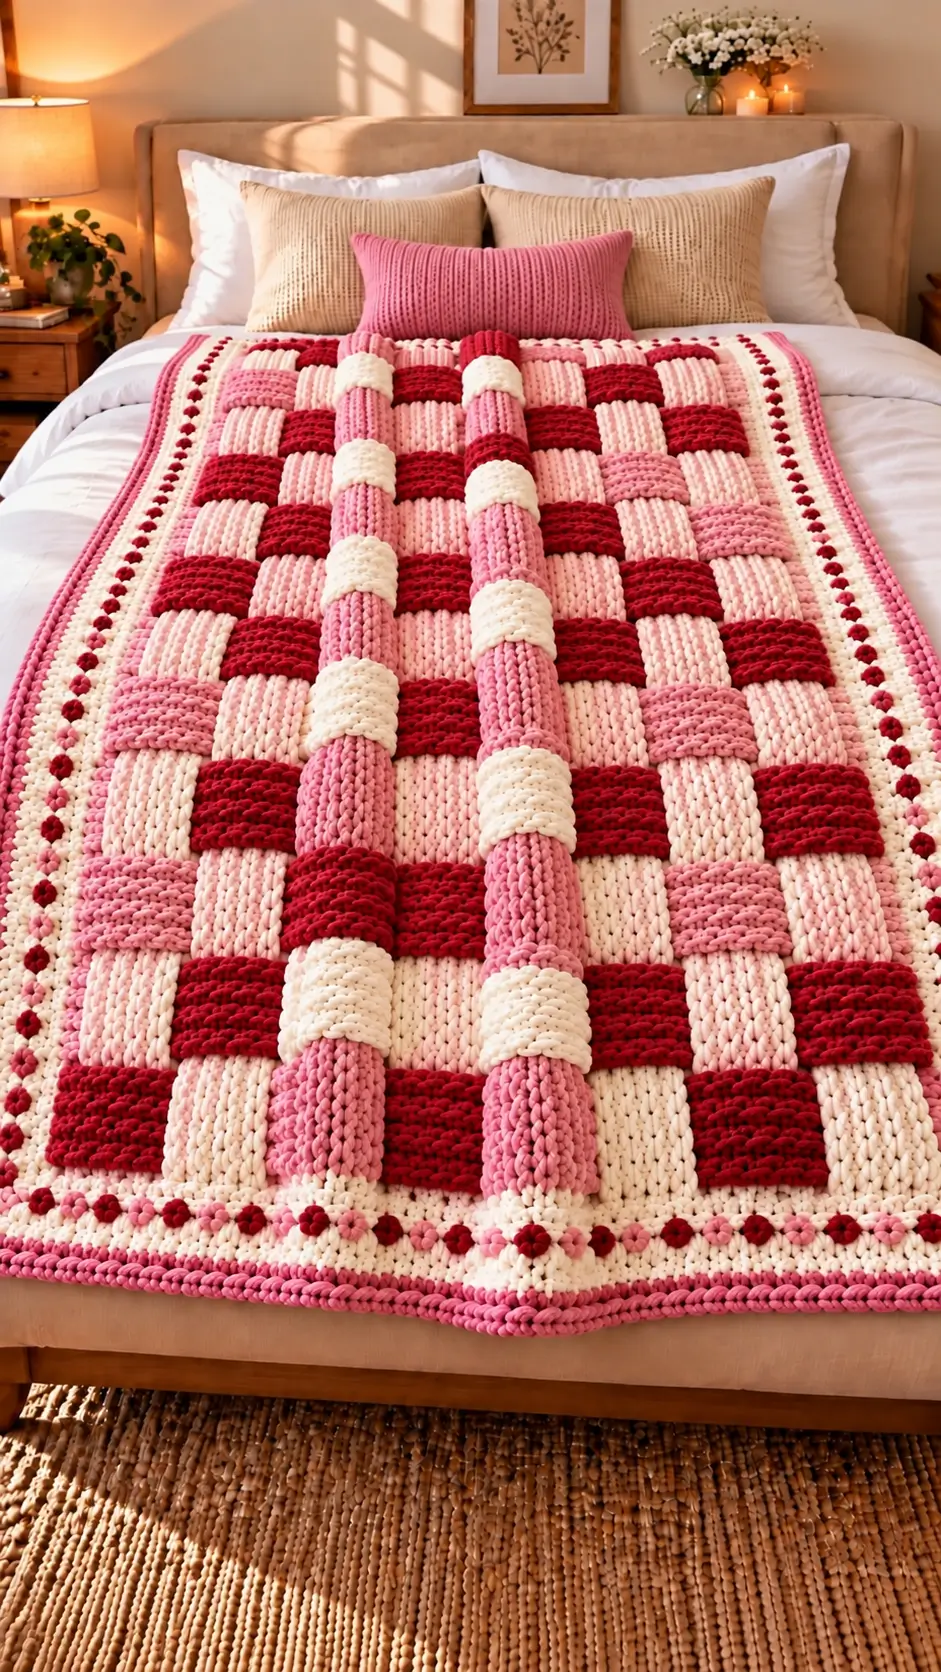
A basketweave blanket with raised pink strips requires two distinct layers: a stable crochet foundation and independently made bands that cross above it. This chunky crochet basketweave blanket pattern uses super-bulky yarn, a 9 mm hook, and a calculated finished size of approximately 140 × 190 cm. The intermediate-level construction combines alternating red and cream stripes, woven pink bands, and a bobble border. Separate strips make damaged decorative sections easier to replace without dismantling the foundation.
The Design: What Makes This Woven Blanket Different
Traditional basketweave crochet produces texture by alternating front-post and back-post stitches. This design takes another approach. The main blanket is worked as a rectangular single-crochet panel, while independent crochet strips create a raised woven surface.
Three structural decisions control the result.
First, the base uses 120 stitches across every row. A constant stitch count keeps the panel rectangular and prevents irregular edges beneath the woven strips.
Second, five long strips cross eighteen shorter strips. Their alternating over-and-under arrangement creates the dimensional basketweave effect without complicated post-stitch sequences.
Third, a separate decorative border secures the outer construction and provides space for red and pink bobbles.
A common mistake with a chunky crochet bedspread is pulling the crossing strips too tightly. This shortens the blanket locally and causes ridges between intersections. A textured crochet blanket needs sufficient strip length to accommodate the raised crossings.
Project Info at a Glance
| Specification | Details |
|---|---|
| Skill level | Intermediate |
| Estimated time | 35–55 hours (untested estimate) |
| Finished size | Approximately 140 × 190 cm (target) |
| Crochet hook | 9 mm |
| Yarn | Super bulky #6 |
| Construction | Flat crochet panel with separate woven strips |
| Main stitches | Single crochet, half double crochet, bobble |
| Best for | Decorative bed covering or substantial throw |
The finished measurements assume approximately 9 single crochet stitches and 6 rows per 10 cm, measured in the intended yarn. The border adds several centimeters. Gauge and strip thickness must be checked before committing to the full project.
Materials and Tools
Yarn
Use yarns with similar thickness and fiber behavior. Mixing a dense polyester blanket yarn with a much lighter acrylic can distort the woven intersections.
The following quantities are provisional purchasing allowances, not measured consumption from a finished sample.
- Cherry red: Super bulky #6 – approximately 1,100 g – Bernat Blanket or equivalent.
- Ivory cream: Super bulky #6 – approximately 1,400 g – Bernat Blanket or equivalent.
- Blush pink: Super bulky #6 – approximately 1,600 g – Bernat Blanket or equivalent.
- Rose pink: Super bulky #6 – approximately 700 g – matching brand and yarn weight.
- Additional allowance: Approximately 200–700 g, distributed by color after measuring swatch consumption.
The selected yarn budget is deliberately generous because the project contains a full foundation plus substantial surface strips. Actual requirements depend on stitch density and the length of the decorative bands.
Tools
- 9 mm crochet hook, or size needed to obtain gauge.
- 10 mm crochet hook, optional for a tight foundation chain.
- Large-eye tapestry needle suitable for bulky yarn.
- Locking stitch markers, at least 24.
- Measuring tape for checking each strip.
- Sharp scissors for cutting yarn ends.
- Rustproof pins for positioning woven intersections.
- Large flat surface for assembling the blanket.
No stuffing, safety eyes, or amigurumi shaping tools are required.
Abbreviations and Special Stitches
| Abbreviation | Meaning |
|---|---|
| ch | Chain |
| sc | Single crochet |
| hdc | Half double crochet |
| dc | Double crochet |
| sl st | Slip stitch |
| st / sts | Stitch / stitches |
| RS | Right side |
| WS | Wrong side |
| BLO | Back loop only |
| rep | Repeat |
| bo | Bobble stitch |
Bobble stitch (bo): Work five unfinished double crochets into the same stitch, leaving the final loop of each on the hook. Yarn over and draw through all six loops. The resulting cluster forms one bobble.
Invisible decrease: Insert the hook through the front loops of two consecutive stitches, yarn over, draw through both front loops, then yarn over and complete the single crochet. This technique is not required in the rectangular blanket.
Pattern convention: Turning chains do not count as stitches. The base and strips are worked in turned rows, not continuous spirals. Numbers in parentheses identify the number of completed stitches per row.
Gauge and Construction Planning
Before making the full blanket, crochet a sample measuring at least 20 × 20 cm. Use single crochet with the selected 9 mm hook.
The design calculation assumes:
- 9 stitches per 10 cm horizontally.
- 6 rows per 10 cm vertically.
- 120 stitches across the base.
- 108 rows along the base.
At this gauge, the foundation panel measures approximately 133.3 × 180 cm before edging.
The target border adds approximately 3–4 cm per side, producing an estimated overall size near 140 × 190 cm.
If the swatch is significantly smaller, change the hook or recalculate the dimensions. Do not force the fabric to reach the target measurement by stretching it.
Pattern – Step by Step
1. Main Blanket Base (Make 1)
Yarn: Cherry red and ivory cream. Original rectangular stitch construction.
The base is a single-crochet panel. Color changes occur every six rows, creating eighteen horizontal sections.
Foundation: With cherry-red yarn, ch 121.
Row 1: Sc in second ch from hook and each remaining chain. Ch 1, turn. (120)
Row 2: Sc in each stitch across. Ch 1, turn. (120)
Row 3: Sc in each stitch across. Ch 1, turn. (120)
Row 4: Sc in each stitch across. Ch 1, turn. (120)
Row 5: Sc in each stitch across. Ch 1, turn. (120)
Row 6: Sc in each stitch across. Change to ivory cream at the final stitch. Ch 1, turn. (120)
Rows 7–12: Sc in each stitch across, using ivory cream. Change to cherry red at the end of Row 12. (120 each row)
Continue the following color schedule. Every row contains 120 sc.
| Rows | Color | Stitches per Row |
|---|---|---|
| 13–18 | Cherry red | 120 |
| 19–24 | Ivory cream | 120 |
| 25–30 | Cherry red | 120 |
| 31–36 | Ivory cream | 120 |
| 37–42 | Cherry red | 120 |
| 43–48 | Ivory cream | 120 |
| 49–54 | Cherry red | 120 |
| 55–60 | Ivory cream | 120 |
| 61–66 | Cherry red | 120 |
| 67–72 | Ivory cream | 120 |
| 73–78 | Cherry red | 120 |
| 79–84 | Ivory cream | 120 |
| 85–90 | Cherry red | 120 |
| 91–96 | Ivory cream | 120 |
| 97–102 | Cherry red | 120 |
| 103–108 | Ivory cream | 120 |
Row 108: Complete 120 sc. Fasten off and weave in the end.
The base contains exactly 12,960 single crochet stitches, excluding the foundation chain.
Lay the panel flat. Check the width at the top, middle and bottom. Mark the five planned positions for the long strips before making the shorter crossing bands.
2. Long Vertical Woven Strips (Make 5)
Yarn: Blush pink. Original rectangular strip construction.
Each long strip runs from the lower edge toward the upper edge of the blanket. The strip width is eight single crochet stitches.
Foundation: Ch 9.
Row 1: Sc in second ch from hook and across. Ch 1, turn. (8)
Row 2: Sc in each stitch across. Ch 1, turn. (8)
Row 3: Sc in each stitch across. Ch 1, turn. (8)
Row 4: Sc in each stitch across. Ch 1, turn. (8)
Rows 5–107: Repeat Row 2. (8 each row)
Row 108: Sc in each stitch across. (8)
Fasten off, leaving a 30 cm sewing tail at each end where practical.
At the specified gauge, each strip measures approximately 8.9 cm wide and 180 cm long before being positioned over crossings.
Important: The woven route consumes more length than a perfectly flat strip. Make one trial strip, pin it over the cross strips, and add rows as needed before completing the remaining four. All five should have matching final lengths.
3. Horizontal Crossing Strips (Make 18)
Yarn: Rose pink, blush pink and cherry red. Original strip construction.
These strips cross the long pink bands at regularly spaced intervals.
Foundation: Ch 9.
Row 1: Sc in second ch from hook and across. Ch 1, turn. (8)
Row 2: Sc in each stitch across. Ch 1, turn. (8)
Row 3: Sc in each stitch across. Ch 1, turn. (8)
Rows 4–79: Repeat Row 2. (8 each row)
Row 80: Sc in each stitch across. (8)
Fasten off, leaving a 30 cm sewing tail.
Each strip is approximately 133.3 cm long at the specified row gauge, matching the unbordered base width.
Make six strips in cherry red, six in rose pink, and six in blush pink. Arrange the colors in a repeating sequence to create a varied grid.
Check the first completed strip against the full width of the blanket. Extend it by the number of rows needed to reach the edges without tension. Repeat that adjusted count for the remaining strips.
4. Ivory Crossover Cuffs (Make 10)
Yarn: Ivory cream. Original decorative accessory construction.
The photograph includes raised ivory sections wrapped around some pink bands. These cuffs are decorative rather than load-bearing.
Foundation: Ch 9.
Row 1: Sc in second ch from hook and across. Ch 1, turn. (8)
Row 2: Sc in each stitch across. Ch 1, turn. (8)
Row 3: Sc in each stitch across. Ch 1, turn. (8)
Row 4: Sc in each stitch across. (8)
Fasten off, leaving a 25 cm tail.
Position two cuffs on each long strip, selecting crossing points that create a balanced arrangement.
The cuffs may be stitched over the exposed front face of the pink bands. For a more rounded effect, make additional rows until the cuff wraps around the strip without compressing it.
5. Cream Foundation Border (Make 1)
Yarn: Ivory cream. Standard crochet perimeter construction adapted for this blanket.
Work this border after the woven strips have been positioned and their ends secured.
Round 1: Join cream yarn at a corner. Work approximately one sc into each stitch along the top and bottom edges and one sc into each row end along the sides. At each corner, work 3 sc into the corner location. Join with sl st.
For a base of 120 stitches × 108 rows, the starting perimeter count is 456 edge positions before corner adjustments. With the four corner positions each replaced by 3 sc, the target is 464 sc.
Round 2: Ch 1. Work one sc in every stitch around, with 3 sc in the center stitch of each corner group. Join with sl st. (472)
Round 3: Repeat Round 2, placing 3 sc in each marked corner center. Join with sl st. (480)
Fasten off.
The exact border count depends on maintaining one stitch per row end and the specified corner treatment. If the border ripples or contracts, adjust side-edge pickup spacing after measuring the fabric rather than forcing the calculated count.
6. Red and Pink Bobble Border (Make 1)
Yarn: Cherry red and rose pink. Original border arrangement using a standard five-double-crochet bobble.
Join cherry-red yarn at a corner.
Round 4: Ch 1. Work sc around the edge, placing one bobble at approximately every eighth stitch. Alternate red and pink bobbles by changing yarn at the selected locations. Work the corner increases as established in the preceding border rounds.
A bobble occupies one stitch position. Work the next sc into the following stitch rather than into the bobble itself.
The perimeter count is 488 stitches if the same four corner increases are applied to the 480-stitch Round 3.
For a visually even distribution, mark the border before starting. Use approximately 58–60 bobbles, allowing the corner spacing to differ slightly where necessary.
Round 5: Join blush-pink yarn. Sc around the entire border, placing 3 sc in each corner center. Join with sl st. (496 if the preceding round has 488 stitches)
Fasten off and weave in all yarn ends.
The bobbles should project outward from the cream border. If they flatten into the fabric, loosen the final pull-through or work with a slightly larger hook for the clusters.
How to Weave the Separate Crochet Strips
Lay the completed blanket base on a flat surface with the right side facing upward.
Position the eighteen shorter strips across the width. Space their centers approximately one six-row section apart. The crossing strips may partially cover the underlying red and cream stripes; this layered appearance is intentional.
Next, place the five long pink strips vertically, with their centerlines roughly at stitch positions 20, 40, 60, 80 and 100 across the base.
At the first horizontal crossing, place Long Strip 1 over the horizontal band. At the second crossing, place it underneath. Continue alternating.
For Long Strip 2, reverse the sequence: under the first crossing, over the second. Repeat this alternating relationship across all five long strips.
Weaving Order Diagram
| Crossing | V1 | V2 | V3 | V4 | V5 |
|---|---|---|---|---|---|
| H1 | Over | Under | Over | Under | Over |
| H2 | Under | Over | Under | Over | Under |
| H3 | Over | Under | Over | Under | Over |
| H4 | Under | Over | Under | Over | Under |
| H5 | Over | Under | Over | Under | Over |
| H6 | Under | Over | Under | Over | Under |
Repeat the six-crossing sequence three times for all eighteen horizontal bands.
Pin each intersection after checking the over-and-under order. The resulting grid contains 90 intersections: five long strips multiplied by eighteen horizontal strips.
Attach the strip ends securely at the foundation edges. Add discreet matching-yarn tacking stitches at each crossing to prevent the layers from shifting during handling. Keep these stitches small enough that they do not flatten the raised texture.
Assembly – 10 Steps
- Complete the 120-stitch, 108-row foundation panel and confirm its dimensions.
- Crochet one full-length blush-pink strip and test its length over the planned crossings.
- Complete the remaining four long strips using the adjusted trial-strip length.
- Crochet the eighteen shorter crossing strips and match their lengths to the foundation width.
- Lay the short strips across the foundation, aligning their centers with the eighteen six-row color sections.
- Position the five long strips vertically and alternate their over-and-under order at every crossing.
- Pin all 90 intersections, checking that the foundation remains flat and the bands are not stretched.
- Stitch the strip ends to the foundation and tack the intersections using matching yarn.
- Attach the ten ivory cuffs at selected exposed crossing locations, then crochet the cream and bobble border.
- Weave in remaining tails, inspect all attachment points and lay the blanket flat to measure the finished dimensions.
The completed blanket consists of one foundation panel, five long strips, eighteen cross strips, ten cuffs and a five-round decorative border.
7 Technical Tips for a More Accurate Result
- Stitch marker drift: Place a marker every 20 stitches across the 120-stitch base. A missing stitch is easier to identify before the next six-row color section begins.
- Uneven strip tension: Measure each strip after 20 rows and compare it with the first strip. A difference greater than 2 cm at that stage may become substantial over 108 rows.
- Overtight weaving: Leave enough slack for each long strip to rise over the horizontal bands. Pulling a strip flat at all 18 crossings can distort the base length.
- Incorrect color changes: Change yarn during the final pull-through of the last stitch of Rows 6, 12, 18 and subsequent six-row sections. Changing after the turning chain creates a visible color step.
- Flattened bobbles: Work five unfinished double crochets into the same stitch and close all six loops together. Fewer partial double crochets produce a smaller cluster than the border design specifies.
- Uneven pinning: Pin the four foundation corners before securing the 90 crossing points. This keeps the rectangle aligned while the woven strips are attached.
- Loose yarn tails: Weave each tail through at least 8–10 cm of matching stitches, reverse direction, and secure it according to the yarn manufacturer’s guidance. Slippery chenille can shed or work loose when ends are cut too short.
Customizing the Blanket Size
The rectangular construction can be adjusted without changing the underlying stitch method.
For a wider blanket, add stitches to the base foundation. At the specified gauge, nine additional stitches add approximately 10 cm to the unbordered width.
For extra length, add rows. Six additional rows increase the foundation length by approximately 10 cm.
Maintain the color-section rhythm if the checkerboard appearance is important. Adding six rows produces one additional horizontal color section, which can be matched with one additional cross strip.
The five long strips must be extended to match the new blanket length. Horizontal strips must be adjusted whenever the width changes.
A smaller throw can use fewer long strips and fewer horizontal sections. The important relationship is proportional spacing: the strips should not crowd each other or expose unusually large empty areas of the foundation.
Care and Finishing
Check the care label of the selected yarn before washing. Polyester blanket yarns vary in their washing, drying and heat restrictions.
Because this design contains attached decorative strips, inspect all crossing points before the first wash. Loose intersections can catch on other textiles, particularly inside a washing machine.
Use a wash bag or a gentle washing method when appropriate for the selected yarn. Avoid hanging the wet blanket from one edge, as the weight of the damp fabric can stretch the foundation and long strips unevenly.
Dry the blanket according to the yarn label. Lay it flat to restore the rectangular shape, then check that the long strips still alternate correctly over and under the shorter bands.
If a strip becomes damaged, carefully release its attachment stitches and replace that component. The independent construction allows individual decorative sections to be repaired without remaking the foundation.
Conclusion
The finished blanket combines a stable single-crochet foundation with independent woven bands and a raised decorative border. Its construction can be adjusted by changing the foundation width, row count, and number of crossing strips. Before making a full-size version, crochet a gauge sample and one test intersection to confirm the strip lengths and yarn consumption. Save this chunky crochet basketweave blanket pattern to Pinterest for project planning, or share a finished photograph on Instagram using #ChunkyWovenBasketweaveBlanket. When assembling the design, did you prefer the ivory crossover cuffs centered on the pink bands or positioned slightly above each red horizontal section?
Pattern note: This is an original, image-inspired design. Finished measurements, yarn quantities, and the three-dimensional strip assembly have not been physically sample-tested.