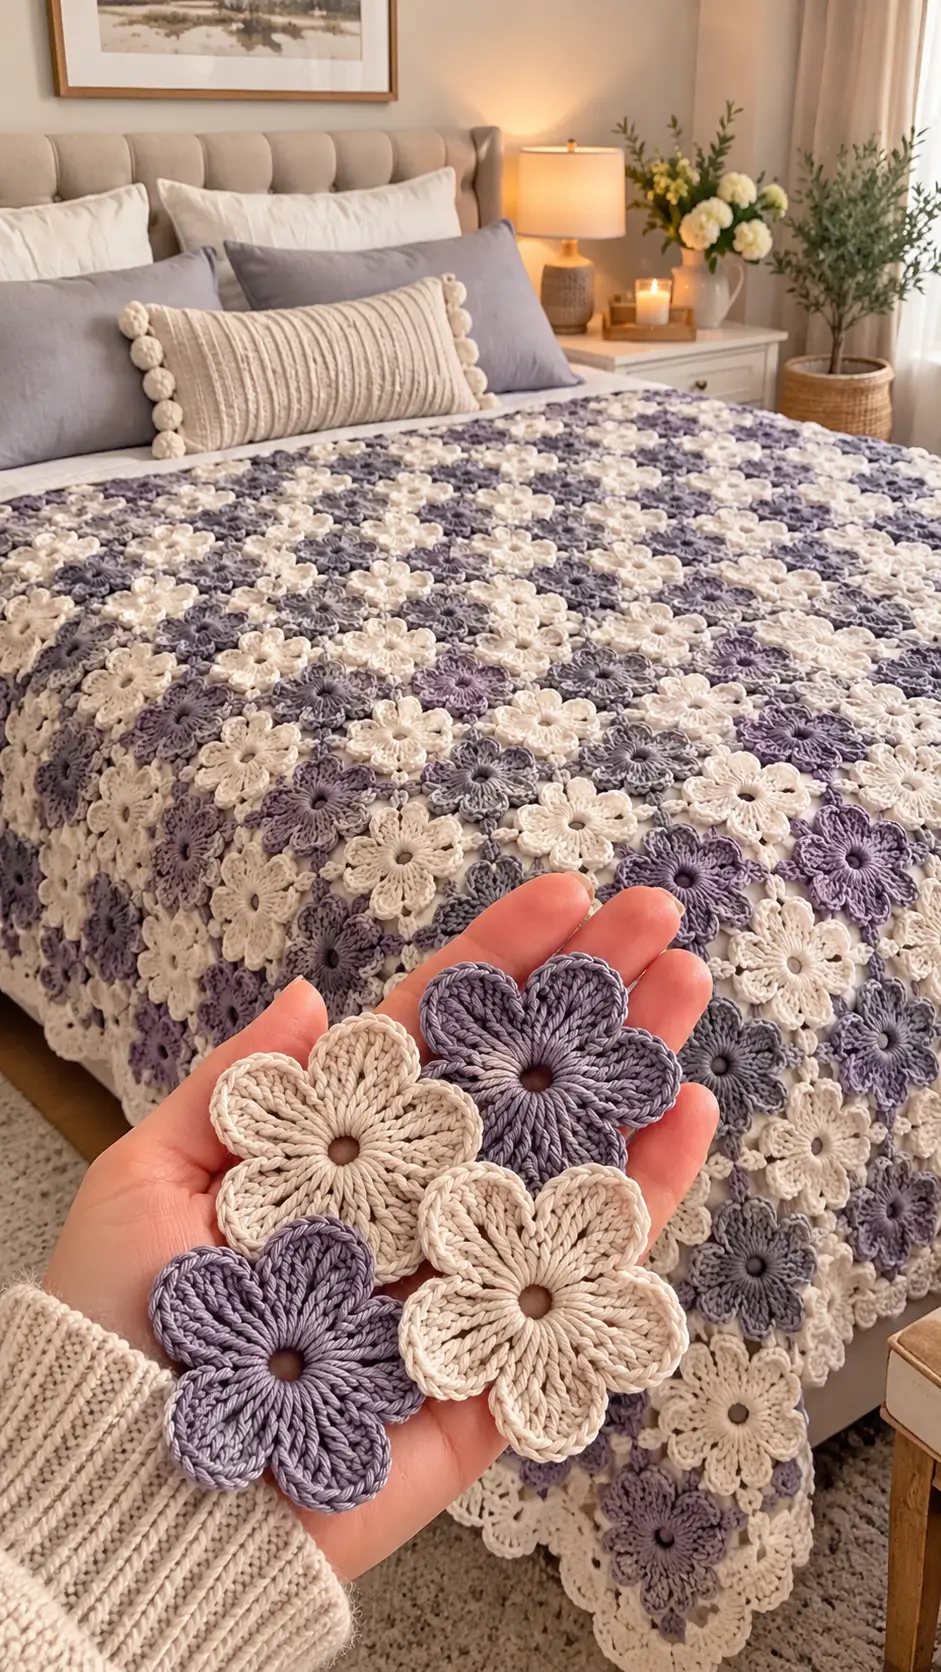
Five-petal flowers leave irregular gaps when arranged edge to edge, so the joining method determines whether this bedspread lies flat. This crochet flower blanket pattern uses separate floral motifs in cream, dusty lavender, and smoky gray. Designed for intermediate crocheters, the project uses worsted-weight yarn, a 4.5 mm hook, and an adjustable number of flowers. The modular construction makes it possible to replace damaged motifs without dismantling the entire blanket.
The Design: What Makes This Flower Blanket Different
The defining feature of this floral crochet blanket is its repeated five-petal construction. Each motif has an open center, elongated petals, and a slightly raised surface.
Three structural decisions control the appearance.
First, tall stitches produce elongated petals instead of compact circular flowers. Second, the center opening remains visible, giving the motif a distinct floral outline. Third, connecting bridges hold adjacent flowers together while allowing the fabric to bend over the mattress.
A common mistake when making a five petal crochet flower blanket is joining every petal tip tightly to its neighbors. Five-sided motifs do not naturally form a gap-free rectangular grid. Excessively tight connections create puckering, particularly where several flowers meet.
The proposed construction uses flexible connecting stitches and a sample layout to establish spacing before the full blanket is assembled.
Project Info at a Glance
| Detail | Specification |
|---|---|
| Skill Level | Intermediate |
| Time | Depends on size and motif count |
| Finished Size | Adjustable |
| Reference Motif | Approximately 9.5 cm |
| Hook | 4.5 mm reference |
| Yarn | Worsted weight |
| Construction | Individual motifs, joined |
| Colors | Ivory, lavender, smoky gray |
The hook and reference motif dimensions are documented in a published flower blanket pattern. They are reference specifications rather than verified measurements for the original instructions below.
Materials and Tools
Yarn
Choose yarns with the same fiber content, thickness, and washing requirements. A consistent yarn specification helps prevent individual motifs from stretching at different rates.
- Warm ivory — worsted weight (#4) — approximately 45% of the planned yarn quantity.
- Dusty lavender — worsted weight (#4) — approximately 35% of the planned yarn quantity.
- Smoky gray — worsted weight (#4) — approximately 20% of the planned yarn quantity.
Suitable yarn families include washable cotton, cotton blends, or smooth acrylic. A smooth yarn provides clear stitch definition and helps the five rounded petals maintain their shape.
Yarn quantities are estimates. Weigh several finished flowers and connecting sections before purchasing the full quantity.
For example, if one completed flower weighs 6 g and the project requires 250 flowers, the flowers alone require 1,500 g. Adding 15% for joins, edging, and waste gives approximately 1,725 g.
Tools
- 4.5 mm crochet hook for the initial gauge sample
- Tapestry needle with a blunt tip
- Locking stitch markers for petal positions
- Sharp scissors
- Measuring tape
- Digital kitchen scale
- Blocking mat and rust-resistant pins
Crochet Abbreviations
All instructions use US crochet terminology.
| Abbreviation | Meaning |
|---|---|
| MR | Magic ring |
| ch | Chain |
| sc | Single crochet |
| hdc | Half double crochet |
| dc | Double crochet |
| tr | Treble crochet |
| sl st | Slip stitch |
| st / sts | Stitch / stitches |
| inc | Increase |
| dec | Decrease |
| BLO | Back loop only |
| rep | Repeat |
| FO | Fasten off |
An invisible decrease is commonly used in amigurumi, but it is unnecessary for the open, flat flower motifs in this project.
Free Crochet Flower Blanket Pattern — Step by Step
Pattern note: These are original, photo-inspired instructions, not the verified pattern used to make the photographed bedspread. Make and block a sample before starting a full blanket.
Part 1: Five-Petal Crochet Flower
Make: As many flowers as required for your blanket size.
Yarn: Ivory, lavender, or smoky gray.
The flower uses a central ring and five evenly spaced groups of stitches.
Foundation
Ch 5. Join with a sl st into the first chain to form a ring. Leave the center opening visible.
Round 1 — Center
Ch 1, work 15 sc into the ring, then sl st into the first sc. (15 sc)
The 15 stitches form five groups of three. Each group supports one petal.
Round 2 — Petals
Repeat the following sequence five times, using the next three unused stitches of Round 1 for each repetition:
- Sl st in the first stitch.
- Work (hdc, dc, 2 tr, dc, hdc) into the second stitch.
- Sl st in the third stitch.
At the end of Round 2, the flower has five petals, each formed from six tall stitches and anchored by slip stitches. (30 petal stitches and 10 sl sts)
Round 3 — Optional Petal Edging
Working around the outside of each petal, use slip stitches or loosely worked single crochet stitches to outline the petals. Keep the edging relaxed and avoid adding stitches into the central ring.
Because stitch access differs around the sides of tall-stitch groups, this optional round does not have a fixed stitch count.
Fasten off. Leave a 20 cm yarn tail for sewing.
Measure the finished motif after blocking. Adjust the hook or yarn if the flower is larger or smaller than your intended size.
Part 2: Color Distribution
The photographed bedspread uses a mixed arrangement rather than strict alternating stripes.
For a similar color balance, prepare approximately:
| Color | Proportion | Example for 200 Flowers |
|---|---|---|
| Warm ivory | 45% | 90 |
| Dusty lavender | 35% | 70 |
| Smoky gray | 20% | 40 |
These proportions are a suggested design distribution rather than exact measurements from the photograph.
Place the flowers on a large flat surface before joining. Avoid positioning several gray flowers in a continuous diagonal line unless that effect is intentional.
Check the arrangement from a distance. Darker motifs attract attention more strongly than cream motifs, so their distribution affects the visual balance of the blanket.
Part 3: Joining the Crochet Flowers
The joining stage requires more testing than the individual flowers.
A five-petal flower cannot be treated as a square granny motif. Its five protruding points leave spaces that vary depending on orientation.
Basic Connecting Bridge
- Position two completed flowers with their right sides facing upward.
- Identify the closest pair of petal tips.
- Attach matching yarn with a sl st at the tip of the first flower.
- Ch 3.
- Join with a sl st at the corresponding tip of the second flower.
- Ch 1, then fasten off with a tail suitable for weaving.
Repeat at another nearby pair of petal tips if the connection needs additional stability.
Do not automatically connect all five tips of each flower. That can restrict movement and distort the motif.
Testing the Connections
Make nine flowers and arrange them in a roughly square sample. Connect adjacent tips using the bridge method, then lay the piece flat.
If the fabric curls upward, the connections may be too short. Try ch 4 or ch 5 bridges.
If the fabric sags excessively, shorten the bridges or add a second connection between neighboring flowers.
This is a sample-based joining method, not a mathematically complete tiling system. Check the full layout before large-scale assembly.
Part 4: Planning Blanket Dimensions
The number of flowers depends on motif diameter, joining distance, arrangement, and the desired amount of drape.
| Blanket Type | Approximate Target Size |
|---|---|
| Baby blanket | 75 × 90 cm |
| Lap blanket | 100 × 120 cm |
| Throw | 130 × 150 cm |
| Large bedspread | 220 × 240 cm |
These are planning dimensions, not verified finished measurements for this pattern.
To estimate the required number of flowers, make a connected sample and measure its actual area.
For example, suppose a nine-flower sample covers approximately 30 × 30 cm.
The sample area is 900 cm², so each flower accounts for an average of 100 cm², including connecting spaces.
A 130 × 150 cm throw has an area of 19,500 cm². Dividing by 100 gives approximately 195 flowers.
This calculation provides a starting estimate. Irregular boundaries, edging, and layout changes can alter the final count.
Part 5: Filling Open Spaces
Small openings between motifs are part of the design. Larger gaps may need additional connections.
For a simple gap-filling bridge:
- Join yarn to one adjacent petal tip.
- Ch 4 and sl st to the next accessible petal tip.
- Continue around the opening only where the surrounding flowers remain flat.
- Fasten off and weave the ends into the connecting stitches.
Avoid drawing all surrounding tips toward one central point. Concentrating tension at a single location can create a raised knot.
For larger openings, a separately crocheted filler motif may be preferable. Develop its shape and stitch count against the actual connected sample, because the number and position of surrounding petals are not fixed.
Part 6: Crochet Blanket Border
The photograph shows a softly irregular floral edge rather than a thick, rectangular frame.
Option A: Natural Flower Edge
Leave the outside petals exposed. Weave in the ends, block the blanket, and check that the outermost flowers have secure connections to their neighbors.
This option most closely follows the visual character of the reference.
Option B: Light Chain Border
Join yarn at an outer petal tip. Work chain bridges between adjacent outside tips, using a consistent chain length that does not pull the fabric inward.
Once the perimeter has been connected, add a loose round of single crochet into the bridges if a more continuous edge is needed.
Because the perimeter is irregular, no universal stitch count can be specified without a confirmed layout. Work the border against the blocked sample and adjust stitch spacing at corners and indentations.
How to Assemble the Crochet Flower Blanket
- Complete the flower motifs. Make an initial set of nine flowers using the three selected colors.
- Block the sample flowers. Allow them to dry fully before measuring their dimensions.
- Test the color arrangement. Position cream, lavender, and gray flowers in a balanced distribution.
- Join the first sample section. Use chain bridges between neighboring petal tips.
- Inspect the sample for distortion. Check whether the connected flowers lie flat without tension at their centers.
- Record the measurements. Measure the joined sample and weigh it to estimate the full project.
- Crochet the remaining flowers. Make the estimated quantity, allowing additional motifs for edge adjustments.
- Expand the blanket in sections. Connect small groups before adding them to the main piece.
- Finish the outer edge. Leave a natural floral perimeter or add a light connecting border.
- Weave in and block. Secure every yarn tail, shape the blanket to its final dimensions, and dry it flat.
The completed fabric consists of individually crocheted five-petal flowers connected into a flexible floral blanket.
7 Technical Tips for Better Results
- Mark the petal groups. Place a stitch marker after every third sc in Round 1. An incorrect division of the 15 foundation stitches will produce uneven petal spacing.
- Measure the center opening. If the initial ch-5 ring expands beyond the intended opening, test a ch-4 ring. Compare the results before making additional flowers.
- Control the height of the treble stitches. Uneven yarn-over tension can make one petal noticeably longer than the other four. Compare all five petals before fastening off.
- Check motif diameter after blocking. A difference of just 5 mm between flowers can accumulate across a large bedspread. Measure several motifs before joining them.
- Test joining tension on nine flowers. Short bridges may cause puckering, while overly long bridges can produce unsupported gaps. Adjust the chain length before continuing.
- Pin the sample before assembly. Use rust-resistant pins to hold the connected section flat. Pulling individual petals outward during blocking can distort the central opening.
- Secure yarn tails along several stitches. Weave each tail through at least 4–5 cm of suitable stitches, changing direction where practical. Repeated handling can otherwise loosen the joins.
Care and Maintenance
A floral motif blanket has more connection points than a solid-stitch blanket. These connections require particular attention during washing and storage.
Check the yarn label before laundering. If all three colors use the same washable fiber and compatible care instructions, the finished piece can usually be maintained more consistently.
Test colorfastness before assembling a large blanket. Dark lavender and gray yarns should not transfer dye onto the cream motifs.
For machine-washable yarn, a large mesh laundry bag can reduce snagging. Heavy bedspreads may require a machine with adequate capacity.
Drying instructions depend on the fiber. Some acrylics tolerate low heat, while cotton and wool blends may shrink or stretch under different conditions.
Do not hang a saturated bedspread by one edge. The weight of wet yarn can pull the flowers out of shape, especially around the connecting bridges.
Inspect any loose joins before washing again. Repairing a short bridge is generally easier than repairing several flowers after the fabric has separated.
Frequently Asked Questions
Can a beginner make this crochet flower blanket?
A crocheter familiar with single, half-double, double, and treble crochet stitches can make the individual flowers. The joining process requires more experience because the five-petal shapes do not create a regular rectangular grid.
Practice with nine flowers before planning a full bedspread.
What yarn works best for a five-petal flower blanket?
Smooth worsted-weight yarn is a practical starting point because the individual stitches remain visible. Cotton provides defined petals, while acrylic may produce a lighter fabric depending on the yarn.
Choose a single yarn family for all colors whenever possible.
How many flowers are needed for a queen-size bedspread?
There is no reliable universal count. Flower diameter, connecting gaps, mattress dimensions, and the desired overhang all affect the result.
Measure a connected sample and calculate the approximate number of flowers from its area.
Can the flowers be joined as they are crocheted?
Yes, but the technique requires a modified final petal or joining round. The pattern above uses completed motifs and chain bridges because that method allows the arrangement to be adjusted before permanent assembly.
How can I stop the flower blanket from curling?
Check motif consistency, joining tension, and the placement of connecting bridges. Blocking can correct minor irregularities, but it cannot reliably compensate for connections that are structurally too short.
Conclusion
This crochet flower blanket pattern provides a modular starting point for recreating a bedspread with five-petal flowers in cream, lavender, and gray. The most important next step is to crochet nine sample motifs, connect them, and record the blocked dimensions before calculating yarn quantities. The sample will also reveal whether the proposed petal proportions and joining bridges suit the selected yarn. Photograph the finished test section and share it on Pinterest or Instagram using #FivePetalFlowerBlanket. Include the hook size, yarn weight, and measured flower diameter so other makers can compare results. Would you keep the flower centers open as pictured, or add a small contrasting center to every motif?








