Introduction
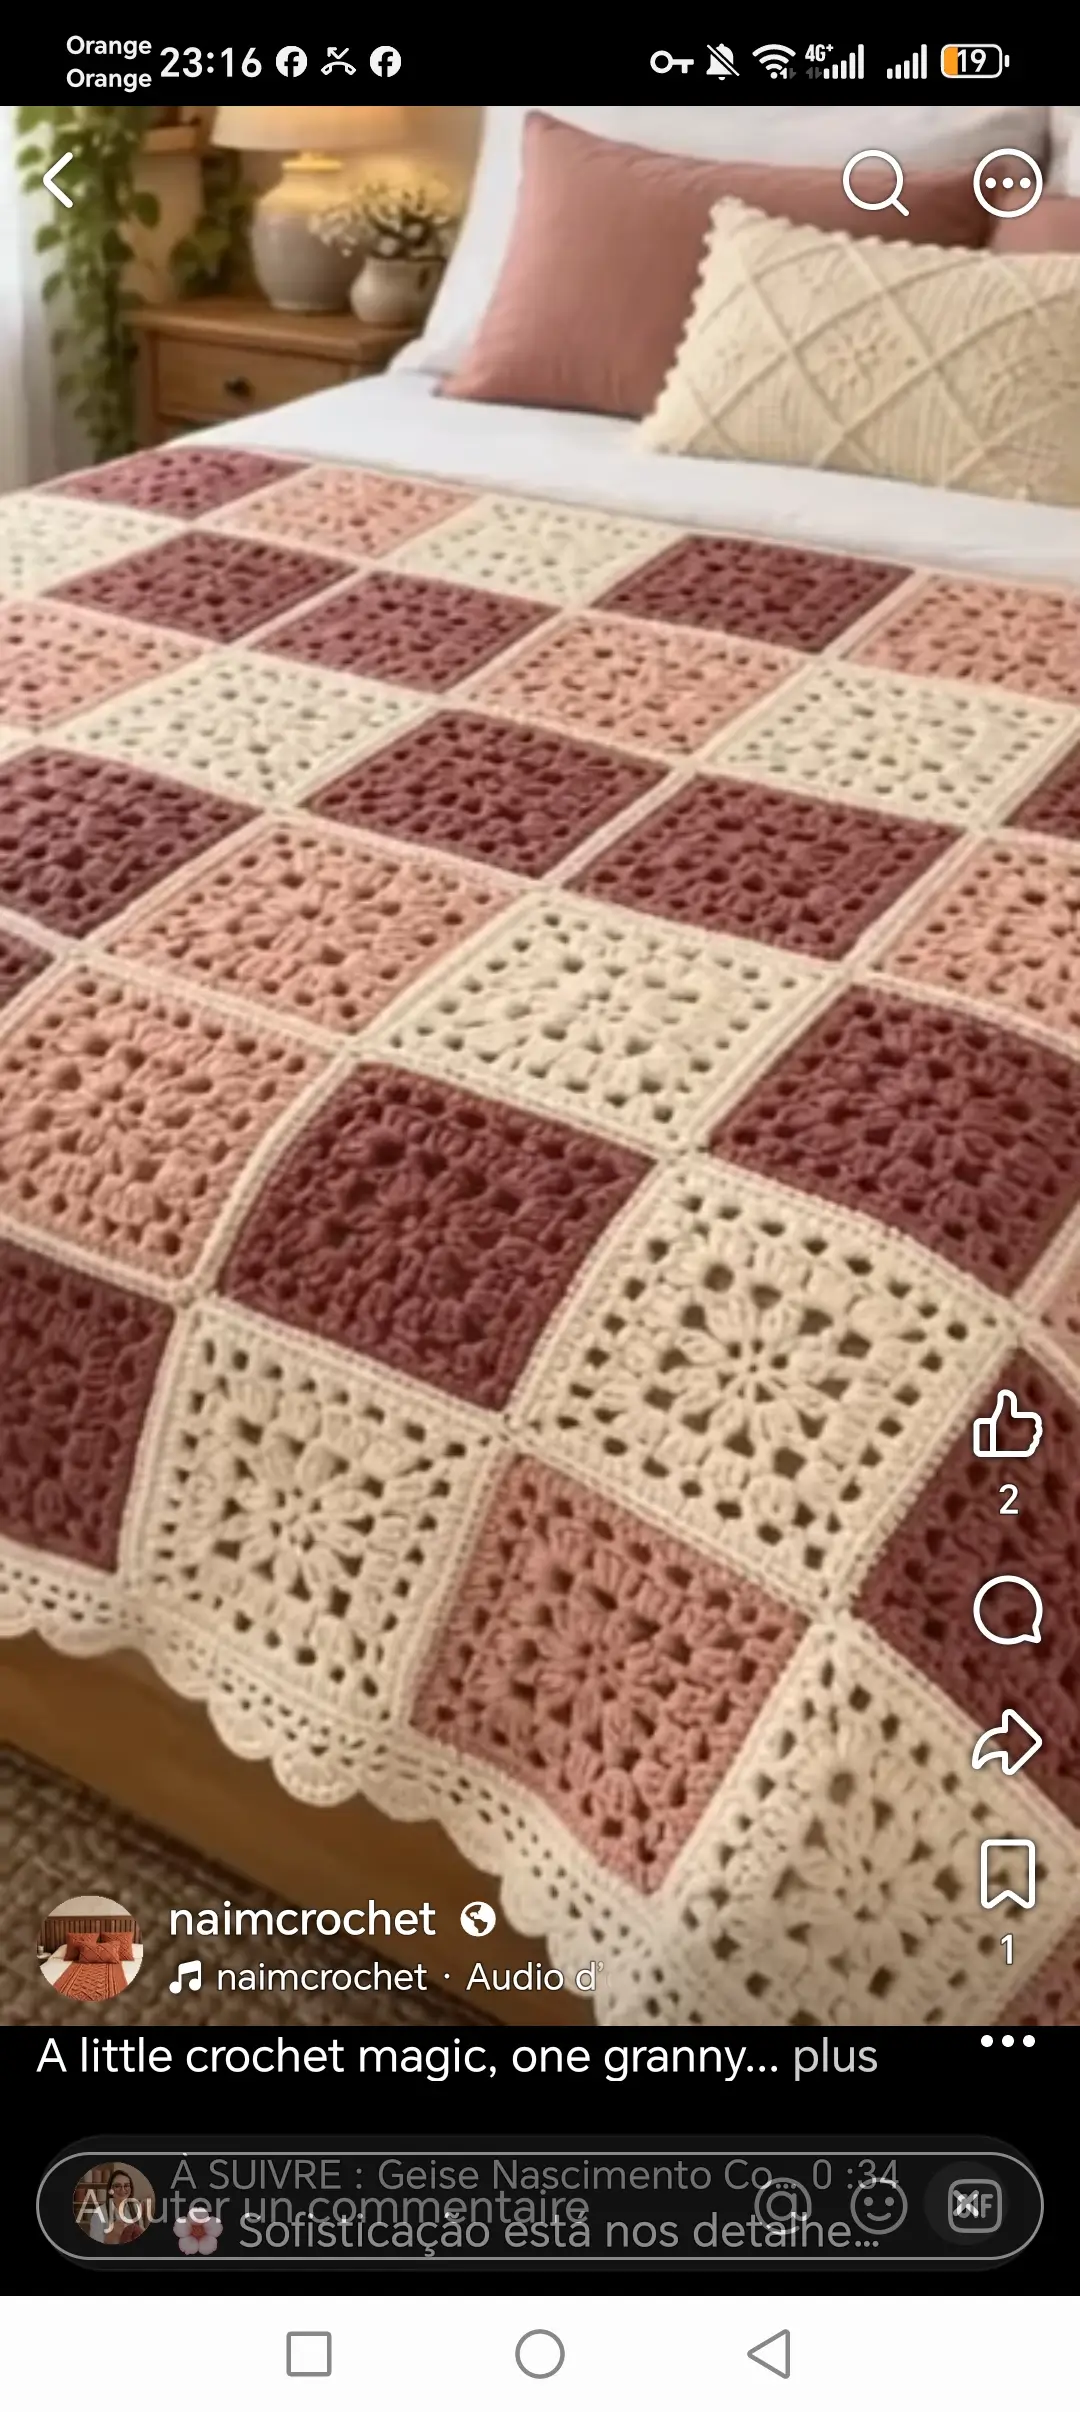
Three flower colors can share one bedspread only if every square finishes at exactly the same measurement. This floral granny square crochet bedspread pattern uses cream, dusty rose and burgundy motifs with an open floral center, geometric lace sections and a firm outer frame. Worked in worsted-weight yarn with a 4.5 mm hook, the design creates a coordinated bedspread with a cream scalloped border.
The Design: One Motif, Three Colors
The strongest structural feature in this bedspread is repetition. Cream, dusty rose and burgundy blocks use the same construction, allowing color placement to create the pattern instead of changing stitch counts between squares. Each motif begins with a small open flower. Longer stitches expand the petals, chain spaces introduce lace openings, and progressively wider rounds convert the circular center into a square.
A dense final frame provides the joining surface. This matters because connecting directly through decorative chain arches can stretch one square differently from the next. The photographed arrangement also uses cream seams between contrasting motifs, creating a narrow visual grid. Keep the three yarn colors in the same weight and fiber family; otherwise identical rounds may block to different dimensions.
Project Info at a Glance
| Skill Level | Construction | Target Square | Hook | Best For |
|---|---|---|---|---|
| Intermediate | Repeated openwork floral squares | 19–21 cm | 4.5 mm | Bedspreads, throws and bed runners |
Materials and Tools
Yarn
- Warm cream — worsted #4 — approximately 40% of motif yarn plus joining and border
- Dusty rose — worsted #4 — approximately 30% of motif yarn
- Burgundy — worsted #4 — approximately 30% of motif yarn
The percentages are planning estimates rather than fixed quantities. Make and weigh one blocked square in each color before purchasing yarn for a full-size bedspread.
Tools
- 4.5 mm crochet hook
- Worsted #4 yarn
- Yarn needle
- Scissors
- Stitch markers
- Tape measure
- Blocking mats
- Rust-resistant pins
- Digital scale for yarn calculations
Abbreviations
- MR — magic ring
- ch — chain
- sl st — slip stitch
- sc — single crochet
- hdc — half double crochet
- dc — double crochet
- tr — treble crochet
- sp — space
- st/sts — stitch/stitches
- FO — fasten off
Pattern — Floral Lace Granny Square
This is an original photo-inspired motif. Make the same square in cream, dusty rose and burgundy. Complete one cream master square first, block it, and use its final measurement as the production standard.
Round 1 — Flower Center
Make a MR.
Ch 1.
Work 12 sc into the ring.
Join with sl st. (12 sc)
Round 2 — Six Petal Foundations
Ch 1.
Sc in the first stitch.
Work:
*ch 5, skip 1 st, sc in next st*
around.
Join.
You should have 6 ch-5 spaces.
Round 3 — Six Flower Petals
Sl st into the first ch-5 space.
Work:
(sc, hdc, 3 dc, hdc, sc)
into the same space.
Repeat in each remaining ch-5 space.
Join.
The motif now contains six rounded petals.
Round 4 — Behind-Petal Arches
Work behind the petals.
Insert the hook between adjacent petal bases.
Work:
sc, ch 6
and sc between the next two petals.
Repeat around.
Join.
You should have 6 ch-6 spaces behind the first flower.
Round 5 — Second Floral Layer
Sl st into the first ch-6 space.
Work:
(sc, hdc, 2 dc, 3 tr, 2 dc, hdc, sc)
into the space.
Repeat in all six spaces.
Join.
The second layer should extend beyond the first without becoming heavily three-dimensional.
Round 6 — Transition Arches
Work behind the second petal layer.
Make one attachment at each petal junction.
Work:
*sc, ch 5*
around.
Join.
You should again have six chain spaces.
Round 7 — Beginning the Square
The motif must now change from six-sided floral geometry to four-sided square geometry.
Mark four positions approximately evenly around the flower. These will become the corners.
In each designated corner space work:
(3 dc, ch 3, 3 dc).
In the spaces between corners work:
3 dc, ch 2, 3 dc
as needed to distribute the fabric evenly.
Join.
Lay the motif flat before continuing. Adjust only the transition round if the four sides are not balanced.
Round 8 — Open Lace Square
Sl st into the first corner.
At each corner work:
(3 dc, ch 3, 3 dc).
Across each side work:
ch 2, 3 dc in next available space
repeated evenly across the side.
Ch 2 before the next corner.
Repeat around.
Join.
Round 9 — Geometric Openwork
At each corner work:
(2 dc, ch 2, 2 dc).
Across each side repeat:
ch 2, skip the next small section, 2 dc in next space.
Keep the same number of groups on all four sides.
Join.
The openings should form straight lines when the square is lightly stretched by hand.
Round 10 — First Structural Frame
Ch 1.
Work sc evenly around the square.
Place one sc in each dc and enough sc in each chain space to keep the edge flat.
At every corner work:
(2 sc, ch 2, 2 sc).
Join.
Round 11 — Half Double Crochet Frame
Ch 2.
Hdc in every stitch along the side.
At each corner work:
(2 hdc, ch 2, 2 hdc).
Repeat around.
Join.
Round 12 — Final Joining Edge
Ch 1.
Sc in every stitch.
At each corner work:
(sc, ch 2, sc).
Join and FO.
Target Motif Size
Block the master square to approximately 19–21 cm.
If Round 12 produces a smaller square with your yarn, add another hdc round followed by one sc round.
If the square is already at the target size, do not add rounds simply to match the appearance of another maker’s gauge.
Cream Square
Make the complete motif in warm cream.
Do not change color inside the square.
This creates the lightest blocks visible throughout the bedspread and gives the alternating palette more contrast.
Use the first cream square as the master measurement.
Dusty Rose Square
Repeat Rounds 1–12 in dusty rose.
Block the square to exactly the same measurement as the cream master.
If the dusty rose yarn behaves differently despite having the same label weight, adjust hook size rather than adding a random extra round.
Burgundy Square
Repeat the complete motif in burgundy.
Dark yarn can make chain spaces harder to see, so mark the four corner spaces as soon as the squaring round begins.
Block to the master measurement.
Blocking the Master Square
Place the completed motif on a blocking mat.
Pin the four corners first.
Measure the top and bottom edges.
Measure the two side edges.
Then measure both diagonals.
Keep the difference between diagonal measurements within approximately 5 mm.
Pin the midpoint of each side only after the square geometry is correct.
Why Blocking Before Joining Matters
The floral center contains more curved stitches than the outer frame. Without blocking, the center may appear slightly rounded while the edge remains square.
Joining unblocked motifs forces the seams to correct that difference. The result can be puckering between blocks.
Block first. Join second.
Suggested Color Layout
A balanced arrangement can be made by shifting the three colors from row to row.
For example:
| Row | Suggested Sequence |
|---|---|
| 1 | Cream – Dusty Rose – Burgundy – Cream – Dusty Rose – Burgundy |
| 2 | Burgundy – Cream – Dusty Rose – Burgundy – Cream – Dusty Rose |
| 3 | Dusty Rose – Burgundy – Cream – Dusty Rose – Burgundy – Cream |
Repeat the three-row sequence across the bedspread.
This prevents large clusters of one color while keeping the layout predictable during assembly.
Alternative Checkerboard Layout
For stronger contrast, alternate burgundy and dusty rose across most of the field and insert cream squares at regular intervals.
Place one cream square approximately every third position.
Repeat the placement consistently in later rows.
The cream joining seams will visually connect those light motifs even when they are not directly adjacent.
Planning the Bedspread Size
If the blocked master square measures 20 cm, example motif fields are:
| Grid | Squares | Approximate Size Before Border |
|---|---|---|
| 5 × 6 | 30 | 100 × 120 cm |
| 6 × 8 | 48 | 120 × 160 cm |
| 8 × 10 | 80 | 160 × 200 cm |
| 9 × 11 | 99 | 180 × 220 cm |
| 10 × 12 | 120 | 200 × 240 cm |
| 11 × 13 | 143 | 220 × 260 cm |
Add the final border width separately. Measure the mattress and required drop before selecting the grid.
Estimating Yarn from a Sample Square
The most reliable calculation begins with a finished block.
Suppose one blocked square weighs 60 g.
For an 80-square bedspread:
60 g × 80 = 4,800 g
This covers the example motif field only.
Add joining yarn and border yarn, then add approximately 10% for gauge differences, swatches and future repairs.
Replace the 60 g example with the actual weight of your square.
Calculating Yarn by Color
Suppose an 80-square layout uses:
- 28 cream squares
- 26 dusty rose squares
- 26 burgundy squares
If each blocked motif weighs 60 g:
Cream motifs: 28 × 60 g = 1,680 g
Dusty rose motifs: 26 × 60 g = 1,560 g
Burgundy motifs: 26 × 60 g = 1,560 g
Purchase additional cream for the seams and outer border.
Arranging the Squares Before Joining
Lay every blocked square on a clean floor or large table.
Follow the planned color sequence.
Take a photograph of the complete arrangement before moving the motifs.
Stack each horizontal row separately and label it.
This prevents accidental color changes during assembly.
Cream Flat Slip-Stitch Join
The photographed design uses a light line between colored blocks. Cream yarn creates a similar effect.
Place two squares side by side with right sides facing upward.
Join cream at one corner.
Insert the hook through corresponding outer loops.
Work loose slip stitches along the seam.
Do not pull the working yarn tight.
Testing Seam Tension
After joining approximately 5 cm, spread the two squares flat.
The seam should remain the same length as the blocked square edge.
If the joined edge lifts or folds, remove the stitches and remake them more loosely.
Joining Complete Rows
Join the motifs into horizontal rows first.
Measure each completed row.
Rows containing the same number of squares should remain within approximately 1 cm of one another.
After the horizontal rows match, join them vertically.
Four-Square Intersections
Pay particular attention where four corners meet.
Do not add several extra joining stitches at the intersection.
One compact cream connection is sufficient.
Bulky corner joins create raised knots across an otherwise flat bedspread.
Outer Border — Round 1
Join cream yarn at one corner.
Work sc evenly around the complete bedspread.
At each corner work:
(2 sc, ch 2, 2 sc).
Join.
Border Round 2
Ch 2.
Hdc in each stitch.
At each corner work:
(2 hdc, ch 2, 2 hdc).
Join.
Border Round 3 — Lace Openings
Ch 1.
Sc in the first stitch.
Repeat:
ch 3, skip 2 sts, sc in next st.
around the perimeter.
At each corner use a ch-5 space.
Border Round 4 — Small Fans
Sl st into the first ch-3 space.
Work:
(sc, hdc, 3 dc, hdc, sc)
in each ch-3 space.
At the corner ch-5 spaces work:
(sc, hdc, 5 dc, hdc, sc).
Border Round 5 — Scalloped Finish
Work a sl st between adjacent fans.
In the center of the next fan work:
5 dc.
Sl st between fans.
Repeat around.
At each corner use 7 dc for a wider scallop.
FO.
Optional Burgundy Accent Before the Border
For additional definition, work one round of burgundy sc immediately after the assembled motif field.
Then change to cream for the five border rounds.
This narrow dark line separates the patchwork field from the light lace edging.
Making a Bed Runner
The same squares can be used for a smaller project.
With 20 cm motifs, a 3 × 8 arrangement produces a field approximately 60 × 160 cm before the border.
Alternate all three colors across the runner.
Use the same cream joining method and scalloped edge.
Making a Throw
A 6 × 8 grid produces an approximate 120 × 160 cm motif field when using 20 cm squares.
This size requires 48 motifs.
Use 16 squares of each color for an exact three-color distribution.
Optional Matching Cushion
For a coordinated cushion, join four squares in a 2 × 2 arrangement.
Use one cream, one burgundy and two dusty-rose squares, or select any distribution that repeats the bedspread palette.
Add cream hdc rounds around the joined panel until it reaches the required pillow dimensions.
Solid Cushion Back
With cream or dusty rose, chain to the width of the blocked cushion front.
Row 1: Hdc in the third chain from the hook and across.
Row 2: Ch 2, turn, hdc across.
Repeat Row 2 until the back matches the front.
FO.
Joining the Cushion
Place the crochet front and solid back with wrong sides together.
Sc through both layers around three sides.
Insert the cushion form.
Close the final edge or add a removable button closure.
Keeping the Floral Centers Flat
The center should have visible texture without forming a raised mound.
If the flower cups after Round 5, check the chain arches first.
They may be too short for your tension.
Increase the affected arches by one chain on the next sample rather than aggressively stretching the completed motif.
Preventing Ruffled Squares
Excess fabric usually appears first in the transition from flower to square.
If the motif ripples during Round 7, reduce unnecessary side stitches or shorten oversized chain spaces.
Do not continue adding frame rounds to a visibly ruffled center.
Correct the transition before proceeding.
Maintaining Consistent Corners
Place a stitch marker in every corner space from Round 7 onward.
Each corner must contain the same increase structure.
Missing one corner increase can make the motif look square while reducing one side enough to cause problems during joining.
Assembly
- Make one complete cream floral square, block it to approximately 19–21 cm and record all four side and diagonal measurements.
- Repeat the same motif in dusty rose and burgundy, adjusting hook tension if necessary so all three colors match the cream master square.
- Make the required number of motifs and block every square before beginning the final color layout.
- Arrange the cream, dusty rose and burgundy squares according to the selected repeating sequence and photograph the layout for reference.
- Join motifs into horizontal rows with cream yarn, checking the seam after approximately every 5 cm for contraction.
- Measure completed rows and correct any row that differs by more than approximately 1 cm from another row containing the same number of motifs.
- Join the rows vertically, keeping the four-square intersections compact and free from bulky additional stitches.
- Work a cream foundation round around the entire assembled bedspread and check that all four corners lie flat.
- Add the openwork, fan and scalloped border rounds, distributing stitches evenly along all four sides.
- Weave every tail through dense structural stitches, complete a light final blocking and reshape the scalloped border before drying.
The finished bedspread should form a regular three-color floral grid separated by narrow cream seams and surrounded by an even cream lace border.
7 Technical Tips
- Keep every blocked square within 5 mm of the master measurement. A repeated 5 mm error across ten motifs can change the final bedspread width by approximately 5 cm.
- Measure both diagonals before joining. If they differ by more than approximately 5 mm, reblock the square before adding it to the bedspread.
- Mark all four corners from the first squaring round. A missed corner increase creates a distorted block even when the flower center looks correct.
- Test the cream joining seam after every 5 cm. A tight seam produces a visible groove and prevents the blocks from lying in one plane.
- Compare the three yarn colors after blocking. If one color consistently finishes more than 5 mm larger, change hook size for that color instead of forcing it to the master dimension.
- Keep four-square intersections compact. Multiple extra stitches at one intersection produce a hard raised knot and distort the surrounding openwork.
- Weave each structural tail through at least 5 cm of dense stitches. Avoid carrying ends through chain arches because the tails may become visible when the lace stretches.
Care and Final Blocking
Wash according to the selected yarn’s care instructions.
Support the complete bedspread while wet rather than lifting it by one corner.
Lay the piece flat.
Align the cream seam grid first, then measure the outer perimeter.
Shape the scallops only after the main field is square.
Allow the bedspread to dry completely before folding or placing it on the bed.
Conclusion
Color placement supplies the variation in this floral granny square crochet bedspread pattern, while identical construction keeps cream, dusty rose and burgundy blocks compatible at every seam. Begin with one 19–21 cm cream master square, then compare blocked samples in the other two colors before starting full production. Keep both diagonals accurate, use cream for the joining grid, and test several connected motifs before assembling long rows. Finish the completed field with the openwork scalloped border shown in the design. Save the finished project to Pinterest or share it on Instagram with #RoseBurgundyGrannyBedspread. Would you arrange the three colors evenly, or use burgundy more heavily around the outside rows?









