Introduction
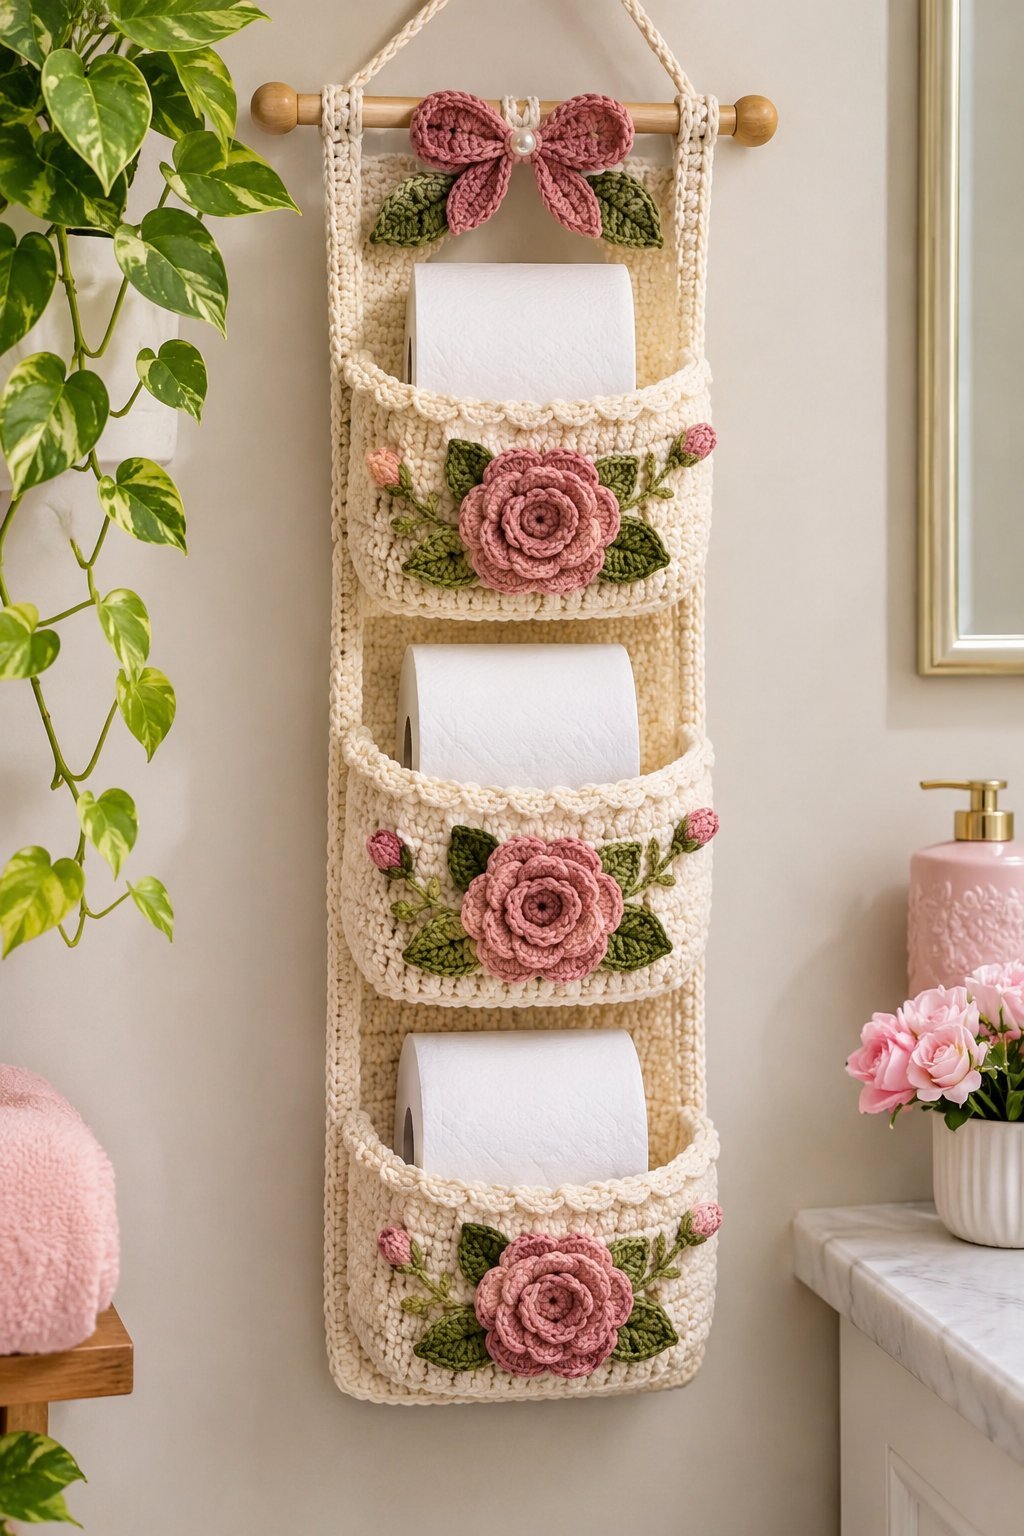
Three toilet paper rolls need three separate compartments, but their combined weight must be supported by one continuous hanging panel. This crochet toilet paper holder pattern features cream-colored storage pockets, dusty rose flowers, olive-green leaves, and a decorative bow. Made primarily with cotton yarn and a 5 mm crochet hook, the organizer measures approximately 70 cm long and 20 cm wide. This intermediate-level project provides vertical bathroom storage while keeping replacement rolls accessible.
The Design: What Makes This Floral Organizer Different
The organizer uses a continuous rectangular backing to distribute weight across three storage compartments. Each pocket features a reinforced bottom, separate side gussets, and a decorative upper edge, providing sufficient depth for standard toilet paper rolls.
Three layered dusty rose flowers create the main decorative features. Olive-green leaves and smaller rosebuds surround each flower, while a four-loop bow finishes the upper section.
Shallow compartments are a common construction problem because rolls can tip forward. Boxed pocket construction and reinforced attachment points help maintain stability.
Project Information at a Glance
| Project Detail | Specification |
|---|---|
| Skill level | Intermediate |
| Estimated time | 10–14 hours |
| Finished dimensions | Approximately 70 × 20 cm |
| Main crochet hook | 5 mm |
| Detail crochet hook | 3.5 mm |
| Construction | Flat panels, boxed pockets, floral appliqués |
| Capacity | Three standard toilet paper rolls |
| Best use | Bathroom wall or cabinet-side storage |
Measurements and yarn quantities are estimates developed from the photograph. The instructions represent an original reconstruction, not a tested reproduction of an existing published pattern. Crochet a gauge sample and check pocket dimensions before completing the organizer.
Materials and Tools
Yarn Requirements
- Warm cream: 350–450 g worsted-weight cotton for the backing, pockets, bottoms, gussets, and hanging straps.
- Dusty rose: 80–100 g DK cotton for the three large flowers and decorative bow.
- Olive green: 35–50 g DK cotton for leaves, stems, and floral accents.
- Soft peach: 10–15 g DK cotton for optional contrasting rosebuds.
Drops Paris is one possible yarn for the main structure, while Drops Muskat may be used for smaller decorative components. These are substitute suggestions rather than identified materials from the photograph.
Additional Tools
- 5 mm crochet hook for structural panels.
- 3.5 mm crochet hook for flowers and leaves.
- Tapestry needle and matching sewing thread.
- Stitch markers, scissors, and measuring tape.
- Wooden dowel, approximately 25–28 cm long.
- Cotton hanging cord, approximately 60 cm.
- Pearl-style bead, approximately 10–12 mm, optional.
- Small amount of polyester stuffing for rosebuds.
- Optional plastic canvas for backing reinforcement.
Choose firm cotton yarn for the main panels. Highly elastic yarn can cause the compartments to sag after repeated use.
Crochet Abbreviations
| Abbreviation | Meaning |
|---|---|
| MR | Magic ring |
| ch | Chain |
| sc | Single crochet |
| hdc | Half double crochet |
| dc | Double crochet |
| inc | Two single crochets in one stitch |
| dec | Invisible decrease |
| sl st | Slip stitch |
| BLO | Back loop only |
| FO | Fasten off |
An invisible decrease joins the front loops of two consecutive stitches into one single crochet, reducing visible gaps.
All instructions use US crochet terminology. Work flat components in turned rows unless otherwise specified. The flower centers and rosebuds use rounds.
Crochet Pattern – Step by Step
Part 1: Main Hanging Back Panel (Make 1)
Yarn: warm cream. Hook: 5 mm.
The backing forms the structural foundation. Maintain consistent tension because uneven rows can cause the organizer to twist when suspended.
Foundation: Ch 37.
R1: Sc in second ch from hook and across (36).
R2–R88: Ch 1, turn, sc across (36).
R89: Ch 1, turn, sc across (36).
Continue working additional rows if necessary until the backing reaches approximately 65–70 cm. The final measurement depends on yarn thickness and individual gauge.
Work an edging of evenly spaced sc around the rectangle, placing 3 sc at each corner. Avoid pulling the long edges inward. Join with sl st and fasten off, leaving a 20 cm tail.
Lay the panel flat and measure both long edges. They should be equal in length before the pockets are attached.
Part 2: Storage Pocket Fronts (Make 3)
Yarn: warm cream. Hook: 5 mm.
Each front panel forms the visible outer wall of one storage compartment.
Foundation: Ch 37.
R1: Sc in second ch from hook and across (36).
R2–R17: Ch 1, turn, sc across (36).
R18: Ch 1, turn, sc across (36).
Measure the rectangle. Aim for approximately 19–20 cm wide and 13–15 cm high, adjusting the number of rows if required.
R19: Ch 1, turn, sc across (36).
For a decorative upper edge, work a separate scalloped trim using repeating groups of sl st and 3 hdc, distributing the groups evenly across the opening.
Fasten off, leaving a 35 cm sewing tail. Repeat twice.
The finished rim should remain flexible enough to insert and remove a full roll without pulling the compartment out of shape.
Part 3: Pocket Side Gussets (Make 6)
Yarn: warm cream. Hook: 5 mm.
Two gussets provide depth for each compartment.
Foundation: Ch 9.
R1: Sc in second ch from hook and across (8).
R2–R13: Ch 1, turn, sc across (8).
R14: Ch 1, turn, sc across (8).
Fasten off, leaving a 25 cm tail.
Make six identical pieces. Each should measure approximately 4–5 cm wide and match the side height of the pocket front after any necessary gauge adjustments.
Attach one gusset to each side of a pocket front. Align the lower corners carefully, as these points will connect to the bottom panel.
Part 4: Pocket Bottoms (Make 3)
Yarn: warm cream. Hook: 5 mm.
Foundation: Ch 37.
R1: Sc in second ch from hook and across (36).
R2–R7: Ch 1, turn, sc across (36).
R8: Ch 1, turn, sc across (36).
Fasten off with a 30 cm tail.
Each bottom should measure approximately 19–20 cm wide and 4–5 cm deep. Adjust the row count to match the gusset depth.
Sew one long edge to the pocket front and the opposite edge to the backing. Connect the short edges to the gussets.
This creates a rectangular base that supports the roll rather than allowing it to hang against a loose pocket front.
Part 5: Layered Dusty Rose Flowers (Make 3)
Yarn: dusty rose. Hook: 3.5 mm.
The photograph shows dimensional flowers with tightly rolled centers and overlapping outer petals.
Foundation: Ch 51.
R1: Sc in second ch from hook and across (50).
R2: Ch 3, turn. Work 2 dc in the first st, skip 1 st, sl st in the next st. Repeat across, adjusting the final group to fit.
R3: Along the petal edges, work groups of sc, hdc, 2 dc, hdc, and sc wherever the available spaces permit.
Fasten off, leaving a 40 cm tail.
Roll the strip from one end, keeping the center compact. Allow the outer petals to spread gradually. Sew repeatedly through the underside to secure the layers.
For additional volume, crochet a second strip beginning with ch 31. Roll this around the first flower center and stitch both layers together.
Make three flowers measuring approximately 8–10 cm across. Check their diameter against the pocket fronts before attachment.
Part 6: Olive-Green Leaves (Make 12)
Yarn: olive green. Hook: 3.5 mm.
Foundation: Ch 13.
R1: Sc in second ch from hook, hdc in next 2 sts, dc in next 6 sts, hdc in next 2 sts, and 3 sc in final ch.
Continue along the opposite side of the foundation chain. Work hdc in next 2 sts, dc in next 6 sts, hdc in next 2 sts, and sc in final st. Join with sl st.
R2: Ch 1, sc around, placing 3 sc at the pointed end.
Fasten off, leaving a 20 cm tail.
Optional surface slip stitches along the center create a raised vein. Each leaf should measure approximately 6–7 cm long.
Arrange four leaves around each rose, with two extending upward and two downward. Keep their pointed ends clear of the pocket openings.
Part 7: Small Rosebuds (Make 6)
Yarn: dusty rose or soft peach. Hook: 3.5 mm.
R1: 6 sc in MR (6).
R2: Inc ×6 (12).
R3: (Sc, inc) ×6 (18).
R4–R5: Sc around (18).
R6: (Sc, dec) ×6 (12).
R7: Dec ×6 (6).
Add a small amount of stuffing before closing. Fasten off and draw the remaining stitches together.
Make six buds, approximately 2–3 cm each. Attach two beside every large flower, using the peach shade selectively to vary the floral arrangement.
Avoid firm overstuffing because it can stretch the decrease stitches and expose the filling.
Part 8: Decorative Green Stems (Make 6)
Yarn: olive green. Hook: 3.5 mm.
Foundation: Ch 16.
R1: Sl st in second ch from hook and across (15).
Fasten off, leaving a 15 cm sewing tail.
Make six stems and position them diagonally behind the rosebuds.
For smaller branches, crochet additional chains of 5–7 stitches and attach them to the main stems.
Secure every branch against the pocket surface using matching yarn. Loose stems may catch on toilet paper rolls during removal.
The greenery should frame the large rose without extending excessively beyond the pocket sides.
Part 9: Four-Loop Dusty Rose Bow (Make 1)
Yarn: dusty rose. Hook: 3.5 mm.
The upper decoration consists of four elongated loops arranged around a central bead.
Make four identical strips.
Foundation: Ch 16.
R1: Sc in second ch from hook and across (15).
R2: Ch 1, turn, hdc across (15).
R3: Ch 1, turn, hdc across (15).
R4: Ch 1, turn, sc across (15).
Fasten off, leaving a 25 cm tail.
Fold each strip into a loop and sew its short ends together. Arrange the loops diagonally, forming two upper and two lower sections.
Stitch the loops together at their centers. Wrap dusty rose yarn around the joining point, then attach the optional pearl-style bead using strong thread.
For households with young children, replace the bead with an embroidered center to eliminate a detachable small component.
Part 10: Bow Leaves (Make 2)
Yarn: olive green. Hook: 3.5 mm.
Foundation: Ch 11.
R1: Sc in second ch from hook, hdc in next 2 sts, dc in next 4 sts, hdc in next 2 sts, and 3 sc in final ch.
Continue along the opposite side of the chain using the corresponding stitch sequence. Join with sl st.
Fasten off, leaving a 20 cm tail.
Position one leaf beneath each side of the bow. Their tips should extend beyond the lower loops without covering the hanging straps.
Part 11: Hanging Straps (Make 2)
Yarn: warm cream. Hook: 5 mm.
Foundation: Ch 9.
R1: Sc in second ch from hook and across (8).
R2–R25: Ch 1, turn, sc across (8).
R26: Ch 1, turn, sc across (8).
Fasten off, leaving a 35 cm tail.
Fold each strap around the wooden dowel and secure both ends to the upper backing panel.
Position the straps approximately 3 cm from the panel edges. Sew through several backing rows to distribute the load.
Attach the hanging cord near the dowel ends and tie a secure knot above the organizer.
The dowel should remain horizontal when all three pockets contain rolls.
Assembly Instructions
- Prepare the backing. Lay the main panel flat and mark three pocket positions. Check that the spaces between compartments are consistent.
- Position the upper pocket. Place it approximately 8–10 cm below the top edge, leaving sufficient room for the bow and hanging straps.
- Attach the remaining pockets. Align the second and third compartments vertically. Check their positions with a measuring tape before sewing.
- Secure the pocket bottoms. Sew each bottom to the front, gussets, and backing. Reinforce the corners with additional stitches.
- Test the compartments. Insert standard toilet paper rolls and check the depth, opening width, and front-panel stability.
- Position the large roses. Center one flower on each pocket, keeping the petals below the upper opening.
- Attach the leaves. Arrange four leaves around every rose. Sew along their center veins while leaving the outer edges slightly raised.
- Add buds and stems. Position two buds beside each rose, connecting them with green stems and smaller branches.
- Install the hanging hardware. Secure the straps around the dowel, attach the hanging cord, and test the upper attachment points.
- Finish the decoration. Attach the bow and its leaves, weave in all yarn tails, and inspect every seam before hanging.
The completed organizer contains three functional storage pockets, three large floral appliqués, six rosebuds, and a decorative upper bow.
7 Technical Tips for a Better Finish
- Prevent uneven spacing. Measure the distance between compartments before sewing. Differences greater than 1 cm may become visible when the organizer hangs vertically.
- Control backing stretch. Maintain firm single crochet tension throughout the main panel. Loose stitches near the upper straps can cause the backing to lengthen under load.
- Protect the pocket openings. Position each large rose at least 2 cm below the upper rim. Petals placed too high can interfere with roll removal.
- Reinforce lower corners. Sew through the front, gusset, and bottom layers at each junction. These corners experience repeated stress whenever rolls are inserted.
- Limit rosebud stuffing. Add only enough filling to create a rounded shape. Excessive stuffing can expose gaps around the final decrease round.
- Pin decorations before sewing. Center each large rose within approximately 5 mm of the pocket midpoint. Uneven floral placement can make otherwise aligned compartments appear crooked.
- Secure the hanging straps. Stitch each strap through multiple backing rows and test the organizer with three rolls. Check that the dowel remains level and the attachment seams do not separate.
Adjusting the Pattern for Different Bathrooms
For a narrower organizer, reduce the backing and pocket widths from 36 to 30 stitches, provided the finished compartments still accommodate the intended rolls.
For oversized rolls, increase the gusset depth by two to four foundation chains and extend the bottom panels to match.
A two-pocket version requires a shorter backing. A four-pocket version needs another compartment and approximately 20–22 cm of additional backing, plus reinforced hanging straps.
If the panel bends inward, place removable plastic canvas inside a fabric sleeve attached behind the backing.
Color Variations and Decorative Options
The original design combines warm cream, dusty rose, olive green, and soft peach. Alternative palettes include taupe with sage green, lavender with ivory, or coral with dark green.
Single-layer roses reduce yarn consumption and sewing time but provide less dimension. Keep bulky decorations outside the compartments to prevent them from catching on stored rolls.
Cleaning and Maintenance
Remove the toilet paper rolls, wooden dowel, and detachable inserts before washing. Hand wash the crochet sections in cool water with mild detergent.
Press out moisture with a towel, reshape the pockets and petals, and dry flat. Avoid hanging the organizer while wet because the additional weight may stretch the backing.
Inspect the hanging straps, pocket corners, and floral attachments periodically. Repair loose stitches before regular use.
Frequently Asked Questions
Can beginners make this crochet toilet paper holder?
The main panels use basic single crochet stitches, but the boxed compartments and layered flowers require intermediate assembly skills. Makers familiar with rectangular crochet pieces, increases, decreases, and sewing techniques can complete the project in separate stages.
What yarn is best for a hanging toilet paper holder?
Worsted-weight cotton works well for the structural panels because it produces relatively firm fabric. DK cotton is suitable for the smaller flowers, leaves, and decorative details. Avoid very stretchy yarn for the backing.
How many toilet paper rolls does the organizer hold?
The design accommodates three standard rolls, with one roll stored in each compartment. Actual capacity depends on the finished pocket dimensions and the diameter of the toilet paper rolls.
Can the flowers be removed for washing?
Yes, provided they are attached using removable fasteners or sewn to a detachable decorative strip. Permanently stitched flowers should remain attached during gentle hand washing.
Does the organizer need a wooden dowel?
A wooden dowel is recommended because it distributes weight across the upper edge. Without rigid support, the backing may fold inward or become distorted when the compartments are filled.
Can this organizer be used in a humid bathroom?
Yes, but keep it away from direct water spray and allow sufficient airflow around the fabric. Cotton absorbs moisture, so regular drying and occasional washing help maintain the organizer’s shape and cleanliness.
Conclusion
This crochet toilet paper holder pattern combines vertical storage with detailed floral construction. The continuous backing supports three boxed compartments, while dusty rose flowers, olive-green leaves, small rosebuds, and a four-loop bow reproduce the main decorative elements of the reference image. Firm cotton yarn, reinforced corners, and a wooden hanging dowel contribute to structural stability.
Before installation, test every pocket with a full toilet paper roll and inspect the hanging attachments. Adjust any loose seams before regular use. Share photographs of the completed organizer on Pinterest or Instagram using #DustyRoseToiletPaperHolder.
Would you retain the four-loop bow or replace it with another layered dusty rose flower?








