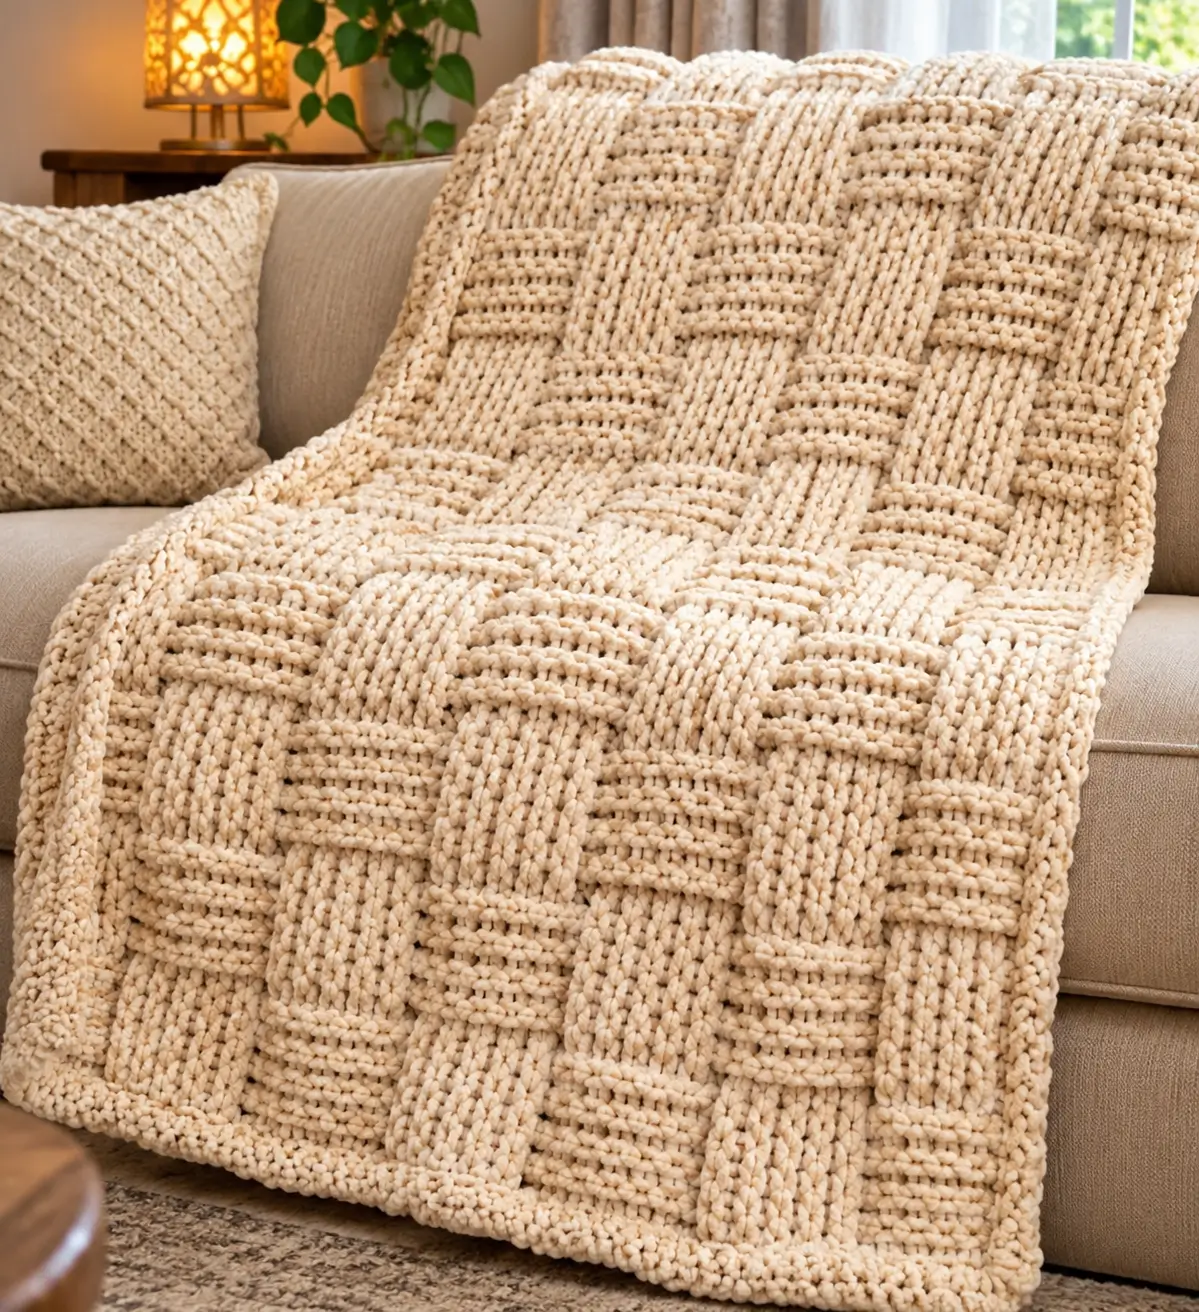
Basket-weave texture depends on one illusion: raised crochet columns must appear to pass over and under one another without the blanket becoming excessively stiff. This photo-inspired chunky basket weave crochet blanket uses a single warm-cream color, thick yarn, alternating raised rectangular blocks, and a compact border. The construction suits a sofa throw because the dense fabric provides substantial coverage while the repeating block system makes both width and length adjustable.
The Design: What Makes This Basket Weave Blanket Different
The photographed blanket has a strongly dimensional woven appearance rather than a flat checkerboard. Long vertical ridges alternate with horizontal textured sections, creating blocks that visually cross each other. A single neutral yarn keeps attention on stitch direction instead of color changes.
The most important structural decision is block proportion. Each raised section needs enough rows and stitches to look rectangular, but neighboring blocks must remain equal in overall dimensions. The second decision is tension: post stitches consume more yarn and pull the fabric inward. A hook that is too small can produce a rigid mat rather than a flexible blanket. Finally, the border is deliberately narrow. A large decorative edging would compete with the heavy basket texture and add unnecessary weight.
Project Information at a Glance
| Skill Level | Construction | Target Size | Hook | Best For |
|---|---|---|---|---|
| Intermediate | One-piece textured rectangle | Approximately 110 × 150 cm | 8–10 mm | Sofa throw, lap blanket, bed-end throw |
Materials and Tools
Yarn
- Warm Cream — bulky #5 or light super-bulky #6 yarn — approximately 1,600–2,200 g for a medium sofa throw.
The quantity is a project estimate because basket-weave fabric can consume considerably more yarn than open crochet. Make and weigh a large swatch before purchasing yarn for a custom-sized blanket.
Tools
- 8–10 mm crochet hook, selected to suit the yarn and desired drape
- Large-eye yarn needle
- Scissors
- Stitch markers
- Measuring tape
- Blocking mats if required for the chosen fiber
Abbreviations
- ch — chain
- sc — single crochet
- hdc — half double crochet
- dc — double crochet
- FPdc — front post double crochet
- BPdc — back post double crochet
- sl st — slip stitch
- st/sts — stitch/stitches
- RS — right side
- WS — wrong side
Understanding the Basket Weave Structure
The woven effect is produced by groups of post stitches. Front post stitches push a section toward the viewer. Back post stitches push the neighboring section behind it. After several rows, the direction is reversed.
For this version, use blocks that are 6 stitches wide. Work the first group as FPdc and the next group as BPdc. Continue alternating across the row.
After six textured rows, reverse the groups. A block that was raised becomes recessed, while the neighboring recessed block becomes raised.
This creates the repeating over-under appearance.
Gauge Swatch
Do not begin with the full foundation chain. First crochet a swatch containing at least four complete basket-weave blocks.
A useful test swatch is approximately 35 × 35 cm.
Work enough rows to complete at least two full directional changes. Measure only after the fabric has rested.
Check three things:
- The raised sections should be clearly visible.
- The swatch should bend easily when lifted from one edge.
- The width should remain reasonably consistent from top to bottom.
If the fabric is rigid, increase the hook size. If the ridges are loose and poorly defined, reduce the hook size.
Choosing the Blanket Width
The stitch count must accommodate complete 6-stitch blocks.
Use a multiple of 12 stitches, then add the stitches required for the selected edge treatment.
Rather than relying on a fixed chain count, measure the blocked swatch. Determine how many 12-stitch pairs are required to reach the intended width.
Suggested Finished Sizes
| Blanket Type | Approximate Finished Size |
|---|---|
| Baby Blanket | 75 × 95 cm |
| Lap Blanket | 90 × 120 cm |
| Sofa Throw | 110 × 150 cm |
| Large Throw | 130 × 170 cm |
| Bed-End Blanket | 150 × 190 cm |
Foundation
Chain the calculated number of stitches for your desired width.
Keep the foundation chain loose. A tight starting chain will pull the lower edge inward once the heavy post-stitch fabric develops.
Foundation Row
Dc in the appropriate starting chain according to your preferred turning-chain method.
Work 1 dc in every chain across.
Turn.
This row forms the posts around which the first basket-weave section will be worked.
Basket Weave Pattern — First Block Section
Row 1
Ch 2 or use your preferred standing stitch. The turning chain does not need to count as a stitch if the edges are worked consistently.
Work 1 dc in the first edge stitch.
*FPdc around each of the next 6 posts.
BPdc around each of the next 6 posts.*
Repeat from * to * across.
Work 1 dc in the final edge stitch.
Turn.
Row 2
Work the stitches as they visually present from the current side so the same physical columns remain raised on the front of the blanket.
Maintain each 6-stitch section without adding or dropping stitches.
Turn.
Rows 3–6
Repeat the established post-stitch arrangement.
After Row 6, the fabric should show alternating raised and recessed vertical rectangles.
Second Basket Weave Section
The stitch direction now changes.
Row 7
Work 1 dc in the edge stitch.
Above the first 6-stitch block, work the opposite post-stitch treatment used in the previous section.
Above the next 6-stitch block, reverse it as well.
Continue across.
In practical terms, the previously raised columns become recessed and the previously recessed columns become raised.
Rows 8–12
Continue the new arrangement for six total rows.
At the end of Row 12, two complete basket-weave sections are established.
Continue the Main Blanket
Repeat Rows 1–12 until the blanket approaches the required length.
Finish after a complete 6-row section rather than stopping halfway through a block. This gives the upper and lower edges a more balanced appearance.
Measure the blanket every three or four sections. Dense post stitches can gradually change the width if tension becomes tighter during a long project.
Creating the Deep Woven Appearance
The photograph shows unusually prominent vertical sections. A standard FPdc/BPdc basket weave gives a similar structural effect, but additional depth can be introduced by using extended post stitches or by working selected raised groups with slightly taller stitches.
Do not dramatically lengthen the loops. A difference of only a few millimeters can make the raised columns more prominent.
Another option is to work the FPdc groups with relaxed tension while keeping the BPdc groups at normal tension. Test this method on the swatch first because the result depends heavily on yarn elasticity.
Alternative Extra-Chunky Version
For a heavier blanket, use super-bulky #6 yarn and a hook appropriate for the yarn.
Reduce the number of blocks rather than trying to reproduce the same stitch count used with thinner yarn.
The finished dimensions are controlled by measurement, not by copying a fixed number of stitches.
Extra-thick yarn also makes each post stitch substantially larger, so four- or five-stitch blocks may produce proportions similar to six-stitch blocks made with bulky yarn.
Maintaining Straight Side Edges
Place a stitch marker in the first and last true stitch of every row.
Post stitches make edge stitches less obvious because the textured fabric pulls forward and backward.
Count the stitches after every directional change.
If one edge begins moving inward, check the previous rows before continuing. Missing a single edge stitch repeatedly can remove several centimeters from the upper width.
Top Finishing Row
After completing the final basket-weave section, work one row of dc across.
This creates a stable foundation for the border and visually balances the initial foundation row.
Fasten off only if you want to begin the border at a different corner.
Simple Crochet Border
The photographed blanket uses a compact frame rather than a wide decorative border.
Border Round 1
Join the same cream yarn at one corner.
Work sc evenly around the entire blanket.
Across the top and bottom, work approximately one sc in each stitch.
Along the row ends, distribute stitches according to the actual height of the fabric rather than forcing a fixed ratio.
At each corner work:
(sc, ch 1, sc)
Border Round 2
Work hdc in every stitch around.
At each corner work:
(hdc, ch 1, hdc)
Border Round 3
Work sc around for a compact final edge.
At the corners work three sc into the corner space.
Join and fasten off.
Optional Raised Border
If a more substantial frame is required, add one round of alternating FPdc and BPdc before the final sc round.
This creates a narrow ribbed border that coordinates with the central texture.
Avoid making the frame too deep. The basket weave already produces considerable visual and physical weight.
Yarn Requirement Calculation
Basket-weave crochet uses a large amount of yarn, so a swatch-based calculation is more useful than a generic skein estimate.
Make a sample measuring approximately 30 × 30 cm using the exact yarn and hook planned for the blanket.
Weigh the finished sample.
For example, if the 30 × 30 cm swatch weighs 90 g:
Swatch area = 900 cm²
A 110 × 150 cm blanket has an approximate area of:
16,500 cm²
Divide:
16,500 ÷ 900 = 18.33
Multiply by the swatch weight:
18.33 × 90 g = approximately 1,650 g
Add extra yarn for the border, swatching, and normal variation. This is only a calculation example; the actual amount depends on yarn thickness, fiber, hook size, tension, and border depth.
Color Options
The monochrome construction is especially effective because shadows define the woven blocks. Suitable alternatives include:
- Natural Cream — closest to the photographed blanket.
- Oatmeal Beige — emphasizes the heavy woven appearance.
- Sage Green — gives the texture a botanical neutral character.
- Dusty Rose — works well for a softer bedroom throw.
- Charcoal Gray — produces strong shadow definition.
- Deep Navy — emphasizes the raised post stitches.
Two-Color Basket Weave Option
The pattern can also be worked with alternating colors, but changing color at every block would require excessive yarn management.
A cleaner method is to change color after each complete six-row section.
For example:
- Rows 1–6: cream
- Rows 7–12: beige
- Rows 13–18: cream
- Rows 19–24: beige
This preserves the woven structure while producing broad horizontal color bands.
Assembly and Finishing
- Make a large basket-weave swatch using the selected yarn and hook.
- Measure the blocked or rested swatch and calculate the required number of 12-stitch repeats.
- Work a loose foundation chain and complete one solid dc foundation row.
- Establish alternating 6-stitch FPdc and BPdc sections.
- Work six rows before reversing the raised and recessed block positions.
- Repeat the 12-row sequence until the required blanket length is reached.
- Finish after a complete basket-weave section and work a stabilizing dc row.
- Work the compact sc and hdc border around all four sides.
- Weave yarn tails through several directions inside the dense stitches.
- Lay the blanket flat, square the corners, and allow the fabric to relax before taking the final measurement.
The finished fabric should show a continuous grid of alternating raised rectangles with a flat, stable perimeter.
7 Technical Tips for a Cleaner Basket Weave
- Contracting foundation: use a hook one size larger for the starting chain if the lower edge pulls inward. The foundation width should remain within approximately 1–2 cm of the width measured after the first full basket-weave repeat.
- Missing edge stitches: mark the first and last true stitch of every row. Losing one edge stitch during each six-row section quickly produces visibly tapered sides.
- Weak basket texture: insert the hook completely around the post rather than into the top loops when making FPdc and BPdc. Partial post placement reduces the raised effect.
- Rigid fabric: increase the hook size when the swatch cannot fold easily under its own weight. Thick basket-weave crochet should remain flexible despite its density.
- Unequal blocks: count every six-stitch group at each direction change. One misplaced post stitch shifts the woven pattern for all subsequent rows.
- Wavy side border: do not force too many stitches into the row ends. If the border begins rippling after 20–30 cm, remove stitches before continuing around the remaining sides.
- Yarn shortage: weigh a minimum 30 × 30 cm swatch before purchasing the full quantity. Basket-weave post stitches consume considerably more yarn than their flat appearance suggests.
Care and Finishing
Follow the washing instructions supplied for the selected yarn. A large chunky blanket becomes heavy when wet, so support its full weight during washing and transfer.
Lay the blanket flat to reshape it. Align the four edges first, then gently arrange the basket-weave blocks with your hands.
Acrylic fibers may respond to careful steam treatment, but the heat source should never touch the yarn directly. Natural fibers should be treated according to their specific care requirements.
Avoid aggressive stretching. The objective is to square the perimeter while retaining the depth of the post-stitch texture.
Conclusion
This chunky basket weave crochet blanket gets its structure from repeated six-stitch post groups rather than separate woven strips. Start with a large swatch, determine the finished width from complete pattern repeats, and check the stitch count every time the basket direction changes. A single warm-cream yarn keeps the construction visually clear, while a narrow border stabilizes the dense center without adding unnecessary bulk. For the next step, crochet one four-block swatch and test its flexibility before calculating the full foundation. Share the finished throw on Pinterest or Instagram with #ChunkyBasketWeaveBlanket. Would you keep this blanket completely cream, or work alternating basket sections in cream and oatmeal?








