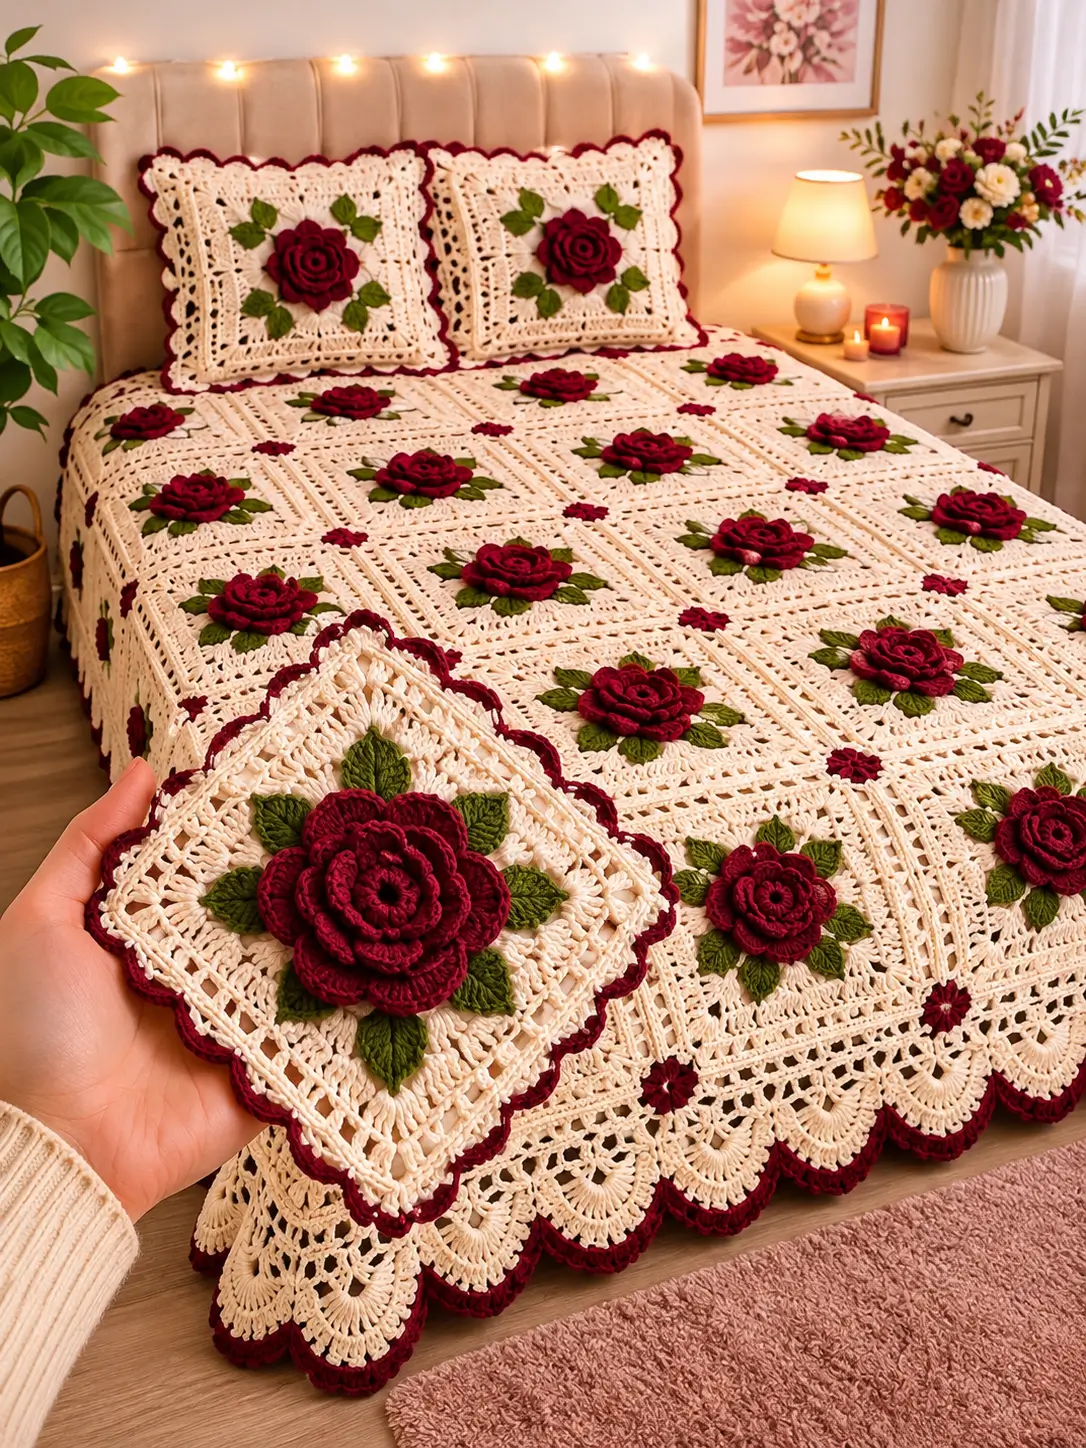
A burgundy rose needs enough height to read as a flower without turning the center of its crochet square into a rigid mound. This photo-inspired 3D rose granny square crochet bedspread uses layered burgundy roses, olive-green leaves, an ivory openwork square, small burgundy joining accents, and a deep scalloped border. The construction is modular, making the finished dimensions adjustable through the number of squares rather than changes to the rose itself.
The Design: What Makes This Rose Bedspread Different
The bedspread is built from individual ivory squares, each carrying a separate dimensional rose and a ring of green leaves. Separating the flower from the structural square keeps the joining edges flat and prevents bulky petals from becoming trapped inside seams.
The rose uses several graduated petal layers. Small inner petals form the tightly rolled center, medium petals establish the recognizable rose shape, and larger outer petals spread across the ivory background. Olive leaves create separation between the burgundy flower and cream square. Narrow openwork sections around each motif reduce the visual weight of the dense rose. Small burgundy accents at the intersections connect the flower color across the entire bedspread. The main construction risk is attaching the rose too close to the square frame; enough ivory background must remain exposed for flat joining.
Project Information at a Glance
| Skill Level | Construction | Square Size | Hook | Best For |
|---|---|---|---|---|
| Intermediate | Joined floral squares | Approximately 20–22 cm | 4.0–4.5 mm | Bedspread, throw, pillow shams |
Materials and Tools
Yarn
- Warm Ivory — DK #3 or light worsted yarn — main square and border.
- Deep Burgundy — DK #3 or light worsted yarn — roses, joining accents, and final border.
- Olive Green — DK #3 or light worsted yarn — leaves.
- Dark Burgundy — optional — inner rose shading.
Use the same yarn weight throughout the project. Cotton or a cotton-acrylic blend gives the openwork square enough definition while allowing the raised petals to hold their shape.
Tools
- 4.0–4.5 mm crochet hook
- Yarn needle
- Scissors
- Stitch markers
- Blocking mats
- Rust-resistant blocking pins
- Measuring tape
Abbreviations
- MR — magic ring
- ch — chain
- sc — single crochet
- hdc — half double crochet
- dc — double crochet
- tr — treble crochet
- sl st — slip stitch
- sp — space
- st/sts — stitch/stitches
- RS — right side
- WS — wrong side
Pattern Construction
Make one complete test square before starting the bedspread. Block it, measure it, and record its finished weight. This master motif determines both the final bedspread dimensions and the approximate yarn requirement.
The square is assembled in four stages:
- Ivory structural square.
- Burgundy dimensional rose.
- Olive crochet leaves.
- Final attachment and blocking.
Ivory Granny Square Foundation
With warm ivory yarn, make an MR.
Round 1
Ch 3, work 2 dc into the ring.
*Ch 3, 3 dc into the ring.*
Repeat from * to * three more times until four 3-dc groups are formed.
Ch 3 and join with a sl st to the top of the beginning ch-3.
Round 2
Sl st into the first corner space.
Ch 3, 2 dc, ch 3, 3 dc in the same corner.
Ch 2.
In each remaining corner work:
(3 dc, ch 3, 3 dc), ch 2.
Join.
Round 3
Sl st to the corner.
Work:
(3 dc, ch 3, 3 dc) in each corner.
Across each side work:
ch 2, 3 dc in next ch-2 space, ch 2.
Join.
Round 4 — Openwork Round
In every corner work:
(2 dc, ch 3, 2 dc)
Across each side alternate:
ch 2, sc in next space, ch 2.
This produces the lighter openwork section around the central flower area.
Round 5 — Structural Frame
Work hdc around the entire square.
Place:
(2 hdc, ch 2, 2 hdc)
in every corner.
Work enough hdc into each chain space to keep the side flat.
Round 6 — Lace Detail
Ch 1, sc in the first stitch.
*Ch 3, skip 2 sts, sc in next st.*
Repeat across each side.
At every corner work:
sc, ch 3, sc
in the corner space.
Round 7 — Outer Square Frame
Work dc groups into the chain spaces from the previous round.
Use 3 dc in regular spaces.
In each corner work:
(3 dc, ch 3, 3 dc)
Join and fasten off.
Blocking the Foundation Square
Block the ivory square before adding the flower. Target approximately 20–22 cm from edge to edge, or select another consistent measurement based on your yarn and hook.
Measure both diagonals. The difference between them should remain below approximately 5 mm. Correct the square now rather than after the dimensional flower has been attached.
3D Burgundy Crochet Rose
The flower is worked separately so the square can remain structurally flat.
Rose Center
With burgundy yarn, make an MR.
Round 1: 8 sc in MR. Join. (8)
Round 2: 2 sc in each stitch around. (16)
Round 3: *sc in next st, 2 sc in next st* around. (24)
Do not increase further. The center should remain compact.
First Petal Layer
*Ch 3, skip 1 st, sl st in next st.*
Repeat around to create petal loops.
Into each ch-3 loop work:
(sc, hdc, 3 dc, hdc, sc)
These small petals form the tightly curled rose center.
Second Petal Foundation
Working behind the first petal layer, attach burgundy yarn around the posts of Round 3.
*Ch 5, anchor behind the next petal with a sc.*
Repeat around.
Second Petal Layer
Into each ch-5 loop work:
(sc, hdc, 5 dc, hdc, sc)
Position these petals between the petals of the first layer.
Third Petal Foundation
Working behind the second layer:
*Ch 7, sc behind the next petal.*
Repeat around.
Third Petal Layer
Into each ch-7 loop work:
(sc, hdc, 2 dc, 3 tr, 2 dc, hdc, sc)
Allow the outer petals to spread more horizontally than the center petals.
Outer Rose Layer
For a fuller bedspread rose, add one final foundation layer behind the third layer using ch-9 loops.
Into each loop work:
(sc, hdc, 2 dc, 5 tr, 2 dc, hdc, sc)
Fasten off, leaving a long tail for attachment.
Shaping the Rose
Do not flatten the finished flower. Curl the first petal layer inward around the center. Position the second layer slightly upward, then allow the final two layers to spread outward.
A finished rose can measure approximately 10–13 cm across depending on yarn, tension, and the number of petal loops used.
The flower should remain smaller than the exposed center of the ivory square. Leave approximately 2–3 cm of visible background between the outer petals and the structural joining edge.
Olive Crochet Leaves
Make approximately 6–8 leaves for each floral square.
Leaf
With olive yarn, ch 9.
Beginning in the second chain from the hook work:
sc, hdc, dc, 2 tr, dc, hdc, sc
At the end work:
(sc, ch 2, sc)
Continue along the opposite side of the foundation chain:
sc, hdc, dc, 2 tr, dc, hdc, sc
Join at the base and fasten off.
Leaf Definition
With a slightly darker olive yarn, surface crochet from the base to the tip.
Alternatively, embroider the center vein using chain stitch.
Keep this line loose enough that the leaf remains flat.
Arranging the Leaves
Place leaves around the rose before sewing any component permanently.
For an eight-leaf arrangement, position one leaf toward each corner and one between each pair of corner leaves.
The tips should radiate away from the flower. Slide the leaf bases approximately 1–2 cm underneath the outer rose petals.
Pin everything in place and verify that the arrangement remains centered when viewed from all four sides.
Attaching the Leaves
Sew each leaf through its base and central vein.
Do not stitch around the complete leaf perimeter. Leaving the edges unattached preserves the raised botanical effect visible in the design.
Keep every leaf tip clear of the square’s outer joining round.
Attaching the Rose
Position the rose over the leaf bases.
Sew the flower to the square through its lowest petal foundation and center base.
Do not sew through the outer edges of the large petals.
Check the reverse side frequently. Attachment stitches should remain localized around the central area rather than traveling across the square.
Make the Remaining Squares
Use the completed master motif as the standard for every additional square.
Check three measurements:
- Blocked square width.
- Rose diameter.
- Distance from outer petals to the joining edge.
Differences in rose height are less important than differences in square size. The structural squares must match before joining.
Planning the Bedspread Size
If each blocked motif measures 21 cm, the approximate dimensions before the outer border are:
| Layout | Approximate Size |
|---|---|
| 5 × 7 squares | 105 × 147 cm |
| 6 × 8 squares | 126 × 168 cm |
| 7 × 9 squares | 147 × 189 cm |
| 8 × 10 squares | 168 × 210 cm |
| 9 × 11 squares | 189 × 231 cm |
| 10 × 12 squares | 210 × 252 cm |
Add the planned border width to both dimensions. Measure the mattress and desired side drop before selecting the final layout.
Estimating Yarn
The most reliable method is to weigh one completely finished motif.
For example, if one blocked square with its rose and leaves weighs 70 g and the project requires 80 squares:
70 g × 80 = 5,600 g
Then add yarn for joining and the border.
For more accurate color planning, weigh the ivory square, burgundy rose, and green leaves separately before assembling the master motif.
Joining the Granny Squares
Arrange all motifs on a large flat surface before joining. Rotate any square whose rose or leaves appear visually heavier on one side.
Join the squares with ivory yarn.
Place two squares with wrong sides together and work a relaxed slip-stitch seam through corresponding outer loops.
Continue joining complete horizontal rows first, then connect those rows vertically.
Do not tighten the seam. A rigid join creates channels between the squares and prevents the bedspread from draping evenly.
Burgundy Intersection Accents
The image uses small burgundy details where four ivory squares meet. These accents visually connect the separate roses.
After joining, attach burgundy yarn at a four-square intersection.
Work a small decorative flower:
Ch 1, sc into the intersection.
*Ch 3, 2 dc, ch 3, sl st into the same central point.*
Repeat four times to create four compact petals.
Fasten off securely on the wrong side.
Repeat at selected intersections across the bedspread.
Inner Bedspread Border
Join ivory yarn at one corner after all squares have been assembled.
Border Round 1
Work sc evenly around the entire bedspread.
At each corner work:
(sc, ch 2, sc)
Border Round 2
Work hdc around.
At each corner:
(2 hdc, ch 2, 2 hdc)
Border Round 3 — Openwork
*Ch 3, skip 2 sts, sc in next st.*
Repeat around.
At each corner increase the chain spacing as required so the border remains flat.
Large Ivory Lace Border
The lower edge in the photo uses deep repeating fan sections. Build these over several rounds rather than attempting the full depth in one row.
Foundation Round
Work chain spaces around the bedspread:
*Ch 5, sc in next suitable space.*
Keep the spacing consistent.
Fan Round
Into alternating chain spaces work:
(2 dc, ch 1) × 5, 2 dc
Anchor each fan with sc into the neighboring chain space.
Expansion Round
Work into each ch-1 space of the fan:
2 dc, ch 1
This expands the shell while maintaining its open structure.
Outer Fan Round
Work sc along the upper sides of each fan and small chain loops around the curved lower edge.
The finished ivory lace should form repeated rounded points around the bedspread.
Burgundy Final Edging
Join burgundy yarn at the edge of one ivory fan.
Work a narrow decorative outline around every scallop.
A compact edging can be made with:
*sc in next 2 sts, ch 2, sl st in first ch, sc in next 2 sts.*
Repeat around the curved sections.
Keep the burgundy edging narrow. Its purpose is to define the ivory lace rather than cover it.
Matching Rose Pillow Sham
The pillow design can be constructed from one large floral square surrounded by additional ivory lace rounds.
Make the rose and leaf arrangement exactly as for the bedspread.
Continue expanding the ivory square until it matches the intended pillow dimensions.
For a 45 × 45 cm cushion, either enlarge one central motif or join four smaller coordinated squares.
Add an ivory backing made with hdc or another dense stitch. An overlapping envelope opening allows the cushion insert to be removed without adding a zipper.
Finish the pillow with the same burgundy-edged scallops used on the bedspread.
Alternative Rose Colors
The same pattern structure can support several palettes:
- Dusty Rose + Ivory + Sage — softer floral version.
- Deep Burgundy + Ivory + Olive — closest to the photographed design.
- Terracotta + Cream + Forest Green — autumn version.
- Navy + Ivory + Sage — higher-contrast botanical version.
- Lavender + Cream + Olive — lighter spring palette.
Assembly
- Make one ivory test square and block it to the selected finished measurement.
- Crochet one complete burgundy rose and shape the graduated petal layers.
- Make 6–8 olive leaves and arrange them evenly around the rose.
- Sew the leaves to the ivory foundation while keeping their outer edges free.
- Attach the rose through its lower foundation, leaving the large outer petals unattached.
- Repeat the process until the required number of matching floral squares is complete.
- Block all squares to identical dimensions before joining.
- Join motifs with relaxed ivory seams and add the small burgundy intersection accents.
- Work the ivory structural border followed by the deep fan-style lace border.
- Add the narrow burgundy edging, weave in all remaining ends, and complete the final blocking.
The completed bedspread should lie flat through the ivory grid while the roses and leaf edges remain visibly raised above the surface.
7 Technical Tips
- Rose center opening: close the starting ring firmly before building the petals. An opening larger than approximately 5 mm becomes increasingly visible as the raised layers spread outward.
- Petals collapsing: attach only the petal foundations to the square. Sewing through the outer 1–2 cm of each petal removes much of the dimensional rose effect.
- Square distortion: block every ivory foundation before adding the flower. Do not use a square when its two diagonal measurements differ by more than approximately 5 mm.
- Leaves disappearing beneath the rose: keep approximately half to two-thirds of each leaf visible beyond the outer petals. Pin the complete arrangement before sewing the first leaf.
- Joining ridge: work slip-stitch seams with a hook one size larger if the join contracts. The joined length of several squares should remain close to the sum of their blocked widths.
- Wavy lace border: excessive stitches are the usual cause. Test one complete side before continuing around the bedspread and remove a fan repeat if the edge begins to ripple.
- Heavy finished blanket: weigh one completed square before committing to the final layout. Multiplying that weight by the number of motifs provides a practical estimate of the finished bedspread weight before the border is added.
Care and Blocking
Check the yarn label before washing. A large dimensional bedspread is best supported during washing rather than allowed to hang while saturated.
After washing, lay the project flat and reshape the square grid first. Arrange the roses only after the foundation is aligned.
Lift the inner petals slightly and spread the outer petals with your fingers. Straighten each olive leaf from base to tip.
Avoid pressing the dimensional flowers directly with an iron. Excessive pressure permanently reduces the relief that defines the design.
Conclusion
This burgundy 3D rose granny square crochet bedspread is built around a flat structural principle: the ivory squares carry the seams, while the roses and olive leaves remain decorative layers above them. Start with one blocked master square, record its measurements and yarn weight, then calculate the required layout from the actual mattress dimensions. Complete and block all foundations before joining, reserving the dimensional flowers for areas safely inside the seams. Finish the assembled grid with deep ivory fan lace and a narrow burgundy outline. Share the finished project on Pinterest or Instagram using #BurgundyRoseCrochetBedspread. Would you use eight olive leaves around each rose, or reduce the arrangement to four larger corner leaves?








