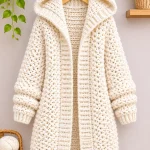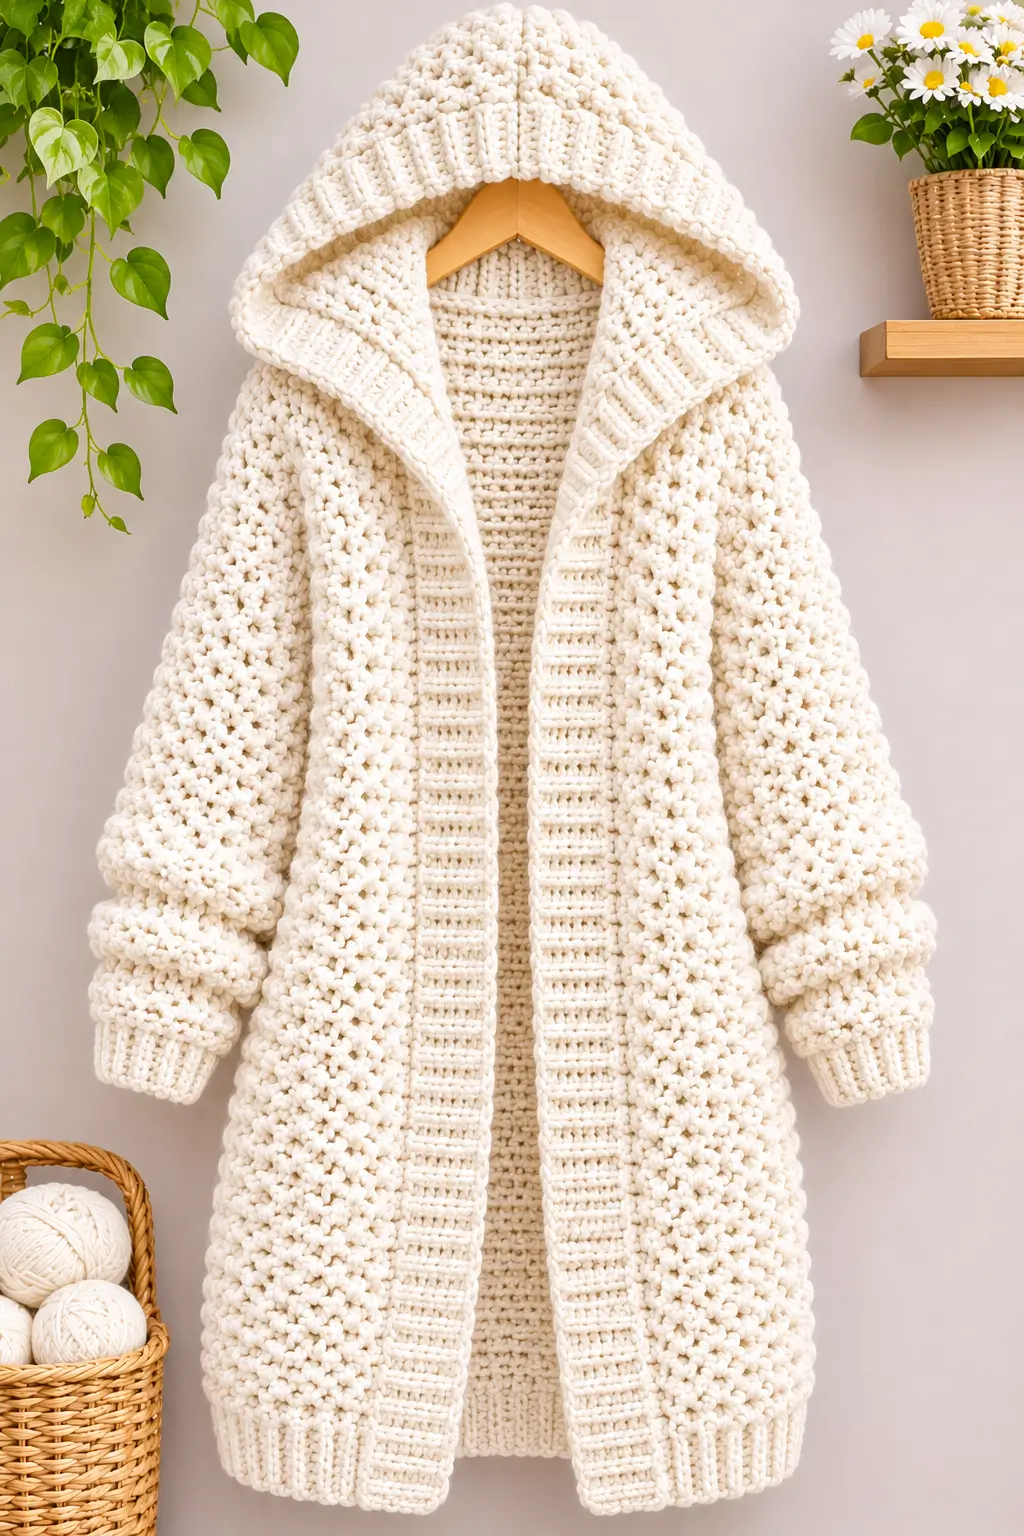
A hood this deep changes the balance of the entire cardigan before a sleeve is even attached. This chunky hooded crochet cardigan pattern uses an ivory textured body, relaxed sleeves, wide ribbed cuffs, a long open front and an oversized hood worked to coordinate with the substantial fabric. The construction is designed around measurements rather than a fixed stitch count, making it practical to adapt after completing a gauge swatch.
The Design: What Makes This Chunky Cardigan Different
The cardigan combines three textures instead of using one stitch everywhere. A dense raised stitch forms the main body and sleeves, giving the ivory surface the pronounced pebble-like definition visible in the reference. Flatter crochet is used inside the front bands so the opening does not become excessively thick, while ribbing stabilizes the cuffs, hem and hood edge.
The second structural decision is the dropped shoulder. It removes complicated sleeve-cap shaping and works with the relaxed silhouette. The third is a separately built hood attached around the back neckline rather than simply extending the front panels upward. That gives better depth around the head.
A frequent failure with super-bulky cardigans is adding too much length before accounting for garment weight. The body should therefore be measured while hanging vertically during construction.
Project Information at a Glance
| Skill Level | Construction | Fit | Hook | Yarn |
|---|---|---|---|---|
| Intermediate | Seamed panels with attached ribbing | Relaxed / oversized | 8–10 mm after swatching | Bulky #5 or light Super Bulky #6 |
Materials and Tools
Yarn
- Warm Ivory — Bulky #5 or light Super Bulky #6 — main body, sleeves and hood
- Warm Ivory — same yarn — ribbed cuffs, hem and front bands
A stable plied yarn is preferable for a wearable garment. Very loose roving can look similar when new but is more vulnerable to abrasion along cuffs, underarms and front edges.
Do not purchase yarn solely from a generic cardigan estimate. Make and wash a large swatch, weigh it, then calculate the garment requirement from the planned measurements. Long textured cardigans consume considerably more yarn than flat openwork garments.
Tools
- 8–10 mm crochet hook, selected after swatching
- One hook 1 mm smaller for firmer ribbing if required
- Large yarn needle
- Locking stitch markers
- Scissors
- Flexible measuring tape
- Blocking mats
Abbreviations
- ch — chain
- sc — single crochet
- hdc — half double crochet
- dc — double crochet
- sl st — slip stitch
- BLO — back loop only
- st/sts — stitch/stitches
- RS — right side
- WS — wrong side
Construction Overview
The cardigan is built from five principal garment sections:
- One rectangular back panel.
- Two front panels.
- Two relaxed sleeves.
- One large hood.
- Attached ribbing and front edging.
The body uses simple rectangular geometry. The shoulders are intentionally dropped beyond the natural shoulder line, allowing the sleeves to begin lower on the arm.
This approach suits thick yarn because it minimizes bulky shaping seams.
Gauge Swatch
Make a swatch at least 20 × 20 cm. A small swatch is not sufficient for a heavy textured garment because thick stitches relax significantly after washing and hanging.
Work the proposed body texture, wash it according to the yarn label and dry it flat.
Then hang the swatch vertically for several hours.
Record:
- Stitches per 10 cm
- Rows per 10 cm
- Width before and after washing
- Length before and after hanging
- Weight of the finished swatch
Use the post-wash measurements for every garment calculation.
Main Textured Stitch
A compact alternating single-crochet texture gives the body a dense, raised appearance without requiring complicated cables.
Texture Row A
Ch 1, sc in first st.
Work sc in BLO of next st, sc normally in next st across.
Turn.
Texture Row B
Ch 1, sc normally in first st.
Work sc normally in next st, sc BLO in next st across, offsetting the texture from the previous row.
Turn.
Repeat Rows A and B.
For a more pronounced surface, replace selected normal single crochets with compact bobble or puff stitches on a test swatch. Keep those raised stitches widely spaced because a full cardigan made entirely from dense bobbles can become extremely heavy.
Choosing the Finished Fit
Measure the wearer’s full bust while wearing the type of clothing expected underneath the cardigan.
Add approximately 15–25 cm of positive ease for the relaxed silhouette.
For example:
100 cm bust + 20 cm ease = 120 cm finished body circumference.
Because the cardigan remains open at the front, this figure is a construction target rather than a requirement for the front edges to meet.
Suggested Finished Garment Measurements
| Fit Range | Target Body Circumference | Approx. Length | Upper Sleeve Circumference |
|---|---|---|---|
| Small | 100–110 cm | 80–90 cm | 38–42 cm |
| Medium | 110–120 cm | 85–95 cm | 40–44 cm |
| Large | 120–132 cm | 90–100 cm | 44–48 cm |
| XL / Oversized | 132–145 cm | 95–105 cm | 48–54 cm |
These are construction targets rather than standardized commercial sizes. Use actual body measurements before selecting panel dimensions.
Back Panel
The back determines the overall cardigan width.
Calculate the required back width from the selected finished circumference. For a relaxed open cardigan, the back can represent approximately 45–50% of the planned body circumference.
Foundation
Chain to the calculated back width using the washed gauge.
Row 1
Sc across.
Turn.
Row 2
Begin Texture Row A.
Row 3
Work Texture Row B.
Remaining Rows
Continue alternating the two texture rows until the back reaches the desired length from hem to shoulder.
For a long cardigan similar to the reference, target approximately 85–105 cm, adjusted to the wearer’s height.
Fasten off.
Checking Vertical Stretch
Before making the front panels, hang the completed back from its shoulder edge for several hours.
Measure it again.
If an originally 90 cm panel stretches to 96 cm, use the hanging measurement when determining the final cardigan length.
Do not assume blocking will permanently return a heavy panel to its original dimension.
Left Front Panel
The front panels are narrower than half the back because the cardigan is designed to remain open.
A useful starting width is approximately 25–30% of the finished body circumference per front panel, but adjust this according to the desired overlap.
Foundation
Chain to the calculated panel width.
Row 1
Sc across.
Rows 2 onward
Work the same alternating body texture used for the back.
Continue until the front panel matches the hanging length of the back.
Fasten off.
Right Front Panel
Repeat the left front panel.
Count the rows rather than relying only on visual measurement.
The two pieces should differ by no more than approximately 5 mm in length before assembly.
Optional Front Texture Columns
The image shows pronounced vertical texture near the front opening.
To reproduce this, reserve approximately 6–8 stitches at the inside edge of each front panel.
Work those stitches in BLO sc on every row while maintaining the main texture over the remainder of the panel.
This creates a subtle vertical structural line before the wider front band is added.
Shoulder Seams
Place the front panels against the back with right sides together.
Align the outside shoulder edges.
Leave the center back section open for the neckline.
Join each shoulder with mattress stitch, slip stitch or a controlled single-crochet seam.
Avoid a thick decorative seam directly on top of the shoulder because the super-bulky fabric already creates substantial depth.
Armhole Placement
Lay the joined body flat.
Measure downward from each shoulder.
Mark an armhole depth that accommodates the upper arm plus approximately 8–12 cm of ease.
Place matching markers on the front and back.
The distance between these markers becomes the sleeve attachment opening.
Sleeves
The sleeves are designed with a relaxed upper arm and gradual narrowing toward the wrist.
They can be crocheted flat and seamed, which makes width adjustments easier with thick yarn.
Sleeve Foundation
Chain to the required upper-arm width.
Remember that a flat sleeve panel represents the full sleeve circumference before seaming.
Row 1
Sc across.
Rows 2–6
Work the body texture without decreases.
Shaping Rows
Decrease one stitch at each edge approximately every 6–10 rows, depending on the row gauge and desired taper.
Continue until the sleeve reaches the wrist area.
Stop before the cuff because the ribbing adds additional length.
Checking Sleeve Length
Measure from the dropped shoulder position rather than from the natural shoulder point.
A dropped shoulder shortens the required sleeve panel.
Pin the unfinished sleeve temporarily into the armhole and try the garment on before adding the cuff.
The sleeve fabric should reach approximately 7–10 cm above the final wrist position if a deep ribbed cuff is planned.
Second Sleeve
Repeat the first sleeve exactly.
Record every decrease row from Sleeve 1 and reproduce those rows on Sleeve 2.
Do not shape the second sleeve by eye.
Ribbed Cuffs
The cuffs in the reference are deep and visibly vertical.
They are best worked perpendicular to the sleeve edge.
Cuff Foundation
Join ivory yarn at the wrist edge.
Ch enough stitches for approximately 8–12 cm of cuff depth.
Row 1
Sc back along the chain.
Sl st into the next one or two available sleeve-edge stitches.
Turn.
Row 2
Skip the attachment slip stitches.
Sc BLO across the cuff.
Turn.
Row 3
Sc BLO across.
Attach to the next section of sleeve edge with sl st.
Continue this attached ribbing around the entire wrist.
Join the first and last rib rows.
Bottom Hem Ribbing
The lower edge can use the same attached ribbing technique.
For a hem depth close to the reference, aim for approximately 7–10 cm.
Work the ribbing continuously across the left front, back and right front lower edges after the side seams are completed.
Keep the attachment ratio consistent. Too many rib rows will make the hem flare.
Side and Sleeve Seams
Fold each sleeve lengthwise with right sides together.
Seam from wrist to upper arm.
Turn the sleeve right side out.
Insert it into the armhole with the garment inside out.
Match the sleeve seam to the underarm.
Place another marker at the sleeve’s upper midpoint and align it with the shoulder seam.
Distribute the remaining fabric evenly before sewing.
Hood Construction
The hood is one of the defining elements of this cardigan. It should be deep enough to drape behind the neck when not worn rather than sitting like a fitted cap.
Measure around the neckline from the inside edge of one front panel, across the back neck and to the opposite front panel.
Hood Foundation Row
Join yarn at one neckline edge.
Work sc evenly around the neckline to the opposite edge.
Count the stitches.
Hood Row 2
Ch 1, work the established body texture across.
Turn.
Hood Rows 3 onward
Continue the texture until the hood measures approximately 35–42 cm from neckline to crown, depending on head size and desired depth.
Do not fasten off until checking the hood around the wearer or an appropriately sized form.
Shaping the Hood Crown
For a less pointed crown, mark the center of the hood.
During the final 8–12 cm, decrease gradually on both sides of the center section.
Another method is to work the hood as a rectangle and seam the top, then flatten approximately 5–7 cm of the back crown and sew across the resulting corners.
The second method produces a boxier oversized hood.
Hood Seam
Fold the hood with right sides together.
Match the front edges.
Seam the crown from front to back.
Turn the hood right side out and inspect the shape before weaving in the tail.
If the crown forms a sharp peak, reopen the final section and redistribute the shaping.
Wide Front and Hood Band
A continuous ribbed band can run from the bottom of one front panel, around the hood and down the opposite front.
This is the structural frame of the open cardigan.
Band Foundation
Join yarn at the lower right-front corner.
Ch enough stitches for a band approximately 7–10 cm wide.
Row 1
Sc back along the chain.
Attach to the cardigan edge with sl st.
Subsequent Rows
Work sc BLO across the band.
Return to the garment edge and attach the next rib row.
Continue upward along the first front, around the complete hood opening and down the second front.
Keep the band relaxed around the hood. Pulling the attachment stitches too tightly will force the front edges to curl inward.
Optional Flatter Front Band
If attached ribbing becomes too bulky, work the front edging directly onto the cardigan.
Row 1: Sc evenly from lower front, around hood and down opposite front.
Row 2: Hdc BLO across.
Row 3: Sc BLO across.
Rows 4–7: Alternate hdc BLO and sc BLO until the desired width is reached.
This version uses less yarn and reduces the weight around the neck.
Keeping the Front Edges Vertical
Hang the cardigan before finishing the front band.
The two lower front corners should sit at approximately the same height.
If one front edge is longer by more than 1 cm, correct the panel or seam before adding the band.
A wide ribbed edging will make an existing length difference more visible rather than hiding it.
Yarn Requirement Calculation
Because yarn thickness and garment size vary, weighing a finished swatch gives a more useful estimate than assigning a fixed number of skeins.
Suppose a washed 20 × 20 cm textured swatch weighs 70 g.
Its area is:
20 × 20 = 400 cm²
The consumption is:
70 ÷ 400 = 0.175 g per cm²
Estimate the combined surface area of the back, fronts, sleeves and hood. Multiply that area by the swatch consumption.
Then add approximately 15% for ribbing, seams, swatches and adjustments.
This remains an estimate because cuffs and bands may have a different stitch density.
Reducing Garment Weight
The reference appearance is very thick, but reproducing that density across a long cardigan can create considerable weight.
Three adjustments can reduce it:
- Use bulky #5 rather than very heavy #6 yarn.
- Increase the hook slightly after testing the resulting fabric.
- Reserve the densest texture for the fronts and sleeves while using a flatter stitch on the back.
Do not reduce weight by making the fabric extremely loose. Oversized loops can snag and distort at the elbows.
Short Cardigan Version
For a hip-length version, stop the body at approximately 60–70 cm before adding the lower ribbing.
Keep the same hood and sleeve proportions.
The shorter body substantially reduces yarn consumption and vertical stretching.
Mid-Thigh Version
For proportions similar to the image, measure from the high shoulder to the desired mid-thigh point.
A typical project target may fall around 85–100 cm, but wearer height controls the actual measurement.
Subtract the planned hem depth before determining the length of the main body panels.
Optional Pockets
Two rectangular patch pockets can be added to the front panels.
Make each pocket approximately 16–20 cm wide and 18–22 cm tall, scaled to the garment.
Work the same main texture.
Add 3–4 cm of BLO sc ribbing across the pocket opening.
Pin both pockets while the cardigan is hanging and verify their height before sewing three sides to the fronts.
Assembly
- Wash, dry and hang a large texture swatch, then record the final stitch and row gauge before calculating any garment panel.
- Crochet the back panel to the calculated width and stop the main fabric short enough to accommodate the planned lower ribbing.
- Make two matching front panels, checking their row counts and hanging lengths against the completed back.
- Join the shoulder seams while leaving the calculated center neckline open for the hood.
- Mark equal armhole depths on both sides, seam the body below those markers and verify the finished chest circumference.
- Make two matching tapered sleeves, seam them and attach them with the sleeve midpoint aligned to each shoulder seam.
- Add the attached BLO ribbed cuffs and lower hem, checking after several centimeters that neither section is flaring.
- Crochet the hood upward from the neckline, shape or seam the crown and test its depth before completing the top seam.
- Work the continuous ivory front band from one lower corner, around the hood and down the opposite front without stretching the garment edge.
- Weave each yarn tail through at least 8–10 cm of matching thick fabric, wash according to the yarn label and dry the cardigan supported in its intended dimensions.
The completed garment should hang with two even open fronts, a relaxed shoulder line, balanced sleeves and a hood that falls behind the neckline without pulling the front panels upward.
7 Technical Tips
- The finished cardigan becomes much longer than planned: heavy crochet has stretched vertically under its own weight. Hang the 20 × 20 cm swatch before calculating row counts and recheck each body panel after approximately 40–50 cm of length.
- The shoulder seam forms a hard ridge: the joining method is adding another thick layer of yarn. Use a flat mattress seam or controlled slip-stitch join and avoid working multiple stitches through the same edge loops.
- The sleeve twists toward the front: the sleeve midpoint was not aligned with the shoulder seam. Mark the exact midpoint and underarm before pinning, then distribute each half independently.
- The cuffs flare away from the wrists: too many attached rib rows have been worked around the sleeve edge. Reduce the attachment frequency and target a cuff circumference approximately 2–4 cm smaller than the relaxed wrist-area sleeve circumference.
- The front bands wave: attachment stitches are being added faster than the cardigan edge can accommodate them. Stop after 20–25 cm, lay the section flat and remove rows immediately if a ripple appears.
- The hood pulls the fronts backward: the neckline foundation is too short or the hood lacks depth. Check for approximately 35–42 cm of hood height before closing the crown and keep the neckline pickup relaxed.
- The elbows stretch into permanent bulges: the body texture is too loose for the selected yarn. Test the fabric by stretching a 10 cm section repeatedly; if it does not recover, reduce the hook by approximately 1 mm before making the sleeves.
Care and Finishing
Follow the yarn manufacturer’s washing instructions.
Support the entire cardigan when wet. Do not lift a saturated long cardigan from the hood or shoulders because the weight can permanently stretch the neckline.
Dry the garment flat whenever the fiber requires it.
Shape the front edges into parallel lines and position the sleeves symmetrically. Form the hood into its natural depth rather than flattening it completely.
After drying, hang the cardigan briefly and measure the body length again. Store very heavy versions folded instead of leaving them permanently on a hanger.
Conclusion
This chunky hooded crochet cardigan pattern depends on garment measurements more than predetermined stitch totals. Begin with a large washed and hung swatch, calculate the back and front widths from the required finished circumference, then check vertical stretch before making the sleeves. Add the deep hood only after the shoulders are joined, and finish with controlled ribbing at the cuffs, hem and open front. The next practical step is to crochet a 20 × 20 cm swatch in the intended ivory yarn and record its washed gauge and weight. Share the finished version on Pinterest or Instagram with #IvoryChunkyHoodedCardigan. Would you keep the cardigan completely ivory or add a contrasting color only to the cuffs and front band?