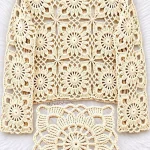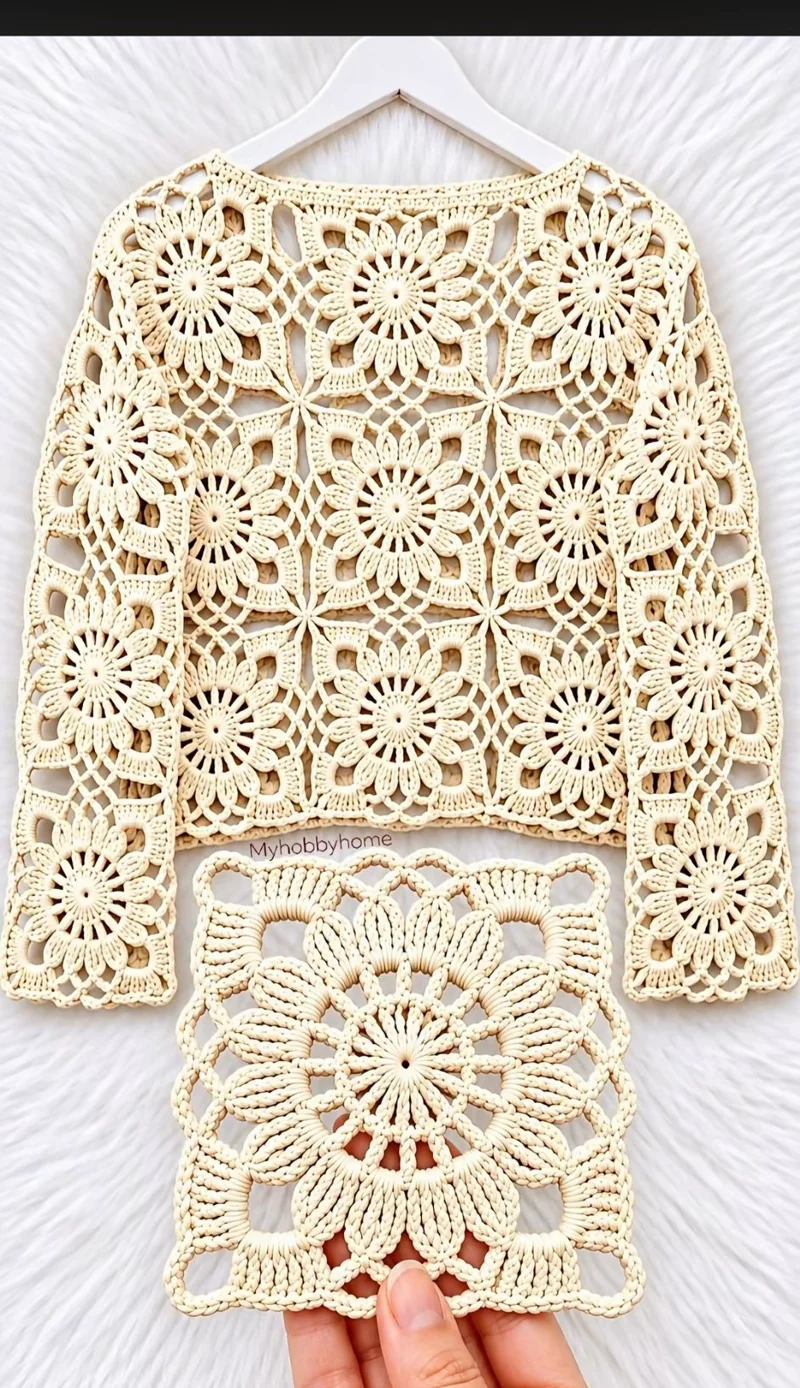
A twelve-petal crochet flower becomes a wearable lace panel when its circular outline is converted into four structured corners. This floral granny square crochet sweater pattern combines cream cotton yarn, raised petals, decorative chain spaces, and a wide boat neckline. Designed for intermediate crocheters, the project uses repeating 15 cm square motifs to create a lightweight, customizable, long-sleeved pullover.
The Design: Cream Floral Lace Crochet Sweater
The construction begins with an individual flower surrounded by an openwork square border. Each flower contains elongated stitch clusters that create raised petals without requiring separate appliqués. Chain spaces between the petals provide flexibility, allowing the finished fabric to move naturally when worn.
Four reinforced corners transform the circular flower into a square suitable for modular garment construction. These corners distribute tension across the seams and help maintain consistent panel dimensions.
Unlike a traditional solid granny square sweater, this crochet lace pullover relies on negative space to reduce fabric weight. The sleeves use the same floral motifs as the main body, producing a continuous decorative arrangement.
A common mistake is joining unblocked motifs. Even small differences in square dimensions can produce uneven shoulders, twisted sleeves, and an irregular lower hem.
Project Information
| Skill level | Intermediate |
| Construction | Joined floral squares |
| Target motif size | 15 × 15 cm |
| Example bust circumference | 90 cm before edging |
| Crochet hook | 3.5–4 mm |
| Yarn | DK cotton |
Pattern note: This is an original photo-inspired reconstruction, not the original designer’s instructions. Make and block a sample motif before beginning the garment. The finished measurements are calculated targets rather than measurements from a tested sample.
Materials and Tools
Recommended Yarn
- Cream or ivory DK cotton yarn: Approximately 450–650 g as an initial purchasing estimate.
- Suggested yarn: Smooth mercerized cotton or a cotton-rich blend.
- Optional contrasting yarn: A small quantity for decorative edging.
Crochet Tools
- 3.5 mm crochet hook
- 4 mm crochet hook for gauge adjustments
- Tapestry needle
- Locking stitch markers
- Measuring tape
- Scissors
- Blocking mat and rustproof pins
Choose yarn with a smooth surface and consistent thickness. Excessively fluffy fibers can obscure the flower clusters and reduce the definition of the open lace sections.
Crochet Abbreviations
This pattern uses US crochet terminology.
- MR: Magic ring
- ch: Chain
- sc: Single crochet
- hdc: Half double crochet
- dc: Double crochet
- tr: Treble crochet
- sl st: Slip stitch
- st: Stitch
- sp: Space
- CL: Cluster stitch
- rep: Repeat
- RS: Right side
- WS: Wrong side
Special Stitch: Five-Treble Cluster
Yarn over twice, insert the hook into the indicated space, and pull up a loop. Yarn over and pull through two loops twice, leaving the final loop of the treble crochet unfinished.
Repeat this process four more times in the same space. With six loops remaining on the hook, yarn over and pull through all six loops to complete the cluster. Secure the cluster with the chain stitches specified in the round.
Gauge and Finished Measurements
One completed flower square should measure approximately 15 × 15 cm after blocking. Measure between the outer corner points without stretching the motif beyond its natural shape.
The example garment consists of two body panels measuring approximately 45 cm wide and 45 cm long.
The finished bust circumference is approximately 90 cm before seam and edging adjustments. This layout is suitable only when that measurement provides the intended wearing ease.
For a larger garment, increase the number of motifs across each body panel or adjust the blocked motif dimensions. Avoid changing hook size dramatically because this can alter the appearance and stability of the flower petals.
Floral Granny Square Crochet Pattern
Make 30 identical flower squares for the example sweater construction. All rounds are joined with a slip stitch rather than worked continuously.
Round 1: Flower Center
Using cream yarn, create a magic ring.
Ch 1, work 12 sc into the ring. Pull the starting yarn tail to close the center. Join with a sl st to the first sc.
Round count: 12 sc.
Round 2: Open Flower Spokes
Ch 6, counting as the first tr and ch 2.
Work 1 tr into the next sc, ch 2. Repeat this sequence 11 times.
Join with a sl st to the fourth chain of the beginning ch 6.
Round count: 12 tr and 12 ch-2 spaces.
Round 3: Raised Flower Petals
Sl st into the first ch-2 space.
For the first cluster, ch 3, work four unfinished tr into the same space, then yarn over and pull through all remaining loops. Ch 1.
Work a five-treble cluster into each of the remaining ch-2 spaces, followed by ch 1.
Join with a sl st to the top of the first cluster.
Round count: 12 clusters and 12 ch-1 spaces.
Keep the unfinished loops at an even height so each flower petal has the same elongated shape.
Round 4: Lace Foundation
Sl st into the first ch-1 space between two petals.
Ch 1, sc into the same space, ch 5.
Work 1 sc into the next ch-1 space, ch 5. Repeat 11 times around the flower.
Join with a sl st to the beginning sc.
Round count: 12 sc and 12 ch-5 arches.
Round 5: Convert the Flower into a Square
Sl st into the first ch-5 arch.
Ch 3, counting as the first dc. Work 4 dc, ch 5, and 5 dc into the same arch to form the first corner.
Ch 3, sc into the next arch, ch 5, sc into the following arch, ch 3.
Work (5 dc, ch 5, 5 dc) into the next arch to create the second corner.
Continue repeating the side sequence and corner group until four corners have been completed. Finish the final side sequence and join to the top of the beginning ch 3.
Round count: 40 dc, 8 sc, 8 ch-3 spaces, and 8 ch-5 spaces, including four corner spaces.
Round 6: Decorative Lace Border
Fasten off and rejoin the yarn in any corner ch-5 space.
Ch 1, work (sc, ch 5, sc) into the corner.
Ch 4, skip the next two dc, sc into the following dc, ch 4, skip the remaining two dc, and sc into the next ch-3 space.
Ch 5, sc into the central ch-5 side space, ch 5, sc into the following ch-3 space.
Ch 4, skip the next two dc, sc into the following dc, ch 4, skip the remaining two dc.
Work (sc, ch 5, sc) into the next corner space.
Repeat the same side sequence around all four edges. On the final side, join to the beginning sc instead of repeating the first corner.
Round count: 28 sc, 16 ch-4 spaces, and 12 ch-5 spaces.
Fasten off, leaving a 25 cm yarn tail for joining. Weave in all other ends before blocking.
Blocking the Flower Squares
Place each completed square in lukewarm water for approximately 10–15 minutes, following the yarn manufacturer’s care instructions.
Remove excess water by pressing the motif between clean towels. Avoid twisting the fabric because this can distort the elongated clusters.
Position each square on a blocking mat with the right side facing upward. Pin the four corners first, followed by the middle of each edge.
Adjust the motif until it measures the same as the original gauge sample. Keep all petal clusters centered and all corner loops evenly extended.
Allow the squares to dry completely before removing the pins. Stack the finished motifs and compare their dimensions before beginning assembly.
Sweater Construction and Square Layout
Front Panel — Make 9 Squares
Arrange nine floral squares in three rows of three. Position all motifs with the right side facing upward.
[ A ] [ B ] [ C ]
[ D ] [ E ] [ F ]
[ G ] [ H ] [ I ]
Join the squares horizontally to form three strips. Connect the strips vertically, matching the corresponding chain spaces along every edge.
The completed front panel should measure approximately 45 × 45 cm at the target gauge.
Back Panel — Make 9 Squares
Construct a second panel using the same three-by-three arrangement. Check that its width and height match the front panel.
Do not compensate for uneven dimensions by tightening the joining yarn. Reblock individual motifs when necessary.
Long Sleeves — Make 12 Squares
Each sleeve uses six floral squares arranged two squares wide and three squares long.
[ A ] [ B ]
[ C ] [ D ]
[ E ] [ F ]
Join the six squares to create one rectangular sleeve panel. Repeat the process for the second sleeve.
Each rectangle measures approximately 30 cm wide and 45 cm long before edging.
Check the upper arm circumference before closing the sleeve seam. Add a narrow crochet mesh strip if additional width is required. Increase sleeve length with additional border rows rather than stretching the existing motifs.
How to Join Floral Crochet Squares
Place two blocked motifs side by side with their right sides facing upward. Identify the corresponding corner loops and six intermediate chain spaces on each edge.
Thread a tapestry needle with the matching cream yarn. Secure the yarn at the first corner, then pass the needle through the corresponding chain spaces on both squares.
Join the remaining spaces using loose whipstitches. Maintain the same distance between every joining point so the seam remains flexible.
At intersections where four squares meet, pass the joining yarn through each corner loop. Secure the intersection without drawing the loops into a tight knot.
An alternative method is a loose single crochet seam worked through corresponding chain spaces. Test both methods on two sample motifs before joining the complete sweater.
Sweater Assembly
- Place the completed front and back panels together with their right sides facing inward.
- Mark the outer shoulder sections and leave a central opening approximately 25–28 cm wide for the boat neckline.
- Join the marked shoulder sections using a flexible seam. Check that the neckline passes comfortably over the head.
- Open the body panels flat and mark a point approximately 15 cm below each shoulder on both the front and back edges.
- Position the center of the upper sleeve edge against the shoulder seam.
- Attach each sleeve across the marked 30 cm armhole section, distributing the joining stitches evenly.
- Fold the garment with the right sides facing inward and close each sleeve seam from the cuff to the underarm.
- Continue joining the remaining side seams from the underarm to the bottom hem.
- Turn the sweater right side out and crochet the neckline, cuff, and hem borders.
- Weave in all remaining yarn ends and block the completed garment to its intended measurements.
The finished construction consists of two joined body panels, two tubular sleeves, and three types of finishing borders.
Boat Neckline Border
Attach cream yarn at one shoulder seam with the right side facing you.
Round 1: Ch 1, distribute sc stitches evenly around the neckline. Work into the chain spaces and adjust the number of stitches according to their width. Join with a sl st.
Round 2: Ch 1, work 1 sc into every sc around. Join with a sl st.
Round 3: Work a loose sl st into every stitch around the neckline. Fasten off.
Try on the sweater before completing the final round. Remove stitches from the first border round if the neckline flares outward, or add stitches if the opening becomes restrictive.
Sleeve Cuffs
Attach yarn at the inside seam of the sleeve opening.
Round 1: Ch 1, work evenly spaced sc around the cuff. Join with a sl st.
Round 2: Ch 2, work 1 hdc into every stitch. Join to the first hdc.
Round 3: Ch 1, work 1 sc into every stitch around. Join and fasten off.
Repeat these rounds on the second sleeve using the same stitch count.
For a narrower cuff, distribute additional decreases evenly through the second round after checking the circumference needed for the hand to pass through.
Decorative Bottom Hem
Join yarn at either side seam.
Round 1: Ch 1, work sc stitches evenly along the lower edge. Adjust the total stitch count to an even number before joining.
Round 2: Ch 1, sc into the first stitch, ch 3, skip the next stitch. Repeat this sequence around the entire hem.
Join with a sl st to the first sc. Fasten off and weave in the yarn tail.
The small chain arches create a decorative edge without adding the weight of a dense ribbed border.
How to Customize the Sweater Size
The modular construction allows the garment measurements to be adjusted before assembly. Measure your bust circumference and add the amount of wearing ease you prefer.
Divide the intended finished circumference by two to calculate the required width of each body panel. Divide that measurement by the blocked width of one flower square.
For example, a finished circumference of 120 cm requires two panels measuring approximately 60 cm across. Using 15 cm motifs, each panel requires four squares per row.
Additional rows increase the body length in 15 cm increments. For smaller adjustments, add decorative mesh rows along the bottom edge.
Recalculate the armhole depth whenever the sleeve width changes. A wider sleeve requires a correspondingly larger opening along the side of the body panel.
7 Technical Tips for Better Results
- Mark the first stitch: Place a locking stitch marker at the beginning of each round. Miscounted arches will prevent the flower from forming four symmetrical corners.
- Maintain cluster height: Keep all five unfinished treble crochet stitches at the same height. Unequal loops create petals that lean toward one side.
- Control the center ring: Close the magic ring firmly without breaking the yarn. Weave the starting tail through the center stitches in two directions to prevent the opening from expanding.
- Check motif dimensions: Block every square to the same target measurement. A difference of 5 mm per square can accumulate across an entire garment panel.
- Avoid tight joining seams: Leave enough movement between corresponding chain spaces. Tight seams produce puckering and restrict the flexibility of the lace fabric.
- Test neckline width: Check the opening before crocheting its final border. Three finishing rounds can noticeably reduce the available opening.
- Secure cotton yarn ends: Weave each finishing tail through at least 5 cm of suitable stitches, changing direction where possible. Smooth cotton fibers can gradually loosen if the ends are trimmed too close to the fabric.
Washing and Care Instructions
Follow the washing instructions provided on the yarn label. Handwashing is generally suitable for delicate openwork cotton garments.
Support the sweater when lifting it from water. Wet cotton becomes heavier, which can stretch the shoulder seams and lengthen the sleeves.
Lay the garment flat on a clean towel and reshape the flower motifs while the fabric is damp. Avoid hanging the sweater until it is completely dry.
Store the finished garment folded rather than suspended from a hanger for extended periods.
Conclusion
This floral granny square crochet sweater pattern provides a modular approach to constructing an openwork cotton garment with raised flower petals, structured corners, and matching sleeves. The most important preparation is completing one sample square, checking its dimensions, and calculating the required number of motifs before purchasing the remaining yarn. Consistent blocking and flexible seams determine how evenly the finished sweater hangs. Save the pattern to your Pinterest crochet collection and share your completed garment on Instagram using #FloralGrannySquareSweater.