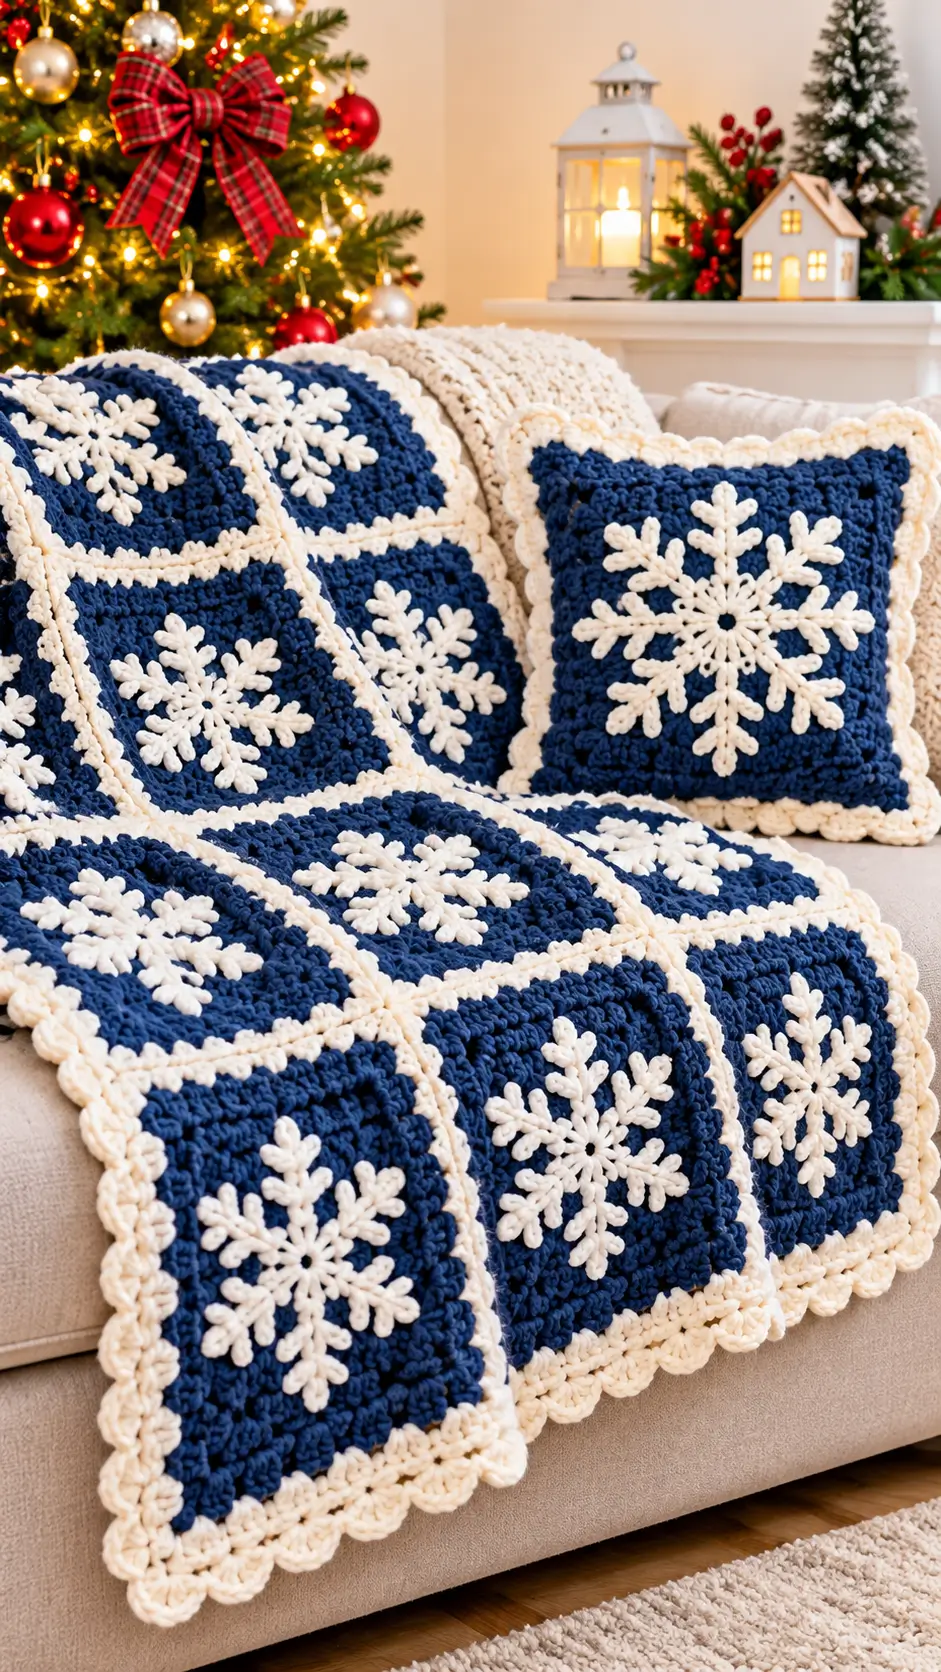
A six-branched snowflake has to stay visually centered while its background becomes a four-cornered square. This snowflake granny square crochet blanket solves that contrast by placing a raised ivory snowflake over a dense navy square, then framing each motif with cream joining and a scalloped border. The project uses worsted-weight yarn and a 5.0 mm hook, producing a substantial winter throw with matching cushion potential.
The Design: What Makes This Snowflake Blanket Different
The blanket combines two structures rather than crocheting the snowflake directly into the square. First comes a stable navy background motif. A separate six-point snowflake is then positioned over its center and stitched down at controlled anchor points. This keeps the branches crisp and prevents decorative stitches from changing the square’s dimensions.
Cream joining lines form a visible grid between the navy motifs. That contrast is important: it separates neighboring snowflakes and repeats the ivory color without making the entire blanket pale. A final cream scalloped border softens the otherwise geometric construction.
The most common failure is attaching the snowflake before blocking the navy square. If the square changes dimensions later, the appliqué can buckle or pull its branches off center.
Project Information at a Glance
| Skill Level | Construction | Motif Size | Hook | Best For |
|---|---|---|---|---|
| Intermediate | Joined squares with appliqué | Approx. 18–20 cm | 5.0 mm | Winter throw, Christmas blanket, cushion |
Materials and Tools
Yarn
- Deep Navy Blue — worsted weight #4 — main square background
- Warm Ivory — worsted weight #4 — snowflakes, joining, and border
Yarn quantity depends on the final blanket dimensions and the density of the selected yarn. Complete and weigh one blocked motif, including its snowflake, before calculating the full requirement.
Tools
- 5.0 mm crochet hook
- Yarn needle
- Scissors
- Stitch markers
- Measuring tape
- Blocking mats
- Blocking pins
Abbreviations
- MR — magic ring
- ch — chain
- sc — single crochet
- hdc — half double crochet
- dc — double crochet
- tr — treble crochet
- sl st — slip stitch
- sp — space
- st/sts — stitch/stitches
- BLO — back loop only
Blanket Construction
The blanket is modular. Crochet all navy squares first, block them to identical dimensions, make the ivory snowflakes separately, attach one snowflake to each square, and then join the completed motifs with ivory yarn.
This sequence makes size correction much easier. It also prevents the raised snowflake branches from becoming trapped inside joining seams.
Navy Blue Granny Square
Round 1
With navy yarn, make an MR.
Ch 3, work 2 dc into the ring, ch 2.
Repeat (3 dc, ch 2) three more times.
Join with sl st to the top of the beginning ch-3.
You now have four 3-dc groups and four corner spaces.
Round 2
Sl st across to the first corner space.
In the corner work:
(3 dc, ch 2, 3 dc)
Ch 1.
Repeat the same corner group in each remaining corner, placing ch 1 between corners.
Join.
Round 3
Sl st to the nearest corner.
Work (3 dc, ch 2, 3 dc) in the corner.
Ch 1, work 3 dc in the next side space, ch 1.
Repeat around, maintaining the same corner construction.
Round 4
Continue the established granny-square pattern.
Each corner receives:
(3 dc, ch 2, 3 dc)
Each side space receives 3 dc, with ch 1 between groups.
Round 5
Repeat one additional granny round if necessary to approach the desired motif size.
Do not fasten off if the square still requires a structural frame.
Dense Navy Structural Frame
The photographed blanket has a relatively solid navy area surrounding each snowflake. Add a denser frame to reduce the open appearance of a conventional granny square.
Frame Round 1
Ch 1.
Work sc evenly around all four sides.
In each corner work:
(sc, ch 2, sc)
Join with sl st.
Frame Round 2
Ch 2.
Work hdc in every stitch.
In each corner ch-2 space work:
(2 hdc, ch 2, 2 hdc)
Frame Round 3
Work one sc in every stitch, placing (sc, ch 2, sc) in each corner.
Fasten off.
Blocking the Square
Block the navy square before adding the snowflake.
A useful target is approximately 18–20 cm per square. The exact measurement is less important than consistency across the complete set.
Measure both diagonals. Their difference should remain within approximately 5 mm.
If one corner repeatedly extends farther than the others, correct the square before attaching the appliqué.
Ivory Crochet Snowflake Appliqué
The snowflake uses six branches. Keep the construction relatively flat because a heavily padded motif would make the finished blanket uncomfortable when folded.
Snowflake Center
With ivory yarn, make an MR.
Round 1: Ch 1 and work 12 sc into the ring. Join with sl st. (12)
Round 2: *Ch 4, skip 1 stitch, sl st into the next stitch.* Repeat six times.
You now have six evenly distributed loops for the six main branches.
Snowflake Branches
Each branch is worked into one ch-4 loop.
Main Branch
Sl st into the first loop.
Ch 9.
Beginning in the second chain from the hook, sl st into the next 2 chains.
First side branch: Ch 4, sl st in second chain from hook and in the next 2 chains. Sl st back into the main branch.
Sl st down the next 2 chains of the main branch.
Second side branch: Ch 4, sl st in second chain from hook and in the next 2 chains. Return to the main branch.
Continue with sl sts toward the base.
For a fuller snowflake, add one more small ch-3 branch near the lower section.
Sl st into the original ch-4 loop.
Repeat the same construction in all six loops.
Making the Snowflake More Dimensional
The ivory motifs in the reference design stand above the navy background slightly. To reproduce that effect without excessive bulk, work the final branch stitches with a relaxed tension.
An optional surface-sl-stitch round can be added around the center ring.
Do not add stuffing. The relief should come from stitch thickness rather than padding.
Snowflake Size
For an 18–20 cm navy square, aim for a snowflake approximately 12–14 cm across from branch tip to opposite branch tip.
Leave at least 2 cm between the snowflake tips and the square’s structural frame.
This clearance prevents branches from disappearing beneath the cream joining seam.
Attaching the Snowflake
Place the blocked navy square on a flat surface.
Fold it lightly along both diagonals to locate the exact center.
Position the snowflake center over that point.
Pin all six branches before sewing.
Using ivory yarn and a yarn needle, secure the center first.
Then sew the middle section of each branch to the square.
Finally, anchor the branch tips with one or two small stitches.
Avoid sewing every stitch of the branch. Leaving some sections slightly free preserves the raised appearance.
Planning Blanket Dimensions
Calculate the blanket from the blocked motif measurement rather than an assumed square size.
If each completed square measures 19 cm before joining, the approximate motif-only dimensions are:
| Layout | Approx. Width | Approx. Length |
|---|---|---|
| 4 × 5 squares | 76 cm | 95 cm |
| 5 × 6 squares | 95 cm | 114 cm |
| 6 × 8 squares | 114 cm | 152 cm |
| 7 × 9 squares | 133 cm | 171 cm |
| 8 × 10 squares | 152 cm | 190 cm |
The joining seams and final border will increase these measurements.
Estimating Yarn
Make one complete navy square with its attached ivory snowflake and weigh it.
For example, if one completed motif weighs 70 g and the blanket uses 48 motifs:
70 g × 48 = 3,360 g
This is an example calculation, not a fixed yarn requirement.
Add the yarn required for joining and the outer border, then include approximately 10% for swatching, repairs, and finishing.
Joining the Snowflake Squares
Arrange all motifs before joining them. Rotate the snowflakes so their branches point in the same direction if you want a highly ordered grid.
For a more natural snow effect, rotate selected motifs slightly while keeping the square itself aligned.
Cream Slip-Stitch Join
Place two squares with wrong sides together.
Using ivory yarn, insert the hook through corresponding outer loops.
Work relaxed slip stitches across the entire edge.
Repeat until all horizontal rows are joined.
Then join the vertical seams.
The ivory seams should form a clear grid over the navy background.
Alternative Flat Joining Method
If you prefer less ridge between motifs, place the squares side by side with the right sides facing upward.
Using ivory yarn, work sc through corresponding edge stitches.
Keep the yarn underneath the work so the cream joining line remains narrow.
Check the blanket after every completed row of motifs. If the joined section curves, the seam tension is too tight.
Outer Blanket Border
The reference blanket uses a substantial ivory frame finished with rounded scallops.
Border Round 1
Join ivory yarn in any corner.
Work sc evenly around the blanket.
At each corner work:
(sc, ch 2, sc)
Border Round 2
Ch 2.
Work hdc around.
In each corner work:
(2 hdc, ch 2, 2 hdc)
Border Round 3
Work another sc round.
This creates a stable foundation for the decorative scallops.
Scalloped Cream Edging
Before starting the scallops, count the stitches along each side.
A simple repeat is:
*Skip 2 stitches, 5 dc in next stitch, skip 2 stitches, sc in next stitch.*
Repeat across each side.
Adjust the spacing near the corners by one stitch if necessary so a full shell lands close to each corner.
For each corner, work a larger shell such as:
7 dc in the corner space
Continue around and join with sl st.
Optional Navy Accent Border
If more navy definition is wanted, add a thin navy round before the final cream scallops.
Work one sc in every stitch around, maintaining the corner increases.
Change back to ivory for the final shell edging.
This version creates a stronger visual boundary between the blanket body and decorative border.
Matching Snowflake Cushion
The cushion shown with the blanket can be made using the same construction.
Create one large navy square or join four smaller navy motifs.
Attach an oversized ivory snowflake to the center.
Make a second square for the back.
Join three sides, insert the cushion form, and close the remaining side.
Finish with the same ivory scalloped edging used on the blanket.
Cushion Sizing
For a 40 × 40 cm cushion insert, crochet the front and back slightly smaller than the insert before assembly so the finished cover remains full rather than loose.
Measure the actual fabric because yarn and stitch tension can change the dimensions substantially.
Color Alternatives
The navy-and-ivory combination creates strong winter contrast, but the same construction can be adapted easily.
- Forest green + ivory — traditional Christmas palette
- Burgundy + cream — warmer holiday version
- Ice blue + white — lighter winter palette
- Charcoal + white — neutral modern version
- Red + ivory — high-contrast Christmas blanket
Making the Snowflakes Consistent
Create one finished snowflake as a master template.
Measure its diameter across two opposite branches.
Use that measurement for every subsequent motif.
If one snowflake is more than approximately 1 cm larger than the master, check the branch chain count and hook tension before attaching it.
Assembly
- Crochet all navy background squares using the same hook, yarn, and round count.
- Block every square to one target measurement and check both diagonals.
- Crochet one six-branch ivory snowflake for each navy square.
- Pin each snowflake at the exact center and check that all six branch tips remain clear of the square edges.
- Sew the snowflakes to the navy backgrounds, securing the centers before the branches.
- Arrange the completed motifs into the selected blanket layout.
- Join the horizontal motif rows with ivory yarn, then complete the vertical seams.
- Work the structural ivory border around all four sides of the assembled blanket.
- Add the scalloped edging and weave every yarn tail securely into matching-color stitches.
- Block the completed blanket flat, checking the corners, joining grid, scallops, and snowflake branches before drying.
The finished blanket should have an even cream grid, square corners, centered snowflakes, and a scalloped border that lies flat without curling.
7 Technical Tips
- Snowflake branches twist: the branch chains are being worked at inconsistent tension. Measure the first completed branch and keep every remaining branch within approximately 3 mm of that length.
- The snowflake looks off-center: do not position it by eye alone. Mark the intersection of the two square diagonals before pinning the appliqué.
- Navy squares become different sizes: stop after every five motifs and stack them together. A difference greater than 1 cm should be corrected before joining.
- The cream grid puckers: joining slip stitches are too tight. Move to a hook approximately 0.5 mm larger for the seams if necessary.
- Scallops ruffle: too many shells have been forced onto the border. Remove one repeat and redistribute the remaining shells across that side.
- Scallops pull inward: the border has too few stitches. Add stitches to the structural sc round rather than increasing the number of dc inside every shell.
- Snowflake tips disappear into seams: the appliqué is too large for the background square. Maintain approximately 2 cm of navy clearance between each branch tip and the joining edge.
Care and Final Blocking
Wash according to the care instructions for the selected yarn. Support the blanket fully when wet because a large joined project can become heavy.
Remove excess water without twisting. Lay the blanket flat and straighten the ivory joining lines first.
Shape the outer scallops individually while damp. Reposition any snowflake branches that folded during washing.
Allow the blanket to dry completely before folding or storing it.
Conclusion
The navy blue snowflake granny square crochet blanket is built from three controlled elements: identical navy squares, separate six-branch ivory snowflakes, and a contrasting cream joining grid. Start by completing one full sample motif and block it before calculating the final blanket dimensions. That measurement will determine the motif count and give a more reliable yarn estimate. After joining the squares, repeat the ivory color in the outer scalloped border and use the same motif for a matching cushion if desired. Share the completed winter set on Pinterest or Instagram with #SnowflakeGrannySquareBlanket. Would you keep every snowflake ivory, or add a few pale-blue snowflakes among the navy squares?









