Introduction
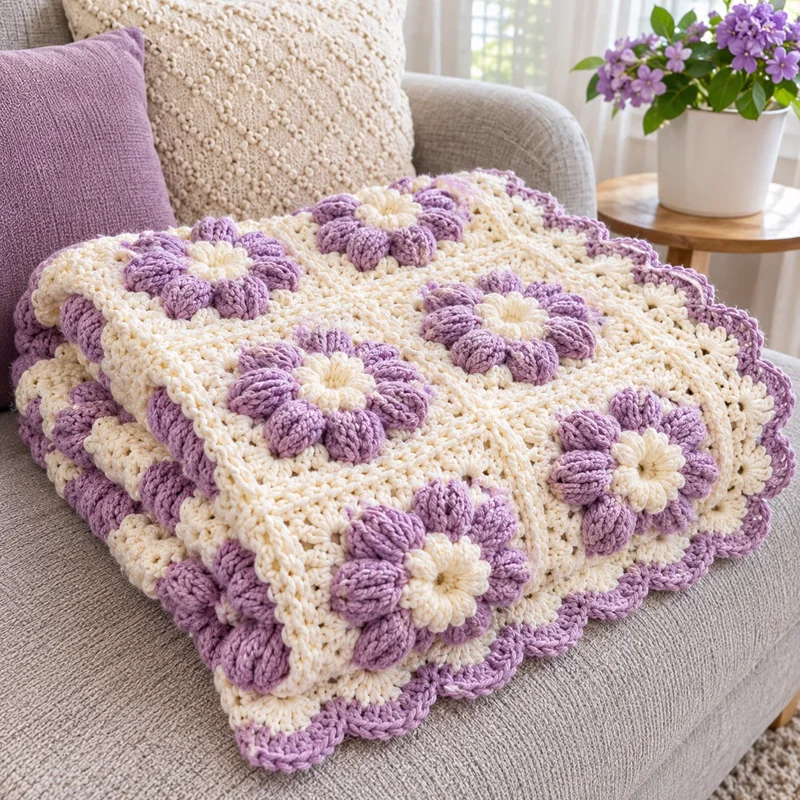
The lavender petals on this blanket stand above the cream fabric rather than forming part of a flat motif. This 3D puff flower crochet blanket pattern combines a textured rectangular background, separately crocheted flower appliqués, and a scalloped border. The proposed design uses worsted-weight yarn, a 5 mm hook, and an approximate 90 × 120 cm finished size. Intermediate crocheters can adjust the flower placement without changing the blanket’s basic construction.
The Design: What Makes This Puff Flower Blanket Different
The defining feature of this lavender crochet blanket is the separation between its structural fabric and decorative flowers. A continuous cream background supports the raised petals, allowing individual flower positions to be adjusted before sewing.
Each crochet puff stitch flower uses a compact central ring and six lavender petals. The cream center is added as a separate raised layer, creating a two-color floral arrangement without complicated color changes inside individual petals.
A scalloped crochet blanket border introduces a repeating curved edge. Its lavender color also connects the outer perimeter to the flower appliqués.
The main construction mistake is attaching flowers before checking the blanket’s final dimensions. Uneven spacing becomes more noticeable after blocking, especially when the flowers are arranged in diagonal rows.
This design avoids that problem by completing the background and border before attaching the floral components.
Project Info at a Glance
| Detail | Specification |
|---|---|
| Skill Level | Intermediate |
| Estimated Time | 25–40 hours |
| Finished Size | Approximately 90 × 120 cm |
| Crochet Hook | 5 mm |
| Yarn Weight | Worsted / Medium Weight |
| Construction | Flat rows and separate appliqués |
| Stitch Terminology | US Crochet Terms |
| Best For | Decorative sofa throw or lap blanket |
These are proposed specifications for this original, photo-inspired pattern. Finished measurements, yarn consumption, and working time have not been sample-tested.
Materials and Tools
Yarn
Choose yarns with similar fiber content, thickness, and washing requirements. Combining substantially different yarn weights may cause the flowers to pull against the background.
- Warm Cream: Worsted-weight acrylic, approximately 850 g. Suggested yarn: Lion Brand Basic Stitch or equivalent.
- Dusty Lavender: Worsted-weight acrylic, approximately 350 g. Suggested yarn: Lion Brand Basic Stitch or equivalent.
- Extra Cream for Flower Centers: Included in the cream allowance above.
- Extra Lavender for Border: Included in the lavender allowance above.
Yarn quantities are planning estimates. Make a gauge swatch, measure yarn consumption, and purchase matching dye lots.
Tools
- 5 mm Crochet Hook: For the background and petals.
- 4.5 mm Crochet Hook: Optional for tighter flower centers.
- Tapestry Needle: For sewing flowers and weaving ends.
- Stitch Markers: For marking row ends and flower positions.
- Scissors: For trimming yarn.
- Measuring Tape: For gauge and spacing.
- Blocking Mats and Rustproof Pins: For shaping the completed blanket.
No stuffing, wire, or safety eyes are required.
Crochet Abbreviations
| Abbreviation | Meaning |
|---|---|
| MR | Magic Ring |
| ch | Chain |
| sc | Single Crochet |
| hdc | Half Double Crochet |
| dc | Double Crochet |
| inc | Two Single Crochets in One Stitch |
| dec | Single Crochet Decrease |
| sl st | Slip Stitch |
| st(s) | Stitch(es) |
| BLO | Back Loop Only |
| RS | Right Side |
| WS | Wrong Side |
| rep | Repeat |
| puff | Puff Stitch |
An invisible decrease is worked through the front loops of two adjacent stitches, although decreases are not required in this blanket pattern.
3D Puff Flower Crochet Blanket Pattern – Step by Step
The blanket is worked in turned rows. Flowers and center motifs are made separately in joined rounds, then sewn to the completed background.
Part 1: Cream Textured Blanket Background (Make 1)
Yarn: Warm Cream
Target Gauge: 14 hdc stitches and 12 rows per 10 cm, measured after washing and drying the sample.
At this gauge, the main panel measures approximately 86 × 120 cm before edging. The final width depends on the border and blocking.
Foundation
Ch 122.
Row 1: Hdc in the third chain from the hook and in each remaining chain. (120 hdc)
Row 2: Ch 2, turn. Hdc in each stitch across. (120)
Row 3: Ch 2, turn. Hdc in each stitch across. (120)
Rows 4–12: Repeat Row 3. (120 per row)
Rows 13–24: Repeat Row 3. (120 per row)
Rows 25–36: Repeat Row 3. (120 per row)
Rows 37–48: Repeat Row 3. (120 per row)
Rows 49–60: Repeat Row 3. (120 per row)
Rows 61–72: Repeat Row 3. (120 per row)
Rows 73–84: Repeat Row 3. (120 per row)
Rows 85–96: Repeat Row 3. (120 per row)
Rows 97–108: Repeat Row 3. (120 per row)
Rows 109–120: Repeat Row 3. (120 per row)
Rows 121–132: Repeat Row 3. (120 per row)
Rows 133–144: Repeat Row 3. (120 per row)
The beginning ch-2 does not count as a stitch. Work into the first stitch of each row and verify the final stitch count before turning.
Fasten off, leaving a 15 cm yarn tail.
Adjusting the Background
To increase the blanket width, add foundation chains and maintain the same stitch count across every row. For extra length, repeat the final row until the desired measurement is reached.
Check the fabric after approximately 20 rows. If the actual gauge differs from the target, calculate the number of stitches and rows required before continuing.
Part 2: Lavender Puff Flower Petals (Make 12 Flowers)
Yarn: Dusty Lavender
Each flower has six rounded lavender petals. The cream centers are made separately.
How to Make a Puff Stitch
Yarn over, insert the hook into the indicated stitch or space, yarn over, and pull up a loop. Repeat this movement until five elongated loops have been drawn up, leaving seven loops on the hook in total, including the initial loop. Yarn over and pull through all seven loops. Ch 1 to secure the puff.
Keep the elongated loops at a consistent height of approximately 1.5 cm.
Flower Foundation
R1: Work 6 sc into MR. Join with sl st to the first sc. (6)
R2: Ch 1, work 2 sc in each stitch. Join with sl st. (12)
R3: Ch 1, *sc in the next stitch, inc in the next stitch*; rep six times. Join with sl st. (18)
R4: Ch 1, *sc in the next 2 stitches, inc in the next stitch*; rep six times. Join with sl st. (24)
R5: Ch 1, *sc in the next 3 stitches, inc in the next stitch*; rep six times. Join with sl st. (30)
R6: Ch 1, *sc in the next 4 stitches, inc in the next stitch*; rep six times. Join with sl st. (36)
Petal Round
R7: Ch 1. Repeat the following sequence six times:
- Sc in the next stitch.
- Work one puff stitch into each of the next four stitches.
- Sc in the next stitch.
Join with sl st to the first sc.
Stitch Count: 36 worked stitches: 12 sc and 24 puff stitches. Securing chains are not counted.
The six groups of four puff stitches form six broad petals. Gently arrange each group into a rounded shape.
Fasten off, leaving a 20 cm tail for sewing.
This is an original flat circular puff-flower interpretation of the raised flowers in the photograph, not an exact reconstruction of the photographed stitch pattern.
Part 3: Raised Cream Flower Centers (Make 12)
Yarn: Warm Cream
The flower center should sit above the lavender foundation while leaving the petals visible.
R1: 6 sc in MR. Join with sl st. (6)
R2: Inc ×6. Join with sl st. (12)
R3: *Sc 1, inc* ×6. Join with sl st. (18)
R4: *Sc 2, inc* ×6. Join with sl st. (24)
R5: Ch 1, *sc in next stitch, ch 2, skip next stitch* ×12. Join with sl st. (12 sc, 12 ch-2 spaces)
R6: In each ch-2 space, work one puff stitch followed by ch 1. Join with sl st. (12 puff stitches)
Fasten off, leaving a 20 cm tail.
The final round forms a raised cream rosette. If the center becomes wider than the lavender petals allow, use the 4.5 mm hook.
Sew each center onto the middle of a lavender flower, passing the needle through the foundation stitches rather than flattening the raised center.
Part 4: Lavender Flower Placement
Materials: 12 completed flowers, stitch markers, and measuring tape.
The photographed blanket uses a scattered floral layout. For a reproducible arrangement, divide the proposed blanket into three vertical columns and four horizontal rows.
Measure from the completed blanket’s outer edges.
| Flower Column | Distance from Left Edge |
|---|---|
| Left | 17 cm |
| Center | 45 cm |
| Right | 73 cm |
| Flower Row | Distance from Top Edge |
|---|---|
| Row A | 17 cm |
| Row B | 45 cm |
| Row C | 75 cm |
| Row D | 103 cm |
Offset the middle flower in alternating rows by approximately 5 cm to avoid a rigid grid.
Pin every flower before sewing. Maintain at least 8 cm between the outer edges of neighboring flowers, adjusting spacing if the finished appliqués are larger than expected.
How to Attach the Flowers
Place each flower right side up. Thread the lavender sewing tail through the tapestry needle and attach the foundation circle to the cream blanket using small, evenly spaced stitches.
Avoid sewing through the outer puff petals. Their edges should remain raised.
Make approximately 12–18 securing stitches around each foundation circle, depending on the motif diameter.
Knot the yarn on the wrong side, weave the tail through several neighboring stitches, reverse direction, and trim.
Part 5: Cream Foundation Border
Yarn: Warm Cream
The first border round creates a stable foundation for the lavender scallops.
R1: Join cream yarn at a corner. Ch 1, work 3 sc into the corner space. Work one sc into each stitch across the top edge, placing 3 sc in the next corner.
Along each side, work approximately 2 sc for every 3 hdc row ends. Continue around the remaining corners and edges, placing 3 sc at each corner. Join with sl st.
R2: Ch 1. Sc in each stitch around, placing 3 sc into the center stitch of each corner group. Join with sl st.
R3: Repeat R2.
Fasten off and weave in the end.
Border Count Note: The exact perimeter count depends on the side-edge pickup rate. Count and distribute side stitches evenly before beginning the lavender scallops.
Part 6: Lavender Scalloped Border
Yarn: Dusty Lavender
The lavender border creates rounded decorative arches around the rectangular cream panel.
Preparation
Join lavender yarn at the beginning of a straight edge.
R1: Ch 1, sc in every stitch around, working 3 sc in each corner’s center stitch. Join with sl st.
R2: Ch 1. Along each straight side, repeat:
*Skip 2 stitches, 5 dc in the next stitch, skip 2 stitches, sc in the next stitch.*
At each corner, adjust the number of skipped stitches over the final repeat so that the shell pattern reaches the corner without crowding.
Work a 7-dc shell into the central corner stitch, then continue along the next side.
Join with sl st and fasten off.
Each standard shell uses a six-stitch repeat: two skipped stitches, one shell base, two skipped stitches, and one sc anchor.
The exact number of shells varies with the final perimeter stitch count. If the last repeat does not fit, distribute one or two additional skipped stitches along the side rather than forcing a partial shell.
Leave a 15 cm tail and weave it into the wrong side of the border.
Part 7: Final Shaping and Blocking
Lay the completed blanket on a clean, flat surface.
Measure the width at three points and the length at three points. If the edges differ by more than 2 cm, check for uneven tension or inconsistent side-edge pickup.
Lightly dampen the blanket if permitted by the yarn-care label. Arrange the flowers so that all six petals remain visible.
Pin the outer scallops into evenly spaced curves. Allow the blanket to dry fully before removing the pins.
Avoid applying direct high heat to acrylic yarn, which may permanently alter the fiber.
How to Assemble the Puff Flower Crochet Blanket
- Complete the Background: Crochet all 144 rows and confirm the width remains consistent.
- Prepare the Foundation: Weave in the cream yarn ends before adding decorative elements.
- Crochet the Flowers: Make 12 lavender puff-flower bases, checking the diameter after the first motif.
- Create the Centers: Crochet 12 raised cream rosettes using the same yarn weight.
- Assemble Each Flower: Sew one cream center onto each lavender flower.
- Add the Cream Border: Work three rounds of sc around the blanket.
- Finish the Lavender Edging: Crochet the scalloped border, adjusting shell spacing at the corners.
- Mark the Flower Positions: Measure the proposed layout and pin the flowers to the right side.
- Sew the Appliqués: Attach each flower through its foundation, leaving the puff petals raised.
- Block and Inspect: Shape the border, check every attachment, and weave in all remaining tails.
The finished blanket consists of one rectangular background, 12 layered floral appliqués, and a two-color decorative edging.
7 Technical Tips for Better Results
- Prevent Stitch-Count Drift: Place a marker in the first and last stitch of each background row. Count 120 hdc stitches every tenth row to catch accidental increases or omissions.
- Control Puff Height: Pull each puff loop to approximately 1.5 cm before closing the stitch. Inconsistent loop height produces petals with uneven thickness and diameter.
- Avoid Flower-Center Distortion: Check that the cream rosette does not exceed the lavender flower’s central area. A center that is too wide hides the petals and pulls the foundation inward.
- Correct Border Rippling: Excessive side-edge stitches cause the blanket perimeter to wave. Start with approximately two sc for every three hdc row ends, then adjust based on how the edge lies flat.
- Prevent Premature Flower Attachment: Complete and measure the blanket before pinning the appliqués. Sewing the flowers too early can create irregular spacing when the background changes dimensions after washing.
- Manage Yarn Tension: If substituting velvet or chenille yarn, make a 10 × 10 cm gauge sample and check for loose loops. Thick plush yarn can obscure stitch openings and change the diameter of the puff flowers.
- Secure Sewing Tails: Leave at least 20 cm for attaching each flower and weave the tail in two directions on the wrong side. Short, unsecured ends may work loose during washing or repeated folding.
Conclusion
This 3D puff flower crochet blanket pattern uses separate floral appliqués to keep the background construction independent from the decorative details. The cream panel provides a continuous base, while the lavender petals and scalloped border establish the visual structure.
Before beginning the full blanket, crochet one flower and a 10 × 10 cm background swatch. Measure both, record yarn consumption, and adjust the proposed quantities if necessary.
Save the finished layout to Pinterest or share your completed project on Instagram using #LavenderPuffFlowerBlanket. Include the finished dimensions and yarn weight so other makers can compare their results.
Would you keep all twelve lavender flowers, or reduce the arrangement to nine larger motifs?









