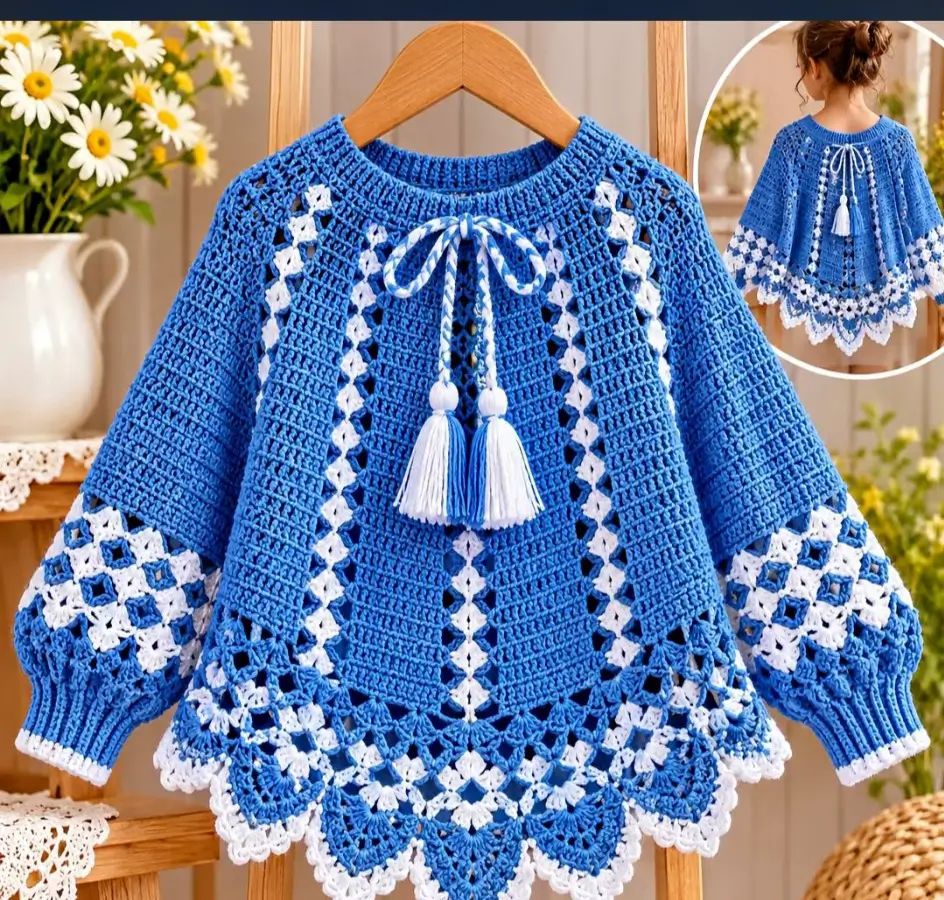
The pointed white lace panels along this poncho’s hem require a different construction from its solid blue upper body. This blue and white crochet poncho pattern combines a flared silhouette, long sleeves, decorative trim, and a ribbed neckline. Designed as an intermediate project using DK yarn and a 5 mm hook, the proposed garment measures approximately 50–55 cm long. Its separate construction sections allow adjustments to sleeve length and body width.
The Design: What Makes This Crochet Poncho Different
The defining feature is the contrast between the structured blue upper garment and its open white-and-blue decorative sections. A conventional poncho often consists of two rectangles or a circular yoke. This design instead uses shaped panels and separate sleeves to create a crochet poncho sweater for girls with more defined arm coverage.
The neckline is kept relatively stable with a narrow ribbed collar, while the lower body expands to accommodate the scalloped edging. The lace border is added after the main garment is assembled, allowing its depth to be adjusted without changing the upper-body measurements.
The long sleeve crochet poncho also uses contrasting openwork near the cuffs. This creates continuity between the sleeve decoration and lower hem.
A common construction error is adding too much fabric at the shoulders. Excess width causes the neckline to spread and the sleeves to hang below their intended position.
Project Info at a Glance
| Feature | Details |
|---|---|
| Skill level | Intermediate |
| Crochet terminology | US |
| Construction | Flat panels and joined rounds |
| Main stitches | Single crochet, double crochet, chains, shell stitches |
| Recommended hook | 5 mm |
| Ribbing hook | 4 mm |
| Target size | 8–10 years |
| Approximate length | 50–55 cm |
| Estimated time | 20–30 hours |
| Best for | Decorative children’s outerwear |
Pattern note: This is an original, photo-inspired construction guide. The measurements and instructions have not been sample-tested and do not reproduce the photographed garment exactly.
Understanding the Fit
The Craft Yarn Council lists chest measurements of approximately 67 cm for size 8 and 71 cm for size 10. These measurements describe the body, not the finished circumference of a loose-fitting garment.
For this project, a finished upper-body circumference of approximately 80 cm is a reasonable design target. The flared lower section will be wider.
Before beginning, measure the intended wearer’s chest, shoulder width, arm length, and desired garment length. Compare these measurements with the target dimensions rather than relying entirely on age.
Materials and Tools
Yarn
Choose a smooth DK-weight yarn with good stitch definition. A cotton-acrylic blend is a practical option because it provides structure without making the entire garment excessively heavy.
- Royal blue DK yarn — 450–550 g: Main body, sleeves, collar, cuffs, and decorative elements.
- White DK yarn — 100–150 g: Lace sections, edging, contrast motifs, and tassels.
The quantities include an allowance for decorative work. Actual consumption depends on gauge, finished dimensions, yarn composition, and the amount of lace added.
For consistent results, select both colors from the same yarn collection.
Crochet Tools
- 5 mm crochet hook for the main garment.
- 4 mm crochet hook for ribbing and tighter finishing details.
- Stitch markers for identifying panel centers and shaping points.
- Measuring tape for checking width, length, and sleeve placement.
- Tapestry needle for joining sections and weaving ends.
- Scissors for cutting yarn.
- Blocking pins and mats for shaping the lace edging.
A 5 mm hook falls within the Craft Yarn Council’s recommended range for category 3 yarn.
Gauge
Make a 15 × 15 cm swatch using the main blue yarn and the proposed hook.
Working gauge target: 16 double crochet stitches × 9 rows = approximately 10 × 10 cm.
This is a design target, not a tested gauge for the photographed garment. Wash and dry the swatch according to the yarn label before measuring.
If the swatch is too narrow, use a larger hook. If it is too wide, use a smaller hook.
Gauge controls the relationship between stitch count and finished garment dimensions. It also affects the number of rows needed to reach the armhole and lower hem.
Crochet Abbreviations
| Abbreviation | Meaning |
|---|---|
| ch | Chain |
| sc | Single crochet |
| hdc | Half double crochet |
| dc | Double crochet |
| tr | Treble crochet |
| sl st | Slip stitch |
| st(s) | Stitch(es) |
| BLO | Back loop only |
| RS | Right side |
| WS | Wrong side |
| rep | Repeat |
| sk | Skip |
| sp | Space |
| inc | Increase |
Pattern note: Turning chains are not counted as stitches unless specifically stated.
Blue and White Crochet Poncho Pattern — Step by Step
The following instructions provide a simplified, photo-inspired construction plan using solid panels and applied lace. The pattern is not a tested replica of the reference garment. Check measurements and stitch counts throughout construction.
Part 1: Front Body Panel
Yarn: Royal blue DK. Hook: 5 mm.
The front panel forms the central structure of the garment. Begin at the upper edge and work downward so the lower section can expand gradually.
Foundation: Ch 65.
Row 1: Dc in the fourth chain from the hook and in each remaining chain. (63 dc)
Rows 2–4: Ch 2, turn. Dc in each stitch across. (63 dc)
Row 5: Ch 2, turn. Work 31 dc, 2 dc in next stitch, 31 dc. (64 dc)
Rows 6–8: Dc in each stitch across. (64 dc)
Row 9: Work 31 dc, 2 dc in each of the next 2 stitches, 31 dc. (66 dc)
Rows 10–12: Dc across. (66 dc)
Row 13: Work 32 dc, 2 dc in each of the next 2 stitches, 32 dc. (68 dc)
Rows 14–16: Dc across. (68 dc)
Row 17: Work 33 dc, 2 dc in each of the next 2 stitches, 33 dc. (70 dc)
Continue with three plain rows followed by a central increase row until the panel reaches the intended lower width.
At the proposed gauge, 70 stitches measure approximately 44 cm. Check the actual width against the wearer before continuing.
Work additional plain rows until the panel measures approximately 40–43 cm from the foundation edge. The remaining length will come from the decorative hem.
Fasten off, leaving a 25 cm sewing tail.
Construction limitation: This panel is intentionally simplified. It does not contain the original photograph’s full vertical lace structure or a shaped front neckline. Those details would require a separate graded, sample-tested pattern.
Part 2: Back Body Panel
Yarn: Royal blue DK. Hook: 5 mm.
Repeat the front-panel instructions to produce a matching back panel.
Check that both pieces have identical row counts and finished dimensions before joining.
The back panel should lie flat without twisting or narrowing along one edge. If the two panels differ in length, compare their row heights before adding extra rows.
A difference of more than 1 cm can distort the shoulder line and cause the decorative hem to hang unevenly.
Part 3: Shoulder and Side Assembly
Place the front and back panels together with right sides facing.
Mark the center of each upper edge. Leave an opening of approximately 18–20 cm for the neckline, subject to the wearer’s head measurement and the stretch of the finished collar.
Join the shoulder sections using mattress stitch or slip stitches.
Next, mark an armhole opening approximately 15–16 cm deep on each side. Sew the side seams from the lower edge toward the markers.
Turn the garment right side out and check the neckline and armhole measurements.
The top opening must pass comfortably over the wearer’s head. A decorative drawstring should never be relied upon to compensate for a neckline that is too small.
Part 4: Long Crochet Sleeves (Make 2)
Yarn: Royal blue DK. Hook: 5 mm.
Work each sleeve from the cuff toward the upper arm. The following instructions create a tapered sleeve blank that can be adjusted to the measured armhole.
Foundation: Ch 33.
Row 1: Dc in fourth chain from hook and each remaining chain. (31 dc)
Rows 2–4: Dc across. (31 dc)
Row 5: Work 2 dc in first stitch, dc in next 29 stitches, 2 dc in final stitch. (33 dc)
Rows 6–8: Dc across. (33 dc)
Row 9: Increase once at each edge. (35 dc)
Rows 10–12: Dc across. (35 dc)
Row 13: Increase once at each edge. (37 dc)
Rows 14–16: Dc across. (37 dc)
Row 17: Increase once at each edge. (39 dc)
Continue the same three-plain-rows, one-increase-row sequence as needed.
Stop when the sleeve length reaches the desired underarm measurement, allowing space for the cuff.
Sew the long sleeve seam, then attach the upper opening to the garment armhole.
Because a flat sleeve blank and a garment armhole may have different edge lengths, measure both before sewing. Add or remove rows or adjust the upper width rather than forcing one edge to fit.
Part 5: Blue and White Openwork Sleeve Decoration
Yarn: Royal blue and white DK. Hook: 5 mm.
The reference garment has contrasting openwork near the lower sleeves. This can be approximated with a separate lace band.
Create a foundation chain long enough to fit around the lower sleeve with slight ease. Use a multiple of 6 chains.
Round 1: Join the chain without twisting. Ch 3, work dc in each chain, and join with sl st.
Round 2: Ch 3, sk 2 stitches, sc in next stitch, then repeat the chain-space pattern around.
Round 3: Work groups of 3 dc into alternating chain spaces, separated by ch 2.
Round 4: Change to white. Work 3 dc clusters into the available spaces, keeping the clusters evenly distributed.
Round 5: Change to blue. Repeat the cluster pattern, staggering the groups between those in the previous round.
Round 6: Work a final blue round of sc, adjusting the stitch count to match the sleeve circumference.
Fasten off and attach the band around the lower sleeve.
The exact number of repeats depends on the finished sleeve measurement. Count the spaces before starting the second sleeve so both decorative bands match.
Part 6: Ribbed Sleeve Cuffs (Make 2)
Yarn: Royal blue DK. Hook: 4 mm.
The cuff is worked separately in rows, using back-loop-only single crochet to create vertical ribs.
Foundation: Ch 11.
Row 1: Sc in second chain from hook and each remaining chain. (10 sc)
Row 2: Ch 1, turn. Sc BLO across. (10 sc)
Rows 3 onward: Repeat Row 2 until the strip fits comfortably around the wrist.
Join the first and last rows to form a ring.
Attach the cuff to the sleeve opening, distributing the sleeve fabric evenly around the smaller circumference.
Do not pull the cuff tight while sewing. Excess tension can produce a rigid wrist opening and distort the openwork above it.
Part 7: Ribbed Crochet Neckline
Yarn: Royal blue DK. Hook: 4 mm.
Work a narrow ribbed strip using the same technique as the sleeve cuffs.
Foundation: Ch 9.
Row 1: Sc in second chain from hook and across. (8 sc)
Row 2: Ch 1, turn. Sc BLO across. (8 sc)
Repeat Row 2 until the strip fits the neckline without excessive stretching.
Join the strip into a ring and sew it around the neck opening.
The finished collar should sit flat. If it pulls the upper body inward, the strip is too short. If it waves or folds outward, it is too long.
For a more polished appearance, position the collar seam at the center back.
Part 8: White Lace Hem Border
Yarn: White DK. Hook: 5 mm.
The scalloped lower edge is one of the most visible features of the design. A shell-stitch border provides a practical alternative to the intricate pointed motifs in the photograph.
Preparation round: Work one round of sc around the lower edge. Adjust the total to a multiple of 6 stitches.
Round 1: Ch 1, sc in each stitch around. Join with sl st.
Round 2: Ch 1, sc in first stitch, sk 2 stitches, work 5 dc in next stitch, sk 2 stitches. Repeat around.
Round 3: Work sc in the spaces between shells and ch 5 across each shell section, keeping the arches evenly spaced.
Round 4: Work 7 dc into each chain arch, with sc between groups.
Round 5: Work a finishing round of sc, placing 3 sc into the center stitch of each shell to emphasize the scallop.
Fasten off and weave in the yarn ends.
For a deeper border, add another shell repeat before the finishing round. The garment will become longer and heavier, so check the finished length before adding further decoration.
Part 9: Decorative Vertical White Motifs
Yarn: White DK. Hook: 4 mm.
The reference image contains narrow white motifs running down the front of the blue garment. These can be represented by surface crochet or separately made decorative strips.
For a simple surface-crochet version, mark three vertical lines on the front panel: one central line and two lines placed symmetrically on either side.
Insert the hook through the fabric and pull a white loop to the front. Work a chain-like line along each marked position, keeping the tension loose enough that the blue fabric remains flat.
For a more open appearance, make narrow chain-and-cluster strips separately and sew them into position.
Measure each strip before attachment. Unequal lengths can pull the front panel upward or create diagonal wrinkles.
Part 10: Blue and White Tassel Drawstrings
Yarn: Royal blue and white DK.
The pictured garment uses a decorative cord with tassels near the neckline.
For the simplified design, make one braided cord using equal lengths of blue and white yarn.
Cut six strands approximately 90 cm long. Fold them together and braid them to the desired length.
Make two tassels by wrapping yarn around a 10 cm cardboard template approximately 20–25 times.
Tie the bundle securely at one end, remove it from the template, and wrap a separate strand around the tassel neck.
Trim the lower ends evenly.
Attach one tassel to each end of the braided cord.
For children’s clothing, the cord should be a securely attached decorative element rather than a long, functional neck drawstring. Shorten or omit it for younger children, and check applicable children’s clothing safety requirements before use.
Assembly and Finishing — 10 Steps
- Block the body panels. Lay the front and back pieces flat and compare their dimensions. Correct major differences before joining.
- Join the shoulders. Align the upper edges, leaving the measured neckline opening in the center. Sew both shoulders using matching blue yarn.
- Complete the side seams. Mark the armhole depth on both sides and sew from the lower edge upward, leaving the openings free.
- Prepare the sleeves. Sew each sleeve’s long seam, checking that the shaping is symmetrical and the seam remains flat.
- Attach the sleeves. Position each sleeve seam at the underarm. Pin around the armhole before sewing and distribute the fabric without puckering.
- Add the ribbed neckline. Join the prepared collar strip and sew it evenly around the opening, with the collar seam at center back.
- Attach the sleeve cuffs. Sew the ribbed cuffs to the lower sleeve edges, keeping the ribbing vertical.
- Complete the lace decoration. Attach the sleeve bands, work the scalloped hem, and add the vertical white front motifs.
- Secure decorative accessories. Attach the shortened tassel cord if appropriate for the intended wearer. Check each attachment for loose strands.
- Finish and block. Weave in all yarn ends, lightly wash according to the yarn label, and block the garment to its target measurements.
The completed garment should have symmetrical sleeves, a stable neckline, and an evenly distributed lace border.
7 Technical Tips for Better Results
- Mark every increase row. Place a stitch marker at the center of the body panel before shaping; a misplaced increase can create a visible diagonal line. Count the stitches immediately after each increase row.
- Check the gauge after washing. A difference of two stitches across 10 cm can significantly change the finished width. Measure the washed swatch rather than relying on the unblocked fabric.
- Prevent uneven sleeve lengths. Measure both sleeves from the cuff edge to the upper opening before assembly. A difference greater than 1 cm should be corrected before sewing.
- Control neckline stretching. A collar that is pulled tightly during attachment can reduce the usable neck opening. Measure the opening after the collar is sewn, not just before.
- Maintain consistent lace tension. Tight chain spaces can make the scalloped border curl upward. Use the same hook and yarn tension across every repeat.
- Pin decorative strips before sewing. A vertical motif that is even 5 mm off-center may become noticeably asymmetrical. Measure the distance from the center line at the top, middle, and bottom.
- Secure the yarn tails carefully. Short tails can work loose during washing, especially around sleeve seams. Weave each tail through several stitches in more than one direction without pulling the fabric out of shape.
How to Adjust the Crochet Poncho Size
The proposed pattern is designed around an approximately 8–10-year-old child, but the same construction method can be adapted to other measurements.
| Child Size | Standard Chest | Suggested Garment Chest |
|---|---|---|
| 6 | 63.5 cm | 73–77 cm |
| 8 | 67 cm | 77–81 cm |
| 10 | 71 cm | 81–85 cm |
| 12 | 76 cm | 86–90 cm |
The standard chest measurements are based on Craft Yarn Council sizing guidance. Suggested garment circumferences are design estimates with approximately 10–14 cm of ease, not tested pattern sizes.
For a larger garment, increase the panel width, adjust the sleeve circumference, and add rows to the body and sleeves. For a smaller garment, reduce these dimensions proportionally.
However, garment grading involves more than changing stitch counts. The neckline, shoulder width, armhole depth, and sleeve attachment must also be checked.
Choosing the Correct Length
Measure from the intended shoulder position to the desired lower hem. Subtract the planned depth of the decorative lace border to calculate the required length of the solid body panel.
For example, if the target finished length is 52 cm and the border measures 9 cm, the solid section should be approximately 43 cm long.
This calculation helps prevent the garment from becoming too long after the edging is attached.
How to Wash and Maintain the Crochet Poncho
The care instructions depend on the fiber content of the yarn. Always follow the manufacturer’s washing and drying recommendations.
For a cotton-acrylic blend, a gentle wash may be appropriate if permitted by the yarn label. Avoid twisting or wringing the garment because this can distort the lace sections.
Support the garment when lifting it from water. Lay it flat to dry, arrange the sleeves symmetrically, and reshape the scalloped hem.
Hanging a wet crochet garment can stretch the neckline and lengthen the body under its own weight.
Store the finished poncho folded rather than hanging it for long periods.
Frequently Asked Questions
Is this crochet poncho suitable for beginners?
The solid double crochet panels are relatively accessible, but sleeve shaping, garment assembly, ribbing, and decorative lace require additional experience. The project is best classified as intermediate.
What yarn works best for a blue and white crochet poncho?
DK-weight yarn is a suitable starting choice for this design. A smooth yarn provides better visibility of the lace and textured stitches than highly fuzzy or velvet yarn.
Can I use worsted-weight yarn instead?
Yes, but a direct substitution will change the dimensions, fabric density, and yarn consumption. Make a new gauge swatch and recalculate the stitch counts before beginning.
How much yarn will I need?
For the proposed 8–10-year size, budget approximately 450–550 g of blue DK yarn and 100–150 g of white DK yarn. These are planning estimates and should be confirmed through sample construction.
Can the poncho be made without sleeves?
The body panels can be adapted into a sleeveless poncho-style garment. However, the armholes and side seams must be redesigned so the fabric hangs correctly without sleeves.
How can I make the lace edging more pronounced?
Increase the depth of the shell border or substitute a tested pointed lace motif. Keep the repeat count compatible with the lower circumference and block the finished edging.
Does this pattern exactly reproduce the photographed poncho?
No. The original photograph shows more intricate shaping, lace panels, and hem motifs than can be accurately reconstructed from a single image. This article provides an original simplified interpretation.
Conclusion
The blue and white crochet poncho pattern combines a structured upper body with contrasting lace details, separate sleeves, and ribbed finishing elements. Its construction can be adapted by changing panel dimensions, sleeve lengths, and border depth, although those changes should be checked against a finished gauge swatch. Before wearing or publishing the instructions as a tested pattern, complete a sample and verify the neckline, armholes, and overall fit.
Save the project to Pinterest for future reference, or share a photograph of the finished garment on Instagram using #BlueWhiteCrochetPoncho.
Which decorative element would you keep from the reference image: the pointed floral hem or the vertical white lace motifs?









