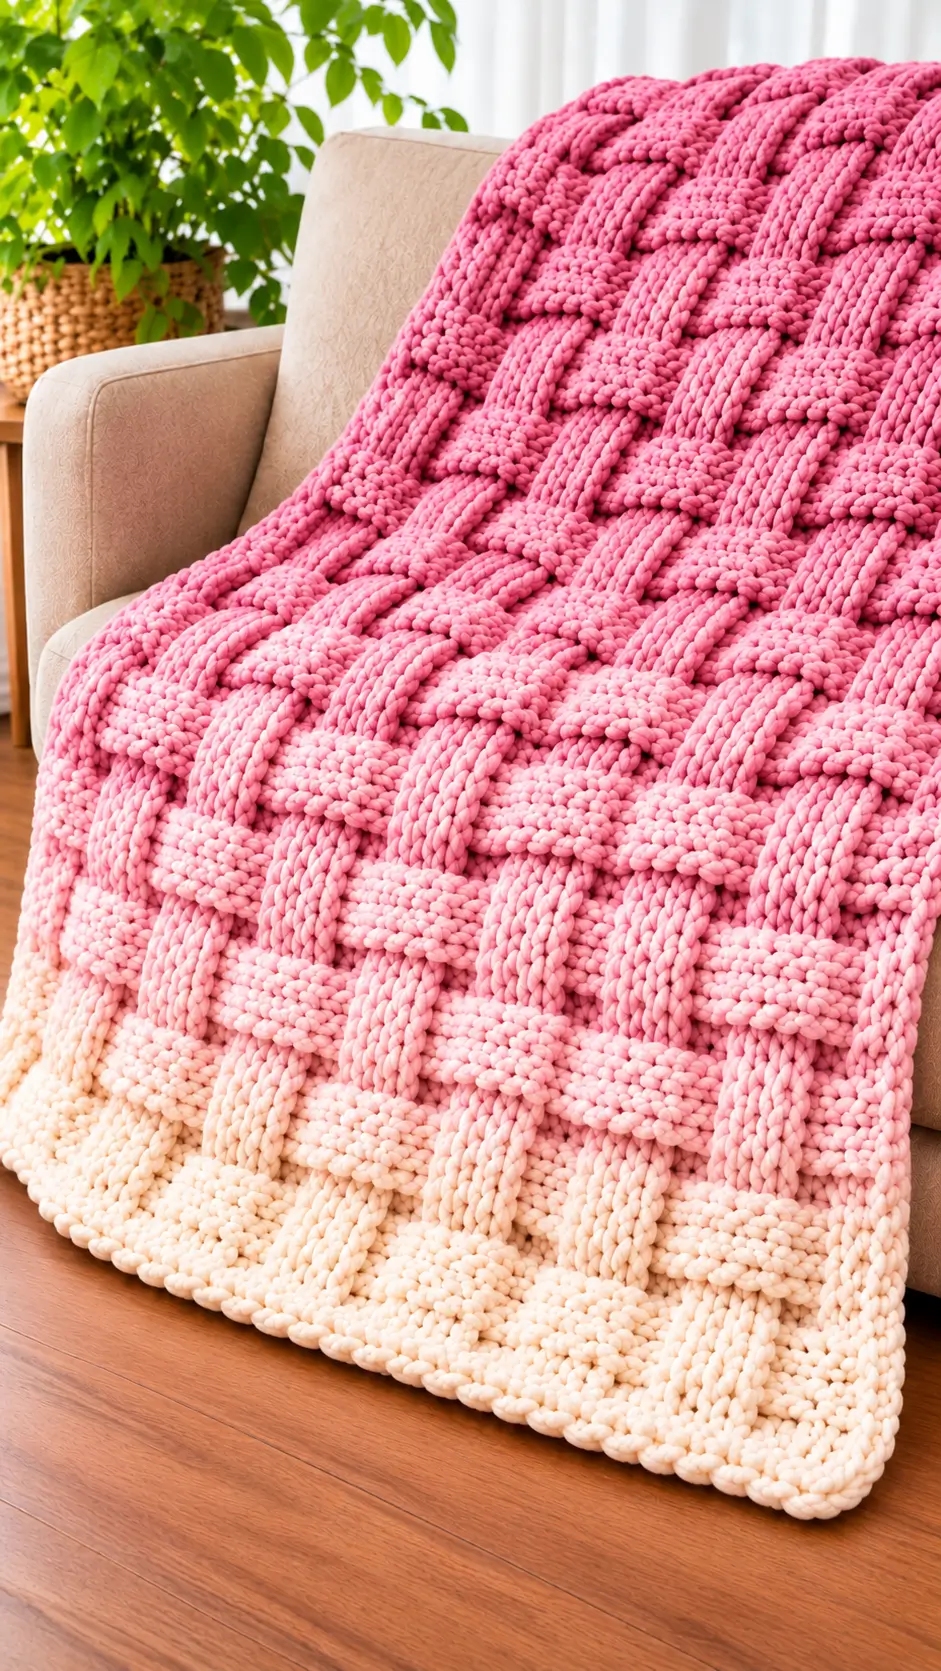
The oversized woven bands are what give this blanket its unusually deep surface. This photo-inspired pink basket weave crochet blanket uses super bulky yarn to create alternating horizontal and vertical raised sections, producing the appearance of thick strips passing over and under one another. A cream lower section breaks up the saturated pink and gives the blanket a clean two-color finish. The construction is best suited to an intermediate crocheter comfortable with textured stitches and consistent tension.
The Design: What Makes This Basket Weave Blanket Different
This blanket does not rely on a small traditional basket-weave texture. Instead, the pattern exaggerates the scale. Wide vertical columns appear to cross over broad horizontal ridges, creating large rectangular blocks that can be read clearly from across a room.
The texture is particularly effective with plush super bulky yarn because the stitches remain rounded and dimensional. The pink body dominates the design, while a wide cream section at the lower edge creates contrast without interrupting the woven structure.
The main technical problem is controlling width. Raised stitches consume more yarn and pull the fabric inward, so a generous gauge swatch is required before calculating the foundation.
Project Information at a Glance
| Skill Level | Construction | Suggested Hook | Yarn | Target Size |
|---|---|---|---|---|
| Intermediate | One-piece textured rectangle | 9–12 mm | Super Bulky #6 | Approximately 120 × 150 cm |
Materials and Tools
Yarn
- Bright Pink — Super Bulky #6 — main blanket color
- Soft Cream — Super Bulky #6 — lower contrast section and optional border
Choose yarns from the same product line whenever possible. Differences in fiber, twist or thickness can change the width of the cream section even when the stitch count remains identical.
Tools
- 9–12 mm crochet hook, matched to the selected yarn and desired density
- Large-eye yarn needle
- Scissors
- Locking stitch markers
- Flexible measuring tape
Abbreviations
- ch — chain
- sc — single crochet
- hdc — half double crochet
- dc — double crochet
- fpdc — front post double crochet
- bpdc — back post double crochet
- sl st — slip stitch
- st/sts — stitch/stitches
- RS — right side
- WS — wrong side
Understanding the Oversized Basket Weave
The photographed blanket has a large-scale woven appearance. A practical crochet interpretation uses groups of raised post stitches rather than physically weaving separate strips.
Each block is formed from a group of stitches worked as either front-post or back-post stitches. After several rows, the orientation changes. The result is a raised rectangle followed by a recessed rectangle.
For this oversized version, use blocks of 6 stitches × 6 rows.
That means:
- 6 fpdc form one raised block.
- 6 bpdc form one recessed block.
- Repeat the same arrangement for 6 rows.
- Reverse the groups for the following 6 rows.
This produces much larger woven sections than a standard small basket-weave pattern.
Gauge Swatch
Make at least a 30 × 30 cm basket-weave sample. A small swatch does not accurately show how this heavy fabric contracts.
Work at least three complete 6-stitch blocks across and two full 6-row sections vertically.
Measure the swatch without stretching it.
If the fabric feels rigid and refuses to drape, move up one hook size. If the post stitches separate enough to create large holes, move down one hook size.
Calculating the Blanket Width
The stitch count should be based on complete 6-stitch blocks.
For example, a blanket containing 12 blocks across requires:
12 × 6 = 72 pattern stitches
Add edge stitches according to the chosen foundation method.
For a wider blanket, use 14 blocks:
14 × 6 = 84 pattern stitches
Measure the actual blocked swatch before choosing the final number. Super bulky yarn varies considerably between manufacturers.
Foundation
Using pink yarn, make a foundation chain corresponding to the required number of pattern stitches plus turning chains.
Foundation Row: Dc in the fourth chain from the hook and in every chain across. Turn.
This first row acts as the structural base for the post stitches.
Pink Basket Weave Section
Rows 1–6: First Block Direction
Row 1: Ch 2. Work fpdc around each of the next 6 stitches. Work bpdc around each of the following 6 stitches. Continue alternating groups of 6 across. Finish with an edge dc. Turn.
Row 2: Ch 2. Maintain the established texture so the raised blocks remain raised when viewed from the right side. Work the post stitches around the posts rather than into the normal top loops. Turn.
Rows 3–6: Repeat the established arrangement.
After Row 6, each block should form a broad rectangular band.
Rows 7–12: Reverse the Blocks
Reverse the texture.
Where the previous section appears raised, create a recessed section. Where it appears recessed, create a raised section.
Row 7: Work the opposite post-stitch orientation across every 6-stitch group.
Rows 8–12: Maintain the new orientation.
The first complete basket-weave repeat is now finished.
Continue the Body
Repeat Rows 1–12 until the pink portion reaches the planned length.
For proportions similar to the photographed blanket, allow pink to cover approximately 75–85 percent of the total blanket length.
Do not measure while the blanket is hanging from the hook. Lay the fabric flat because the weight of super bulky yarn can temporarily lengthen the stitches.
Creating Stronger Raised Bands
If a more dramatic woven appearance is required, add surface relief to the raised blocks.
Work the front-post stitches slightly taller by using relaxed loops rather than tightening them against the previous row.
Keep the recessed bpdc groups comparatively firm.
The difference in tension increases the visual separation between the two surfaces without changing the stitch count.
Changing from Pink to Cream
Plan the color change at the beginning of a new 6-row block rather than halfway through a textured section.
On the final pink stitch, stop before completing the final yarn-over.
Pull the cream yarn through the remaining loops.
Leave tails of approximately 15–20 cm for secure weaving.
Continue the basket-weave pattern in cream without changing the number of stitches.
Cream Basket Weave Section
Continue alternating 6-stitch groups exactly as established in the pink portion.
Work enough cream rows to produce approximately 20–25 cm of contrasting fabric, or adjust the depth to suit the finished blanket dimensions.
The color transition should not change the geometry of the woven blocks.
If the cream yarn produces a noticeably wider fabric, change hook size rather than reducing the stitch count. Removing stitches would disrupt the basket-weave repeat.
Optional Gradient Transition
The photograph shows a strong transition between pink and cream. A softer version can be made by introducing a pale blush section between the two colors.
For example:
| Section | Approximate Proportion |
|---|---|
| Bright Pink | 65% |
| Pale Pink | 15% |
| Cream | 20% |
Keep every color change aligned with a 6-row texture block.
Finishing the Final Row
After the final cream basket-weave block, work one row of hdc across.
This stabilizes the lower edge and creates a flatter foundation for the border.
Do not work additional increases.
Simple Crochet Border
A heavy textured blanket needs a relatively restrained border. A complicated lace edge competes with the oversized woven surface.
Border Round 1
Join cream yarn in one corner.
Work sc evenly around the complete blanket.
Place (sc, ch 1, sc) in each corner.
Along the side edges, distribute stitches according to the actual row height rather than placing one stitch mechanically into every row end.
Border Round 2
Work hdc in every stitch around.
At each corner work (2 hdc, ch 1, 2 hdc).
Border Round 3
Work sc around the entire blanket.
For a rounded edge, substitute reverse single crochet for the final round.
Suggested Blanket Sizes
| Blanket Type | Approximate Finished Size |
|---|---|
| Baby Blanket | 75 × 95 cm |
| Lap Blanket | 90 × 120 cm |
| Sofa Throw | 120 × 150 cm |
| Large Throw | 135 × 170 cm |
| Bed Throw | 150 × 190 cm |
Use these measurements as planning targets. The actual foundation stitch count must come from the basket-weave swatch.
Estimating Yarn Requirements
Post-stitch basket weave consumes considerably more yarn than a flat double-crochet blanket of the same dimensions.
The most accurate method is to weigh a finished swatch.
Suppose a 30 × 30 cm basket-weave sample weighs 120 g.
The swatch area is:
30 × 30 = 900 cm²
A 120 × 150 cm blanket has an area of:
120 × 150 = 18,000 cm²
Divide:
18,000 ÷ 900 = 20
Multiply by the swatch weight:
20 × 120 g = approximately 2,400 g
Add approximately 10 percent for the border, gauge differences and finishing.
This calculation is an example only. Weigh your own swatch because plush yarn density can vary substantially.
Keeping the Basket Weave Square
Measure the blanket after every two complete 12-row pattern repeats.
Compare the width at the top, center and bottom.
A difference greater than approximately 2–3 cm indicates that tension is changing.
Do not attempt to correct a narrowing blanket by adding random stitches. Adjust hook tension first.
Alternative Construction with Separate Woven Strips
For an even more sculptural appearance, the design can be constructed from separate crochet strips.
Make multiple vertical strips approximately 5–7 cm wide and horizontal strips of the same width.
Arrange them in an over-under sequence and secure each crossing invisibly from the wrong side.
This method produces extreme depth, but it also increases weight and yarn consumption. For a functional sofa blanket, the post-stitch version is generally more practical because the complete surface remains connected.
Color Variations
The same oversized basket texture works with several two-color combinations:
- Dusty rose and ivory
- Sage green and cream
- Terracotta and beige
- Navy and pale blue
- Caramel and warm white
- Lavender and soft gray
For the strongest woven effect, select two colors with enough contrast to make the transition visible without distracting from the texture.
Assembly and Finishing
- Make a large basket-weave swatch using the selected yarn and hook.
- Wash or relax the swatch, then measure its actual width and height.
- Calculate the number of complete 6-stitch blocks needed for the desired blanket width.
- Crochet the pink foundation and establish the first basket-weave section.
- Alternate the block direction every 6 rows and check the width after each complete 12-row repeat.
- Change to cream at the beginning of a new texture block and continue without altering the stitch count.
- Finish the final cream section with a stabilizing hdc row.
- Work the border around all four sides, adjusting the side-edge pickup rate if the fabric begins to ripple.
- Weave each yarn tail through several directions on the wrong side because super bulky yarn can work loose from short finishing paths.
- Lay the finished blanket flat, shape the corners and allow the stitches to relax before taking the final measurements.
The finished blanket should display clearly defined alternating raised blocks with straight side edges and an uninterrupted cream lower section.
7 Technical Tips
- Narrowing blanket: post stitches frequently tighten as the project grows. Measure the width after every 12-row repeat and correct tension before a difference exceeds approximately 2 cm.
- Weak basket texture: inserting the hook through the normal top loops will flatten the woven effect. Post stitches must wrap around the vertical post of the stitch below.
- Distorted blocks: every texture block should contain exactly 6 stitches. Place a marker between groups until the repeat becomes easy to identify.
- Uneven color transition: change yarn only at the edge and at the beginning of a new 6-row section. A mid-block color change breaks the large woven geometry.
- Rigid fabric: a hook that is too small makes super bulky post stitches extremely dense. Increase the hook by 1 mm and remake the swatch if it cannot fold naturally.
- Wavy border: excessive stitches along the vertical edges create ruffling. Begin with approximately two border stitches for every three row ends, then modify that ratio according to the actual gauge.
- Loose yarn ends: thick yarn can escape from short woven tails. Leave at least 15 cm and weave each tail back through the dense fabric in two or three directions.
Care and Final Shaping
Follow the washing instructions printed on the yarn label.
Because a super bulky basket-weave blanket can become very heavy when wet, support the entire fabric during washing and moving.
Avoid hanging the wet blanket. Its weight can permanently lengthen the raised blocks.
Lay it flat on a large clean surface and shape the corners to 90 degrees.
Measure the width in several places and gently redistribute the fabric while damp.
Allow it to dry completely before folding or placing it on furniture.
Conclusion
The key to a successful pink basket weave crochet blanket is maintaining identical block dimensions from the first pink section through the final cream rows. Make the 30 cm swatch first, calculate the width from complete 6-stitch groups, and check the blanket after every 12-row texture repeat. Once the body is finished, use a restrained cream border so the oversized woven structure remains the dominant feature. Save the project to Pinterest or share the finished blanket on Instagram with #PinkBasketWeaveBlanket. For this particular two-color design, would you keep the cream only at the bottom or repeat a second cream band near the top?









