Introduction
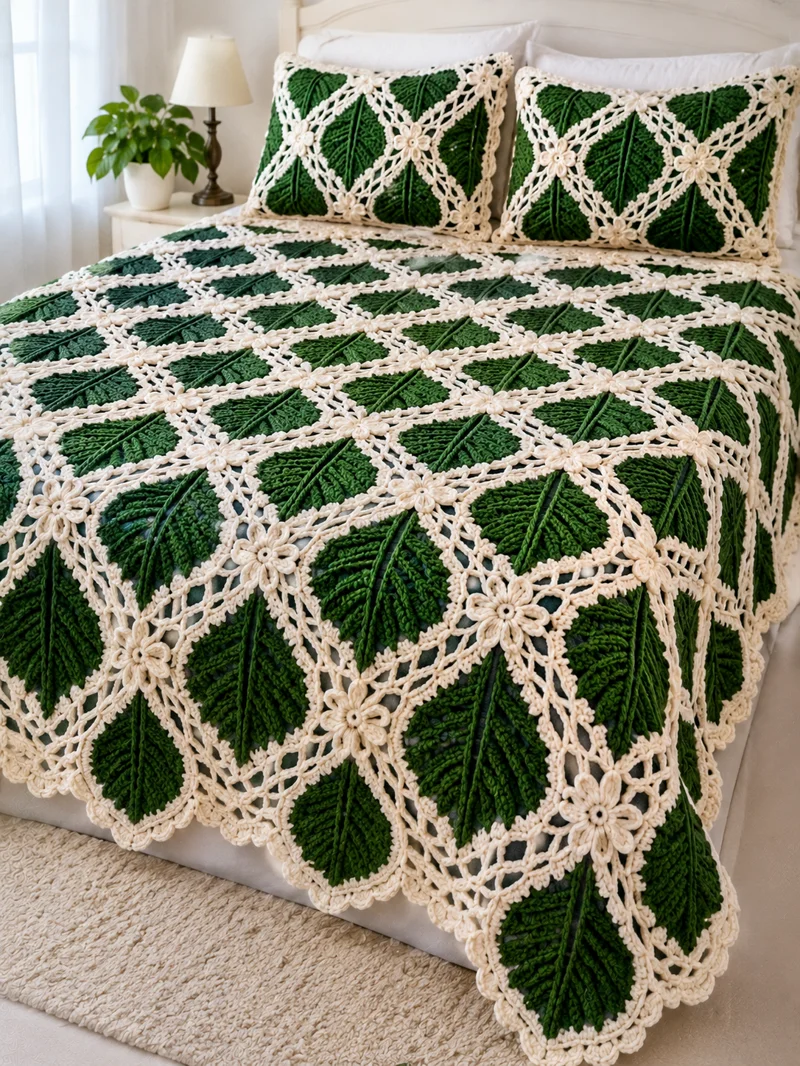
A raised central vein gives each forest-green leaf its shape, while ivory lace connects the foliage into a repeating botanical arrangement. This crochet leaf bedspread pattern uses worsted-weight yarn, a 4.5 mm crochet hook, textured leaf appliqués, and modular squares to create a proposed 180 × 220 cm coverlet with matching pillow covers. Designed for intermediate crocheters, the construction allows individual motifs to be completed, measured, and joined before the final border is added.
The Design: What Makes This Botanical Bedspread Different
The bedspread combines three structural elements: dimensional green leaves, cream-colored openwork backgrounds, and small flowers positioned at selected motif intersections.
Each leaf is worked separately around a foundation chain. The changing stitch heights produce a pointed outline, while a raised embroidered vein provides the botanical detail visible in the reference photograph.
The ivory background uses open granny-style clusters. This construction reduces the density of the fabric and provides regular joining points without requiring complicated lace charts.
The third element is the flower decoration. Small five-petal motifs conceal selected joins and repeat across the blanket and matching crochet pillow covers.
A common mistake when making a green crochet blanket with raised appliqués is attaching the leaves too tightly. Restricting the outer edges prevents the fabric from lying flat. Attach the central vein securely, but leave some movement along the leaf perimeter.
This original interpretation prioritizes repeatable motifs, accessible stitch counts, and adjustable sizing.
Project Info at a Glance
| Feature | Details |
|---|---|
| Skill Level | Intermediate |
| Estimated Time | 100–160 hours, depending on size and experience |
| Target Bedspread Size | 180 × 220 cm |
| Pillow Covers | Two, approximately 45 × 45 cm |
| Main Hook | 4.5 mm |
| Joining Hook | 5 mm, optional |
| Yarn Weight | Worsted / Aran, category 4 |
| Main Technique | Modular squares and appliqués |
| Crochet Terminology | US |
| Construction | Flat motifs, joined squares, sewn decorations |
| Best For | Decorative bed coverings and coordinated bedroom textiles |
Gauge target: One blocked square should measure approximately 20 × 20 cm for the proposed nine-column, eleven-row bedspread layout.
This gauge is a design requirement, not a measured result from a completed sample. Adjust the number of granny rounds, hook size, or motif count after making a swatch.
The proposed 180 × 220 cm dimensions exclude any additional width introduced by the outer border.
Materials and Tools
Yarn
Choose a smooth, tightly twisted yarn that gives clear definition to the raised leaf veins. Cotton-acrylic blends and washable acrylic yarns are practical options.
For the proposed full-size bedspread and two pillow covers, begin with the following provisional material budget:
- Forest green worsted-weight yarn — approximately 1,800–2,400 g. Used for leaf appliqués, central veins, and optional edging accents.
- Ivory or natural cream worsted-weight yarn — approximately 1,400–2,000 g. Used for background squares, floral decorations, joins, and scalloped borders.
Suitable yarn families include Paintbox Yarns Cotton Aran, Lion Brand 24/7 Cotton, and comparable medium-weight acrylic yarns. These are substitution suggestions, not yarns confirmed from the photograph.
The quantities above are not validated consumption figures. Make and weigh one complete square, including its leaf and flowers, before purchasing the full project quantity.
Tools
- 4.5 mm crochet hook for the primary motifs
- 5 mm crochet hook for looser joining stitches, if needed
- Blunt tapestry needle for sewing and weaving ends
- Locking stitch markers for identifying corners
- Blocking mats and rust-resistant pins for consistent sizing
- Measuring tape for checking square dimensions
- Scissors for trimming yarn
- Two 45 × 45 cm cushion inserts for the matching covers
- Optional fabric backing and zipper closures for the cushions
No safety eyes, stuffing, or amigurumi hardware are required for this project.
Crochet Abbreviations
| Abbreviation | Meaning |
|---|---|
| MR | Magic ring |
| ch | Chain |
| sc | Single crochet |
| hdc | Half double crochet |
| dc | Double crochet |
| tr | Treble crochet |
| sl st | Slip stitch |
| st / sts | Stitch / stitches |
| sp | Space |
| inc | Two stitches in one stitch |
| dec | Decrease |
| BLO | Back loop only |
| FLO | Front loop only |
| RS | Right side |
| WS | Wrong side |
| rep | Repeat |
| rnd | Round |
A standing double crochet can replace a beginning chain-three when joining a new color.
An invisible decrease is made through the front loops of two adjacent stitches, although this particular flat-motif design does not require shaping decreases.
Pattern – Step by Step
Construction note: This is an original photo-inspired modular design. The square, leaf, and flower instructions below are written as separate components so they can be measured and assembled consistently. The sample has not been physically crocheted or fit-tested.
Part 1: Forest Green Crochet Leaf (Make 99 for Bedspread)
Yarn: Forest green. Hook: 4.5 mm.
The leaf is worked around both sides of a foundation chain, producing a symmetrical shape with a pointed tip.
Foundation: Ch 17.
Round 1: Starting in the second chain from the hook, work:
- 1 sc in the first chain
- 1 hdc in the next chain
- 1 dc in each of the next 3 chains
- 1 tr in each of the next 6 chains
- 1 dc in each of the next 3 chains
- 1 hdc in the next chain
- 1 sc in the final chain
There are 16 stitches along the first side. Ch 2 at the tip.
Rotate the work to crochet into the unused loops along the opposite side of the foundation chain. Work the reverse sequence:
- 1 sc
- 1 hdc
- 3 dc
- 6 tr
- 3 dc
- 1 hdc
- 1 sc
There are 16 stitches on the second side. Ch 2, then join with a slip stitch at the base.
Round 1 total: 32 worked stitches and two chain-two turning spaces.
Round 2: Ch 1. Work one sc into each of the 16 stitches on the first side. In the tip chain-two space, work (sc, ch 2, sc). Work one sc into each of the 16 stitches on the opposite side. In the base chain-two space, work (sc, ch 2, sc). Join with a slip stitch.
Round 2 total: 36 sc and two chain-two spaces.
Round 3: Ch 1. Work one sc in each of the 17 stitches along the first side, including the additional tip-adjacent stitch from Round 2. In the tip chain-two space, work (sc, ch 2, sc). Continue with one sc in each of the next 18 stitches along the opposite side and base-adjacent section. In the base chain-two space, work (sc, ch 2, sc). Work one sc in the remaining stitch and join.
Round 3 total: 40 sc and two chain-two spaces.
Fasten off, leaving a 20 cm sewing tail.
Blocking note: Shape the motif into a tapered oval with a defined point. The foundation chain should run along the central axis.
Part 2: Raised Leaf Vein
Yarn: Forest green, or a slightly darker shade.
The central vein is a defining feature of the reference design.
Cut a length of yarn approximately three times the finished leaf length. Thread the tapestry needle and bring it from the wrong side to the right side at the leaf base.
Use a chain-style embroidery stitch along the foundation-chain centerline. Work toward the pointed tip, keeping each embroidery loop approximately 5–7 mm long.
Secure the yarn at the tip and weave the end into the wrong side.
For a more prominent ridge, work a second line of surface slip stitches directly over the centerline using a crochet hook.
Add two or three short diagonal branches on each side if a more detailed botanical appearance is required.
Do not pull the embroidered vein so tightly that the leaf curls inward.
Part 3: Ivory Openwork Square (Make 99)
Yarn: Ivory. Hook: 4.5 mm.
The background is a traditional granny-style square designed to support the green leaf appliqué.
R1: Make MR. Ch 3 (counts as first dc), work 2 dc, ch 2. Repeat (3 dc, ch 2) three more times. Join. (12 dc, four ch-2 corners)
R2: Sl st into first corner. Work (3 dc, ch 2, 3 dc) in each of the four corners. Join. (24 dc, four corners)
R3: Work (3 dc, ch 2, 3 dc) in each corner and 3 dc in each space between corners. Join. (36 dc, four corners)
R4: Repeat the corner sequence, working 3 dc in each available side space. (48 dc, four corners)
R5: Continue the same granny-square expansion. (60 dc, four corners)
R6: Repeat the established corner and side sequence. (72 dc, four corners)
R7: Continue working three-double-crochet clusters between corners. (84 dc, four corners)
R8: Repeat the expansion. (96 dc, four corners)
R9: Work one additional granny round. (108 dc, four corners)
Fasten off, leaving a 20 cm tail.
Each round increases the total double-crochet count by 12 because the four corners each gain one additional three-stitch cluster.
Important: The number of rounds required to reach 20 cm depends on your yarn and tension. Stop earlier or add further rounds as needed. The 20 cm measurement takes priority over the illustrative nine-round sequence.
Part 4: Attach the Green Leaf to the Ivory Square
Place one green leaf diagonally across each blocked ivory square.
The leaf base should sit near one corner, while the pointed tip extends toward the opposite corner.
Pin the leaf at three positions: base, center, and tip.
Using the green yarn tail, sew the central vein to the ivory background with small stitches. Add two or three securing stitches near the widest section of the leaf.
Avoid sewing every outer stitch of the leaf to the square. Keeping part of the edge free produces the raised relief visible in the reference image.
Repeat for all 99 bedspread squares.
For a balanced arrangement, rotate alternate leaves by 90 degrees or arrange them in alternating diagonal directions.
Part 5: Small Ivory Crochet Flower (Make as Needed)
Yarn: Ivory. Hook: 4.5 mm.
These flowers are used at selected square intersections and on the pillow covers.
R1: Make MR and work 10 sc into the ring. Join with sl st. (10)
R2: Ch 1, sc in first stitch, ch 3, skip one stitch. Repeat five times around. Join. (5 sc, five ch-3 spaces)
R3: In each chain-three space work (sc, hdc, 3 dc, hdc, sc). Repeat in all five spaces. (Five petals, 35 worked stitches)
Fasten off, leaving a 20 cm sewing tail.
Flatten each petal with your fingers. The flower should remain open at the center without being stretched.
For additional dimension, sew a small French knot into the center using ivory yarn.
Avoid heavy beads on bedding intended for frequent washing.
Part 6: Decorative Cream Lace Connectors
Yarn: Ivory. Hook: 5 mm if needed.
The reference image includes airy lace between the green leaves. The granny-square backgrounds provide this openwork foundation, but additional chain connectors can increase the floral-lace appearance.
After joining two adjacent squares, identify corresponding open spaces along the seam.
Attach ivory yarn to one open space. Ch 5, then slip stitch into the next available space along the seam.
Repeat along the join, keeping the chains relaxed.
For a crossed-lace appearance, work a second chain sequence diagonally across the first.
Do not use these decorative chains as the only structural connection between squares. They are surface embellishments; the main square seams must carry the weight of the bedspread.
Part 7: Joining the Bedspread Squares
Arrange the completed squares into nine columns and eleven rows.
This layout requires 9 × 11 = 99 squares.
With a blocked square width of 20 cm, the joined body has a nominal width of 180 cm and length of 220 cm before any border adjustments.
Lay the squares right side up and check the leaf direction.
Join neighboring squares using an ivory mattress stitch through corresponding edge stitches, or use a flat slip-stitch seam.
For a flat seam, hold two squares with right sides facing and work slip stitches through corresponding outer loops.
Continue across each row, then connect the completed rows.
Keep seam tension consistent. Tight joins shorten the fabric and can distort the rectangular layout.
Part 8: Scalloped Ivory Border
Yarn: Ivory. Hook: 4.5–5 mm.
The border frames the bedspread and repeats the rounded lace appearance visible around the lower edge.
Border Round 1: Join ivory yarn at one corner. Work sc evenly around the entire bedspread, placing (sc, ch 2, sc) in each corner. Join with sl st.
Border Round 2: Ch 3. Work dc into each stitch around, placing (2 dc, ch 2, 2 dc) in each corner chain space. Join.
Border Round 3: Work a decorative shell pattern around the outer edge.
Repeat the following along each side: Skip 2 stitches, work 5 dc into the next stitch, skip 2 stitches, then work 1 sc into the next stitch.
Continue around, adjusting the stitch spacing near corners so the shells lie flat.
Work a larger corner shell if needed, such as (5 dc, ch 2, 5 dc), in a suitable corner space.
Fasten off and weave in all remaining ends.
The final shell spacing must be checked against the actual stitch count around the completed bedspread. Add or remove a small number of evenly distributed stitches in Round 1 if required.
Part 9: Matching Crochet Pillow Covers (Make 2)
The two matching pillows repeat the same forest-green leaf and ivory floral construction.
For each 45 × 45 cm pillow, prepare four additional ivory squares with four green leaf appliqués.
Arrange the four squares in a two-by-two layout.
If each square measures 20 cm, the joined panel will measure approximately 40 × 40 cm before edging.
Add granny-style expansion rounds around the joined panel until it measures approximately 45 × 45 cm, accounting for seam allowance and the intended insert.
Make a matching back panel using ivory granny squares or a plain crochet stitch.
For a removable cover, sew a zipper into one edge before joining the remaining sides.
Alternatively, create an envelope closure by overlapping two rectangular back panels.
Join the front and back panels with a flat seam, keeping the decorative leaf surfaces facing outward.
Add small ivory flowers at the central square intersection and selected corners.
Repeat the process for the second pillow.
Pillow construction note: A fabric-backed cushion is another option. It reduces the amount of crochet needed and helps prevent the insert from showing through the openwork lace.
Assembly Instructions
- Complete the ivory background squares. Make and block a sample first, then produce the remaining squares at a consistent gauge.
- Crochet the forest-green leaves. Work each leaf around its foundation chain, maintaining the same stitch sequence and overall shape.
- Add the raised veins. Embroider the central ridges before attaching the leaves to their backgrounds.
- Attach the leaf appliqués. Pin and sew one leaf diagonally across each ivory square.
- Arrange the bedspread layout. Position all 99 squares into nine columns and eleven rows, checking the direction of each leaf.
- Join the squares. Work the horizontal and vertical seams using consistent tension.
- Add the floral decorations. Attach the small ivory flowers at selected intersections without overcrowding the lace.
- Complete the outer border. Work the foundation rounds followed by the scalloped shell edging.
- Construct the pillow covers. Join the pillow-front motifs, make the backs, and add the chosen closures.
- Block and inspect the finished pieces. Check the bedspread dimensions, flatten the lace, secure loose ends, and allow the work to dry completely.
The completed set consists of one botanical crochet bedspread and two coordinated pillow covers.
7 Technical Tips for Better Results
- Control square dimensions. A difference of 5 mm per square can accumulate to 4.5 cm across nine columns, so block and measure motifs before joining.
- Use stitch markers at every corner. Missing a corner chain space can alter the granny-square geometry and cause one side to become shorter than the others.
- Keep leaf veins flexible. Embroidery stitches pulled too tightly cause the leaf center to pucker, particularly after blocking.
- Test the lace tension. A 5 mm hook may produce looser chain connectors than a 4.5 mm hook, but excessive slack can make the openwork sag.
- Pin before sewing. Secure each leaf at its base, center, and tip so the diagonal placement remains consistent across the blanket.
- Check the border stitch multiple. Five-double-crochet shells need suitable spacing; an unmatched final repeat can create a crowded or uneven corner.
- Weave tails through several stitch directions. For washable bedding, use at least three changes of direction over several centimeters to reduce the risk of yarn ends working loose.
How to Adjust the Bedspread Size
The modular construction makes the design adaptable to different beds.
The number of squares depends on the desired dimensions and the measured size of each completed motif.
| Arrangement | Squares | Approximate Body Size at 20 cm Gauge |
|---|---|---|
| Small throw, 5 × 7 | 35 | 100 × 140 cm |
| Medium blanket, 7 × 9 | 63 | 140 × 180 cm |
| Large bedspread, 9 × 11 | 99 | 180 × 220 cm |
| Extra-large cover, 11 × 12 | 132 | 220 × 240 cm |
These calculations exclude the additional border width and any dimensional changes caused by seams or blocking.
Measure the mattress width, length, and desired side drop before selecting the final layout.
For example, a mattress measuring 150 cm wide with a 25 cm drop on each side requires a cover approximately 200 cm wide.
Choose a motif arrangement that comes closest to the required measurement, then adjust the border if necessary.
How Much Yarn Does a Crochet Leaf Bedspread Need?
Yarn requirements vary with the stitch density, fiber composition, motif dimensions, and number of decorative elements.
Raised leaf appliqués add material consumption compared with a simple openwork blanket. The ivory background, however, contains open spaces that reduce the amount of yarn required.
The most reliable method is to complete and weigh one finished square.
For example, suppose one complete 20 × 20 cm square weighs 35 g.
For 99 squares: 99 × 35 g = 3,465 g.
If joining, flowers, and edging require another 15%, the total becomes approximately 3,985 g.
The pillow covers must then be calculated separately.
This is a mathematical example, not a measured consumption figure for the design.
Record the weight of green and ivory yarn separately. That provides a more accurate shopping list than dividing the total weight equally between the two colors.
Washing and Caring for the Finished Bedspread
Check the care instructions on the yarn label before washing.
Cotton yarn can become heavy when wet, particularly in a large bedspread. Support the entire piece when transferring it from the washing machine or washing container.
A washable acrylic blend may be easier to maintain, although heat exposure can affect its shape and surface texture.
Wash a sample motif first to check for color bleeding between the forest-green and ivory yarns.
Dry the finished bedspread flat whenever possible. Reshape the scalloped border while the fabric is still damp.
Avoid hanging a wet, heavy crochet bedspread by one edge. The weight can stretch the openwork joins and distort the square arrangement.
Inspect the decorative flowers periodically, particularly where the petals are attached to the underlying lace.
Frequently Asked Questions
Is this crochet leaf bedspread suitable for beginners?
The project is best suited to intermediate crocheters who already understand granny squares, stitch-height changes, and joining techniques. A beginner can practice the individual leaves and flowers before attempting a full bedspread.
Can I use cotton yarn instead of acrylic?
Yes. Cotton produces clear stitch definition and supports the raised leaf veins, but it may create a heavier finished bedspread. Compare swatch weight before committing to a large project.
Can the bedspread be made without the flowers?
Yes. The flowers are decorative rather than structural. Omitting them produces a simpler botanical design and reduces finishing time.
How do I stop the leaves from curling?
Check the stitch counts, avoid tightening the central vein, and block the leaf motifs before sewing. If curling continues, test a slightly larger hook.
Can I change the green color?
Yes. Sage, olive, emerald, and eucalyptus green are alternatives. Maintain sufficient contrast with the ivory background so the raised leaf outlines remain visible.
Does the pattern exactly reproduce the photograph?
No. The photograph provides visual guidance for the leaf shapes, color arrangement, floral details, and border. The written instructions describe an original modular interpretation, not the original maker’s verified stitch pattern.
Conclusion
This crochet leaf bedspread pattern combines raised forest-green foliage, ivory granny-style openwork, small floral decorations, and a scalloped border in a modular construction. The matching pillow covers repeat the same materials and motif arrangement to create a coordinated bedroom textile set.
Before producing the full bedspread, crochet one complete square, block it to the intended dimensions, and record its yarn weight. Use those measurements to calculate the final motif count and materials.
Save the project to Pinterest, or share your completed version on Instagram with #BotanicalLeafBedspread.
For the leaf arrangement, would you prefer every green leaf pointing in the same direction, or alternating diagonally across the finished bedspread?








