Introduction
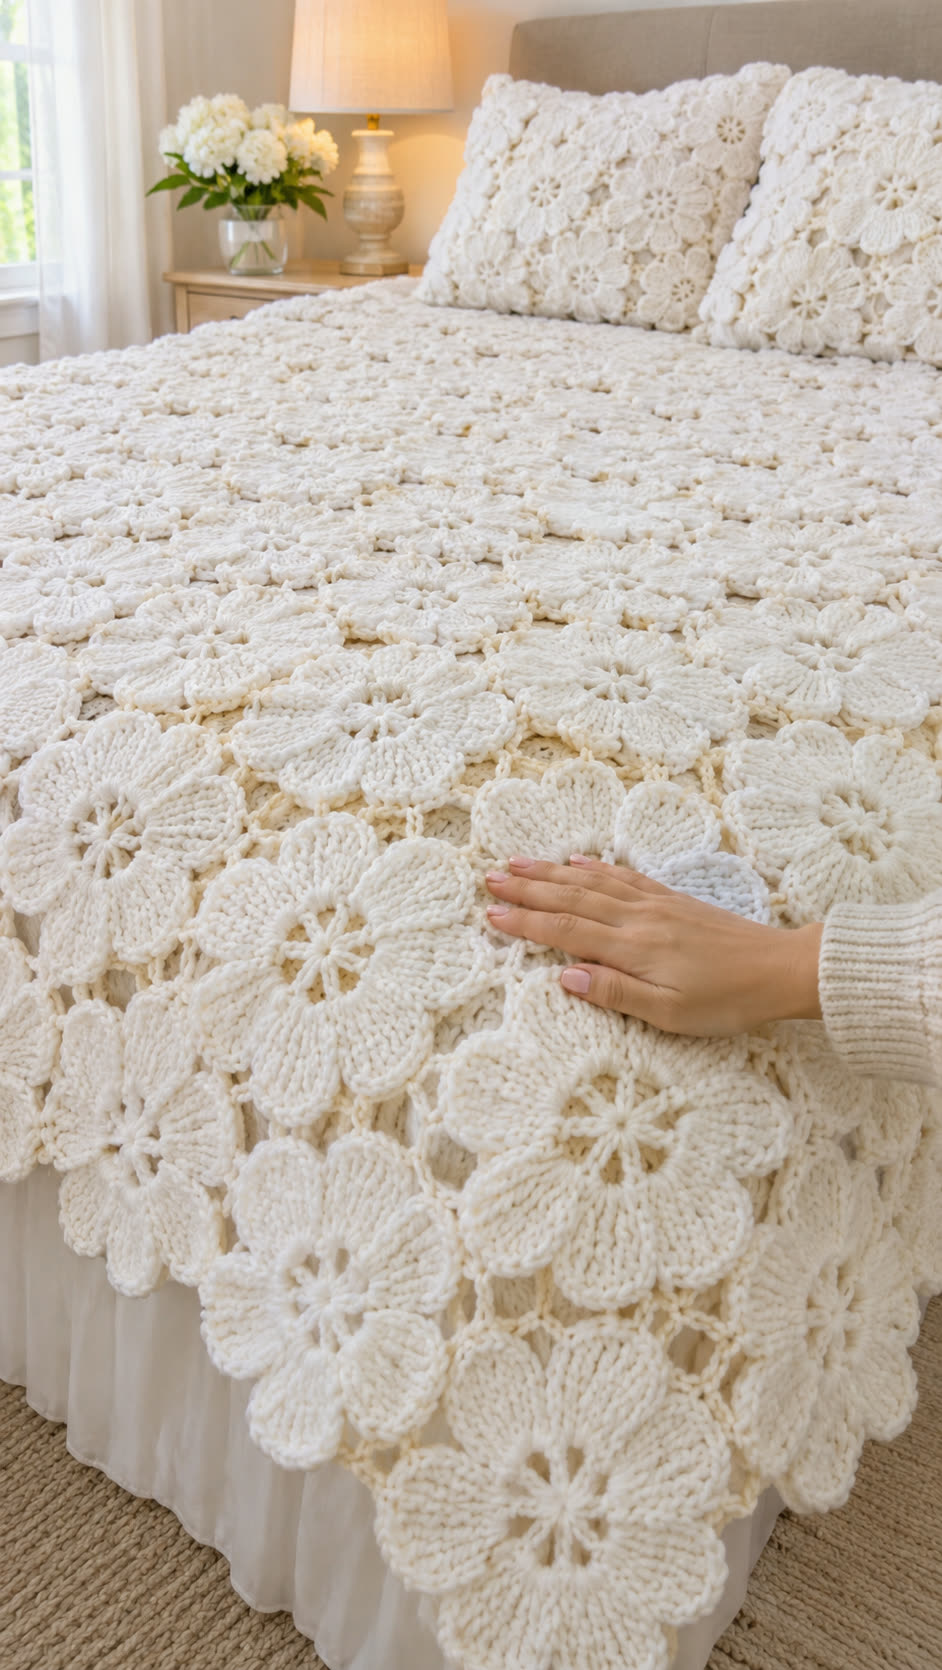
Large, overlapping flower petals give this ivory crochet blanket its distinctive surface, with individual floral motifs forming a continuous bedspread rather than a conventional granny-square grid. This crochet flower blanket pattern guide examines the visible construction and provides a practical motif-based method for recreating the look. Worked in cream-colored yarn with raised stitches and open flower centers, the design is best suited to intermediate crocheters making a decorative bed covering.
The Design: What Makes This Crochet Flower Blanket Different
The defining feature of this blanket is its dense arrangement of large, dimensional flowers. Each motif has a small open center surrounded by elongated petals that spread outward and overlap neighboring flowers.
Unlike a traditional crochet granny square blanket, the floral shapes remain visible across the entire surface. There are no obvious contrasting borders or square frames separating the motifs.
The ivory color also plays an important structural role. Because the blanket uses a single color, the raised stitches, petal outlines, and shadows between the flowers provide the visual definition.
Along the front edge, the flower shapes extend beyond the main fabric, creating an irregular scalloped border.
A common mistake when recreating this type of 3D crochet flower blanket is joining the flowers too tightly. Excessive tension can compress the petals and flatten the layered effect.
Project Information at a Glance
| Detail | Description |
|---|---|
| Project | Dimensional floral crochet blanket |
| Skill level | Intermediate |
| Construction | Individual flower motifs joined together |
| Main color | Ivory / warm cream |
| Yarn appearance | Thick, soft, lightly twisted yarn |
| Suggested yarn | Bulky weight, subject to swatch |
| Suggested hook | 6.0–8.0 mm, depending on yarn |
| Main stitches | Chain, slip stitch, single crochet, double crochet, treble crochet |
| Texture | Raised, overlapping flower petals |
| Border | Natural scalloped floral edge |
| Finished size | Customizable |
| Estimated time | Depends on motif count and finished dimensions |
Pattern accuracy note: The photograph is the only design reference. Exact stitch counts, yarn weight, hook size, construction method, and finished measurements cannot be confirmed from an image. The instructions below are an original approximation intended to reproduce the visible floral structure, not a verified transcription of the photographed blanket.
Materials and Tools
Yarn
The photographed blanket appears to use one consistent ivory yarn throughout the flowers and connecting sections.
For a similar appearance, select a soft yarn with enough body to hold the raised petal shapes.
- Main yarn: Ivory or warm cream bulky-weight yarn, approximately category 5.
- Optional joining yarn: Matching ivory yarn in the same weight.
- Suggested fiber: Soft acrylic, wool blend, or washable cotton blend.
A smooth bulky yarn is preferable to heavily textured chenille for this interpretation because it makes the petal stitches easier to distinguish.
The total amount of yarn depends on the size of the blanket and the weight of each completed flower. Measure one finished motif before purchasing the full quantity.
Tools
- Crochet hook: Begin with 6.5 mm and adjust after making a sample.
- Tapestry needle: For joining motifs and weaving in ends.
- Stitch markers: For marking petal positions and joining points.
- Scissors: For cutting yarn.
- Measuring tape: For checking flower diameter and finished blanket dimensions.
- Blocking mats: Optional, for shaping motifs before assembly.
No stuffing, safety eyes, or internal supports are required.
Understanding the Flower Construction
The image shows broad petals radiating from small open centers. Several petals appear to contain tall, closely grouped stitches that create a ridged texture.
The flowers are arranged closely enough that the petals overlap, leaving only small openings between motifs.
Three construction elements are particularly important.
1. Open Flower Centers
Each flower has a small central opening. This prevents the center from becoming excessively bulky when multiple petals are worked around it.
A chain ring provides a suitable starting structure for recreating that feature.
2. Broad Raised Petals
The petals are elongated and rounded rather than pointed.
Tall crochet stitches can create the required length, while increases near the outer edge help the petal widen before tapering toward the center.
3. Overlapping Motif Arrangement
The blanket does not appear to rely on clearly defined square borders.
Instead, the floral motifs cover the surface in an offset arrangement. Their outer edges meet or overlap to create the impression of a continuous field of flowers.
The exact joining technique is not visible, so the joining instructions below are a proposed method.
Crochet Abbreviations — US Terms
| Abbreviation | Meaning |
|---|---|
| ch | Chain |
| sc | Single crochet |
| hdc | Half double crochet |
| dc | Double crochet |
| tr | Treble crochet |
| sl st | Slip stitch |
| st | Stitch |
| sp | Space |
| rep | Repeat |
| FO | Fasten off |
Important: This motif is worked in joined rounds and individually constructed petals, not a continuous amigurumi spiral.
Crochet Flower Blanket Pattern — Step by Step
Step 1: Make the Flower Center
Yarn: Ivory
The center should remain open, with six evenly spaced attachment points for the petals.
Round 1: Ch 6. Join with a sl st to the first chain to form a ring.
Round 2: Ch 1. Work 12 sc into the ring. Join with a sl st to the first sc. (12 sc)
Round 3: Ch 3 (counts as the first dc), dc in the same stitch, ch 2, skip the next stitch. Repeat the following sequence five times: 2 dc in the next stitch, ch 2, skip the next stitch. Join with a sl st to the top of the beginning ch 3. (12 dc and 6 ch-2 spaces)
You now have six spaces around the center ring.
These spaces will serve as the foundations for the six flower petals.
Step 2: Crochet the First Petal
The petals need to be broad enough to create the layered surface visible in the photograph.
The following method produces a rounded petal using rows of increasing and decreasing stitches.
Yarn: Ivory
Join the yarn to one ch-2 space.
Row 1: Ch 1, work 3 sc into the ch-2 space. Turn. (3)
Row 2: Ch 1, 2 sc in the first stitch, sc in the next stitch, 2 sc in the last stitch. Turn. (5)
Row 3: Ch 1, 2 sc in the first stitch, sc in each of the next 3 stitches, 2 sc in the last stitch. Turn. (7)
Row 4: Ch 3 (counts as dc), dc in each remaining stitch. Turn. (7)
Row 5: Ch 3, dc in each remaining stitch. Turn. (7)
Row 6: Ch 3, dc2tog over the next 2 stitches, dc in the next stitch, dc2tog over the following 2 stitches, dc in the last stitch. Turn. (5)
Row 7: Ch 1, sc2tog, sc in the next stitch, sc2tog. (3)
Fasten off, leaving a tail approximately 15 cm long.
The petal should widen through the middle and narrow toward its outer end.
For a fuller shape, work one additional row of 7 dc between Rows 5 and 6.
Step 3: Make the Remaining Five Petals
Repeat the petal instructions in each of the remaining five ch-2 spaces.
Work all petals with the same number of rows for the first sample flower.
The finished motif should have six rounded petals surrounding a small open center.
The petals may overlap slightly when laid flat. This is consistent with the layered appearance in the reference image.
Do not force the petals into a perfectly flat circle. Their natural curves contribute to the dimensional texture.
Step 4: Add Texture to the Petals
The photographed flowers show visible ridges running along the petal surfaces.
To approximate this detail, surface crochet can be added to each petal.
With the right side facing, join the matching yarn near the base of a petal.
Work a loose line of surface slip stitches along the center of the petal, following the direction of the stitches.
Stop before the outer tip and fasten off.
Repeat on the remaining petals.
Keep the surface stitches relaxed. Tight slip stitches can pull the petals inward and create unwanted curling.
For additional relief, a second line may be worked alongside the first.
This step is optional, but it helps create the pronounced texture seen across the blanket.
Step 5: Make a Sample Group of Flowers
Before committing to a full bedspread, crochet four complete flowers.
Place them together on a flat surface.
Arrange the motifs so the petals overlap slightly and the centers remain visible.
Check the following characteristics:
- The flower centers should remain open.
- The petals should form a continuous textured surface.
- Neighboring flowers should overlap without folding sharply.
- The joining points should remain mostly hidden beneath the petals.
- The outer edges should retain their scalloped outlines.
If the flowers look too sparse, increase the width of the petals or reduce the spacing between motifs.
If the surface becomes excessively thick, decrease the overlap.
Step 6: Join the Flower Motifs
The photograph does not reveal the reverse side of the blanket, so the exact original joining method cannot be identified.
A concealed whipstitch join is a practical option for recreating the visible appearance.
Place two flowers next to each other, right sides facing upward.
Overlap their outer petals slightly, then identify two or three locations where the flowers naturally touch.
Thread a tapestry needle with matching yarn.
Working from the back, sew through the lower loops of the petal stitches at the selected contact points.
Avoid stitching through the entire petal surface.
The join should hold the flowers together while allowing the upper petal edges to remain raised.
Repeat until the sample group is connected.
Lift the sample gently to check whether the joins support the motifs without leaving large gaps.
Step 7: Build the Blanket in Offset Rows
The photographed bedspread has a dense floral arrangement rather than a rigid grid of square motifs.
An offset layout is therefore a suitable approach.
Start with a horizontal row of flowers.
Position the next row so each flower center falls approximately between two flower centers in the previous row.
This arrangement allows the petals to fill spaces more naturally.
Continue joining rows until the blanket reaches the desired width and length.Conceptual arrangement only. Flower positions are offset between rows; the diagram does not represent exact stitch placement.
For the front edge, allow the outer petals to extend beyond the joining line.
This creates the irregular floral border visible along the lower edge of the bed.
How Many Crochet Flowers Do You Need?
The required number of motifs depends on the finished flower diameter and the amount of overlap.
Because the image provides no reliable physical scale, the flower size must be measured from a completed sample.
Use the calculator below to estimate the number of flowers needed for your chosen blanket dimensions.
Flower blanket motif estimator
Blanket width (cm)
Blanket length (cm)
Flower diameter (cm)
Overlap (cm)
ESTIMATED FLOWERS165
Approximately 11 flowers per full row × 15 rows
This is a planning estimate based on staggered spacing, not an exact cutting or joining chart. Edge shaping and motif overlap may change the final count.
How to Recreate the Thick Floral Texture
The main visual characteristic of this blanket is the raised surface.
The flower petals sit close together, creating a fabric with substantial depth.
Several technical decisions affect this result.
Yarn Thickness
A bulky yarn produces larger stitches and more pronounced petal ridges.
However, very thick yarn can make the flowers excessively heavy.
Make one complete motif and assess its weight before selecting yarn for the full blanket.
Hook Size
A smaller hook produces a firmer flower.
A larger hook creates a softer, more flexible motif.
For the sample instructions, begin with a 6.5 mm hook if using bulky yarn.
Adjust the hook size if the petals become rigid or the stitches appear too loose.
Petal Density
The photographed blanket has very little exposed background between the flowers.
A loose arrangement with large gaps will not reproduce the same appearance.
Position motifs closely and connect them at multiple points.
The petals should remain recognizable as individual shapes while collectively covering the bed.
Consistent Color
Use the same ivory yarn throughout the project.
Different dye lots may create visible bands across a large blanket, particularly in a single-color design.
Check dye lot information before buying the main yarn quantity.
Assembly and Finishing
- Complete four sample flowers and measure their diameter after resting them flat.
- Check the petal width and adjust the pattern if the flowers appear too narrow.
- Make the required number of motifs using the same yarn and hook.
- Lay out the flowers in staggered rows on a large flat surface.
- Check that the outer petals overlap without hiding the flower centers.
- Pin neighboring motifs together at their intended joining points.
- Sew the flowers together from the reverse side using matching yarn.
- Reinforce any joining points that separate when the blanket is lifted.
- Weave in all yarn tails through several stitches on the reverse side.
- Lay the finished blanket flat, shape the scalloped edges, and allow the fabric to settle before use.
The completed blanket should have a continuous floral surface with a naturally irregular outer edge.
7 Technical Tips for a Better Crochet Flower Blanket
- Control petal curling. If a petal curls sharply after Row 5, the stitch tension may be too tight. Try a hook 0.5 mm larger for the next sample.
- Keep the centers consistent. The six chain spaces in Round 3 must be distributed evenly. An uneven center can make the petals lean toward one side.
- Measure the finished motif. Record the diameter of each of the first four flowers. A difference greater than approximately 1 cm may become visible when the motifs are joined.
- Avoid tight joining stitches. Tight joins pull neighboring flowers together and flatten their edges. Leave enough movement for the petals to overlap naturally.
- Check blanket weight. A large floral bedspread can become heavy when made with bulky yarn. Weigh a sample group of four motifs and calculate the approximate total before making the full quantity.
- Pin before sewing. Misaligned flowers can create diagonal ridges across the finished blanket. Pin at least two contact points per neighboring pair before joining.
- Secure every yarn tail. Short tails may work loose during handling or washing. Leave approximately 15 cm when fastening off and weave each tail through several stitch paths.
Washing and Caring for the Finished Blanket
A dimensional crochet blanket requires careful handling because its petals and joining points can catch or stretch.
Follow the care instructions on the selected yarn label.
For a large bedspread, the weight of wet yarn is an important consideration. Lifting a saturated blanket from one corner can place significant stress on the joins.
Support the blanket from underneath when moving it.
If the yarn is machine washable, use a gentle cycle only when the finished size and weight are appropriate for the washing machine.
Lay the blanket flat to dry whenever practical.
Avoid hanging it by one edge while wet, since the weight may distort the flower arrangement.
After drying, reshape any petals that have folded or curled.
Matching Crochet Flower Pillows
The image also includes two large ivory pillows with raised floral crochet surfaces.
Their appearance complements the blanket through the repeated flower shapes and matching color.
The pillows show smaller, more tightly arranged floral elements than some of the large flowers near the front edge of the bedspread.
To create a coordinated set, the blanket motif can be adapted for a removable pillow cover.
Use a smaller hook or lighter yarn to reduce the flower diameter.
Join enough flowers to cover the front panel of the pillow.
A plain crochet or fabric backing can help the pillow maintain its shape.
Attach the floral front to the backing, leaving an opening for the pillow insert or adding a suitable closure.
The pillow instructions are an optional adaptation; the photograph does not provide enough information to identify the exact construction of the matching covers.
Common Problems and Solutions
| Problem | Likely cause | Suggested correction |
|---|---|---|
| Petals curl too tightly | Hook too small or high tension | Increase hook size slightly |
| Flower centers look uneven | Inconsistent placement of center spaces | Recheck Round 3 |
| Large gaps between flowers | Insufficient overlap | Reduce spacing before joining |
| Blanket feels stiff | Dense stitches or heavy yarn | Try a larger hook |
| Flowers lose definition | Excessive overlap | Expose more of each center |
| Joining stitches are visible | Joins placed on upper petal surfaces | Sew through lower loops from the back |
| Blanket edges look too straight | Outer petals joined too far inward | Allow edge petals to extend freely |
Frequently Asked Questions
Is this an exact pattern for the blanket in the photograph?
No. The instructions are an original reconstruction based on visible features of the supplied image. The exact original stitch pattern, reverse-side construction, and joining method cannot be verified from the photograph.
Can beginners make this crochet flower blanket?
A crocheter who already understands basic stitches, increases, decreases, and joining methods can attempt the project. The most demanding stage is assembling the motifs while maintaining consistent spacing.
What yarn is best for a 3D crochet flower blanket?
A soft bulky yarn is a reasonable starting choice for reproducing the large raised petals. The exact yarn used in the photographed blanket is unknown.
Does the blanket need a separate border?
Not necessarily. The visible blanket has an irregular scalloped edge formed by the outer flower petals. A conventional straight border would change that appearance.
Can I make the blanket in another color?
Yes. The motif construction can be worked in other colors, although a single ivory or cream shade is closest to the supplied image.
How do I prevent the flowers from separating?
Join neighboring motifs at multiple contact points rather than relying on one stitch. Test the strength of a four-flower sample before assembling the full blanket.
Conclusion
This ivory crochet flower blanket is defined by its oversized floral motifs, raised petal texture, closely joined construction, and scalloped edges. The image provides a clear visual reference for those features, although it does not establish the original stitch instructions or material specifications.
Begin by making four sample flowers, joining them, and checking the resulting fabric against the photograph. Adjust the petal dimensions and overlap before calculating the full motif quantity.
Save this crochet flower blanket pattern guide to Pinterest or share your finished sample on Instagram using #IvoryCrochetFlowerBlanket.
When recreating the design, would you keep the large overlapping petals along the front edge or make the flowers smaller for a denser surface?








