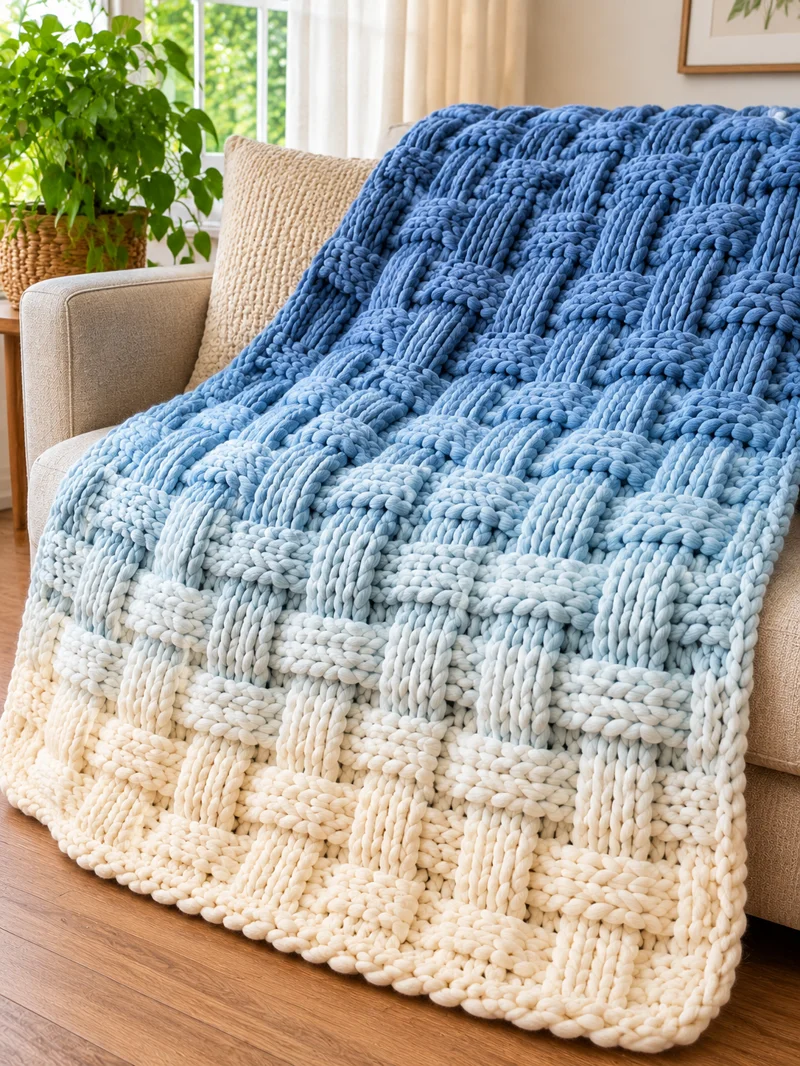
Eight raised cable stitches must cross without distorting the blue-to-cream gradient. This chunky cable crochet blanket pattern uses super bulky yarn, an 8 mm hook, and repeating front-post stitches to create a textured throw with a target size of approximately 120 × 150 cm. Designed for intermediate crocheters, it combines a controlled five-color transition with a practical rectangular construction suitable for a sofa or reading chair.
The Design: What Makes This Ombre Cable Blanket Different
The design uses three structural decisions to reproduce the reference blanket’s appearance.
First, raised front-post stitches form cable columns above a flatter double-crochet background. This separation makes the braids visible without introducing additional seams. The crochet cable stitch blanket relies on regular crossings rather than independently attached decorative strips.
Second, five color bands move from denim blue through pale blue to cream. Color changes occur at row boundaries, preserving the direction of the raised columns. This creates a blue ombre crochet blanket without changing yarn within individual cable crossings.
Third, the design uses a consistent 12-stitch panel repeat with narrow outer margins. Those margins help stabilize the edges and provide a foundation for the final border.
A frequent mistake is pulling crossing stitches too tightly. Restricted cables shorten the fabric locally and cause uneven horizontal ridges. Longer post stitches and consistent working tension reduce this distortion.
Project Information at a Glance
| Detail | Specification |
|---|---|
| Skill Level | Intermediate |
| Estimated Time | 18–30 hours (untested estimate) |
| Target Finished Size | 120 × 150 cm |
| Crochet Hook | 8 mm, adjusted for gauge |
| Yarn Weight | Category 6, super bulky |
| Construction | Flat, turned rows |
| Main Stitches | Double crochet and post stitches |
| Color Scheme | Five-color blue-to-cream gradient |
| Terminology | US crochet terms |
The finished dimensions and working time are planning estimates. The pattern has not been physically sample-tested.
Materials and Tools
Yarn
Choose a super bulky yarn with enough stitch definition to display the raised cables. Bernat Blanket is one available reference yarn, made from 100% polyester, with approximately 201 m per 300 g ball and a recommended 8 mm crochet hook.
The following quantities are a provisional purchasing allowance rather than measured consumption.
| Color | Quantity | Purpose |
|---|---|---|
| Deep Denim Blue | 600 g | Upper gradient |
| Medium Blue | 300 g | Second band |
| Sky Blue | 300 g | Central band |
| Pale Ice Blue | 300 g | Fourth band |
| Ivory or Cream | 900 g | Lower band and border |
| Total | 2,400 g | Eight 300 g balls |
Eight balls containing 201 m each provide approximately 1,608 m of yarn. Actual consumption depends on the final dimensions, cable density, and individual tension.
Purchase yarns of comparable thickness across the complete color palette. If one shade comes from a different yarn range, compare the diameter and gauge before combining it with the others.
Tools
- 8 mm crochet hook, or size required for gauge
- At least 16 locking stitch markers
- Large-eye tapestry needle
- Sharp scissors
- Flexible measuring tape
- Digital kitchen scale for yarn calculations
- Blocking mats, optional
Crochet Abbreviations
| Abbreviation | Meaning |
|---|---|
| ch | Chain |
| sc | Single crochet |
| dc | Double crochet |
| fpdc | Front-post double crochet |
| bpdc | Back-post double crochet |
| fptr | Front-post treble crochet |
| sl st | Slip stitch |
| st(s) | Stitch(es) |
| RS | Right side |
| WS | Wrong side |
| rep | Repeat |
This pattern maintains a constant stitch count, so increases and invisible decreases are not required.
Understanding the Crochet Cable Stitch
The blanket consists of seven repeating cable panels, each 12 stitches wide. Every panel contains two background stitches, eight central cable stitches, and another two background stitches.
The eight central stitches cross in groups of four. On a crossing row, the first four underlying posts are temporarily skipped while the following four are worked. The skipped group is then worked to form the raised braid.
How to Make a Front-Post Treble Crochet
Yarn over twice. Insert the hook from front to back and back to front around the post of the indicated stitch. Yarn over and pull up a loop. Yarn over and draw through two loops three times.
A front-post stitch is worked around the vertical post of a stitch rather than through its top loops.
How to Make the Eight-Stitch Cable Crossing
- Skip the first four underlying cable stitches temporarily.
- Work one fptr around each of the next four underlying stitch posts.
- Reach back to the four skipped posts and work one fptr around each, maintaining their original left-to-right order.
- Keep the second group in front of the first group to form the crossing.
- Continue with the remaining background stitches.
The crossing consumes eight underlying positions and produces eight stitches. No increases are made.
Keep the crossing stitches sufficiently loose to prevent horizontal puckering. If the fabric contracts sharply at the cable, use a larger hook for the crossing stitches or relax the working tension.
Blue Ombre Chunky Cable Crochet Blanket Pattern – Step by Step
Construction: Work in turned rows. The foundation contains 93 stitches, including the counted beginning chain of the foundation row. Subsequent turning chains do not count as stitches.
Step 1: Crochet a Gauge Swatch
Before beginning the full blanket, make a swatch containing one complete 12-stitch cable panel and several background stitches on both sides.
Work at least 16 rows so the sample contains two complete cable cycles. Measure the center without stretching the fabric.
Record the stitch gauge, row gauge, and yarn consumption. Cable fabric can be considerably denser than ordinary double crochet.
For a 93-stitch width to measure approximately 120 cm, the completed fabric must average about 7.75 stitches per 10 cm. Adjust the hook size or number of panels if your swatch differs substantially.
Step 2: Make the Foundation Chain
Yarn: Deep Denim Blue
Foundation: Ch 95.
Row 1 (RS): Dc in the fourth chain from the hook and in each remaining chain. Count the beginning ch-3 as one dc. (93 sts)
Place a stitch marker in the top of the beginning chain to make the first edge stitch easier to identify.
Step 3: Establish the Cable Panels
Divide the 93 stitches into four edge stitches, seven 12-stitch cable panels, and five edge stitches.
Stitch distribution: 4 + (12 × 7) + 5 = 93 stitches.
Place removable markers between the panels. Check the stitch count after every row.
Row 2 (WS): Ch 2, turn. Dc in each stitch across. (93)
Row 3 (RS): Ch 2, turn. Dc in first 4 sts. Repeat [bpdc around next 2 posts, fpdc around next 8 posts, bpdc around next 2 posts] seven times. Dc in last 5 sts. (93)
Row 4 (WS): Ch 2, turn. Dc in each stitch across. (93)
Row 5 (RS – Cable Crossing): Ch 2, turn. Dc in first 4 sts. Repeat [bpdc around next 2 posts, work an eight-stitch cable crossing using fptr, bpdc around next 2 posts] seven times. Dc in last 5 sts. (93)
Row 6 (WS): Ch 2, turn. Dc in each stitch across. (93)
Row 7 (RS): Repeat Row 3. (93)
Row 8 (WS): Repeat Row 4. (93)
Row 9 (RS): Repeat Row 3. (93)
Row 10 (WS): Repeat Row 4. (93)
Row 11 (RS): Repeat Row 3. (93)
Row 12 (WS): Repeat Row 4. (93)
Rows 5–12 form the eight-row repeat. Repeat these rows in sequence, working the next crossing on Row 13, then Rows 21, 29, 37, and so on.
Keep all seven cable panels aligned. Every completed row must contain 93 stitches.
Step 4: Create the Blue Ombre Gradient
The gradient moves from deep denim blue at the upper edge through medium and pale blues to cream at the lower edge.
- Deep Denim Blue: Upper color band.
- Medium Blue: Second color band.
- Sky Blue: Central color band.
- Pale Ice Blue: Fourth color band.
- Cream: Lower band and border.
Divide the planned body length into five sections using your measured row gauge. An equal number of rows in each shade produces a stepped gradient, while alternating adjacent colors near the boundaries produces a more gradual transition.
Change yarn at the final yarn-over of the last stitch in the preceding row. Complete the stitch with the new color, turn, and continue the established cable sequence.
Keep joins at row edges instead of inside raised cable crossings. This prevents visible yarn ends from interrupting the braid.
Step 5: Continue to the Required Length
Repeat the eight-row cable cycle until the body approaches the intended length, leaving room for the finishing rows and border.
Measure the blanket while it rests flat. Do not stretch the fabric to reach the target measurement.
For example, if a completed swatch measures 12 rows per 20 cm, each row averages approximately 1.67 cm in height. A body length of 144 cm would require approximately 86 rows before final adjustments.
This is an illustrative calculation, not a tested row count. Use your actual gauge and finish after an appropriate cable repeat.
Step 6: Finish the Main Fabric
After the final complete cable cycle, work two rows of double crochet.
Finishing Row 1: Ch 2, turn, dc across. (93)
Finishing Row 2: Ch 2, turn, dc across. (93)
Fasten off, leaving a 20 cm yarn tail.
These rows create a stable horizontal edge before the outer border is added.
How to Crochet the Blanket Border
The border frames the gradient and stabilizes the fabric without competing with the raised cable texture.
Border Round 1
Join cream yarn at one corner. Work sc evenly along the first side. Place 3 sc in the corner space and continue around the blanket, placing 3 sc at each corner.
Join with sl st to the first sc.
The total stitch count depends on the completed blanket length and side-edge gauge. Space stitches evenly to prevent rippling.
Border Round 2
Ch 1. Work sc in each stitch around, placing 3 sc in the center stitch of each corner group.
Join with sl st.
Border Round 3
Repeat Border Round 2, maintaining flat corners and even side edges.
Fasten off, leaving a 20 cm tail.
If the border ripples, reduce the number of side-edge stitches. If it pulls inward, add stitches along the affected edge.
Assembly and Finishing
- Lay the blanket on a large, flat surface.
- Compare the width of the top and bottom edges.
- Check that all cable columns remain vertically aligned.
- Inspect each color transition for loose yarn ends.
- Thread the first yarn tail through a tapestry needle.
- Weave the tail through matching-color stitches on the reverse side for 10–15 cm.
- Reverse direction and weave through a second path.
- Repeat for every remaining yarn tail.
- Measure the completed width and length without stretching.
- Wash or shape the blanket according to the yarn manufacturer’s instructions, then dry completely.
The blanket is complete when the borders lie flat, all ends are secured, and the finished dimensions have been recorded.
7 Technical Tips for Better Crochet Cables
- Prevent stitch-count drift. Place a marker after each 12-stitch panel and confirm that every completed row contains 93 stitches. A missing background stitch can shift subsequent cable crossings.
- Control cable tightness. If a crossing pulls the fabric inward by more than approximately 1 cm compared with neighboring rows, loosen the front-post treble stitches. Excessively tight cables can cause puckering.
- Avoid distorted post stitches. Insert the hook around the complete stitch post rather than splitting the yarn strand. Split fibers can weaken the braid and make later rows harder to work.
- Track color-change placement. Make each color change at a row end rather than in the center of a cable panel. This keeps visible joins away from the raised texture.
- Manage chenille tension. Maintain consistent yarn tension and avoid repeatedly unraveling the same stitches. Plush polyester fibers may shed or lose surface texture after excessive friction.
- Check the border before finishing. Lay the blanket flat after the first border round and inspect all four corners. Rippling indicates excess stitches, while inward curling suggests insufficient spacing.
- Secure tails against slipping. Weave each yarn end at least 10–15 cm through the reverse side and reverse direction once. Short tails can loosen after washing, especially in smooth polyester yarn.
How to Adjust the Blanket Size
The foundation uses seven 12-stitch cable panels plus nine edge stitches. To change the width, use the following formula:
Foundation stitch count = (12 × number of cable panels) + 9
| Cable Panels | Row Stitches | Starting Chains |
|---|---|---|
| 5 | 69 | 71 |
| 6 | 81 | 83 |
| 7 | 93 | 95 |
| 8 | 105 | 107 |
| 9 | 117 | 119 |
Smaller blankets may use five or six cable panels. Wider throws may use eight or nine.
Adjust length by adding or removing complete eight-row cable repeats. Changing the panel count does not affect the vertical stitch sequence.
Calculate the actual width per panel from the gauge swatch before resizing. Raised cables can contract more than ordinary double crochet.
Yarn Substitution and Care Instructions
Bernat Blanket is one category 6 reference yarn, but other super bulky yarns can be substituted when their thickness and fabric behavior are comparable.
Chenille-style polyester produces a plush surface but may soften the definition of smaller cable details. Tightly constructed acrylic or wool blends can produce more distinct braids, although their weight, stretch, and drape may differ.
When changing yarn type, make a new gauge swatch. The same 8 mm hook will not necessarily produce an equivalent fabric.
Follow the care label for the exact yarn purchased. Bernat Blanket is commonly machine washable and suitable for low-temperature tumble drying, subject to the manufacturer’s instructions.
Support the blanket during washing and drying. Pulling a heavy, wet blanket from one corner can stretch the rows and distort raised cable columns.
Frequently Asked Questions
Is this chunky cable crochet blanket pattern suitable for beginners?
This project is intended for intermediate crocheters familiar with double crochet and post stitches. Newer crocheters should practice the 12-stitch cable panel separately before making the full blanket.
Can I use jumbo yarn instead of super bulky yarn?
Yes, but the dimensions and cable proportions will change. Jumbo yarn generally requires a larger hook, and the same 93-stitch foundation may produce a much wider blanket.
How much yarn is needed for a chunky crochet throw?
The proposed yarn allowance is eight 300 g balls, totaling 2,400 g. This is a provisional purchasing budget rather than verified consumption. Weighing a completed cable swatch provides a more reliable estimate.
Why are my crochet cables twisting unevenly?
Common causes include inconsistent crossing direction, tight front-post stitches, and incorrect stitch placement. Check that every crossing uses the same eight underlying stitch positions and follows the established row sequence.
Can I make the gradient with fewer colors?
Yes. Three color bands—dark blue, pale blue, and cream—can create a simplified gradient. The cable pattern remains unchanged; only the color schedule needs adjustment.
How can I prevent the blanket edges from curling?
Maintain the correct number of background stitches at both edges, avoid tightening the turning chains, and work an evenly spaced single-crochet border. Measure the blanket after the first border round and adjust side-edge stitch spacing if necessary.
Conclusion
The blue ombre chunky cable crochet blanket combines seven raised cable columns with a five-stage color transition and a stable single-crochet border. Its construction depends on consistent post-stitch placement, accurate panel counts, and a measured gauge swatch. Before making the full throw, complete one cable swatch and record its width, row height, and yarn consumption. These measurements determine the final size and purchasing requirements.
Save the chunky cable crochet blanket pattern to Pinterest for reference, or share a finished project on Instagram using #BlueOmbreCableBlanket.
For your next version, would you keep the cream section at the bottom or reverse the gradient so the darkest blue forms the lower edge?








