Introduction
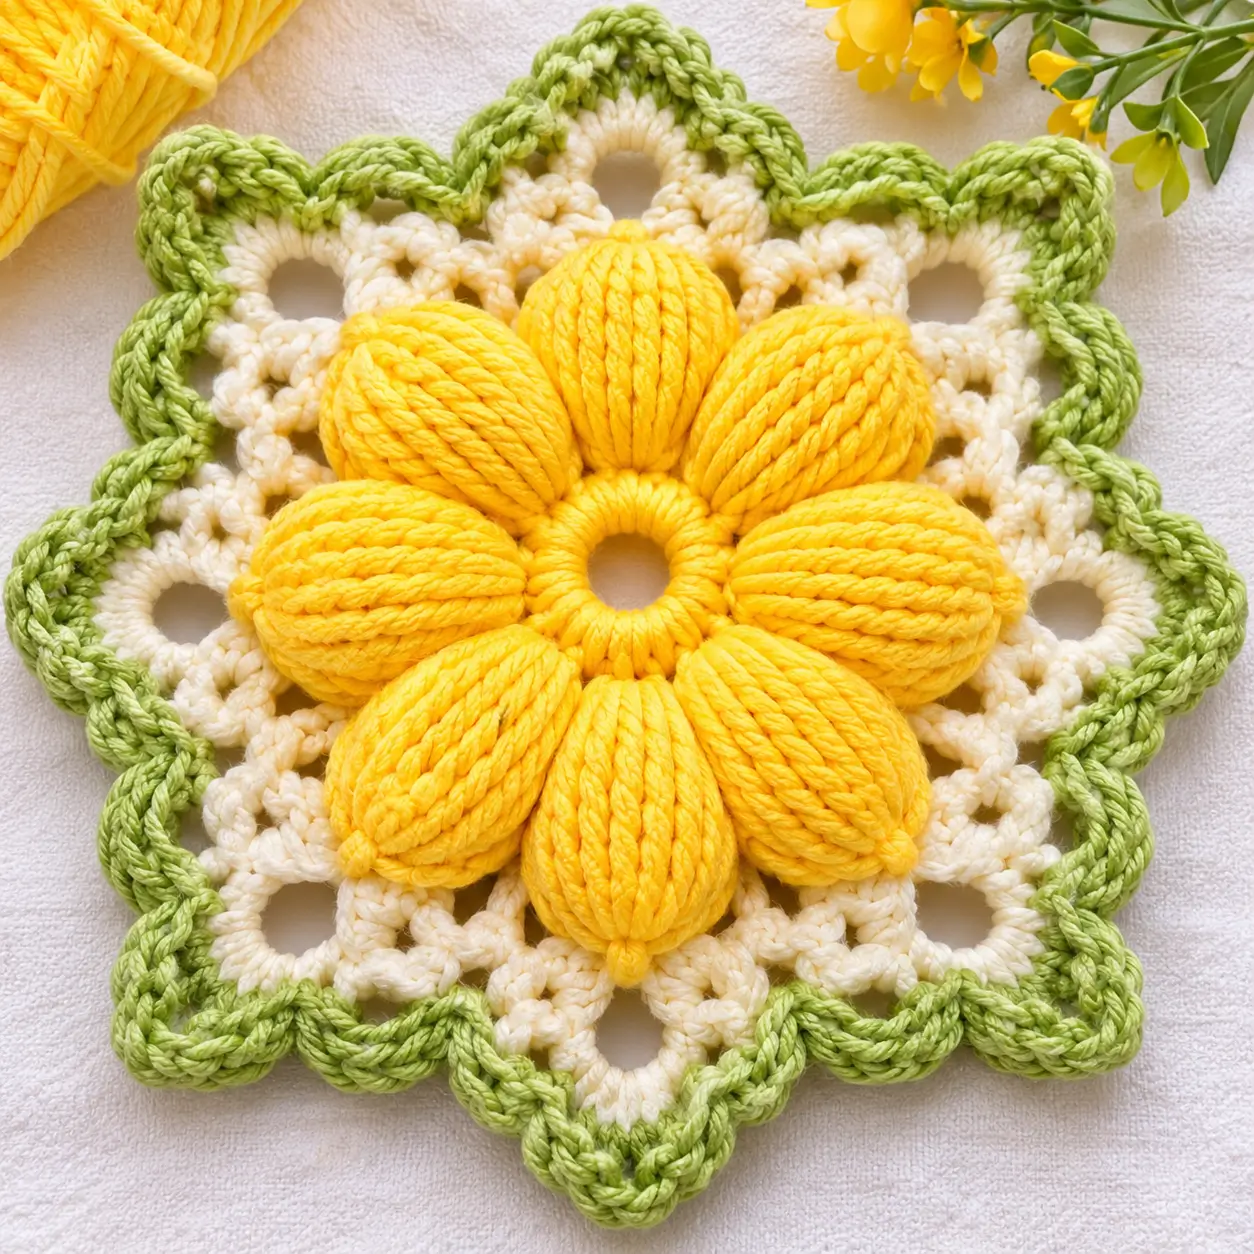
Eight raised yellow petals turn this square from a flat lace motif into a strongly dimensional sunflower block. This 3D sunflower granny square crochet pattern combines a yellow padded flower, an ivory openwork background, and a fresh green scalloped border. The construction uses separate decorative and structural layers, which keeps the flower full while allowing the finished square to lie flat for blankets, cushions, table pieces, or bags.
The Design: What Makes This Sunflower Square Different
The central flower is not worked as an ordinary flat daisy. Each of its eight petals has extra height and thickness, creating the rounded, almost padded shape visible in the design. The petals radiate from an open yellow center and finish with pointed outer ends.
Behind the flower sits an ivory lace layer. Large chain spaces provide visual separation between the dense sunflower and the outer frame while reducing unnecessary weight. The final green border uses repeated shells to produce pronounced points and rounded valleys.
The main technical problem is balance. If the flower base becomes too large, the ivory section buckles. If the lace layer is too tight, the corners curl toward the center. Make the structural square independently from the petal thickness and check the motif on a flat surface after every major round.
Project Information at a Glance
| Skill Level | Construction | Finished Size | Hook | Recommended Yarn |
|---|---|---|---|---|
| Intermediate | 3D flower + lace square + scalloped frame | Approx. 18–22 cm | 4.0–4.5 mm | DK or light worsted cotton |
The finished measurement is a project target rather than a fixed gauge requirement. Yarn thickness, hook size, blocking, and the number of framing rounds can all change the final dimensions.
Materials and Tools
Yarn
- Sunflower yellow — DK or light worsted cotton — approximately 20–30 g per motif
- Warm ivory — DK or light worsted cotton — approximately 20–30 g per motif
- Leaf green — DK or light worsted cotton — approximately 10–15 g per motif
Tools
- 4.0–4.5 mm crochet hook
- Yarn needle
- Scissors
- Stitch markers
- Blocking mat
- Rust-resistant blocking pins
- Measuring tape
Abbreviations
- MR — magic ring
- ch — chain
- sc — single crochet
- hdc — half double crochet
- dc — double crochet
- tr — treble crochet
- sl st — slip stitch
- sp — space
- st/sts — stitch/stitches
- RS — right side
- BLO — back loop only
- FLO — front loop only
Construction Overview
The motif is built from the center outward in three visual layers:
- A yellow center and eight dimensional sunflower petals.
- An ivory lace foundation that changes the round flower into a square.
- A green decorative border with eight prominent points and scalloped sections.
Work one complete test motif before making a large batch. Record its blocked measurement and weight so every later square can be matched to the same specifications.
Yellow Flower Center
Use yellow yarn.
Round 1
Make a MR.
Work 16 sc into the ring.
Join with sl st. (16 sts)
Do not pull the center completely closed. Leaving a small controlled opening reproduces the ring-shaped center visible in the design.
Round 2
Ch 1.
Work 2 sc in each stitch around.
Join. (32 sts)
Round 3 — Petal Foundation
Ch 1.
*Sc in next 4 sts, ch 8.*
Repeat eight times.
Join with sl st.
You now have 8 chain loops, one for each sunflower petal.
Dimensional Sunflower Petals — Make 8
The petal loops are worked individually. Each petal is broad near the center and narrows toward its outer point.
Petal Round 1
Into the first ch-8 loop work:
2 sc, 2 hdc, 3 dc, 3 tr, 3 dc, 2 hdc, 2 sc
Work all stitches around the chain loop rather than into individual chains.
Repeat in every ch-8 loop.
The flower now has eight broad petals.
Petal Definition Round
Working around each petal, crochet sc along the first side.
At the outermost point work:
sc, ch 2, sc
Continue sc down the opposite side.
Sl st into the base before moving to the next petal.
Repeat around all eight petals.
Creating the Raised Petal Effect
The photograph shows substantial vertical volume. A single flat petal round will produce a thinner flower, so additional structure can be added without stuffing.
With yellow yarn, join behind the first petal.
Surface crochet a line from the flower center toward the petal point using relaxed slip stitches.
Return to the center through the underside.
Repeat along all eight petals.
The surface line acts like a central rib. It draws the sides slightly inward and produces a rounded petal profile.
For additional height, lightly pinch the two sides together near the petal base and secure them with two or three hidden stitches on the reverse.
Ivory Structural Foundation
The ivory section should support the flower without forcing the petals flat.
Turn the flower over.
Join ivory yarn to an unused loop or secure point behind one petal.
Ivory Round 1
Work:
*sc at the back of petal base, ch 5*
Repeat around.
Join.
You should have eight evenly distributed chain spaces.
Ivory Round 2
Sl st into the first ch-5 space.
Work:
*sc, ch 5, sc in same space, ch 3*
Repeat in each space.
Join.
This produces the first open lace ring visible around the flower.
Turning the Round Motif into a Square
Four of the eight sections become corners. Mark every second major space with a stitch marker.
There should be four marked spaces separated by four side spaces.
Square Round 1
In each marked corner space work:
2 dc, 2 tr, ch 3, 2 tr, 2 dc
In each side space work:
2 hdc, 3 dc, 2 hdc
Between groups, ch 2.
Join with sl st.
Square Round 2
Sl st to the nearest ch-2 space.
Work:
*sc in space, ch 4*
Repeat across each side.
At every corner work:
sc, ch 5, sc into the corner space.
Continue around.
Square Round 3
Work 4 sc into each side ch-4 space.
At each corner ch-5 space work:
3 sc, ch 2, 3 sc
Join.
Lay the motif flat before proceeding. The four corners should form approximately 90-degree angles.
Ivory Decorative Lace Round
To create the larger openings visible behind the green border:
Ch 1.
Work:
*sc in next 3 sts, ch 4, skip 3 sts*
Repeat along each side.
At each corner, work:
sc, ch 5, sc
Adjust the final repeat on each side so the open spaces remain symmetrical.
Ivory Stabilizing Round
Work one sc into each stitch and approximately four sc into each ch-4 space.
At each corner work:
2 sc, ch 2, 2 sc
Join.
This round gives the decorative green edging a stable foundation.
Green Scalloped Border
Change to leaf green.
The photographed border alternates deep valleys with pronounced rounded points. Mark the four corners before beginning.
Green Round 1
Ch 1.
Sc in every stitch around.
At each corner ch-2 space work:
2 sc, ch 2, 2 sc
Join.
Green Round 2 — Scallop Foundation
Work:
*sc in next 3 sts, ch 4, skip 2 sts*
Repeat along the sides.
At each corner make a larger ch-5 space.
Join.
Green Round 3 — Shells
Into each regular ch-4 space work:
sc, hdc, 3 dc, hdc, sc
Into each corner ch-5 space work:
sc, hdc, 3 dc, 2 tr, ch 2, 2 tr, 3 dc, hdc, sc
The larger corner shell creates the pointed shape.
Green Round 4 — Definition
Work relaxed sc around each scallop.
At the top of a regular shell work:
sc, ch 1, sc
At each corner point work:
sc, ch 2, sc
Fasten off.
Target Measurements
After blocking, a motif made with DK or light worsted cotton and a 4.0–4.5 mm hook can be targeted to approximately:
| Component | Target Measurement |
|---|---|
| Yellow flower diameter | 10–13 cm |
| Ivory square before border | 15–18 cm |
| Complete motif | 18–22 cm |
| Petal height | Approx. 4–6 cm |
These measurements are adjustable project targets. Matching every motif to the same blocked dimension matters more than reproducing a particular number.
Making a Blanket from the Motif
The raised sunflower can become a statement blanket when repeated across a grid.
For a 20 cm blocked square, approximate layouts are:
| Layout | Motifs | Approximate Size Before Outer Border |
|---|---|---|
| 4 × 5 | 20 | 80 × 100 cm |
| 5 × 6 | 30 | 100 × 120 cm |
| 6 × 8 | 48 | 120 × 160 cm |
| 8 × 10 | 80 | 160 × 200 cm |
Add the width of the final blanket border to these measurements.
Joining Multiple Sunflower Squares
For blankets, it is better to create a separate joining edge than to sew through the decorative green scallops.
Before working the final green shell round, add one structural round in ivory or green:
sc in every stitch with (sc, ch 2, sc) at each corner.
Use these structural loops for joining.
A mattress seam gives a relatively flat result. A slip-stitch join creates a visible raised line.
Keep all dimensional flowers facing the same direction while arranging the blocks.
Sunflower Cushion Version
One large motif can form the decorative center of a cushion cover.
Continue adding ivory square rounds until the front reaches the required cushion dimensions.
For a 40 × 40 cm cushion, increase the square evenly while preserving four fixed corners.
Add a plain crocheted back in sc or hdc. Join the front and back around three sides, insert the cushion pad, then close the final edge.
Table Mat Version
A single sunflower square works as a decorative table mat when made in cotton.
For this application, reduce the petal height. Do not pinch the petal bases as strongly, and omit the additional raised surface line if a flatter result is required.
Block the finished square to approximately 20 cm and keep the green scallops symmetrical.
Bag Panel Version
Two motifs can be converted into a small decorative bag.
Add extra solid sc rounds around each square until both panels reach the desired size.
Place the panels with wrong sides together and join along three edges.
Leave the upper edge open.
For a bag carrying substantial weight, add a fabric lining. The open ivory lace alone is not designed to support heavy objects.
Changing the Flower Colors
The same construction can produce several floral variations.
- Mustard + cream + olive — autumn sunflower
- White + yellow + sage — daisy-inspired square
- Terracotta + ivory + dark olive — fall floral motif
- Dusty rose + cream + sage — garden flower square
- Lavender + ivory + soft green — spring floral version
Making the Petals Flatter
For a blanket that will be used regularly rather than displayed decoratively, reduce the flower relief.
Replace the 3 tr at the highest portion of each petal with 3 dc.
Do not pinch the petal base.
Skip the surface-crochet center rib.
The resulting sunflower will retain its eight-petal shape but sit closer to the ivory foundation.
Making the Petals More Dimensional
For stronger relief, crochet a second set of eight smaller petals behind the main layer.
Create eight ch-6 loops around the center.
Into each loop work:
sc, hdc, 3 dc, 2 tr, 3 dc, hdc, sc
Position this second layer between the large petals.
Check the motif after adding the extra layer. Excessive thickness can make joined blankets difficult to fold.
Yarn Quantity
The safest method for calculating yarn is to complete one full blocked square and weigh each color separately during construction.
For example, if one finished motif weighs 65 g and a blanket requires 48 motifs:
65 × 48 = 3,120 g
Add the yarn needed for joining and the final border, then allow an additional margin for swatching and color matching.
The example is a calculation method rather than a fixed yarn requirement. Dimensional petals can change yarn consumption substantially.
Blocking the Motif
Block the structural square rather than stretching the flower.
Pin the four corners first.
Measure both diagonals. They should be nearly equal.
Next, pin the midpoint of every side.
Arrange the green scallops individually.
Shape the ivory chain spaces into consistent openings.
Finally, arrange the eight yellow petals with their points facing outward.
Allow the motif to dry completely before removing the pins.
Assembly
- Crochet the yellow center and confirm that eight petal positions are distributed evenly around it.
- Work all eight yellow petals and compare their lengths before adding the definition round.
- Shape the petals and add the optional central ribs without pulling the flower center inward.
- Attach ivory yarn behind the flower and establish eight evenly spaced structural sections.
- Mark every second section as a corner, producing four corners and four side sections.
- Work the ivory lace rounds and check that the motif remains flat after every round.
- Add the ivory stabilizing round before starting the decorative green border.
- Work the green scallops, enlarging only the four marked corner shells.
- Weave yarn tails into matching-color areas and block the square to the selected measurement.
- For a multi-square project, match every blocked motif to the master square before joining.
7 Technical Tips
- Failure mode: the yellow center closes completely. If the design requires the visible central opening shown here, stop tightening the starting ring when the opening measures approximately 1–1.5 cm across.
- Failure mode: one petal becomes noticeably longer. Count every stitch in the first petal and use it as the reference for the remaining seven rather than shaping the petals visually.
- Failure mode: the flower forms a bowl. Loosen the stitches at the petal bases or increase the supporting ivory chain spaces; the flower base should rest flat before the lace frame is added.
- Failure mode: the square develops eight corners. Mark only four structural corners before the first squaring round, even though the flower itself has eight petals.
- Failure mode: the ivory lace puckers. Increase a ch-4 space to ch-5 where required instead of stretching the motif aggressively during blocking.
- Failure mode: green corner points look smaller than the side scallops. Use the larger corner-shell sequence consistently at all four marked corners and check them before fastening off.
- Failure mode: joined squares have different dimensions. Block every motif to the same target size and keep diagonal measurements within approximately 5 mm of the master square.
Care Instructions
Wash according to the yarn manufacturer’s instructions. Cotton motifs may become heavier when wet, so support the complete piece rather than lifting it by one corner.
Dry flat. Reshape the petals while damp and arrange the green scallops before the fabric dries.
For dimensional blankets, avoid aggressive pressing directly over the flower. Heavy pressure can permanently flatten the raised petal structure.
Conclusion
The key to this 3D sunflower granny square crochet pattern is treating the flower and square as two different structures. Build the eight yellow petals for volume, then use the ivory lace foundation to control the actual geometry of the block. Four marked corners—not the eight petals—determine whether the finished motif remains square. Make one complete sample, block it, record its dimensions, and use that piece as the reference for every additional motif. The design can then be repeated for blankets, cushions, table mats, or decorative bag panels. Share a finished version on Pinterest or Instagram with #3DSunflowerGrannySquare. Would you keep the green scalloped border or replace it with a plain joining edge for a full blanket?








