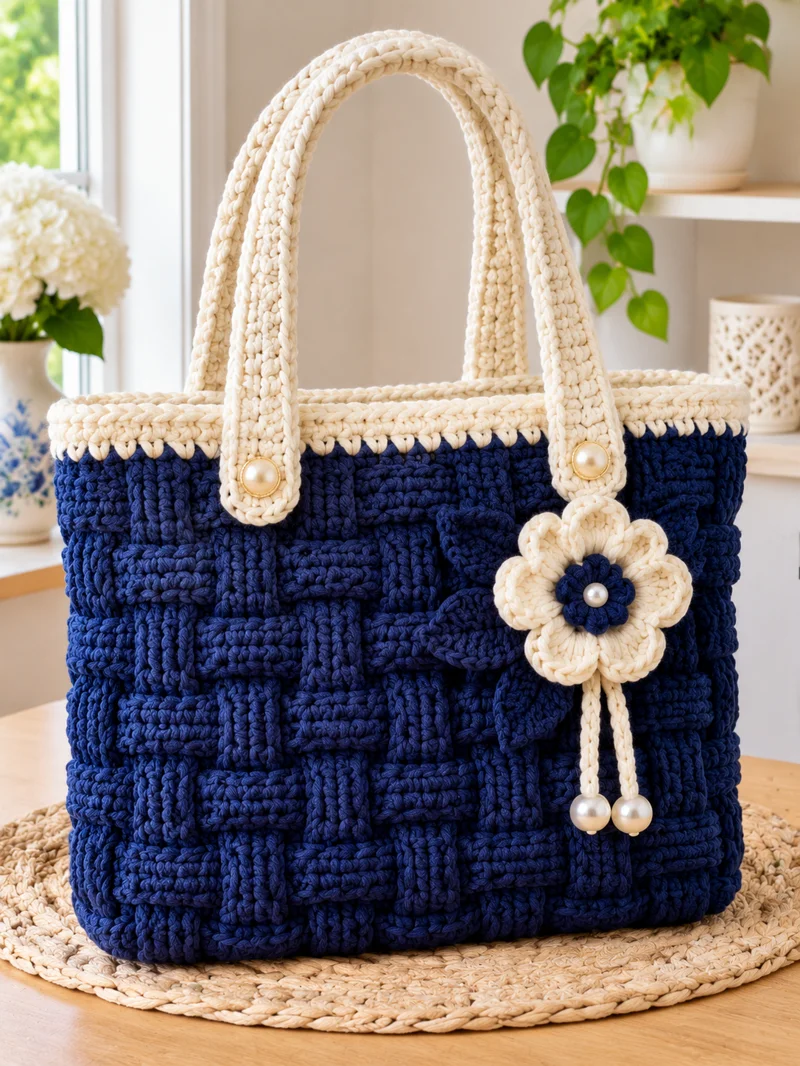
Basketweave stitches create the raised, interlocking panels that define this navy handbag. This navy blue crochet tote bag pattern combines a rectangular base, dense textured sides, cream shoulder straps, and a layered flower appliqué. Designed for intermediate crocheters, the project uses cotton yarn, a 6.5 mm hook, and basic post-stitch techniques. The target size is approximately 34 × 30 × 9 cm, suitable for a structured everyday handbag.
The Design: What Makes This Crochet Tote Different
The defining feature of this bag is its raised basketweave surface. Alternating front-post and back-post double crochet stitches create the appearance of interlocking woven strips without requiring separate strips to be sewn together.
The rectangular base provides a stable foundation. Its flat shape also helps distribute the weight of contents more evenly than a narrow circular bottom.
Cream handles introduce a strong visual contrast while making the attachment points easy to identify. Each handle should be reinforced because dense crochet fabric becomes considerably heavier when filled.
A layered flower provides the focal point. Navy leaves behind the cream petals connect the decoration to the bag body.
The most common mistake when making a basketweave crochet bag is losing the stitch sequence at the corners. That produces uneven texture and can twist the fabric. Maintaining consistent stitch counts is essential when constructing this two-tone crochet bag.
Project Info at a Glance
| Detail | Specification |
|---|---|
| Skill level | Intermediate |
| Estimated time | 12–18 hours |
| Target width | 34 cm |
| Target height | 30 cm, excluding handles |
| Target depth | 9 cm |
| Main hook | 6.5 mm |
| Strap hook | 5 mm |
| Yarn | Doubled worsted cotton |
| Construction | Bottom-up |
| Terminology | US crochet terms |
These are proposed project specifications. Gauge and finished measurements must be confirmed with a sample.
Materials and Tools
Yarn
- Deep navy blue: Worsted cotton, held double, estimated 450–550 g. Suggested yarn: Lion Brand 24/7 Cotton.
- Ivory or cream: Worsted cotton, held double, estimated 200–250 g. Suggested yarn: Lion Brand 24/7 Cotton.
- Navy blue for flower center and leaves: Use yarn remaining from the main body.
- Cream for decorative cords: Use yarn remaining from the handles.
The yarn budget includes an allowance for the dense post stitches. Purchase quantities should be adjusted after making and weighing a gauge swatch.
Tools
- 6.5 mm crochet hook for the main body
- 5 mm crochet hook for straps and decorative pieces
- Stitch markers, at least four
- Tapestry needle for assembly
- Scissors
- Measuring tape
- Two pearl-style buttons, approximately 14–18 mm
- Three pearl-style beads for the flower and hanging cords
- Optional cotton lining fabric
- Optional firm bag-base insert
Use firmly attached embellishments. Beads and buttons are not suitable for projects intended for young children.
Crochet Abbreviations
| Abbreviation | Meaning |
|---|---|
| MR | Magic ring |
| ch | Chain |
| sc | Single crochet |
| dc | Double crochet |
| hdc | Half double crochet |
| inc | Two sc in one stitch |
| dec | Single crochet decrease |
| sl st | Slip stitch |
| BLO | Back loop only |
| FPdc | Front-post double crochet |
| BPdc | Back-post double crochet |
| st | Stitch |
| rep | Repeat |
| FO | Fasten off |
An invisible decrease works through the front loops of two adjacent stitches to reduce bulk and minimize visible gaps.
Pattern – Step by Step
Construction note: This bag is worked in joined rounds, rather than the continuous spiral typically used for amigurumi. Chains used to raise the work are not counted as stitches unless explicitly stated.
Rectangular Base (Make 1)
Yarn: Navy blue, held double.
The base is worked in rows. Its stitch count is designed to produce an 88-stitch perimeter for the bag walls.
R1: Ch 27. Sc in second ch from hook and across (26).
R2: Ch 1, turn. Sc in each st (26).
R3–R12: Repeat R2 (26 stitches per row).
Do not fasten off.
Work one round of sc around the rectangle, placing 26 sc along each long edge and 18 sc along each short edge, distributing the side stitches evenly.
Perimeter round: 26 + 18 + 26 + 18 = 88 stitches.
Join with sl st. Place a stitch marker at each corner.
The 88-stitch perimeter is the basis for the body stitch pattern. The exact physical dimensions depend on the chosen yarn and gauge.
Lower Bag Wall (Make 1)
Yarn: Navy blue.
R1: Ch 1, sc BLO around (88). Join.
R2: Ch 2, dc in each st around (88). Join.
R3: Ch 2, repeat [FPdc 4, BPdc 4] 11 times (88). Join.
R4: Repeat R3 (88).
R5: Repeat R3 (88).
R6: Ch 2, repeat [BPdc 4, FPdc 4] 11 times (88). Join.
R7: Repeat R6 (88).
R8: Repeat R6 (88).
R9: Repeat R3 (88).
R10: Repeat R3 (88).
R11: Repeat R3 (88).
R12: Repeat R6 (88).
R13: Repeat R6 (88).
R14: Repeat R6 (88).
Continue the six-round basketweave sequence until the body reaches approximately 27 cm from the base.
Keep 88 stitches in every round.
The alternation of post stitches produces rectangular raised sections. The texture becomes more apparent after several repetitions.
Important: A basketweave pattern has no increases or decreases in the vertical body section. Changing the stitch count can distort the blocks.
Cream Upper Border (Make 1)
Yarn: Cream, held double.
Change to cream at the end of the final navy round.
R1: Ch 1, sc around (88). Join.
R2: Ch 1, sc around (88). Join.
R3: Ch 1, sc around (88). Join.
R4: Ch 1, sc around (88). Join.
Fasten off. Weave in the end.
The border should lie flat. If it flares outward, compare the hook tension with the navy body before continuing.
Cream Shoulder Handles (Make 2)
Yarn: Cream, held double. Hook: 5 mm.
The straps are worked in rows to create dense bands.
R1: Ch 7, sc in second ch from hook and across (6).
R2: Ch 1, turn, sc across (6).
R3–R76: Repeat R2 (6).
Fasten off, leaving a 30 cm sewing tail. Repeat for the second strap.
Each strap should measure approximately 45–55 cm, depending on gauge. The final length must be checked before attachment.
For a more rounded strap, fold the long edges inward slightly and sew them together along the underside. This creates a thicker handle, although it shortens the visible width.
Structural note: Crocheted cotton handles can stretch under load. Reinforcing them with cotton webbing or a non-stretch fabric strip is recommended for regular use.
Handle Attachment Tabs (Make 4)
Yarn: Cream.
R1: Ch 7, sc in second ch from hook and across (6).
R2–R8: Ch 1, turn, sc across (6).
Fasten off, leaving a 20 cm tail.
These tabs cover the attachment points on the outside of the bag.
Position them symmetrically, approximately 5–6 cm inward from the side edges, adjusting for the actual width of the finished bag.
Decorative Flower Center (Make 1)
Yarn: Navy blue.
R1: 6 sc in MR (6).
R2: Inc ×6 (12).
R3: [Sc 1, inc] ×6 (18).
Join with sl st and fasten off, leaving a 20 cm tail.
This flat circle forms the navy center of the flower.
Layered Cream Flower (Make 1)
Yarn: Cream.
The flower uses a small center ring with six raised petals.
R1: 6 sc in MR (6).
R2: [Sl st in next st, ch 3, 3 dc in same st, ch 3, sl st in same st] repeated in each of the six stitches.
The flower now has six petal groups.
R3: Working behind the petals, attach yarn to the center and create six ch-4 loops, anchoring each loop between neighboring petals with sl st.
R4: In each ch-4 loop, work [sc, hdc, 5 dc, hdc, sc]. Repeat for all six loops.
Fasten off, leaving a 25 cm sewing tail.
Spread the rear petals so that they remain visible behind the front layer.
This creates a dimensional flower with two distinct levels.
Navy Leaves (Make 2)
Yarn: Navy blue.
R1: Ch 11.
R2: Starting in second ch from hook, work sc, hdc, dc, dc, dc, dc, dc, hdc, sc, sl st (10).
R3: Working along the opposite side of the foundation chain, sl st, sc, hdc, dc, dc, dc, dc, dc, hdc, sc (10).
Join and fasten off, leaving a 20 cm sewing tail.
The leaf should have a pointed tip and a rounded base. Make a second leaf.
For a raised central vein, surface-crochet a line of slip stitches along the center using the same navy yarn.
Cream Decorative Hanging Cords (Make 2)
Yarn: Cream.
Cord 1: Ch 22. Sl st in second ch from hook and every remaining ch (21).
Cord 2: Repeat Cord 1 (21).
Fasten off, leaving 15 cm tails.
Attach one pearl-style bead to the lower end of each cord.
The cords should hang beneath the flower, with the beads positioned at slightly different heights. Adjust their lengths during assembly.
Optional Inner Lining
A fabric lining is useful because post-stitch crochet can stretch and may leave small openings between stitches.
Measure the finished interior width, height, and base depth.
Cut two fabric panels with seam allowances and a separate base panel, or use a boxed-corner lining construction.
Sew the fabric pieces together, press the upper edge inward, and hand-stitch the lining just below the cream border.
A firm insert may be placed between the crocheted base and lining to improve shape retention.
Assembly – 10 Steps
- Shape the base. Lay the bag on a flat surface and check that the rectangular bottom is not twisted.
- Check the body. Measure both sides from the base to the upper border. Correct any noticeable height difference before attaching the straps.
- Position the handles. Mark four attachment points, keeping the spacing identical on the front and back.
- Sew the straps. Attach the handle ends through several rows of the upper bag wall, not just the cream border.
- Add the attachment tabs. Place one cream tab over each handle end and sew around its edges.
- Attach the decorative buttons. Center one pearl-style button on each visible front tab. The rear tabs may be left plain or decorated to match.
- Assemble the flower. Sew the navy circular center onto the cream petals and attach the central pearl-style bead.
- Attach the leaves. Position both navy leaves behind the flower, angled outward, and sew them in place.
- Add the hanging cords. Secure the two cream cords beneath the flower and attach their beads before sewing the complete decoration onto the front-right area of the bag.
- Finish the interior. Weave in all yarn ends, add the optional lining, and test the handles with a light load before regular use.
The completed bag has a rectangular silhouette, textured navy body, contrasting cream straps, and a layered floral decoration.
7 Technical Tips for a Better Crochet Tote
- Prevent lost stitches at the corners. Place four stitch markers at the base corners and count all 88 perimeter stitches before starting the basketweave body. A missing stitch can shift the post-stitch pattern.
- Control fabric stretch. Use a hook that produces a firm fabric without excessive gaps, and test a 10 × 10 cm swatch. Loose tension can cause the tote to lose its rectangular shape.
- Maintain consistent post-stitch placement. Insert the hook around the full post of the previous stitch rather than through its top loops. Incorrect insertion flattens the basketweave texture.
- Check the strap length before sewing. Measure both handles under gentle tension and keep the lengths within 5 mm of each other. Unequal handles cause the bag to hang at an angle.
- Reinforce the attachment points. Sew each handle through at least three rows of the bag wall and use a backing patch if the bag will carry heavy items. Attaching only to the upper border can cause the rim to distort.
- Pin the flower before attaching it. Place the flower approximately 4–6 cm below the cream border and check that it does not overlap the handle tab. Poor placement can obscure the decoration or interfere with the strap.
- Secure every decorative yarn tail. Weave each tail through several stitch directions and inspect the attachment after gentle pulling. Short, unsecured tails can work loose during use.
Common Problems and Corrections
Why Does the Basketweave Pattern Look Uneven?
The most likely causes are incorrect front-post or back-post placement, inconsistent tension, or a missing stitch.
Count each group of four stitches. Check the sequence at the beginning of every round, particularly after switching the raised blocks.
Why Does the Bag Lean to One Side?
Uneven handle attachment is a common cause.
Measure the distance between each strap end and the nearest side edge. Compare the front and rear placement before sewing permanently.
Why Is the Base Curling?
A base can curl when the perimeter round is worked too tightly or when the body stitches pull inward.
Check the perimeter count and compare the base tension with the first body round. Blocking may help mild distortion, but significant curling requires adjusting the tension or construction.
Can Acrylic Yarn Replace Cotton?
Yes, but acrylic generally behaves differently under weight. A tote made from acrylic may stretch more noticeably, especially in the handles.
For a structured crochet shoulder bag, cotton or cotton-blend yarn is generally preferable. Reinforced straps remain important regardless of fiber choice.
Can This Pattern Be Made Larger?
The body circumference can be expanded by adding stitches in multiples of eight to maintain the four-stitch basketweave blocks.
The base must be resized accordingly. A larger circumference also increases yarn consumption and may require stronger straps.
Conclusion
The finished navy blue crochet tote bag pattern combines a flat rectangular base, repeated basketweave panels, cream shoulder handles, and a layered flower decoration. The most important construction checks are the 88-stitch body perimeter, consistent post-stitch placement, and reinforced handle attachments.
Before using the bag regularly, complete a gauge sample and test the finished straps with a light load. Add a fabric lining if the tote will carry small objects.
Photograph the finished bag from the front and side, then share the results on Pinterest or Instagram using #NavyBasketweaveTote.
For your version, would you keep the cream flower on the right side or move it to the center?








