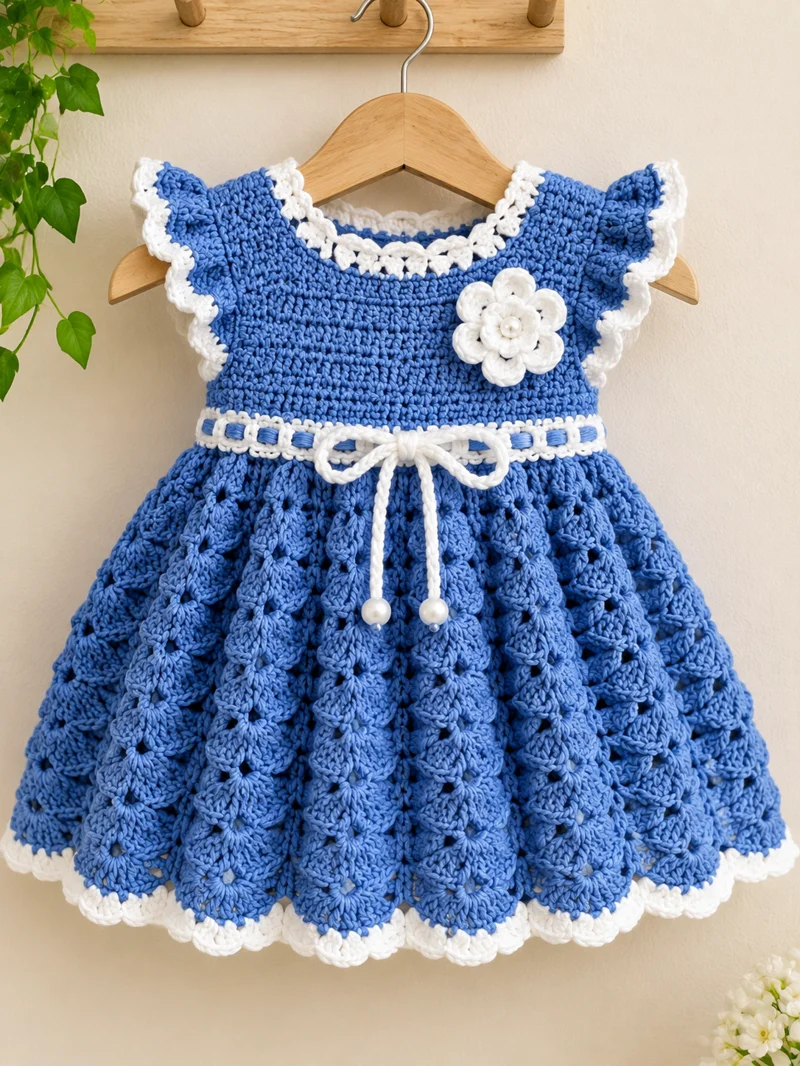
The blue skirt on this dress expands into overlapping shell motifs while the white trim outlines every major edge. This blue and white crochet baby dress pattern recreates that combination using DK yarn, a 4 mm hook, and separate bodice and skirt sections. Designed as a provisional 6–12-month size, it is an intermediate project suited to makers who want to practice shell repeats, flutter sleeves, and garment finishing.
Pattern note: This is an original, untested crochet interpretation inspired by the photographed dress. It is not the original designer’s pattern. Finished measurements, stitch placement, yarn consumption, and fit must be checked with a sample before the instructions are treated as a tested garment pattern.
The Design: What Makes This Crochet Baby Dress Different
Three construction decisions define this crochet baby girl dress. First, the bodice is worked in compact double crochet rows rather than the open shells used below the waist. That contrast helps maintain the neckline shape and gives the decorative flower a stable attachment surface.
Second, the skirt begins with a controlled shell repeat. Each shell is placed consistently around the waist, then extended vertically to produce the visual depth associated with a shell stitch baby dress. Increasing shell height instead of increasing the number of repeats helps preserve a predictable circumference.
Third, the sleeves use a separate ruffled edging. This allows the armhole opening to be checked before adding volume.
A frequent mistake is adding too many stitches at the waist. The resulting skirt may flare abruptly, distort the bodice, and become heavier than intended.
Project Info at a Glance
| Project Detail | Information |
|---|---|
| Skill Level | Intermediate |
| Estimated Time | 12–18 hours |
| Suggested Age | 6–12 months |
| Target Chest | 50 cm |
| Target Length | 36–38 cm |
| Crochet Hook | 4 mm |
| Yarn Weight | DK cotton or cotton blend |
| Construction | Flat bodice, joined skirt, added sleeves and trims |
All time, size, and yarn estimates are provisional. Choose garment dimensions using actual body measurements rather than age alone.
Materials and Tools
Yarn
Choose smooth DK-weight yarn with clear stitch definition. Cotton or cotton-blend yarn is suitable for the textured shell skirt and decorative borders.
- Cornflower blue DK cotton – approximately 200 g: Main bodice, skirt, and flutter sleeves. DROPS Cotton Light is one possible yarn.
- White DK cotton – approximately 50 g: Neckline edging, sleeve borders, scalloped hem, waistband, and flower appliqué.
These amounts are purchasing allowances, not measured consumption from a completed sample. Buy matching dye lots and retain extra yarn for adjustments.
Tools
- 4 mm crochet hook, or the size needed to match gauge
- Tapestry needle for seams and finishing
- Locking stitch markers
- Measuring tape
- Sharp scissors
- Rust-resistant sewing pins
- Matching sewing thread for attaching decorations
Infant safety: Do not use loose pearls, detachable beads, long decorative cords, or unsecured appliqués. Replace the photographed dangling waist ties with a firmly attached decorative bow with short ends.
Gauge and Measurements
Work a 12 × 12 cm double crochet swatch in blue yarn. Wash and dry it according to the yarn label, then measure the central 10 cm.
Target gauge: 18 double crochet stitches and approximately 10 rows per 10 cm.
The draft uses 45 stitches across each bodice panel. At the target stitch gauge, this produces approximately 25 cm per panel and 50 cm around the chest before seam take-up.
Measure the bodice after every two rows. Crochet row height varies with yarn and tension, so adjust the number of plain rows as needed.
Compare the proposed finished chest circumference with the child’s actual chest measurement and allow appropriate wearing ease. Check that the neckline can pass over the head comfortably.
Crochet Abbreviations
| Abbreviation | Meaning |
|---|---|
| ch | Chain |
| sc | Single crochet |
| hdc | Half double crochet |
| dc | Double crochet |
| tr | Treble crochet |
| sl st | Slip stitch |
| st / sts | Stitch / stitches |
| sp | Space |
| sk | Skip |
| inc | Increase |
| dec | Decrease |
| BLO | Back loop only |
| RS | Right side |
| WS | Wrong side |
| rep | Repeat |
| FO | Fasten off |
All instructions use US crochet terminology.
An invisible decrease catches the front loops of two consecutive stitches before completing one single crochet; it is not required in the main garment sections.
Special Stitches
Five-double-crochet shell: Work five double crochet stitches into the indicated stitch or space.
Seven-double-crochet shell: Work seven double crochet stitches into the indicated stitch or space.
Picot: Chain three, then slip stitch into the first chain.
Scallop: Work five double crochet stitches into one indicated stitch, separated from neighboring scallops by slip stitches.
Blue and White Crochet Baby Dress Pattern – Step by Step
The bodice is worked flat, while the skirt is joined and worked in rounds. Sleeves and decorative details are added after the main garment sections are assembled.
Part 1: Front Bodice (Make 1)
Yarn: Cornflower blue DK.
Begin at the waist and work upward.
Foundation: Ch 47.
Row 1: Dc in the fourth chain from the hook and in each remaining chain. (45 dc, counting the beginning ch-3 as one dc)
Rows 2–8: Ch 3, turn, skip the first dc, dc in each remaining stitch. (45 dc)
The turning chain counts as the first double crochet throughout this section.
Measure the panel. It should be approximately 25 cm wide at the target gauge.
Shape the Neckline and Shoulders
Row 9: Ch 3, turn, dc in next 11 sts. Fasten off the working yarn. Skip the center 21 stitches and join blue yarn to the next stitch. Ch 3 as the first dc, then work 11 dc across the remaining shoulder section. (12 dc on each shoulder; 21 center stitches unworked)
Row 10, first shoulder: Ch 3, turn, dc in the next 11 sts. (12)
Row 10, second shoulder: Rejoin yarn at the outer edge, ch 3, and work 11 dc across the second shoulder. (12)
Fasten off both shoulder sections, leaving 20 cm sewing tails.
The resulting square neckline will appear softer after the white border is added.
Part 2: Back Bodice (Make 1)
Yarn: Cornflower blue DK.
Repeat the front panel foundation and Rows 1–8. (45 dc each row)
Work the same 12-stitch shoulders and 21-stitch center opening as the front panel.
If the neckline cannot pass comfortably over the intended wearer’s head, add a properly constructed back opening before proceeding.
Join the Bodice
Place the front and back panels with right sides together. Sew the 12-stitch shoulder sections using a mattress seam or another low-profile joining method.
Join the side seams from the waist upward, leaving approximately 10–12 cm open at the upper edge for each armhole. Check the opening against the intended wearer.
Turn the bodice right side out.
Part 3: Skirt Foundation (Make 1)
Yarn: Cornflower blue DK.
With the bodice right side facing, attach blue yarn at one side seam along the lower waist edge.
Round 1: Work 90 sc evenly around the lower edge, placing approximately 45 stitches across the front and 45 across the back. Join with sl st. (90 sc)
Round 2: Ch 1, sc in each stitch around, join with sl st. (90 sc)
Round 3: Ch 1, sc in each stitch around, join. (90 sc)
These foundation rounds form a stable transition between the bodice and the textured skirt.
The foundation count must remain a multiple of five for the following shell repeat.
Part 4: Shell Stitch Skirt (Make 1)
Yarn: Cornflower blue DK.
This section uses 18 shell repeats around the waist. It is a simplified stacked-shell interpretation of the photograph’s denser raised texture.
Round 4 – Establish the Shells
Repeat the following sequence 18 times:
Sc in the next stitch, skip one stitch, work 5 dc in the next stitch, skip one stitch, sc in the next stitch.
Join with sl st. (18 shells, 36 sc; 126 worked stitches total)
Round 5 – Stack the Shells
Slip stitch as needed to reach the first sc between adjacent shells.
Work 1 sc into the center (third) dc of each shell, and 5 dc into the gap between that shell and the next. Repeat around. Join.
(18 shells, 18 sc; 108 worked stitches total)
Round 6
Work 1 sc into the center dc of each five-dc shell and 5 dc into each gap between shells, keeping the same alternating arrangement. Join. (18 shells, 18 sc; 108 worked stitches)
Rounds 7–10
Repeat Round 6, placing each new shell into the gap between neighboring shells and each single crochet into the center stitch of the shell below. (18 shells per round)
Keep the shell columns aligned.
Round 11 – Add Shell Depth
Work one sc into each shell center and 7 dc into each gap between shells. Repeat around. Join. (18 seven-dc shells, 18 sc; 144 worked stitches)
Rounds 12–18
Work one sc into the center (fourth) dc of each seven-dc shell and seven dc into each gap between shells. Repeat around. Join each round. (18 shells, 18 sc; 144 worked stitches per round)
Rounds 19–24
Continue the seven-dc shell pattern without increasing the number of repeats. (18 shells, 18 sc per round)
Measure from the waist to the lower edge. Add or remove complete shell rounds to achieve the required length, leaving approximately 1–2 cm for the white hem edging.
Fasten off blue yarn and weave in the end.
Technical note: The shell arithmetic is specified, but the finished flare and drape are not tested. Additional shaping may be needed to match the wide skirt in the photograph.
Part 5: Flutter Sleeves (Make 2)
Yarn: Cornflower blue DK, followed by white DK.
With the right side facing, attach blue yarn at the lower armhole.
Round 1: Work 40 sc evenly around the armhole and join with sl st. (40 sc)
If the armhole cannot accommodate 40 stitches comfortably, adjust the pickup count and recalculate the following rounds.
Round 2: Ch 3, work 2 dc into the same stitch, then work 2 dc in each remaining stitch around. Join. (81 dc including the beginning ch-3)
Round 3: Ch 1, sc in each stitch around. Join. (81 sc)
Round 4: Work a five-dc scallop into selected stitches, separated by slip stitches, distributing the scallops evenly around the sleeve edge.
Fasten off blue yarn.
Attach white yarn and work a single crochet border around the outer ruffle edge, placing additional stitches where needed to avoid pulling the fabric inward.
Fasten off and weave in the ends.
Repeat for the second sleeve, matching the number and placement of scallops.
Part 6: White Scalloped Hem
Yarn: White DK.
Attach white yarn to the lower edge of the blue skirt.
Round 1: Work single crochet evenly around the hem, placing one stitch in each available top stitch and adjusting at the joins to create a flat foundation.
Round 2: Repeat the following sequence around the edge:
Slip stitch in the next stitch, skip one stitch, work five double crochet into the next stitch, skip one stitch.
Continue around the circumference. Adjust the final repeat if needed to avoid an oversized gap.
Join with a slip stitch and fasten off.
If the edging pulls inward, add foundation stitches before repeating Round 2.
Part 7: White Neckline Edging
Yarn: White DK.
Join white yarn at the back neckline.
Round 1: Work sc evenly around the neckline, placing one or two stitches at corners as required to prevent curling. Join.
Round 2: Work small scallops by alternating a slip stitch, a skipped stitch, and three double crochet into the next stitch.
Continue around the neckline and join with a slip stitch.
Fasten off. The trim should lie flat against the blue bodice.
Test the neckline opening again after adding the border.
Part 8: Waistband and Decorative Bow
Yarn: White DK.
The photographed dress has an openwork waistband and a central bow. This version uses a fixed decorative bow without long dangling cords.
Waistband
Foundation: Ch 91.
Row 1: Sc in the second chain from the hook and in each chain across. (90 sc)
Row 2: Ch 3, turn, then repeat *ch 1, skip one stitch, dc in next stitch* across the band, adjusting the final stitch to maintain an even edge.
Row 3: Ch 1, turn, sc into each stitch and chain space across.
Fasten off with a 20 cm sewing tail.
Position the band around the waist and sew it flat to the dress, with the ends meeting at the back seam. Adjust its length to the actual waist measurement.
Decorative Bow
Make two short crochet loops in white yarn and stitch them together at their centers.
Wrap the center with white yarn several times and secure the ends on the reverse side.
Sew the bow firmly to the front waistband.
Do not add long hanging cords or detachable pearl beads for infant use.
Part 9: White Crochet Flower Appliqué
Yarn: White DK.
The photographed flower has layered rounded petals and a raised center. This simplified two-layer flower reproduces the general shape.
Flower Center
R1: Make a magic ring, work 6 sc into the ring, and join with sl st. (6 sc)
R2: Work 2 sc into each stitch around. Join. (12 sc)
First Petal Layer
R3: Repeat *sl st in next stitch, ch 2, 3 dc in next stitch, ch 2* six times around. Join. (6 petals)
Second Petal Layer
Work behind the first petal layer, attaching the yarn to the rear loops or base of the petals.
R4: Create six evenly spaced chain-3 loops behind the petals, securing each loop with a slip stitch.
R5: Work (sc, hdc, 3 dc, hdc, sc) into each chain-3 loop. (6 outer petals)
Fasten off, leaving a 25 cm sewing tail.
Position the flower on the upper side of the bodice, approximately 2–3 cm below the shoulder line, depending on available space.
Sew through the flower base and bodice fabric at multiple points. Finish the center with tight embroidery stitches rather than a bead.
Part 10: Final Surface Details
The skirt in the reference image has a more dimensional texture than ordinary stacked shells. Optional surface crochet can add visual depth along selected shell columns.
With blue yarn and a tapestry needle or crochet hook, add short raised lines along the center of every second shell column.
Keep the decorative yarn loose enough that the skirt hangs naturally.
Do not carry long strands across the reverse side, where fingers or toes could catch them.
A closer reproduction of the photographed raised-cluster skirt would require a separately tested stitch pattern and recalculated skirt instructions.
How to Assemble the Crochet Baby Dress
- Block the bodice panels. Lay both panels flat and check that their widths and heights match before joining.
- Join the shoulder seams. Align the 12-stitch shoulder sections and sew them together with a flat seam.
- Close the side seams. Leave matching armhole openings and inspect the finished chest circumference.
- Check the neckline. Verify that the opening can pass over the intended wearer’s head; add a suitable back opening if needed.
- Attach and complete the skirt. Work the 90-stitch waist foundation and continue the shell rounds to the desired length.
- Finish the sleeves. Crochet both flutter sleeves and check that their ruffles have similar fullness.
- Add the white borders. Complete the neckline trim, sleeve edging, and scalloped hem.
- Attach the waistband. Position it evenly across the waist seam and sew it flat without tightening the bodice.
- Secure the flower and bow. Stitch each decorative piece firmly to the fabric and omit detachable embellishments.
- Finish and inspect. Weave in all yarn ends, wash and dry according to the yarn label, remeasure the dress, and inspect every seam and decoration for loose threads.
The completed garment has a compact blue bodice, a textured shell skirt, white edging, flutter sleeves, and fixed floral decoration.
7 Technical Tips for a Better Crochet Baby Dress
- Use stitch markers at the waist. Mark every fifth foundation stitch before the first skirt shell round. One missed stitch can shift the 18-repeat pattern and produce an uneven join.
- Control the skirt circumference. Measure the shell skirt after Round 10 and compare it with the intended flare. A skirt that folds sharply at the waist may have excessive volume for the bodice.
- Check neckline size after edging. The white trim can reduce the opening by several millimeters. Test the finished neckline rather than relying on the untrimmed bodice measurement.
- Avoid tight sleeve pickup stitches. If the 40-stitch armhole foundation pulls the shoulder inward, redistribute or increase the pickup stitches. Recalculate the ruffle before continuing.
- Keep the white border consistent. Changing hook tension between the blue and white yarn can cause the scallops to cup or ripple. Compare the border against a flat surface every few repeats.
- Pin the flower before sewing. A flower positioned too close to the armhole may fold under the sleeve. Leave approximately 2–3 cm of clearance where the bodice permits.
- Secure yarn tails inside the fabric. Weave each tail through multiple stitch directions. Inspect the reverse side for loops that could catch a finger or toe.
How to Customize the Crochet Baby Dress
Adjusting the Size
The draft is intended as a starting point for a 6–12-month garment. To change the size, begin with the chest circumference rather than changing the hook size alone.
At 18 dc per 10 cm, a 54 cm chest circumference requires approximately 97 stitches around the bodice before seam adjustments.
Divide the required circumference between front and back panels, then recalculate the neckline and shoulder stitch counts.
A larger bodice also changes the skirt foundation. Choose a waist stitch count divisible by five to preserve the shell repeat.
Changing the stitch count without modifying the armhole depth or shoulder width may produce a garment that is wider but still too short through the upper body.
Adjusting the Skirt Length
Add or remove complete seven-double-crochet shell rounds. Keep the same number of shells around the circumference so the pattern remains aligned.
For a shorter dress, stop the skirt several rounds earlier and work the white hem.
For a longer dress, measure the growing skirt weight and check whether the additional length changes the drape.
Cotton can relax after washing. Take final measurements after laundering and drying the garment according to the yarn label.
Changing the Colors
Cornflower blue and white produce the strongest resemblance to the reference photograph. Other combinations can retain the same structure.
A dusty rose bodice and skirt with ivory trim would emphasize the flower. Sage green with cream trim would make the raised shell columns more visible in soft daylight.
Navy with white trim produces greater contrast but may make individual dark stitches harder to count during construction.
When substituting yarn, use comparable weight and check the swatch. Two DK yarns can have noticeably different stitch density.
Frequently Asked Questions
Is this crochet baby dress suitable for beginners?
This design is best classified as intermediate. The individual stitches are common, but the project combines garment shaping, seams, shell repeats, decorative borders, and finishing work.
A maker who has already completed a simple baby cardigan or dress will be better prepared to check fit and correct stitch placement.
What is the best yarn for a crochet baby dress?
Smooth DK cotton or a cotton blend is a practical starting point. The yarn should be washable according to its label, comfortable against the skin, and appropriate for infant clothing.
Avoid yarn that sheds fibers excessively or produces loose decorative strands.
How much yarn is needed?
Allow approximately 200 g of blue yarn and 50 g of white yarn for this draft. This is a planning estimate, not a verified amount from a completed sample.
A larger size, longer skirt, denser shell pattern, or different gauge can increase consumption.
Can the dress be made without the flower?
Yes. The flower is decorative and does not affect the bodice construction. Omitting it leaves a simpler front panel and reduces the number of attached components.
Can the dress be made for a newborn?
Not by scaling the 6–12-month draft proportionally. Newborn clothing requires separate neckline, armhole, chest, and length measurements. A dedicated newborn-size pattern is the more reliable option.
How do I keep the skirt from becoming too heavy?
Use lightweight yarn, avoid unnecessary increases, and check the skirt length frequently. Heavy cotton combined with dense raised stitches can pull on the bodice and stretch the garment vertically.
How should the dress be washed?
Follow the yarn manufacturer’s care instructions. Place the garment in a laundry bag if machine washing is permitted, and inspect the flower, seams, and decorative bow after laundering.
Conclusion
This blue and white crochet baby dress pattern combines a compact bodice, an expanding shell stitch skirt, flutter sleeves, and contrasting white decoration. Its construction separates the main garment from the ornamental elements, making it easier to adjust the fit before attaching the flower and waistband. Before making the final version, crochet a gauge swatch, test the bodice dimensions, and measure the skirt after washing. Save the finished project to Pinterest or share a photograph on Instagram using #BlueWhiteCrochetBabyDress. For the next variation, would you keep the photographed dress’s wide textured skirt or replace it with a lighter, less densely worked shell pattern?








