Introduction
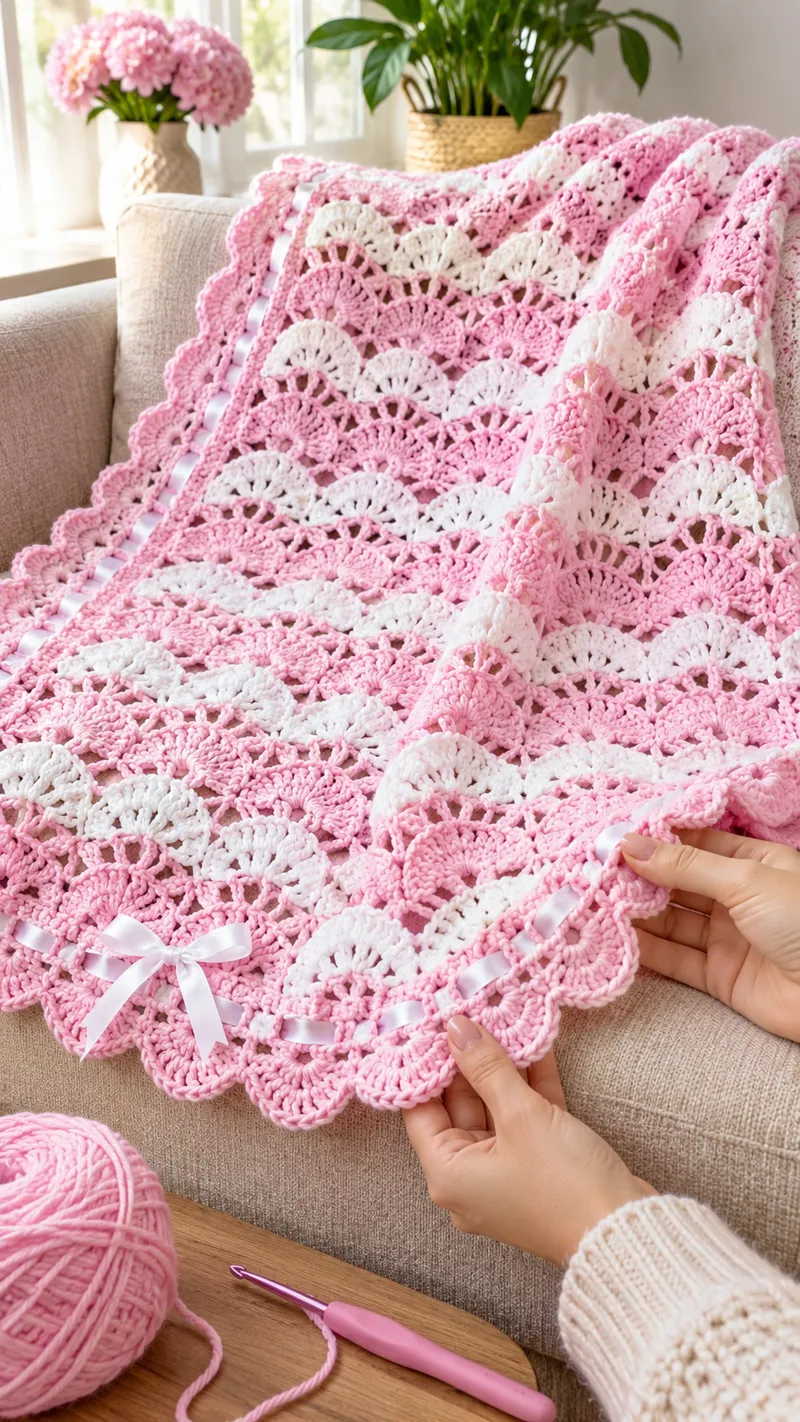
The alternating pink and white fans give this blanket its distinctive layered shell appearance. This pink and white crochet baby blanket uses DK yarn, a 4 mm hook, and repeating shell-stitch rows to create an approximately 75 × 90 cm project. The construction suits intermediate crocheters familiar with color changes and decorative borders. Its rectangular shape makes it suitable for a handmade nursery display or a supervised baby-shower photograph.
The Design: What Makes This Blanket Different
Three structural choices define this photo-inspired blanket.
First, alternating pink and white rows create horizontal bands without requiring separate crochet motifs. The repeated shell groups form the visual rhythm of a traditional shell stitch baby blanket.
Second, the outer edge uses larger crochet shells than the blanket body. This produces a scalloped crochet blanket border that extends beyond the rectangular foundation and creates a decorative frame.
Third, an optional satin ribbon runs through a separate eyelet round near the perimeter. The ribbon should not be woven directly through the structural stitches because pulling it tight can distort the blanket.
A common mistake in a lace crochet baby blanket is adding stitches at the ends of rows. That gradually widens the fabric and causes uneven edges. Consistent turning chains and marked edge stitches prevent this problem.
The photographed blanket has more elaborate fan motifs than the simplified shell construction below. This reconstruction captures the color arrangement and overall border treatment rather than duplicating every visible stitch.
Project Info at a Glance
| Detail | Specification |
|---|---|
| Skill Level | Intermediate |
| Estimated Time | 15–25 hours |
| Target Finished Size | 75 × 90 cm |
| Crochet Hook | 4 mm |
| Yarn Weight | DK / Category 3 |
| Colors | Pastel pink and white |
| Construction | Flat, turned rows |
| Best For | Decorative nursery projects, supervised photography, handmade gifts |
The size and yarn specification are based on comparable published patterns. Time is a planning estimate, not a verified completion time.
Materials and Tools
Yarn
- Pastel baby pink – DK – 250 g: Main color for alternating shell rows, the foundation, and scalloped edging. Stylecraft Special DK is one possible yarn choice.
- Soft white – DK – 150 g: Accent color for the alternating shell rows. Choose the same yarn range and fiber composition as the pink yarn to reduce gauge differences.
Purchase approximately 400 g total for this version. Actual consumption depends on yardage per gram, tension, border width, and final dimensions.
Tools
- 4 mm crochet hook
- Stitch markers – at least four
- Tapestry needle for finishing
- Scissors
- Measuring tape
- Blocking mats and rustproof pins – optional
- 10 mm satin ribbon – optional for removable decorative presentation only
Safety note: Do not leave ribbons, bows, loose embellishments, or the blanket itself in an infant sleep space. Keep the sleeping area free of loose blankets and soft items.
Crochet Abbreviations
All instructions use US crochet terminology.
| Abbreviation | Meaning |
|---|---|
| ch | Chain |
| sc | Single crochet |
| dc | Double crochet |
| sl st | Slip stitch |
| st / sts | Stitch / stitches |
| sk | Skip |
| sp | Space |
| rep | Repeat |
| RS | Right side |
| WS | Wrong side |
| shell | Five double crochet stitches worked into one stitch |
Invisible decreases are commonly used in amigurumi, but they are not required for this flat blanket pattern.
Pattern – Step by Step
Before You Begin: Gauge and Construction
Work a small shell-stitch sample before committing to the full blanket. Use the same yarn and hook intended for the finished piece.
The target is approximately 3 cm per shell repeat, although this varies with the yarn and stitch arrangement. A gauge swatch will also show whether the pink and white yarns have matching thickness.
This version uses a foundation of 146 chains and a repeating two-row shell structure. The stitch counts and repeat are adapted from established shell-stitch construction.
A turning chain counts as a stitch only where specifically indicated.
Step 1: Foundation Chain
Yarn: Pastel pink
Chain 146 loosely.
Do not tighten the foundation stitches. A tight foundation can make the bottom edge narrower than the remainder of the blanket.
The first working row creates 24 full shells, separated by single crochet stitches.
Place a marker in the first and last working stitches so the edges remain easy to identify.
Step 2: First Shell Row
Yarn: Pastel pink
Row 1: Work 1 sc into the second chain from the hook.
Repeat the following sequence across the foundation:
Skip 2 chains, work 5 dc into the next chain, skip 2 chains, then work 1 sc into the next chain.
Continue until the foundation has been worked.
Row 1 count: 24 full shells, with 25 sc anchor stitches.
Check that every shell contains five double crochets. A shell with four or six stitches changes the location of the center stitch used in the next row.
Step 3: Second Shell Row
Yarn: Pastel pink
Row 2: Chain 3 and turn. The turning chain counts as the first double crochet.
Work 2 dc into the first sc.
For each complete shell, skip the first two dc and work 1 sc into its center dc. Skip the remaining two dc, then work 5 dc into the following sc anchor.
Repeat this sequence through the row, reserving the final anchor for the edge treatment.
Finish with 3 dc in the final sc.
Row 2 count: 23 full shells and two half-shell edges.
The half shells form straight side boundaries while the full shells shift horizontally. This staggered arrangement is responsible for the repeated fan appearance.
Step 4: Third Shell Row
Yarn: Pastel pink
Row 3: Chain 1 and turn.
Work 1 sc into the first dc.
Skip the next two dc, then work 5 dc into the next sc.
Skip two dc and work 1 sc into the center dc of the following shell.
Repeat across the row, finishing with 1 sc in the top of the turning chain.
Row 3 count: 24 full shells.
The full shells now align with the positions established in Row 1.
Count them before continuing. Correcting a missing shell at this stage is considerably easier than correcting several completed color bands.
Step 5: Establish the Color Sequence
Repeat Rows 2 and 3 to build the blanket.
For a simple pink crochet blanket pattern with white accents, use four-row color bands:
| Rows | Color |
|---|---|
| 1–4 | Pink |
| 5–8 | White |
| 9–12 | Pink |
| 13–16 | White |
| 17–20 | Pink |
| 21–24 | White |
Continue the same sequence until the desired length is reached.
Make color changes at the end of a completed row. On the final yarn-over of the last stitch, draw the new color through the remaining loops.
Turn and begin the following row with the new color.
Leave yarn tails long enough for secure weaving, approximately 15 cm.
For a more pink-dominant appearance, work six pink rows followed by two white rows. That produces narrower white accents and may more closely match some areas of the reference photograph.
Step 6: Complete the Main Blanket
Continue the shell repeat until the body reaches the required length, allowing room for the border.
For a finished length near 90 cm, stop the central fabric several centimeters short of the target measurement.
The number of rows depends on the measured gauge.
Do not rely on a fixed row number if your yarn produces taller or shorter shells than the reference.
Finish after a Row 3 repeat, when the edge has full shells rather than half shells.
Fasten off and weave in the color-change tails on the wrong side. Work the tails through several stitch backs and reverse direction before trimming.
Step 7: Foundation Border
Yarn: Pastel pink
The foundation border creates a stable perimeter for the decorative edging.
Round 1: Join the pink yarn at a corner.
Work single crochet stitches evenly around all four sides.
Place 3 sc into each corner to turn the edge.
Along the sides, distribute the stitches consistently rather than forcing one stitch into every visible gap. Begin with approximately two sc for each double-crochet-height row edge, then adjust after checking for rippling or pulling.
Join with a slip stitch.
Round 2: Chain 1 and work 1 sc into each stitch around the perimeter.
At every corner, work 3 sc into the center corner stitch.
Join with a slip stitch.
The blanket should now lie flat. If the border curves inward, additional stitches may be needed along the sides. If it waves outward, remove excess stitches.
Step 8: Optional Ribbon Eyelet Border
Yarn: Pastel pink
This round provides decorative openings for a removable ribbon.
Round 3: Chain 4, counting as 1 dc and 1 ch.
Skip the next stitch and work 1 dc into the following stitch.
Repeat the sequence of 1 ch, skip 1 stitch, and 1 dc around each straight side.
At corners, adjust the spacing and work a corner group of (dc, ch 2, dc) where needed to turn without pulling.
Join with a slip stitch.
Check the perimeter for evenly spaced openings. If the stitch count does not permit a complete repeat at the end of a side, adjust the last two or three spaces rather than adding an extra large opening.
For infant use, omit the ribbon entirely and keep the eyelet round as a decorative crochet feature.
Step 9: Scalloped Crochet Border
Yarn: Pastel pink
A shell edging creates the rounded outline visible in the photograph.
Begin with a single-crochet preparation round if necessary, adjusting the stitch count on each side so the scallops can be distributed evenly.
For a seven-double-crochet scallop, work the following repeat:
1 sc into the next stitch, skip 2 stitches, work 7 dc into the following stitch, then skip 2 stitches.
Repeat around the perimeter.
At each corner, use a larger shell of approximately 9 dc where the geometry requires additional fullness.
The precise number of scallops depends on the final border stitch count. Before completing the entire round, test one side and one corner.
If the edge ripples excessively, reduce the number of double crochets in selected shells or increase the spacing between them.
If it curls inward, reduce the skipped stitches or add appropriate corner fullness.
Fasten off, leaving a 15 cm tail for weaving.
Step 10: Optional Ribbon and Bow
The photograph includes a pale satin ribbon threaded around the border and tied into a bow.
For a decorative presentation, measure the full blanket perimeter and add sufficient length for a bow.
Weave the ribbon through the eyelet spaces in an alternating front-to-back sequence.
Keep the ribbon flat. Twisted ribbon creates uneven tension and can gather the border.
Position the bow near one corner, leaving the blanket body unobstructed.
Important: Remove the ribbon and bow before the blanket is handled by a baby. Do not attach the ribbon permanently or use it as a functional blanket component.
Step 11: Finishing and Blocking
Lay the completed blanket on a flat surface and measure its width and length.
If blocking is suitable for the selected yarn, dampen the blanket according to the yarn manufacturer’s care instructions.
Shape the corners into a rectangle and spread the shell edging evenly.
Use rustproof pins where needed, keeping the scallops consistent.
Allow the fabric to dry completely before removing the pins.
Inspect the edges for loose yarn tails, missed stitches, or distorted shells.
Assembly and Finishing Checklist
- Complete the main pink and white shell-stitch rectangle.
- Check the first and last shell counts.
- Weave in all color-change yarn tails.
- Measure the unbordered fabric.
- Add the first single-crochet border round.
- Complete the second stabilizing border round.
- Add the optional crochet eyelet round.
- Work the pink scalloped outer edging.
- Block the blanket and inspect the corners.
- Photograph the finished blanket, adding a removable ribbon only for supervised decorative styling.
The finished project is a rectangular shell-stitch blanket with alternating colors and a scalloped perimeter.
7 Technical Tips for Better Results
- Stitch-marker placement: Place markers in the first and last stitch of every row. Missing an edge stitch can gradually reduce the blanket width and distort the shell alignment.
- Foundation-chain tension: Work the 146 foundation chains loosely. If the bottom edge contracts, try a hook 0.5 mm larger for the foundation alone.
- Shell consistency: Each standard shell contains exactly five double crochet stitches. An extra stitch shifts the center position used by the following row.
- Color-change tails: Leave approximately 15 cm of yarn at every color change. Short tails may work loose during washing, particularly in open lace stitches.
- Border stitch distribution: Check each side before beginning the scalloped round. Too many single crochet stitches cause rippling, while too few cause the perimeter to curl inward.
- Ribbon tension: A 10 mm ribbon should move freely through the eyelets without gathering the crochet. Remove all ribbon and bow components before the blanket is used around a baby.
- Blocking measurements: Measure the blanket both before and after blocking. Stretching one edge more than the opposite edge can turn a rectangular blanket into a trapezoid.
Conclusion
The finished pink and white crochet baby blanket combines alternating shell rows with a structured foundation border and rounded scalloped edging. A 4 mm hook and DK yarn provide a practical starting point, although the final dimensions depend on the maker’s gauge. Before repeating the pattern in another color combination, record the completed row count, shell width, and total yarn consumption.
Save this tutorial to Pinterest for future reference, or share a finished project photograph on Instagram using #PinkShellBabyBlanket. Keep decorative ribbons separate from any blanket intended for infant handling.
For your version, would you choose four-row pink and white stripes, or narrower white bands to emphasize the pink shell pattern?








