Introduction
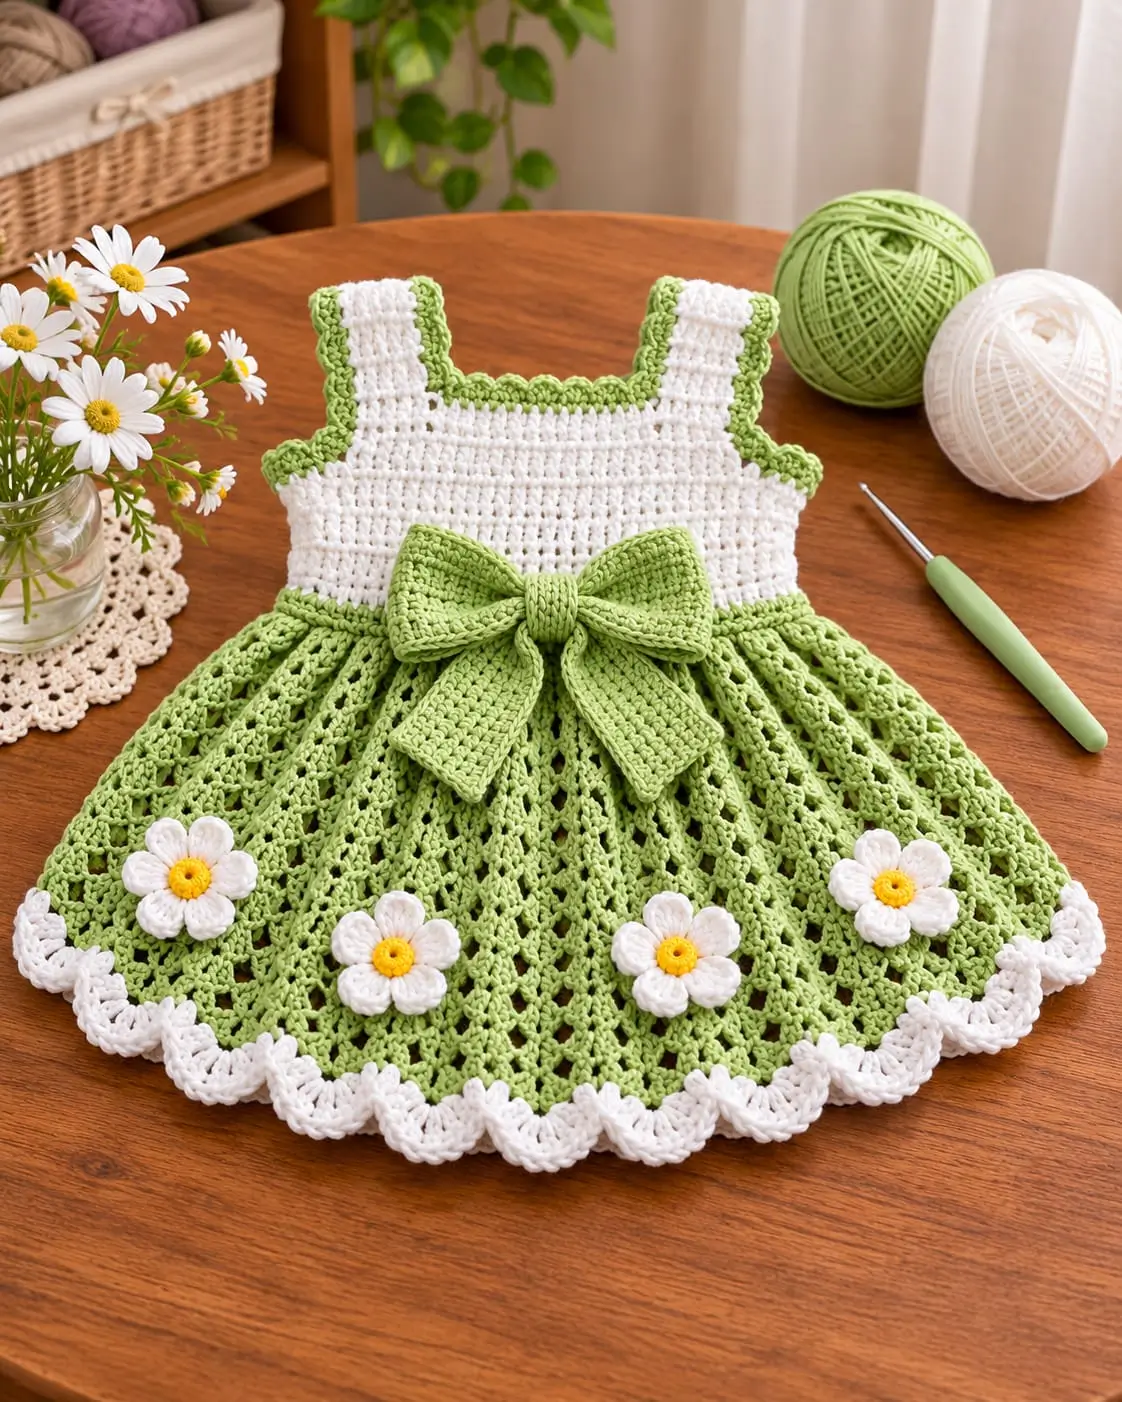
The wide sage skirt in this dress depends on repeated openwork columns expanding evenly from a compact white bodice. This sage green crochet baby dress pattern is a photo-inspired construction featuring shoulder straps, a fitted bodice, flared lace skirt, oversized crochet bow, white scalloped hem, and four daisy appliqués. The instructions below use cotton or cotton-blend yarn and can be adjusted from baby to toddler sizing by working from measurements.
The Design: What Makes This Crochet Dress Different
The dress combines three different crochet structures. The white bodice uses relatively dense stitches so the upper section keeps its shape. The sage skirt changes to an open lace repeat, allowing the lower section to expand without becoming excessively heavy. A white shell border visually connects the skirt back to the bodice.
The large sage bow is made separately and attached at the waist. Four white daisies with yellow centers are distributed across the lower skirt rather than arranged in a rigid horizontal line. That placement keeps the floral decoration balanced when the skirt spreads.
The main construction risk is adding too much width immediately below the waist. Gradual increases create a smoother flare and prevent the skirt from forming deep gathers directly under the bodice.
Project Information
| Skill Level | Construction | Suggested Yarn | Hook | Style |
|---|---|---|---|---|
| Intermediate | Bodice + expanding lace skirt | DK cotton or cotton blend | 3.5–4.0 mm | Sleeveless baby/toddler dress |
Materials and Tools
Yarn
- Sage green — DK weight cotton or cotton blend — approximately 180–300 g depending on size
- White — DK weight cotton or cotton blend — approximately 80–140 g
- Yellow — small quantity for daisy centers
Tools
- 3.5–4.0 mm crochet hook
- Yarn needle
- Scissors
- Stitch markers
- Measuring tape
- Blocking pins
- Optional small buttons for the back opening
The quantities above are project estimates rather than fixed requirements. Measure the child and make a gauge swatch before calculating the final stitch count.
Abbreviations
- ch — chain
- sc — single crochet
- hdc — half double crochet
- dc — double crochet
- tr — treble crochet
- sl st — slip stitch
- sp — space
- st/sts — stitch/stitches
- MR — magic ring
- BLO — back loop only
Suggested Finished Measurements
Because children of the same age can have very different measurements, chest circumference is more useful than age alone.
| Approximate Size | Dress Chest | Dress Length | Skirt Length |
|---|---|---|---|
| 6–12 months | 48–51 cm | 40–43 cm | 24–27 cm |
| 12–18 months | 51–54 cm | 43–47 cm | 27–30 cm |
| 18–24 months | 54–57 cm | 47–51 cm | 30–33 cm |
| 2–3 years | 57–61 cm | 51–56 cm | 33–37 cm |
Use these measurements only as starting targets. Compare the crochet piece with an actual garment that fits the intended wearer.
Gauge Swatch
Make a minimum 12 × 12 cm swatch using the yarn and hook selected for the dress.
Work the swatch in hdc because the bodice is the part where accurate sizing matters most.
Wash and dry the swatch using the same method planned for the finished dress. Measure a central 10 cm section after the fabric has settled.
To calculate the bodice stitch count:
desired chest circumference × stitches per centimeter = approximate required stitches
Add only a small amount of ease because cotton crochet can relax during wear.
White Bodice
The photo shows a simple rectangular upper section with a relatively high neckline and wide shoulder straps. A practical construction is to work the bodice from the waist upward.
Foundation
With white yarn, chain enough stitches to match the required chest circumference.
Join carefully with a sl st, checking that the chain is not twisted.
Round 1
Ch 2. Work one hdc in each chain around. Join with sl st.
Rounds 2–8
Ch 2. Hdc in each stitch around.
Continue until the lower bodice reaches approximately 8–11 cm, depending on size.
Creating the Armholes
Lay the bodice flat and divide the stitches into four sections:
- Front
- First armhole
- Back
- Second armhole
The front and back sections should contain approximately equal stitch counts.
Mark the beginning and end of both armholes.
Continue working the front panel back and forth in hdc until the upper front reaches the required height.
Repeat for the back.
If a back opening is needed for easier dressing, divide the upper back into two sections and add a button-and-loop closure after the main construction is complete.
Shoulder Straps — Make 2
Attach white yarn to the upper corner of the front bodice.
Work approximately 6–9 hdc across, depending on the dress size and desired strap width.
Turn.
Continue in hdc until the strap comfortably reaches the corresponding back position.
Attach securely.
Repeat for the second strap.
Before weaving in the ends, check that both straps have identical finished lengths.
Sage Green Bodice Edging
Join sage yarn at one upper edge.
Work sc evenly around the neckline, straps, and armhole edges.
For the small decorative edge visible in the photo, work a second round using:
*sl st in next st, 3 hdc in next st, sl st in next st*
Repeat where the stitch count permits.
Keep this edging compact. Large shells around the armholes can rub against the wearer and may cause the straps to curl.
Waistband
Join sage green yarn around the lower edge of the white bodice.
Round 1: Work one sc in each available stitch around.
Round 2: Work one hdc in each stitch.
Round 3: Begin the skirt increases by placing approximately 1 increase every 4–6 stitches.
The exact increase rate depends on the desired skirt fullness.
For a moderate flare, aim for approximately 20–30% more stitches at the start of the skirt than around the waist.
Sage Lace Skirt
The skirt uses repeating vertical lace sections. Open chain spaces reduce weight while controlled increases create the broad A-line shape.
Foundation Lace Round
Repeat around:
*dc in next 2 sts, ch 2, skip 1 st, dc in next 2 sts*
Adjust the final repeat if necessary so the pattern closes cleanly.
Next Round
Work:
*dc in each dc, ch 2 over each ch-2 space*
This maintains the vertical openings.
Open Diamond Section
To create the elongated openwork appearance in the photograph, alternate the chain-space position over several rounds.
Round A: *2 dc, ch 2, skip ch-space center, 2 dc.*
Round B: Work the solid stitches over the previous chain spaces and create the next chain space slightly offset.
Round C: Return the opening toward its original position.
The result is a narrow diamond rather than a perfectly straight ladder.
Increasing the Skirt
Do not increase on every round.
Work approximately 3–5 rounds without increases, then add one extra dc to selected solid sections.
For example, a section containing two dc can become three dc.
Several rounds later, selected three-dc sections can become four dc.
Distribute the increases around the entire skirt rather than concentrating them at the sides.
Place the dress flat after each increase round. The fabric should spread into a gentle arc without forming waves.
Skirt Length
Continue the lace pattern until the sage section is approximately 3–5 cm shorter than the desired finished skirt length.
The remaining length will be added by the white scalloped border.
Measure vertically from the waistband rather than following the diagonal direction of the lace stitches.
White Hem Foundation
Change to white.
Round 1: Work sc evenly around the entire lower edge.
If the sage skirt is slightly wavy, reduce a few stitches during this round.
If the hem pulls inward, add evenly distributed stitches instead.
Round 2: Work hdc around without increasing unless additional circumference is required.
White Scalloped Hem
The photograph shows large rounded white shells rather than a narrow picot edge.
A suitable repeat is:
*Skip 2 sts, 7 dc in next st, skip 2 sts, sc in next st.*
Repeat around.
If the stitch count does not divide evenly, adjust the spacing across several repeats rather than placing all remaining stitches into one shell.
More Defined Shell Option
For a deeper decorative border, work:
*sc, hdc, 2 dc, 3 tr, 2 dc, hdc, sc*
into each designated shell space.
This produces a broader fan similar to the prominent white scallops in the image.
Large Sage Crochet Bow
The waist bow is a major design element and should be made separately.
Bow Rectangle
With sage yarn, ch enough stitches for a rectangle approximately 18–24 cm wide, depending on dress size.
Row 1: Hdc in second suitable chain and across.
Rows 2 onward: Ch 1, turn, hdc across.
Continue until the rectangle measures approximately 7–9 cm high.
Fasten off.
Shaping the Bow
Fold the rectangle so the center forms two equal loops.
Pinch the middle firmly.
Wrap sage yarn around the center several times until the bow keeps its shape.
Secure the wraps on the back.
Bow Center Band
Ch approximately 7–10 stitches.
Work sc back and forth until the band is long enough to wrap around the pinched center.
Sew the ends together behind the bow.
Bow Tails — Make 2
Ch enough stitches for a strip approximately 14–20 cm long.
Work hdc rows until the strip is approximately 4–5 cm wide.
For a tapered end, decrease one stitch at both edges across the final few rows.
Make the second tail to the same measurements.
Position both tails behind the bow before sewing the completed decoration to the waistband.
White Daisy Appliqués — Make 4
Yellow Center
With yellow yarn:
Round 1: 6 sc in MR. (6)
Round 2: 2 sc in each stitch around. (12)
Join and fasten off.
White Petals
Join white yarn to any center stitch.
For each petal work:
ch 3, 3 dc in the same or designated base stitch, ch 3, sl st to the center.
Move to the next petal position.
Make 6 petals evenly around the center.
Fasten off leaving a long sewing tail.
Alternative Fuller Daisy Petal
For a more dimensional flower, work each petal as:
ch 3, hdc, 3 dc, hdc, ch 3, sl st
Keep all four flowers the same size.
A finished diameter of approximately 5–7 cm works well for a small dress.
Daisy Placement
Position the flowers only after the dress has been blocked.
The image uses four daisies distributed across the lower half of the skirt.
Place the first flower toward the lower left section.
Position two flowers through the center region at slightly different heights.
Add the fourth toward the lower right.
Avoid placing every flower on exactly the same horizontal line.
Attaching the Daisies
Sew around the yellow center first.
Add one hidden stitch near the outer end of each petal.
Do not pull the sewing yarn tightly enough to collapse the openwork skirt.
The petals should sit on the surface rather than disappearing into the lace openings.
Optional Green Leaves
If you want to extend the floral decoration, small sage or darker-green leaves can be placed beside selected daisies.
Ch 8.
Starting in the second chain from the hook, work:
sc, hdc, dc, tr, dc, hdc, sc
Continue around the opposite side of the chain with the reverse stitch sequence.
At the tip work (sc, ch 2, sc).
Fasten off with a sewing tail.
Optional Back Opening
For smaller sizes, a back opening can make dressing easier.
Leave approximately 6–8 cm of the upper back unjoined.
Work sc evenly along both sides of the opening.
On one side, create one or two button loops using ch 4–6, depending on button diameter.
Sew the buttons firmly to the opposite side.
Buttons on children’s clothing require secure attachment and regular inspection.
Adjusting the Pattern for Different Sizes
Do not scale the entire dress by simply changing hook size. That also changes fabric density and can produce oversized openings.
Instead, use the child’s measurements.
Adjust the bodice circumference first. Then alter bodice height, strap length, skirt length, and skirt expansion separately.
The decorative elements can also be scaled independently. A smaller dress may use a 16–18 cm bow, while a toddler version can support a 22–26 cm bow.
Yarn Calculation
A gauge swatch provides the most reliable yarn estimate.
Weigh a finished swatch of known dimensions. Calculate its area and compare it with the estimated garment area.
Add approximately 10–15% for the bow, flowers, borders, swatching, and finishing.
The open lace skirt normally consumes less yarn per square centimeter than the dense bodice and bow.
Color Variations
The sage-and-white combination gives the dress a botanical appearance, but the same construction can be adapted to other palettes.
- Dusty rose skirt with cream bodice and burgundy flower centers
- Lavender skirt with white bodice and yellow daisies
- Powder blue skirt with ivory bodice
- Mustard skirt with cream trim for an autumn version
- Terracotta skirt with beige bodice and ivory flowers
Keep the bodice and hem in the same light color if you want to preserve the strong visual framing seen in the photo.
Assembly
- Complete the white bodice and verify the chest measurement before beginning the skirt.
- Finish both shoulder straps and compare their lengths before attaching them permanently.
- Work the sage edging around the neckline and armholes, keeping the decorative shells compact.
- Join sage yarn at the waist and establish the first skirt increases evenly around the bodice.
- Continue the openwork skirt while adding gradual increases until the required width and length are reached.
- Work the white foundation rounds and complete the scalloped hem.
- Make the sage bow, center band, and two tails, then secure the complete bow at the front waist.
- Crochet four matching daisies and block them separately before placement.
- Sew the daisies across the lower skirt with the petals lightly anchored to the fabric.
- Weave in every yarn end, block the dress to its final measurements, and inspect all appliqués and closures before use.
7 Technical Tips
- Failure mode: bodice stretches too wide. Wash and measure a 10 cm gauge swatch before calculating the chest circumference because cotton can change after its first wash.
- Failure mode: skirt gathers abruptly at the waist. Limit the first expansion to approximately 20–30% more stitches than the waistband and distribute the increases around the full circumference.
- Failure mode: openwork columns lean sideways. Place a stitch marker at the beginning of each round and check the vertical alignment every 3–4 rounds.
- Failure mode: scalloped hem forms waves. Lay the skirt flat after the first six shells; if the edge rises into ruffles, increase the number of skipped base stitches between shells.
- Failure mode: bow droops forward. Attach the center and both upper corners of the bow to the waistband rather than sewing only through the center wrap.
- Failure mode: daisies disappear into the lace openings. Keep each flower approximately 5–7 cm wide and anchor every petal tip with one small hidden stitch.
- Failure mode: unequal shoulder straps. Measure both straps from the upper bodice edge to the back attachment point and keep the finished difference below 3 mm.
Blocking and Finishing
Wash or dampen the dress according to the yarn manufacturer’s care requirements.
Lay it flat on a blocking surface.
Align the bodice first. Both side edges should have equal lengths, and the straps should sit parallel.
Spread the sage skirt into an even semicircular shape without aggressively stretching the lace.
Shape each white scallop individually.
The bow can be pinned separately so both loops have equal dimensions.
Allow the dress to dry completely before removing the pins.
Care
A washable cotton or cotton-blend yarn is practical for this project. Use gentle washing and reshape the garment while damp.
Dry flat rather than hanging the wet dress from its shoulder straps. The weight of wet cotton can lengthen the bodice and distort the armholes.
Check the bow, daisies, buttons, and other attached components regularly when the garment is intended for a young child.
Conclusion
This sage green crochet baby dress pattern works by combining a stable white upper section with a progressively expanding lace skirt rather than forcing the entire garment into one stitch pattern. Start with the child’s chest measurement and a washed gauge swatch, then calculate the bodice before making the decorative elements. Complete one daisy and the bow early so their scale can be checked against the garment. After assembly, block the skirt into an even flare and shape every white hem shell separately. Share your finished version on Pinterest or Instagram with #SageDaisyCrochetDress. Would you keep the large sage bow shown here or replace it with a smaller bow and additional daisies?








