Introduction
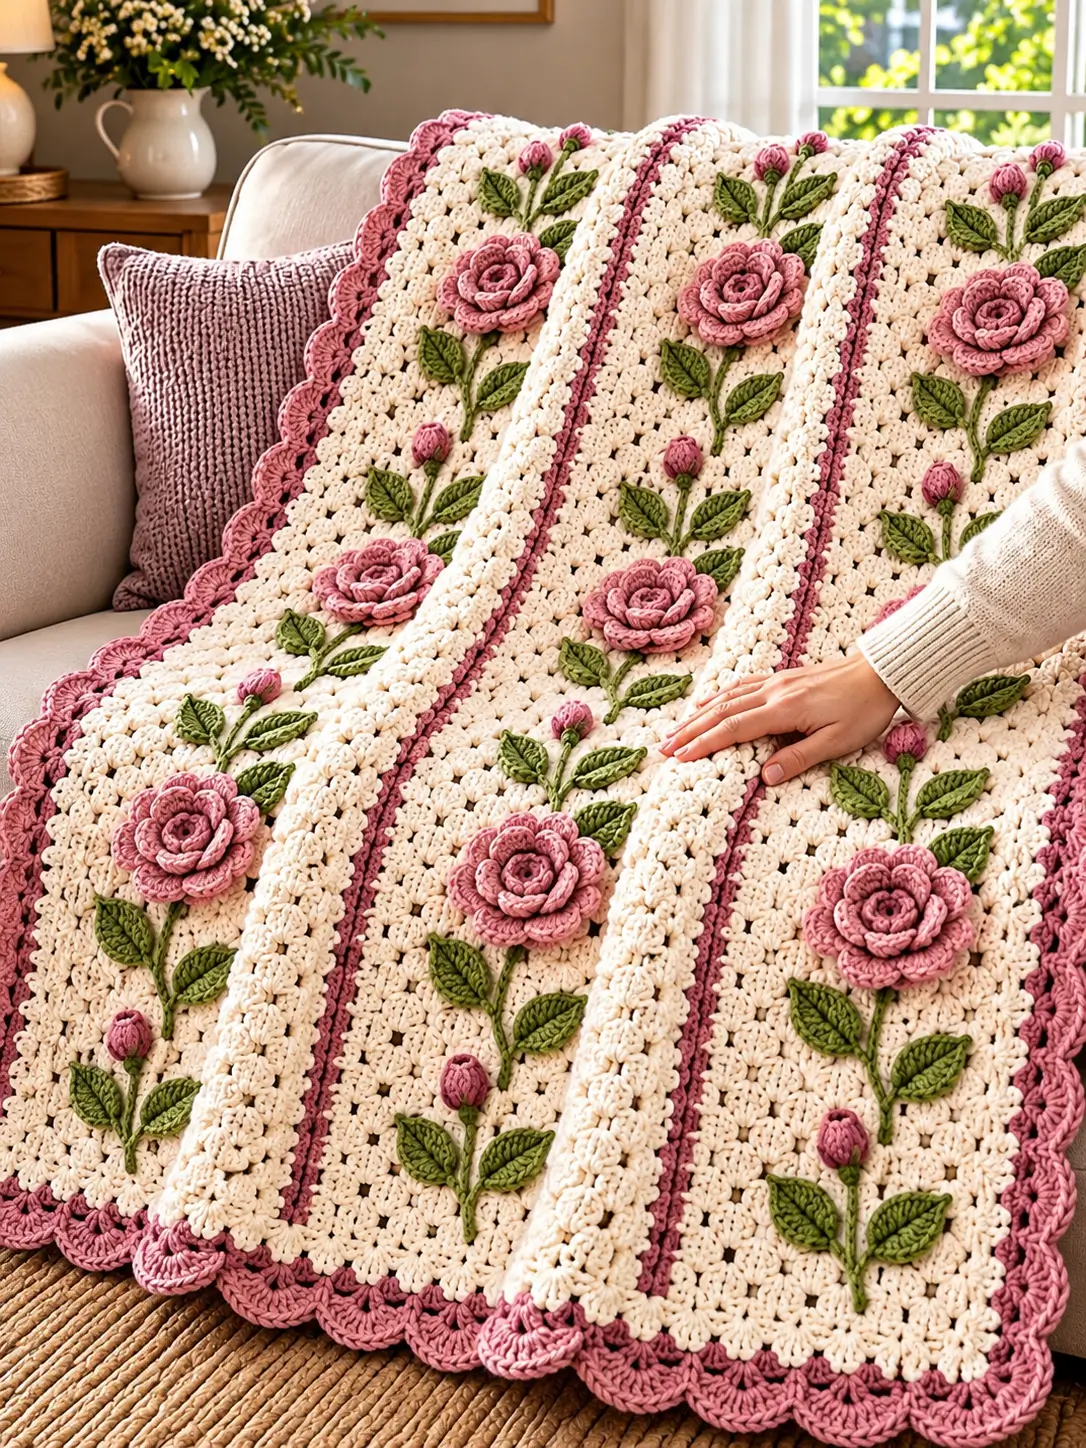
Each rose on this blanket rises from its own green stem instead of sitting as an isolated flower appliqué. This 3D rose crochet blanket pattern uses a warm cream textured background, dusty-pink layered roses, olive-green leaves and buds, narrow pink divider bands, and a deep scalloped border. The construction is best suited to intermediate crocheters because the flat blanket base and dimensional botanical pieces are worked separately before assembly.
The Design: What Makes This Rose Blanket Different
The blanket is organized into long vertical garden panels. Cream textured sections form the background, while narrow dusty-pink lines separate one floral column from the next. Large roses alternate with smaller closed buds, and paired leaves keep each stem visually balanced.
The important structural decision is to keep the flowers separate from the blanket fabric. Crocheting a heavy rose directly into the background can pull the surrounding stitches inward. Here, each rose is made independently and sewn through its compact base. Leaves are attached mainly through their center veins, allowing their edges to remain slightly raised. The stems are added after the blanket body is complete, so their position can be adjusted before the flowers are permanently attached.
Project Info at a Glance
| Skill Level | Construction | Suggested Size | Hook | Best For |
|---|---|---|---|---|
| Intermediate | Textured panel with separate appliqués | Approx. 110 × 150 cm | 5.0 mm | Throw, sofa blanket, decorative bed cover |
Materials and Tools
Yarn
- Warm cream — worsted weight #4 — main blanket background
- Dusty rose pink — worsted weight #4 — roses, buds, divider stripes and border
- Olive green — worsted weight #4 — stems and leaves
- Dark olive green — optional small amount for leaf definition
A cotton-acrylic blend works particularly well for this construction because the background remains stable while the flower petals retain their shape.
Tools
- 5.0 mm crochet hook
- 4.0–4.5 mm hook for firmer appliqués if required
- Yarn needle
- Locking stitch markers
- Scissors
- Measuring tape
- Blocking mats and pins
Abbreviations
- MR — magic ring
- ch — chain
- sc — single crochet
- hdc — half double crochet
- dc — double crochet
- tr — treble crochet
- sl st — slip stitch
- BLO — back loop only
- sp — space
- st/sts — stitch/stitches
- RS — right side
- WS — wrong side
Finished Size and Custom Sizing
The construction can be adapted to almost any rectangular blanket size. A useful starting target for a sofa throw is approximately 110 × 150 cm. Make the background larger for a bed cover or reduce both dimensions for a lap blanket.
| Project | Approximate Width | Approximate Length |
|---|---|---|
| Baby blanket | 75 cm | 95 cm |
| Lap blanket | 90 cm | 120 cm |
| Sofa throw | 110 cm | 150 cm |
| Large throw | 130 cm | 170 cm |
| Bed cover | 160 cm or more | 200 cm or more |
Gauge Swatch
Make at least a 15 × 15 cm swatch using the cream yarn and the main background stitch. Wash and dry it before calculating the foundation.
The exact stitch gauge is less important than producing a stable fabric that can support the dimensional roses. The background should bend easily without becoming loose enough for the flower stitches to pull through it.
Main Cream Background
The photographed blanket has a compact textured surface rather than a completely open granny-style fabric. A simple alternating shell texture produces a similar foundation while keeping the appliqués supported.
Foundation
Chain to the required blanket width using a stitch multiple that works with your chosen background repeat.
For the version below, use a multiple of 4 + 2 stitches.
Row 1
Sc in second ch from hook and in each chain across. Turn.
Row 2
Ch 3.
Skip 1 st, work 3 dc in next st, skip 1 st, sc in next st.
Repeat across. Turn.
Row 3
Ch 3.
Work 3 dc into each sc from the previous row and sc into the center dc of each 3-dc group.
Repeat across. Turn.
Rows 4 onward
Repeat Row 3 until the cream section reaches the planned length.
Check the width every 15–20 cm. If the sides begin contracting, the turning chains or edge stitches are being worked too tightly.
Planning the Floral Columns
Before adding any decoration, lay the completed cream blanket flat.
Divide the width into equal vertical sections. For a 110 cm blanket, four or five floral columns work well. Keep approximately 18–25 cm between the centers of neighboring flower stems.
Mark each column with removable stitch markers.
The photo-inspired layout alternates:
- Large open rose
- Leaf pair
- Small rosebud
- Leaf pair
- Large open rose
Offset the sequence in neighboring columns so that the large flowers do not form rigid horizontal rows.
Dusty-Pink Divider Bands
The narrow pink lines between the cream floral panels can be created with surface crochet after the background is finished.
Method
Insert the hook through the blanket at the lower edge of a marked divider line.
Hold the dusty-pink yarn behind the fabric.
Pull up a loop and work surface sl sts vertically through the background.
Keep every surface stitch loose enough that the blanket remains flat.
For a wider divider, work two parallel surface-crochet lines approximately 1–1.5 cm apart.
Large Layered Rose
Make enough roses for the planned layout. A throw similar to the photographed arrangement may use approximately 10–15 large flowers depending on its dimensions.
Rose Center
With dusty pink:
Round 1: MR, 6 sc into ring. Join with sl st. (6)
Round 2: 2 sc in each st around. (12)
Round 3: BLO, sc around. (12)
Inner Petals
Work into the available front loops from Round 2.
In the first loop work:
(sc, hdc, 3 dc, hdc, sc)
Sl st into the next loop.
Repeat around to form six compact inner petals.
Middle Petal Foundation
Working behind the first petals, create six chain arches:
*sl st around the post between petals, ch 5.*
Repeat around.
Middle Petals
Into each ch-5 space work:
sc, hdc, 4 dc, hdc, sc.
Repeat around.
Outer Petal Foundation
Behind the middle layer work:
*sl st around the next structural post, ch 7.*
Repeat to create six arches.
Outer Petals
Into each ch-7 space work:
sc, hdc, 2 dc, 3 tr, 2 dc, hdc, sc.
Repeat around.
Fasten off, leaving a 25–30 cm sewing tail.
Optional Fourth Rose Layer
For the largest flowers, add one more layer behind the existing petals.
Create six ch-9 arches.
Into each arch work:
sc, hdc, 3 dc, 3 tr, 3 dc, hdc, sc.
The finished rose should remain relatively flat at its base even though the petals project outward.
Closed Rosebud
The smaller buds break up the repeated large-flower pattern.
Bud
With dusty pink, ch 9.
Beginning in second chain from hook:
sc, hdc, dc, 2 dc, 2 dc, dc, hdc, sc.
Fasten off with a long tail.
Roll the strip tightly from the narrow end. Sew through the base several times to hold the rolled shape.
Bud Base
With olive green, join at the lower edge of the bud.
Work 4–5 small sc around the base.
Fasten off, leaving a sewing tail.
Large Crochet Leaf
Make leaves in pairs for the large roses.
With olive green, ch 12.
Starting in second ch from hook work:
sc, hdc, dc, dc, tr, tr, dc, dc, hdc, sc, sl st.
Working along the opposite side of the foundation chain, mirror the sequence:
sl st, sc, hdc, dc, dc, tr, tr, dc, dc, hdc, sc.
At the tip work (sc, ch 2, sc) to sharpen the point.
Join and fasten off with a 20 cm tail.
Raised Leaf Vein
For the defined center line visible in the design, join dark olive yarn at the base of the leaf.
Work surface sl sts along the foundation chain toward the point.
Fasten off at the tip.
The vein should lie on the surface without shortening the leaf.
Small Leaf
For buds and upper stems, ch 9.
Work:
sc, hdc, dc, tr, dc, hdc, sc, sl st
along the first side.
Mirror the stitch sequence along the opposite side.
Finish with a ch-2 point.
Crochet Stems
There are two practical ways to create the green stems.
Method 1: Surface Crochet
Mark the planned stem line with removable markers.
Hold olive yarn behind the blanket and work a line of surface sl sts from the lower bud toward the large rose.
This method produces a clean, integrated stem.
Method 2: Crochet Cord
Chain to the required stem length.
Sl st back along the entire chain.
Fasten off with long tails and sew the cord to the blanket.
A separate cord is useful when the stem needs a pronounced curve.
Building One Complete Rose Stem
Pin every component before sewing.
For one botanical unit:
- Position the large rose.
- Run the green stem downward from the flower.
- Place two large leaves below the rose.
- Continue the stem downward.
- Add the closed bud.
- Position another pair of leaves below or beside the bud.
Leave approximately 2–4 cm between the rose base and the first leaf pair so the flower does not cover the leaf tips.
Attaching the Large Roses
Do not sew through the outer edges of every petal.
Secure the rose through its center and the compact lower 3–4 cm of the flower base.
Add several hidden anchoring stitches beneath the middle petal layer if the rose tilts excessively.
The outer petals should remain free enough to retain their dimensional appearance.
Attaching the Leaves
Pin each leaf first.
Sew mainly along the central vein.
Add one small stitch near the base and another approximately 1 cm below the tip.
Leaving the side edges unsewn gives the leaf the raised appearance visible in the photo-inspired design.
Attaching the Buds
Sew the lower green section firmly to the stem.
Add one hidden stitch through the lower third of the pink bud.
Do not flatten the rolled upper section.
Spacing the Floral Arrangement
For a balanced layout, use the same general spacing in every column without making every stem identical.
A useful starting arrangement is:
| Element | Suggested Spacing |
|---|---|
| Large rose diameter | 10–14 cm |
| Rose to leaf pair | 2–4 cm |
| Large rose to bud | 15–22 cm |
| Neighboring stem centers | 18–25 cm |
| Flower to blanket edge | At least 6–8 cm |
Measure these distances from your actual appliqués before permanent sewing.
Side and End Preparation
Once all appliqués are attached, join cream yarn at one corner.
Work one round of sc around the entire blanket.
Place (sc, ch 2, sc) at each corner.
The border must lie flat before the decorative pink rounds are added.
Dusty-Pink Border
Round 1
With dusty pink, work hdc around.
At each corner work:
(2 hdc, ch 2, 2 hdc).
Round 2
Work sc around, maintaining the ch-2 corners.
Round 3 — Shell Foundation
Repeat:
*sc, skip 2 sts, 5 dc in next st, skip 2 sts.*
Adjust the spacing slightly near each corner so the shells remain symmetrical.
Round 4 — Outer Scallops
Into the center of each shell work a larger fan:
sc, hdc, 2 dc, 3 tr, 2 dc, hdc, sc.
At the four corners, use a slightly larger shell with two additional tr stitches.
Optional Cream Detail Inside the Border
For additional contrast, work one cream sc round immediately before the final dusty-pink scallops.
This thin line separates the textured cream body from the darker outer border and makes the pink edging more visible.
Making the Blanket Wider
Do not enlarge the roses simply to fill a wider blanket.
Add another floral column instead.
For example, a narrow throw may use four rose columns, while a larger bed cover may use six or seven.
Keeping the flower size consistent produces a more controlled botanical repeat.
Making the Blanket Longer
Add another rose-and-bud sequence to each vertical stem.
Maintain the staggered arrangement between neighboring columns.
Before adding the final sequence, reserve enough plain background for the lower border so that the lowest leaves do not become trapped inside the scalloped edging.
Estimating Yarn
Because the dimensional flowers consume substantially more yarn than flat appliqués, weigh a completed sample section before purchasing the full quantity.
Make:
- One cream background sample
- One complete large rose
- One bud
- Four leaves
- One representative length of stem
Weigh each component separately.
Suppose one complete floral arrangement uses 45 g of yarn and the blanket contains 15 arrangements:
45 × 15 = 675 g for the botanical decoration.
Calculate the cream background and border separately, then add approximately 10% for swatching, tails, and finishing.
The numbers above demonstrate the calculation method; actual yarn consumption depends on yarn thickness, blanket dimensions, tension, and flower size.
Alternative Colorways
Burgundy Rose Garden
Replace dusty pink with burgundy and use deep forest green for the leaves. Keep the background cream.
Peach Botanical Blanket
Use muted peach flowers with sage-green stems and warm ivory for the main fabric.
Lavender Garden
Work the roses in lavender and plum, then pair them with gray-green leaves.
Blue Rose Version
Use deep royal blue flowers, olive foliage, and ivory background for a higher-contrast arrangement.
Assembly
- Complete the entire cream blanket background and check that all four edges lie flat.
- Add the dusty-pink vertical divider lines using loose surface crochet.
- Mark every planned stem position with removable stitch markers.
- Pin the green stems in place without sewing them permanently.
- Arrange all large roses and check the spacing from a distance.
- Add the paired leaves, keeping their tips clear of neighboring flowers.
- Position the smaller rosebuds between the large flowers and adjust the stems.
- Sew stems first, leaves second, buds third, and large roses last.
- Work the stabilizing border followed by the dusty-pink scalloped edging.
- Weave in all remaining tails, block the blanket lightly, and confirm that no appliqué pulls the background out of shape.
7 Technical Tips
- Failure mode: puckering beneath the roses. Sew through only the compact 3–4 cm flower base rather than stitching every outer petal to the blanket.
- Failure mode: twisted leaves. Pin each leaf through its center vein before sewing and keep the two side edges mostly free.
- Failure mode: surface-crochet dividers shortening the blanket. Use a hook 0.5 mm larger for the pink vertical lines if the fabric begins drawing upward.
- Failure mode: oversized flowers colliding between columns. Maintain approximately 18–25 cm between neighboring stem centerlines and test the largest roses before attaching smaller pieces.
- Failure mode: border ruffling. If the scallops begin waving, reduce the number of foundation shells rather than tightening the final round.
- Failure mode: loose dimensional pieces after washing. Anchor each large rose at the center plus several hidden points around its lower petal layer.
- Failure mode: uneven botanical columns. Measure from the blanket edge to every stem at three points—top, center and bottom—before permanent sewing.
Blocking and Finishing
The blanket should be blocked before the flowers are aggressively shaped.
Lay the finished piece flat and square the main background first. Pin the outer border so the scallops are evenly spaced.
Shape the leaves while damp, keeping their pointed tips visible. Arrange the rose petals from the innermost layer outward.
Do not press the flowers flat with an iron. If steam is appropriate for the chosen yarn, keep the heat source above the fabric and reshape the petals by hand afterward.
Care
Dimensional crochet requires more support during washing than an ordinary flat blanket. Follow the yarn label and avoid lifting the wet blanket from one corner because the added weight of the flowers can stretch the background.
Dry the blanket flat whenever practical. Reposition the roses, buds and leaves while damp.
Before storage, confirm that the blanket is completely dry beneath the thickest rose centers.
Conclusion
The structure of this 3D rose crochet blanket pattern depends on separating the stable cream background from the dimensional botanical decoration. Complete and block the base first, mark the vertical garden columns, then attach stems, leaves, buds and layered roses in that order. For the next step, make one full rose with four leaves and a bud before beginning the blanket; its finished dimensions will determine the correct spacing between columns. Finished versions can be shared on Pinterest or Instagram with #RoseGardenCrochetBlanket. For this specific design, would you keep every rose dusty pink or alternate light and dark pink flowers along the stems?








