Introduction
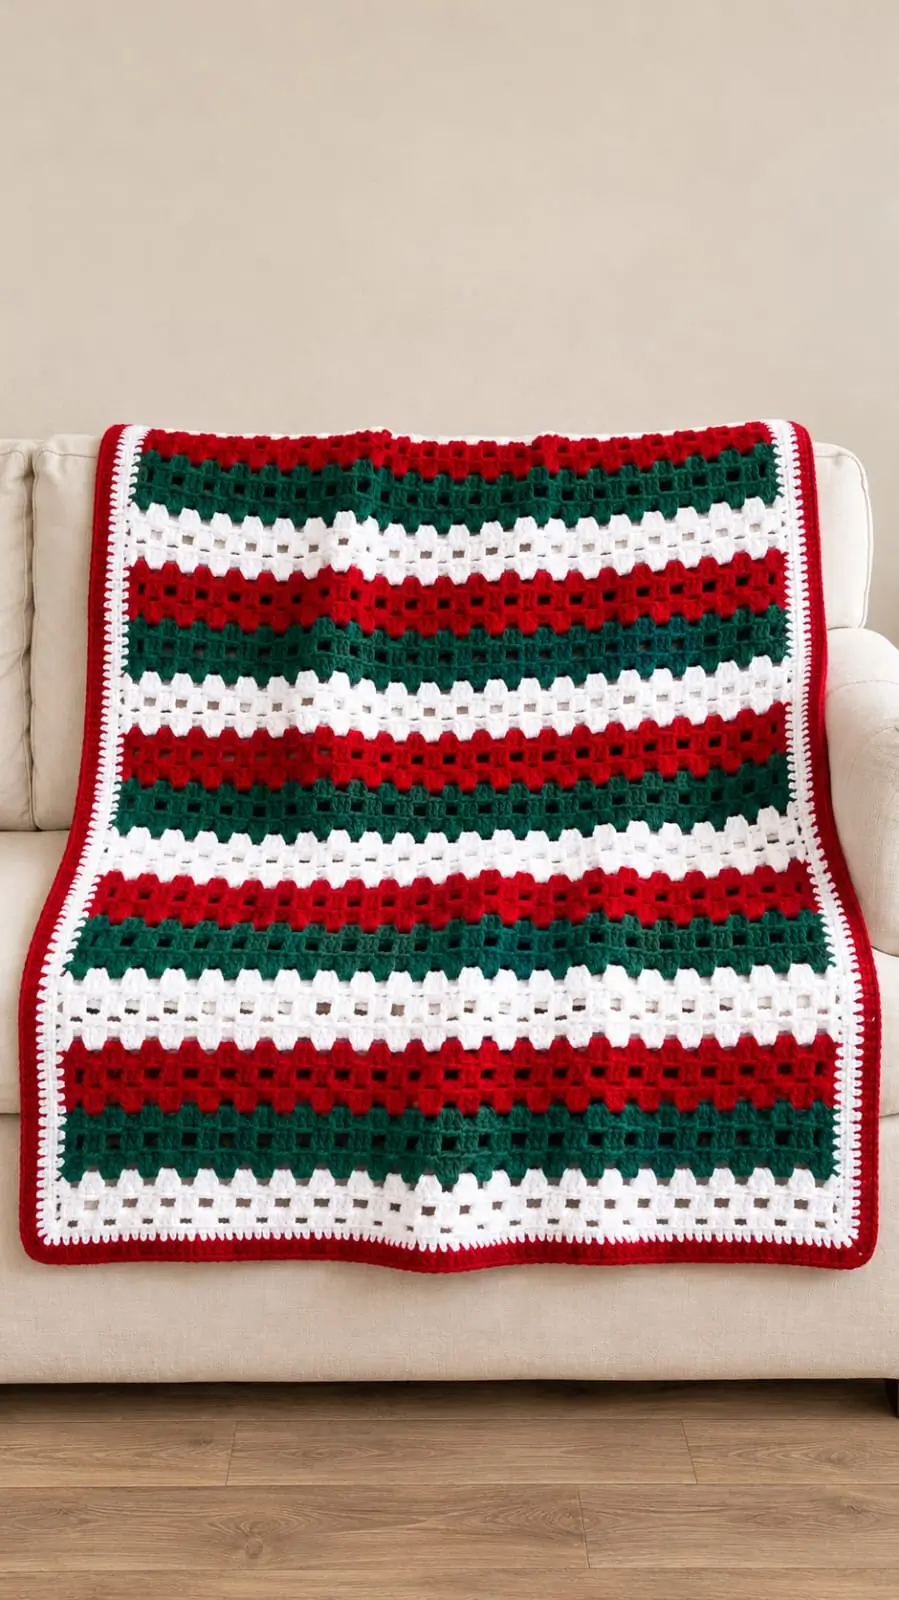
Three horizontal colors define this throw: white at the foundation, forest green above it, and red at the top of every repeat. This Christmas granny stripe crochet blanket uses medium-weight acrylic yarn, a 5.5 mm hook, and rows of three-double-crochet groups. The design is easy once double crochet and turning chains are familiar. Its open fabric works as a decorative sofa throw without requiring separate granny squares or joining seams.
The Design: What Makes This Striped Blanket Different
The photographed blanket combines three decisions that matter mechanically. First, horizontal color blocks change at row ends, avoiding vertical floats. Second, the spaces between groups produce small square openings without making the fabric an open lace mesh. Each group rests between groups from the previous row, a placement that controls alignment. Third, a white inner border separates the stripes from a narrow red outline.
For this red green white crochet blanket, the easiest mistake is adding a group near a turning chain. That error widens the holiday crochet afghan one cluster at a time. Use alternating edge treatments, count the groups on every row, and place the final stitch into the top of the previous turning chain. The border will then follow a true rectangle.
Project Info at a Glance
| Skill Level | Time | Finished Size | Hook | Best For |
|---|---|---|---|---|
| Easy | Depends on maker’s pace | Approx. 115–120 × 140–145 cm (estimated) | 5.5 mm | Sofa throw and seasonal home décor |
Size context: A published Red Heart Christmas granny blanket measures 114.5 × 150 cm and uses a 5.5 mm hook. The size above is a projection for the different 139-chain, 96-row adaptation here, not a measurement taken from the photograph. Make a gauge swatch before treating the projection as exact.
Materials and Tools
Yarn
- Soft white: Medium #4 / Aran acrylic yarn — 594 g to purchase (three 198 g balls). Red Heart Super Saver Soft White suggested. White is worked through 32 body rows plus the first border round.
- Forest green: Medium #4 / Aran acrylic yarn — 396 g to purchase (two 198 g balls). Red Heart Super Saver Paddy Green, Hunter Green, or similar deep green suggested. Green occupies 32 body rows.
- Christmas red: Medium #4 / Aran acrylic yarn — 396 g to purchase (two 198 g balls). Red Heart Super Saver Cherry Red suggested. Red occupies 32 body rows plus the outer border.
Yarn note: These figures are shopping allowances, not tested yarn consumption. Red Heart Super Saver is available in 198 g / 333 m balls for several colors. Swatch, weigh your first 12-row sequence, and calculate the amount before discarding yarn labels. Use the same yarn line and weight for all three colors to limit inconsistent row heights.
Tools
- 5.5 mm crochet hook for the blanket.
- 6 mm crochet hook (optional) for a tight foundation chain.
- Tapestry needle for weaving yarn ends.
- Stitch markers for corners and group counting.
- Tape measure for checking width and length.
- Scissors for cutting yarn.
- Flat blocking surface for finishing.
Crochet Abbreviations
| Abbreviation | Meaning |
|---|---|
| ch | Chain |
| dc | Double crochet (US terminology) |
| sc | Single crochet |
| sl st | Slip stitch |
| sk | Skip |
| st / sts | Stitch / stitches |
| sp | Space between stitch groups |
| RS | Right side |
| WS | Wrong side |
| Granny group | Three dc worked into the same chain or space |
| Turning ch | Beginning ch 3, counted as one dc |
This blanket uses rows and no decreases, so an invisible decrease is not required.
Christmas Granny Stripe Crochet Blanket Pattern — Step by Step
Construction: Work flat in turned rows. Start from the bottom white stripe, build the panel upward, then crochet a white round and a red round around all four sides.
Follow US crochet terminology throughout. This is a photo-inspired adaptation rather than a verified transcript of the original maker’s instructions.
Foundation Chain — White
With the 6 mm hook if needed, ch 139. Return to the 5.5 mm hook for the stitches.
This foundation follows the formula 3 × 46 + 1 = 139 chains.
Count all 139 chains before working the first row. A missing chain may not become obvious until the far end of Row 1.
Mark the first and last chains with removable stitch markers.
Row 1 — Setup Row (White)
R1: Work 3 dc in the 5th ch from the hook. *Sk the next 2 ch, work 3 dc in the next ch*; repeat from * to * 44 times. Sk the next ch and work 1 dc in the final ch. Turn.
Stitch count: 45 complete granny groups × 3 dc = 135 dc, plus one final dc and the foundation turning chain counted as one dc = 137 dc equivalents.
There are 45 full groups and one standing edge stitch at either side. These establish the staggered texture used by the rest of the panel.
If the last dc cannot reach the final chain, undo Row 1 rather than squeezing in an incomplete group. The last visible group belongs in the chain immediately before the skipped chain and final dc.
Row 2 — Half-Group Edges (White)
R2: Ch 3 (counts as 1 dc), turn. Work 1 dc into the same first stitch. *Sk the next 3 sts, work 3 dc into the gap before the next stitch*; repeat 44 times. Sk the next 3 sts; work 2 dc into the top of the turning chain at the far edge.
Stitch count: 44 full granny groups × 3 = 132 dc, plus 2 dc equivalents at each edge = 136 dc equivalents.
The beginning edge consists of the ch-3 and one actual dc. At the far end, two actual dc complete the second half-group.
These are half-groups rather than full interior groups. The paired edge stitches prevent a staircase shape.
Confirm there are exactly 44 full groups in the center, not 45.
Row 3 — Full Groups Between Half-Groups (White)
R3: Ch 3 (counts as 1 dc), turn. Sk the next stitch; work 3 dc in the gap before the following stitch. *Sk the next 3 sts, work 3 dc in the next gap*; repeat 44 times. Finally, sk the next stitch; work 1 dc into the top of the turning chain.
Stitch count: 45 complete granny groups × 3 = 135 dc, plus the beginning ch-3 and final dc = 137 dc equivalents.
This row begins and ends with a single edge stitch. The full groups occupy the gaps created by the previous row’s half-groups.
On future odd-numbered rows, repeat R3. For future even-numbered rows, repeat R2.
Row 4 and the Main Stripe Repeat
R4: Repeat R2 in white (136 dc equivalents). Change to forest green during the final yarn-over of the final stitch.
R5: Repeat R3 in green (137).
R6: Repeat R2 in green (136).
R7: Repeat R3 in green (137).
R8: Repeat R2 in green (136). Change to red on the last yarn-over.
R9: Repeat R3 in red (137).
R10: Repeat R2 in red (136).
R11: Repeat R3 in red (137).
R12: Repeat R2 in red (136). Change back to white.
These first 12 rows create one complete color cycle:
- 4 rows white
- 4 rows forest green
- 4 rows Christmas red
Keep the two-row stitch repeat continuous across color changes. Beginning a new color does not reset the edge construction.
Color Schedule — Rows 13 Through 96
Continue the same 12-row color cycle until eight cycles are complete. Each row uses R3 on odd row numbers (137 dc equivalents) and R2 on even row numbers (136 dc equivalents).
| Cycle | White Rows | Green Rows | Red Rows |
|---|---|---|---|
| 1 | 1–4 | 5–8 | 9–12 |
| 2 | 13–16 | 17–20 | 21–24 |
| 3 | 25–28 | 29–32 | 33–36 |
| 4 | 37–40 | 41–44 | 45–48 |
| 5 | 49–52 | 53–56 | 57–60 |
| 6 | 61–64 | 65–68 | 69–72 |
| 7 | 73–76 | 77–80 | 81–84 |
| 8 | 85–88 | 89–92 | 93–96 |
At the end of R96, fasten off the red yarn with a 15 cm tail.
The panel now has 96 completed rows:
- 32 rows in white
- 32 rows in green
- 32 rows in red
Exactly 48 odd rows contain 137 dc equivalents each, and 48 even rows contain 136 each. The alternating totals are intentional.
Before adding the border, lay the panel on a flat surface. Compare its two long edges, mark the four corners, and measure the width at the top, middle, and bottom.
A difference greater than 2 cm signals tension changes or a missed group that should be corrected before edging.
White Inner Border — One Round
Join white in a corner and ch 1. This chain does not count as a stitch.
Work a round of sc around the rectangle, placing one sc in each accessible top or foundation-edge stitch and approximately 2 sc per row end along the sides.
Place 3 sc in each corner position to turn cleanly. At each corner, count the corner stitch within its neighboring edge only once.
Join with a sl st into the first sc and fasten off, leaving a 15 cm tail.
The exact border stitch total depends on how the foundation and row ends accept stitches. It is not a fixed 137-stitch row.
Spread the work flat after each side and remove any local bunching before starting the next section.
Red Outer Border — One Round
Join red in any white corner’s center sc, then ch 1.
Work sc in each white-border stitch around the blanket.
At each corner, work 3 sc into the center sc of the preceding three-stitch corner.
Continue the remaining edges without missing the first stitch after a corner.
Join with a sl st, fasten off, and leave a 15 cm yarn tail.
A narrow red outline now surrounds the white inner band, reflecting the edge treatment visible in the photo.
If the outer edge ripples, check for extra corner increases or overly loose stitches before blocking.
Assembly and Finishing — 10 Steps
- Spread the completed 96-row panel with the foundation edge at the bottom.
- Confirm that white begins the sequence and red ends the eighth cycle.
- Count 45 full groups in a representative odd row.
- Count 44 full groups, plus the two half-groups, in an adjacent even row.
- Pin all four corners and check that opposite long edges measure equally.
- Weave every 15 cm color-change tail through stitches of its own color, reversing direction once.
- Inspect the white border for skipped row ends and compressed corners.
- Check that the red border has one consistent round and four three-sc corners.
- Wash or dampen according to the yarn care label and lay the blanket flat to dry.
- Measure the dry width and length, then record the actual size and remaining yarn weight for future copies.
The result is a single-piece striped throw with no separate motifs to seam.
7 Technical Tips for a Christmas Granny Stripe Blanket
- Foundation-chain contraction: If the starting edge measures more than 2 cm narrower than Row 6, the 139 chains were likely worked too tightly. Make the foundation with a 6 mm hook while retaining the 5.5 mm hook for all dc groups.
- Lost group at the turning chain: A sloping edge commonly comes from placing the final dc in a side gap instead of the top of the ch-3. Insert a removable marker into that chain top before beginning the return row.
- Uneven color bands: A band with three rows rather than four interrupts the 12-row rhythm and changes the stripe proportions. Mark completed row numbers 4, 8, and 12, repeating that checkpoint at each subsequent cycle.
- Eyelet distortion: Working three dc into stitch tops rather than between group posts closes the square spaces and pushes the groups out of alignment. Locate the opening beneath the two neighboring groups before every insertion.
- Loose side-edge loops: A loop longer than about 5 mm at a color change may remain visible outside the white border. Leave approximately 15 cm of tail and secure it through several matching-color stitches instead of pulling it abruptly tight.
- Wavy edging: Three-sc corners can become five-sc corners when the first and last stitches of a side are counted twice. Mark the center of each three-sc corner and add the next round’s three sc only in that center stitch.
- Stripe color transfer: Bright red yarn may bleed into adjacent white stripes when washed. Test red and white yarn swatches together following their care instructions before laundering the completed throw.
How to Resize the Christmas Crochet Blanket
To change the width, adjust the foundation in groups of three chains.
For example:
- Ch 121: 3 × 40 + 1
- Ch 139: 3 × 46 + 1
- Ch 157: 3 × 52 + 1
Under the same construction, an initial chain of 3n + 1 produces n − 1 complete groups in odd-numbered rows, and n − 2 complete groups in even-numbered rows with half-groups at the edges.
These formulas keep both sides aligned.
To change the length, add or subtract complete 12-row color cycles.
One additional cycle adds four white rows, four green rows, and four red rows, preserving equal color coverage.
Stopping in the middle of a cycle is possible, but the end colors will differ from the photographed arrangement.
A measurement swatch is more useful than estimating from an online photo. Crochet at least 12 rows with the intended yarn and hook, measure the width and height after relaxing the fabric, and calculate the required final dimensions from that real gauge.
Troubleshooting Common Crochet Blanket Problems
Why Does One Side of My Granny Stripe Blanket Lean Outward?
Compare the edge treatment on Rows 2 and 3. Row 2 has two dc equivalents at each end, while Row 3 has one at each end.
Accidentally combining a Row 2 beginning with a Row 3 ending changes the shape.
Why Do the Granny Stripe Holes Look Smaller in One Color?
Check the yarn thickness before changing hook size.
Different yarn lines sold under the same weight category can compress or spread the granny groups. Keep the three colors in one yarn line whenever possible.
Why Is My Crochet Blanket Border Ruffling?
Too many sc along the sides can stretch the boundary farther than the blanket fabric.
Remove the border over the affected section, reduce the number of side-edge stitches, and work the corner increase again.
Can I Make the Christmas Stripes Wider?
Yes, provided all colors use a planned row count.
Six rows per color yields wider bands, but it changes the full cycle from 12 rows to 18 and requires a new total row target.
Conclusion
The finished design uses 96 flat rows, eight repeated color cycles, and two border rounds. Its distinctive elements are the four-row white, green, and red bands, the staggered groups of three double crochet, and the white edging framed in red. Measure the finished throw after drying, then compare the result with the calculated size range to adjust your next version.
Save the row schedule with the pattern so future color changes remain consistent. Share a completed Christmas granny stripe crochet blanket on Pinterest and Instagram using #ChristmasGrannyStripeBlanket.
When posting, include the actual finished dimensions, yarn quantities, and hook size.
Would you keep the green stripes four rows high or widen them to six?








