Introduction
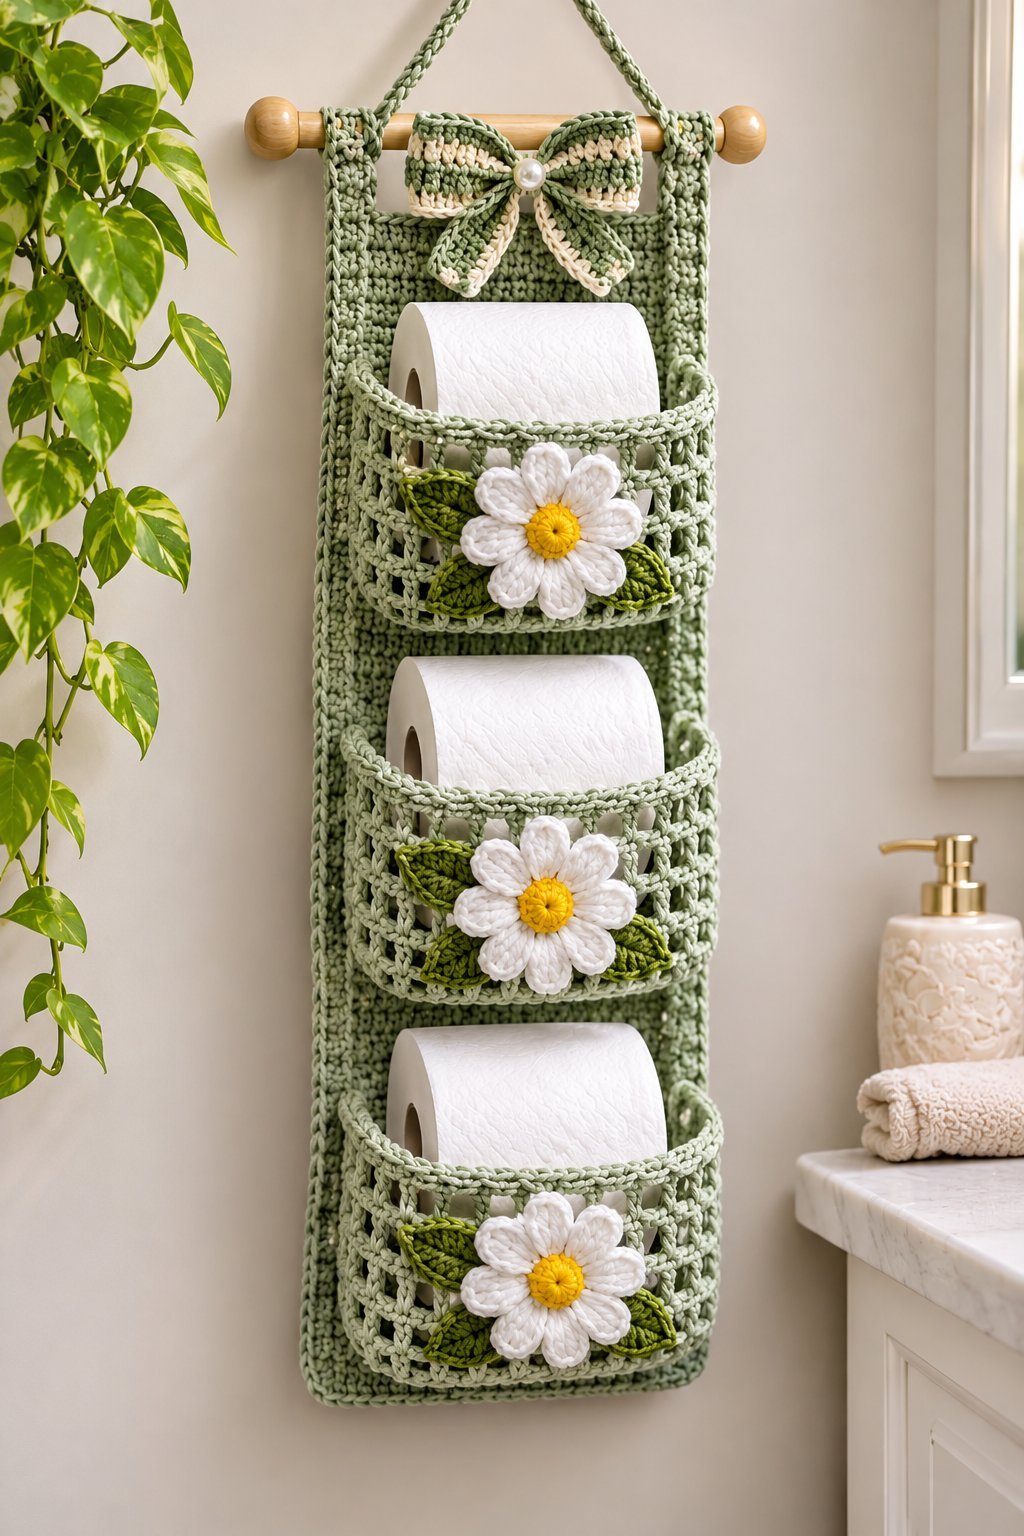
Three toilet paper rolls need three independently supported pockets, not one stretched crochet tube. This crochet toilet paper holder pattern recreates the sage green hanging organizer shown in the reference image, including white daisies, olive leaves, and a striped bow. Made with bulky cotton yarn and a 5 mm hook, the approximately 72 cm project suits intermediate crocheters. Its vertical design stores spare rolls without occupying bathroom shelves or floor space.
The Design: What Makes This Daisy Organizer Different
This organizer combines a rectangular backing with three forward-projecting crochet pockets. Each compartment supports one toilet paper roll, keeping the remaining rolls accessible when another pocket is empty. Unlike a tube-style hanging crochet toilet paper holder, the separate pockets maintain their shape independently.
Sage green forms the structure, while white daisies, yellow centers, and olive leaves decorate the fronts. A cream-striped bow sits above the upper pocket. The wooden dowel distributes weight across the top edge and reduces folding.
The most common construction mistake is making the pocket fronts as narrow as the backing. Rolls need additional fabric to project outward. This crochet bathroom organizer uses wider pocket panels gathered along their lower edges, creating space without enlarging the entire wall hanging.
Project Info at a Glance
| Project detail | Specification |
|---|---|
| Skill level | Intermediate |
| Estimated time | 10–14 hours |
| Target finished size | 72 × 25 cm |
| Crochet hook | 5.0 mm |
| Yarn category | Bulky cotton |
| Construction | Rows, rounds, appliqués |
| Storage capacity | Three standard toilet paper rolls |
| Best for | Bathroom wall or door storage |
Measurements and working time are estimates for this image-inspired design, not verified results from a completed sample.
Materials and Tools
Yarn
Choose firm, low-stretch cotton. It supports pocket edges more consistently than soft acrylic, particularly when the organizer is loaded.
- Sage green — bulky cotton — approximately 400 g — suggested brand: DROPS Paris held double, subject to gauge.
- White — matching cotton — approximately 50 g — three daisy flowers.
- Golden yellow — matching cotton — approximately 15 g — flower centers.
- Olive green — matching cotton — approximately 25 g — leaves.
- Cream — matching cotton — approximately 10 g — bow stripes.
The photographed yarn resembles thick cotton cord. Adjust the hook and stitch counts if substituting macramé cord or another yarn weight.
Tools and Additional Supplies
- 5.0 mm crochet hook, or size required for gauge.
- Tapestry needle with a large eye.
- Locking stitch markers, at least eight.
- Sharp scissors.
- Measuring tape.
- Wooden dowel, approximately 30–32 cm long and 12–16 mm in diameter.
- Pearl-style button, approximately 12–15 mm.
- Sewing thread matching the button.
- Optional plastic canvas for backing reinforcement.
Avoid metal components that may rust. For households with small children, replace the detachable pearl with an embroidered bow center.
Gauge and Sizing
Make a 15-stitch by 15-row single-crochet swatch. Wash according to the yarn label, dry flat, and measure the central area.
Target gauge: 12–13 single crochets and 13 rows per 10 cm. At 12.4 stitches per 10 cm, the 31-stitch backing measures approximately 25 cm wide.
Measure your toilet paper rolls before crocheting. Narrow pockets compress rolls, while oversized pockets may sag. Adjust the pocket dimensions after testing the swatch.
Crochet Abbreviations
| Abbreviation | Meaning |
|---|---|
| MR | Magic ring |
| sc | Single crochet |
| inc | Two single crochets in one stitch |
| dec | Single-crochet decrease |
| sl st | Slip stitch |
| ch | Chain |
| hdc | Half double crochet |
| dc | Double crochet |
| BLO | Back loop only |
| st / sts | Stitch / stitches |
| RS / WS | Right side / wrong side |
| FO | Fasten off |
For an invisible decrease, insert the hook through the front loops of two consecutive stitches, yarn over, draw through both loops, and complete one single crochet.
Pattern note: Backing, pockets, and bow use turned rows. Flower centers use joined rounds. Counts in parentheses indicate completed stitches unless otherwise specified.
Pattern — Step by Step
Part 1: Main Rectangular Backing (Make 1)
Yarn: sage green. Construction: turned single-crochet rows.
The backing supports the compartments and determines the organizer’s length. Maintain consistent width throughout.
Foundation: Ch 32.
R1: Sc in second ch from hook and across (31).
R2: Ch 1, turn, sc in each st (31).
R3–R12: Repeat R2 (31 per row).
R13–R24: Repeat R2 (31 per row).
R25–R36: Repeat R2 (31 per row).
R37–R48: Repeat R2 (31 per row).
R49–R60: Repeat R2 (31 per row).
R61–R72: Repeat R2 (31 per row).
R73–R84: Repeat R2 (31 per row).
R85–R92: Repeat R2 (31 per row).
Do not fasten off. Work one single-crochet round around the panel, placing three stitches in each corner. Distribute stitches evenly along the vertical edges without tightening the fabric.
Fasten off, leaving a 20 cm tail.
Lay the backing flat and check its measurements. If the edges taper, inspect the row-end stitch counts.
Optional reinforcement: Attach a washable plastic-canvas insert slightly smaller than the backing, keeping the dowel area flexible.
Part 2: Three Storage Pocket Fronts (Make 3)
Yarn: sage green. Construction: rectangular panels with extra width for volume.
Each pocket holds one roll facing outward. Its 41-stitch width provides additional space beyond the 31-stitch backing.
Foundation: Ch 42.
R1: Sc in second ch from hook and across (41).
R2: Ch 1, turn, sc across (41).
R3–R5: Repeat R2 (41 per row).
R6: Ch 3, turn, skip first st, dc in next st; *ch 1, skip next st, dc in next st* across the remaining stitches (21 dc, 20 ch-1 spaces).
R7: Ch 1, turn, sc in each dc and ch-1 space (41).
R8–R10: Ch 1, turn, sc across (41).
R11: Repeat the openwork construction of R6 (21 dc, 20 ch-1 spaces).
R12: Repeat R7 (41).
R13–R16: Ch 1, turn, sc across (41).
Fasten off, leaving approximately 50 cm for sewing. Repeat for all three pockets.
Important: Gather the wider lower edges into the backing’s 31-stitch attachment width. This creates forward projection instead of a flat sleeve.
Mark five stitches at both ends of each pocket’s lower edge. Ease these sections into the seam, keeping the central 31 stitches aligned with the backing.
Part 3: Reinforced Pocket Top Edges (Make 3)
Yarn: sage green.
The reinforced rim helps each pocket retain its opening during repeated use.
R1: Attach yarn to one upper corner and sc across the 41-stitch top edge (41).
R2: Ch 1, turn, sc in BLO across (41).
R3: Ch 1, turn, sc across (41).
Fasten off, leaving a 15 cm tail. Repeat on all three pockets.
The BLO row creates a subtle ridge. If the rim stretches excessively, use a 4.5 mm hook for reinforcement, then check the opening against a roll.
Part 4: White Daisy Centers (Make 3)
Yarn: golden yellow. Construction: joined rounds.
Each yellow center forms a small disk beneath seven white petals.
R1: Work 6 sc in MR; join with sl st (6).
R2: Ch 1, inc in each st; join (12).
R3: Ch 1, *sc in next st, inc in next st* six times; join (18).
Fasten off, leaving a 20 cm tail.
For a raised center, crochet another disk and sew the two together around their edges. The flat version attaches more easily.
Avoid heavy stuffing, which can push the flower outward and create snagging points.
Part 5: White Daisy Petals (Seven Per Flower)
Yarn: white. Make 21 petals in total.
Each petal is shaped around a foundation chain to produce a rounded outer edge.
Foundation: Ch 8.
R1: Sc in second ch from hook, hdc in next st, dc in next four sts, 3 hdc in final ch. Working along the opposite side of the chain, dc in next four available loops, hdc in next loop, sc in final loop (15).
R2: Ch 1, turn, sc in first st, hdc in next st, dc in next four sts, 2 hdc in each of next three sts, dc in next four sts, hdc in next st, sc in final st (18).
Fasten off, leaving a 15 cm sewing tail. Repeat until 21 petals are complete.
Arrange seven petals around each yellow center, overlapping their narrow ends. Sew the petal bases behind the center, maintaining even spacing.
Lightly pinch each petal base to create the fuller appearance shown in the image.
Target flower diameter is approximately 10–12 cm. Oversized flowers may obstruct the pocket openings.
Part 6: Olive Green Leaves (Make 6)
Yarn: olive green.
Two leaves frame each daisy, contrasting with the sage green pocket.
Foundation: Ch 11.
R1: Sc in second ch from hook, hdc in next two sts, dc in next five sts, hdc in next st, 3 sc in final ch. Work along the opposite side: hdc in next loop, dc in next five loops, hdc in next two loops, sc in final loop (21).
R2: Ch 1, sc in next st, hdc in next two sts, dc in next five sts, hdc in next st, 3 sc in tip st, hdc in next st, dc in next five sts, hdc in next two sts, sc in next st (21).
Fasten off, leaving a 20 cm tail.
Flatten the leaves and shape their pointed ends. Position two diagonally behind each flower.
Optional: Embroider a central vein using olive yarn. Keep the stitching on the visible surface to avoid catching the stored roll.
Part 7: Decorative Bow Loops (Make 4)
Yarn: sage green with cream accents.
The bow has two upper loops and two lower loops, each formed from a folded rectangular panel.
Foundation: Ch 15.
R1: Sc in second ch from hook and across (14).
R2: Ch 1, turn, sc across (14).
R3: Change to cream, ch 1, turn, sc across (14).
R4–R6: Change to sage green, ch 1, turn, sc across (14).
R7: Change to cream, ch 1, turn, sc across (14).
R8: Change to sage green, ch 1, turn, sc across (14).
Fasten off, leaving a 25 cm tail.
Repeat for four loops. Fold each panel lengthwise and stitch its short ends together.
Arrange two loops horizontally and two diagonally. Join their ends at the center.
Wrap a narrow sage strip around the middle. Sew the pearl-style button securely through the central layers, not through a single strand.
Part 8: Hanging Straps (Make 2)
Yarn: sage green.
Dense stitches help the straps support the loaded organizer.
Foundation: Ch 9.
R1: Sc in second ch from hook and across (8).
R2–R18: Ch 1, turn, sc across (8).
Fasten off, leaving a 30 cm tail.
Fold each strap over the dowel. Stitch both ends firmly to the backing near its upper corners.
Part 9: Braided Hanging Cord (Make 1)
Yarn: sage green.
Cut six strands approximately 110 cm long. Divide into three pairs and braid firmly.
Knot both ends and attach them near the dowel’s outer straps. Adjust the cord until the organizer hangs level.
The braid resembles the photographed hanger more closely than a crochet chain. Test its strength under the expected load.
Assembly — Ten Steps
- Prepare the backing. Lay it flat, right side upward. Mark the center and side edges.
- Position the pockets. Place the bottom pocket near backing row 5, middle near row 35, and upper near row 65. Adjust for actual roll height.
- Attach the lower seams. Gather each 41-stitch pocket bottom into the 31-stitch backing width. Sew securely through both layers.
- Secure the sides. Sew each side approximately 16 rows upward from its lower seam. Leave the top open.
- Test storage capacity. Insert one roll per pocket. Check depth, clearance, and opening width before trimming tails.
- Attach the daisies. Center one below each pocket rim. Sew through the front panel without closing the pocket.
- Add the leaves. Place two behind each daisy. Secure their bases and centers without flattening them.
- Mount the dowel. Fold both straps around the rod and attach them to the backing. Add the braided cord.
- Secure the bow. Center it above the upper pocket. Stitch through its middle and backing, checking the button attachment.
- Finish and inspect. Weave in tails, inspect the mounting hardware, and load three rolls. Confirm the backing hangs vertically.
The completed organizer provides three accessible compartments with decorative floral fronts.
7 Technical Tips for a Better Crochet Toilet Paper Holder
- 1. Control stitch-marker placement. Mark the first and last stitches of every tenth backing row. Missing an edge stitch can narrow the panel and misalign the pockets.
- 2. Check pocket firmness before assembly. Insert a roll and hold the pocket vertically for 30 seconds. Reinforce the lower seam if stretching exceeds 2 cm.
- 3. Maintain consistent decorative tension. Loose daisy centers create gaps around the petals. Use the same hook and tension for all three flowers.
- 4. Measure roll clearance. Toilet paper rolls vary in diameter. Allow approximately 1–2 cm beyond the measured roll diameter for easier insertion.
- 5. Avoid loose velvet tension. Velvet yarn may stretch and obscure openwork stitches. Use firm cotton for structural panels when adding softer decorative yarn.
- 6. Pin appliqués before sewing. Position daisies approximately 3–4 cm below pocket rims. Check vertical alignment and opening clearance before stitching.
- 7. Secure yarn tails thoroughly. Short, straight woven tails may loosen during use. Leave 12–15 cm and weave through stitches in multiple directions.
Adjusting the Pattern for Different Toilet Paper Rolls
Toilet paper rolls differ in diameter and width. Measure the rolls used in your bathroom before adjusting the organizer.
For larger rolls, add four stitches to each pocket foundation to increase circumference without changing the backing width.
If rolls are taller, add two to four pocket rows. Maintain enough clearance to remove each roll without disturbing the compartment above.
Taller pockets may require a longer backing or reduced spacing between compartments.
Changing yarn thickness also changes stitch height, pocket curvature, flower size, and total weight. Make another gauge swatch before resizing.
Preventing Sagging and Distortion
Each loaded pocket pulls against the backing, transferring weight to the upper straps.
If the backing bows outward, reinforce its vertical edges with surface slip stitches.
For heavier yarn, add a central supporting strap behind the upper panel and attach it to the dowel.
The wooden rod should extend beyond both straps. Rounded end caps help prevent slipping.
Use wall hardware rated for the expected weight and suitable for the mounting surface. Check adhesive-hook specifications before installation.
Washing and Maintaining the Organizer
Cotton absorbs bathroom moisture. Keep the organizer away from shower spray and persistently damp walls.
Remove the rolls before cleaning. Follow yarn-label instructions and detach nonwashable components where possible.
Dry the panels flat. Hanging wet crochet may stretch the backing and distort pocket openings.
Inspect the bow button, hanging cord, and seams regularly. Repair loose stitches before reloading.
Frequently Asked Questions
Can a beginner make this crochet bathroom organizer?
Beginners familiar with single crochet, double crochet, and turned rows can make the main panels. Flower shaping, openwork, and assembly require additional skills, making the complete project intermediate.
What yarn works best for a hanging toilet paper holder?
Firm cotton provides stitch definition and moderate stability. Bulky cotton supports pocket rims effectively. Acrylic is possible, but test its stretch before assembly.
Can the organizer be made without the wooden dowel?
Yes. Substitute a rigid mounted bar or suitable rail. Avoid suspending the entire organizer from one unreinforced crochet loop, which may distort the upper corners.
How many toilet paper rolls will it hold?
Three standard rolls, one per compartment. Actual fit depends on gauge and roll dimensions. Test all pockets before permanently sewing their sides.
Can the daisies be removed or changed?
Yes. Replace the sewn appliqués with sunflowers, roses, or circular motifs. Keep decorations below the rims and avoid heavy embellishments that distort the pockets.
Conclusion
The finished organizer combines three storage compartments with a reinforced backing, shaped pocket fronts, and floral appliqués. Sage green cotton, white daisies, olive leaves, and a striped bow reproduce the main features of the reference image. Before publishing the crochet toilet paper holder pattern as a tested design, complete a sample, record its measurements, and check hanging strength under load. Photograph the finished organizer with all three pockets filled, then share it on Pinterest and Instagram using #DaisyToiletPaperHolder. Which detail would you retain in another version: the four-loop bow or the olive leaves surrounding each daisy?








