Introduction
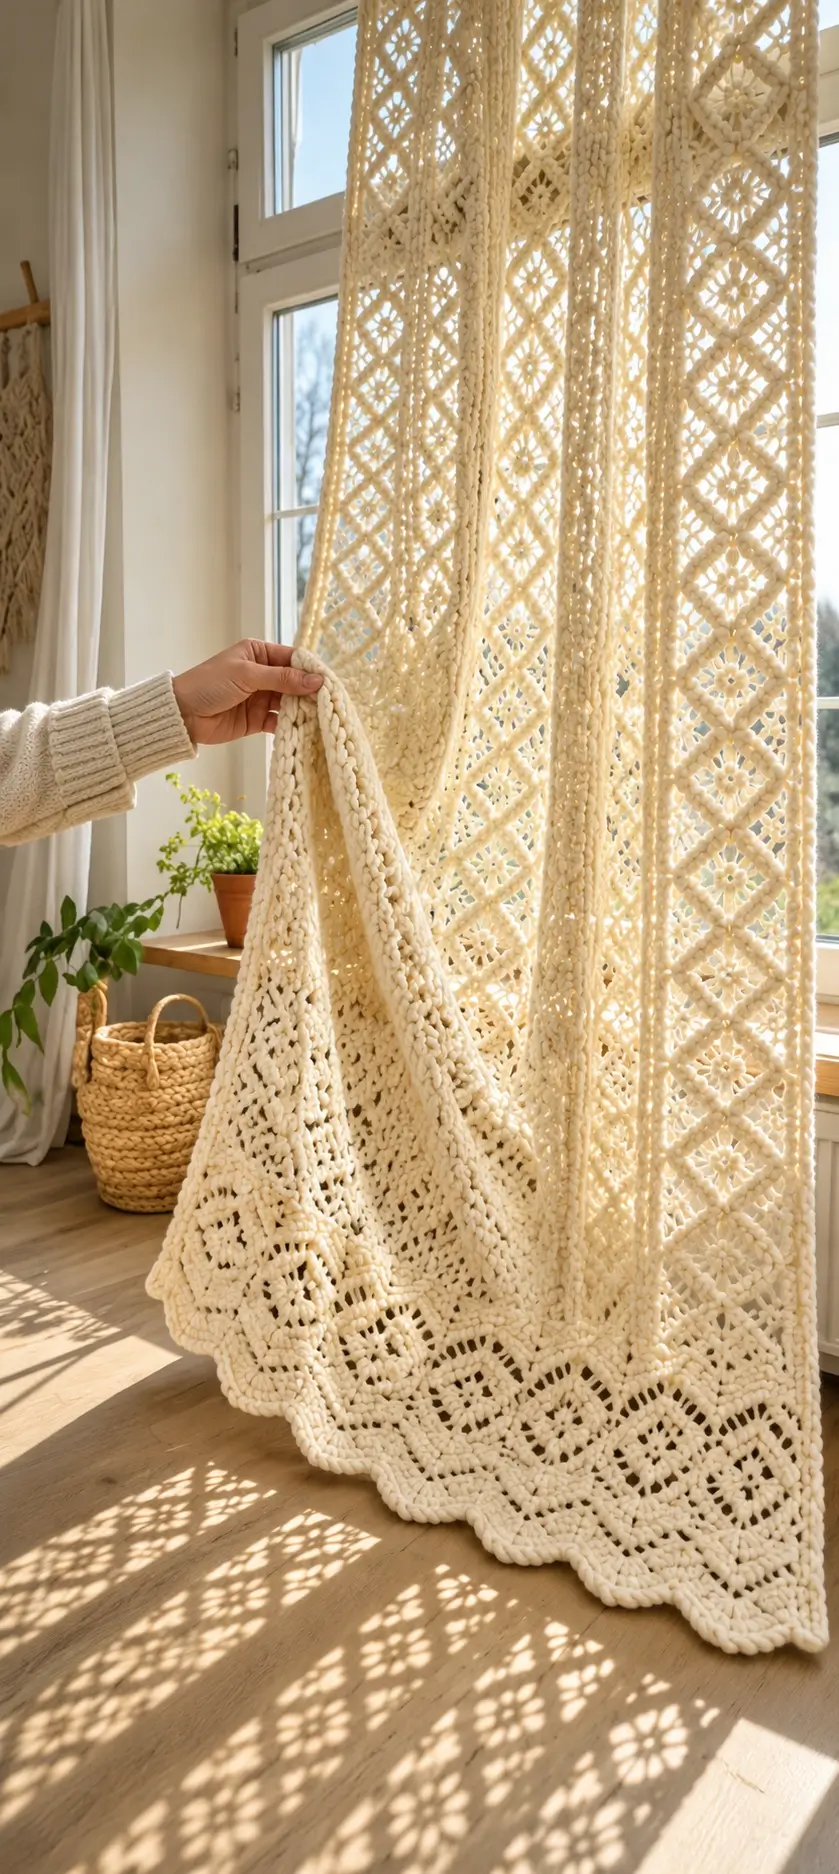
A curtain built from stacked crochet diamonds has one structural problem: every open section must remain aligned vertically while the full panel hangs under its own weight. This ivory crochet lace curtain pattern recreates the photo-inspired design with repeating diamond lace columns, small floral centers, narrow textured dividers, and a deeper geometric border. Cotton crochet yarn gives the panel enough definition for sunlight to reveal the pattern clearly.
The Design: What Makes This Crochet Curtain Different
The curtain combines three levels of density rather than using one lace stitch from top to bottom. The main field consists of tall diamond motifs with open chain spaces and compact floral centers. Narrow vertical columns separate those motifs and reduce sideways stretching. At the bottom, a deeper geometric lace section adds visual weight before the final scalloped edge.
The most common failure with a long crochet curtain is uncontrolled vertical growth. Open chain spaces can lengthen considerably after washing and hanging. For that reason, make and hang a large swatch before calculating the final number of pattern repeats. The finished panel should also be blocked before its final hanging length is judged.
Project Info at a Glance
| Skill Level | Construction | Suggested Yarn | Hook | Finished Size |
|---|---|---|---|---|
| Intermediate–Advanced | Bottom-up rectangular lace panel | Cotton DK or light worsted | 3.5–4.5 mm | Custom to window |
Materials and Tools
Yarn
- Warm ivory / natural cream — cotton or cotton-blend DK/light worsted — quantity determined from finished curtain dimensions
Mercerized cotton gives crisp stitch definition. Softer unmercerized cotton produces a more relaxed drape similar to the photographed curtain.
Tools
- 3.5–4.5 mm crochet hook, matched to yarn and gauge
- Locking stitch markers
- Yarn needle
- Scissors
- Measuring tape
- Blocking mats
- Rust-resistant blocking pins or blocking wires
- Curtain rod, rings, or clips appropriate for the installation
Abbreviations
- ch — chain
- sc — single crochet
- hdc — half double crochet
- dc — double crochet
- tr — treble crochet
- sl st — slip stitch
- sp — space
- st/sts — stitch/stitches
- RS — right side
- WS — wrong side
Measure the Window Before Crocheting
Measure the usable width of the curtain rod rather than only the glass. Then measure from the intended hanging point to the desired finished lower edge.
For a relatively flat lace curtain like the photo, calculate a finished width approximately 1.05–1.20 times the covered width. Use more width only if pronounced gathering is required.
Record:
- Rod width
- Desired curtain width
- Hanging point to windowsill or floor
- Desired clearance above the floor
- Depth reserved for the decorative lower border
Do not calculate the curtain length from an unwashed swatch.
Large Hanging Gauge Swatch
For this project, a small square gauge sample is not enough. Crochet a test panel containing at least three complete diamonds across and three repeats vertically.
Measure the sample before washing. Wash it using the same method planned for the completed curtain, block it lightly, allow it to dry, then hang it vertically for at least 24 hours.
Measure again.
If a 30 cm sample becomes 32 cm long after hanging, the growth is:
(32 − 30) ÷ 30 × 100 = 6.7%
That percentage should be considered when determining the final number of vertical repeats.
Construction Overview
The curtain can be worked as one large panel. The photo-inspired structure is divided into four sections:
- Lower scalloped finishing edge
- Deep geometric diamond border
- Main repeating diamond-lace field
- Upper hanging band
Working from the bottom upward makes it easier to establish the decorative lower border first. A top-down version is also possible, but the bottom-up method provides better control over the final hanging length.
Foundation
Make a foundation chain to the required blocked curtain width.
The exact number depends on your yarn, hook, and chosen diamond width. For the construction below, establish the panel in repeat units rather than relying on a fixed universal chain count.
Each main diamond should measure approximately 8–12 cm wide after blocking. Narrow diamonds produce a finer curtain; wider repeats create the bolder appearance shown in the image.
Foundation Row
Work one row of sc across the foundation chain.
Count the stitches and place a marker at the beginning and end of every planned diamond repeat.
All repeat sections must contain the same number of foundation stitches.
Lower Structural Band
Row 1
Ch 3, dc across.
Row 2
Ch 1, sc across.
Row 3
Ch 3.
Work:
*dc in next 3 sts, ch 2, skip 2 sts.*
Repeat across, adjusting only at the side margins if necessary.
Row 4
Work sc into each dc and 2 sc into every ch-2 space.
This compact band stabilizes the lower edge before the larger openwork motifs begin.
Deep Diamond Border
The photographed curtain has a more substantial lace pattern near the floor. Build this section from alternating solid stitch groups and expanding chain spaces.
Border Row 1
Ch 3.
Across each repeat work:
5 dc, ch 3, skip 3 sts, 5 dc, ch 3, skip 3 sts.
Repeat according to the marked motif divisions.
Border Row 2
Work dc over the solid groups.
Over each ch-3 space work:
sc in space, ch 5.
Move directly to the next solid section.
Border Row 3
Work the solid groups one stitch narrower at each inner edge.
Increase each open arch from ch 5 to ch 7.
This begins opening the diamond.
Border Row 4
Reduce the solid sections again and work ch 9 across the central openings.
Border Row 5
Begin closing the openings by increasing the solid sections at both sides.
Reduce the open arch to ch 7.
Border Row 6
Continue increasing the solid areas and reduce the arch to ch 5.
Border Row 7
Close the diamond with compact dc groups and ch-3 openings.
The exact distribution at the two side margins can be modified so the panel width remains constant.
Small Floral Center
The centers of the larger diamonds can contain a compact flower-like cluster.
At the center ch-space work:
(sc, ch 3, 2 dc, ch 3, sc)
Repeat around the same central space or around adjoining arches to create four small petals.
Keep the flower compact. Oversized centers can close too much of the lace and make the curtain noticeably heavier in those areas.
Main Diamond Lace Field
The central field uses narrower diamonds stacked vertically. Each diamond opens over several rows, reaches its widest point, then closes at the same rate.
Diamond Row A
At the center of each marked repeat work:
dc group, ch 3, dc group.
Use sc or dc between motifs according to the desired density.
Diamond Row B
Increase the opening:
dc group, ch 5, sc into previous arch, ch 5, dc group.
Diamond Row C
Continue:
dc group, ch 5, sc in arch, ch 7, sc in next arch, ch 5, dc group.
Diamond Row D — Widest Point
Maintain equal chain lengths on both sides of the center.
Add the small floral center or compact stitch cluster at the midpoint.
Diamond Row E
Reverse the expansion sequence.
Reduce the central spaces symmetrically.
Diamond Row F
Continue closing the motif until the two diagonal sides meet.
Diamond Row G
Finish the point with a compact dc or sc group.
The next diamond begins directly above this point.
Keeping the Diamonds Aligned
Run a temporary contrasting thread vertically through the center of each motif column while working.
Every top and bottom point should touch this guide.
Check the panel every 20–25 cm. A one-stitch error repeated over several rows can produce a clearly visible diagonal drift in a floor-length curtain.
Correct the first misaligned repeat rather than compensating several rows later.
Textured Vertical Divider Columns
The image shows narrow denser lines separating portions of the openwork. These can be reproduced with compact crochet columns.
At selected repeat boundaries, replace the open chain section with:
2–3 dc worked in consecutive stitches.
On the following row, work the same stitches directly above them.
For stronger relief, alternate front-post and back-post dc in these narrow columns.
Do not make every divider heavily textured. Too many dense vertical bands add weight and reduce the curtain’s transparency.
Repeating the Main Field
Repeat the complete diamond sequence until the curtain approaches the required finished length.
Stop before reaching the target measurement because the upper hanging band still needs to be added.
For example, if the intended blocked curtain length is 220 cm and the top band will measure 8 cm, stop the lace field at approximately 212 cm after accounting for the measured hanging growth of your swatch.
Upper Stabilizing Band
A long lace curtain needs a denser upper section to distribute its weight along the rod.
Top Row 1
Work sc evenly across.
Top Row 2
Work hdc across.
Top Row 3
Work dc across.
Top Row 4
Work sc across.
Measure the width. If the top has contracted, use a larger hook for the final band or distribute a few increases evenly across the row.
Option 1: Curtain-Rod Channel
For a hidden rod channel, continue in solid hdc until the band is wide enough to wrap around the curtain rod.
Fold the band toward the wrong side.
Sew the lower edge to the curtain with a loose whipstitch, leaving both ends open.
Test the rod before completing all sewing.
Option 2: Crochet Hanging Loops
For visible loops, mark positions evenly across the top.
At each marker:
Ch 12–20 depending on the rod diameter, skip the corresponding number of stitches, then attach with sc.
On the following row, work sc around each chain loop.
Every loop must contain the same number of chains and stitches.
Option 3: Curtain Rings
If using rings or clips, keep the upper band flat and dense.
Space the rings approximately 8–12 cm apart, adjusting the spacing so both side edges have equal support.
Closely spaced rings distribute the weight more effectively than a few widely separated attachment points.
Side Edging
Join yarn at one upper corner.
Work sc evenly down the entire side.
A starting ratio for dc row ends is approximately 2 sc for every 3 row ends, but the actual spacing must be determined from the fabric.
The edge should lie completely flat.
Repeat on the opposite side using the same number of stitches.
Scalloped Bottom Border
The bottom of the photographed curtain ends in broad, rounded points rather than a narrow picot.
Preparation Row
Work sc evenly across the bottom.
Openwork Row
Repeat:
*sc in next marked space, ch 5, skip the next section.*
Continue across.
Shell Row
Into each ch-5 space work:
sc, hdc, 3 dc, tr, 3 dc, hdc, sc.
This creates a broad pointed shell.
Final Edge
Work sc around each shell.
At the center tr, work:
sc, ch 2, sc.
The ch-2 point sharpens each lower scallop without making the edge excessively frilly.
Optional Picot Detail
For a finer lower edge, add a picot at the center of each shell.
Work:
ch 3, sl st into the first chain.
Use one picot per shell. Multiple picots add unnecessary weight to a long curtain.
Calculating the Number of Diamond Repeats
After blocking the swatch, measure one complete diamond horizontally.
If one repeat measures 10 cm and the desired curtain width is 120 cm:
120 ÷ 10 = 12 repeats.
If the calculation produces a fraction, compare the two nearest complete repeat counts.
For example:
11 repeats = 110 cm
12 repeats = 120 cm
13 repeats = 130 cm
Choose the width according to the required fullness rather than inserting a partial motif into the center of the curtain.
Calculating Curtain Length
Measure one complete vertical repeat after hanging the blocked swatch.
If one repeat measures 14 cm and the lace field needs to cover 196 cm:
196 ÷ 14 = 14 repeats.
Add the measured upper band and lower border separately.
This approach is more reliable than counting rows because different stitch sections can have substantially different row heights.
Yarn Quantity Calculation
Use the large blocked swatch to estimate yarn requirements.
Weigh the completely dry swatch.
Suppose a 30 × 30 cm sample weighs 42 g.
The swatch area is:
30 × 30 = 900 cm².
A 120 × 220 cm curtain has an area of:
120 × 220 = 26,400 cm².
Estimated number of swatch areas:
26,400 ÷ 900 = 29.33.
Estimated yarn:
29.33 × 42 ≈ 1,232 g.
Add approximately 10–15% for the denser borders, swatching, joining new balls, and finishing.
This is an example calculation only. Use the weight of your own blocked swatch for purchasing yarn.
Joining a New Ball of Yarn
Avoid changing yarn at the center of a large open chain arch.
Make joins inside solid dc or sc sections whenever possible.
Leave a tail long enough to weave through several dense stitches in two directions.
For cotton, split the yarn path when weaving the final few centimeters so the tail is less likely to work loose during washing.
Making Two Matching Curtain Panels
If the window requires two panels, work them simultaneously when possible.
Complete one full vertical repeat on Panel A, then work the same repeat on Panel B.
Count the motifs after every section.
Before beginning the lower or upper border, place both panels flat together and compare:
- Total width
- Total length
- Number of horizontal repeats
- Number of vertical repeats
- Side-edge stitch counts
Small differences become more obvious when two lace curtains hang next to each other.
Blocking the Finished Curtain
Wash the completed panel according to the yarn label.
Remove excess water without twisting the fabric.
Lay the curtain on a clean blocking surface.
First pin the top edge to its required width.
Next align both side edges.
Use blocking wires or multiple pins through the major diamond points.
Shape the lower scallops last.
Measure diagonally from opposite corners. Similar diagonal measurements indicate that the curtain is approximately square.
Allow the panel to dry completely before removing any pins.
Testing the Curtain After Blocking
Hang the finished curtain for 24–48 hours before making any permanent length adjustment.
Cotton lace can continue to settle under its own weight.
Measure from the rod to the lowest scallop at several points across the curtain.
A variation greater than approximately 1 cm across a single panel usually indicates uneven blocking, unequal hanging loops, or accumulated row-count differences.
7 Technical Tips
- Mark every diamond repeat. Missing one chain space can shift all motifs above it, so check the repeat count before beginning each closing section.
- Test vertical growth with at least a 30 cm hanging sample. Measuring only a flat swatch can underestimate the finished curtain length after gravity stretches the openwork.
- Keep matching chain arches within one chain of each other. Random differences between ch-5, ch-6, and ch-7 arches produce irregular diamond edges after blocking.
- Check the panel width every 20–25 cm. If it changes by more than about 1 cm without intentional shaping, inspect the most recent repeats before continuing.
- Do not tighten the side edging. A compressed side border makes the curtain curl inward even when the central lace has been blocked correctly.
- Place hanging points 8–12 cm apart when using rings. Wider unsupported sections can sag between rings and distort the first row of diamonds.
- Weave cotton tails through at least 4–5 cm of dense stitches. Short tails hidden inside open chain spaces can become visible or loosen after repeated washing.
Alternative Curtain Sizes
| Use | Approximate Width | Approximate Length |
|---|---|---|
| Small café panel | 45–70 cm | 60–90 cm |
| Kitchen window | 70–100 cm | 90–140 cm |
| Standard single panel | 90–130 cm | 180–230 cm |
| Long floor panel | 100–140 cm | 220–260 cm |
These are planning ranges rather than fixed pattern measurements. Calculate the actual panel from the window and blocked motif size.
Changing the Yarn
Fine Cotton Thread
Fine crochet cotton produces smaller diamonds and a more traditional lace appearance. More repeats will be required to reach the same curtain dimensions.
DK Cotton
DK cotton creates the balanced combination of visible texture and open lace represented by this photo-inspired version.
Light Worsted Cotton
Light worsted yarn produces larger motifs and a heavier curtain. Test hanging stretch carefully before committing to a floor-length panel.
Color Options
Warm ivory emphasizes the shadows created by the diamond lace and works well with natural wood and neutral interiors.
The same construction can also be worked in:
- Pure white
- Natural cotton
- Soft beige
- Sage green
- Dusty rose
- Light gray
For the clearest geometric pattern, use a solid color rather than a highly variegated yarn.
Care
Follow the yarn manufacturer’s washing instructions. For a large cotton curtain, gentle washing reduces unnecessary abrasion on the open chain sections.
Support the entire wet curtain when removing it from water. Do not lift a saturated floor-length panel by one corner.
Reshape the major diamonds and scallops while damp. After several washes, reblocking may be required to restore the original width and geometric alignment.
Final Construction Check
- Measure the window and calculate the required blocked curtain width and length.
- Make a large diamond-lace swatch, wash it, block it, and test it vertically for hanging stretch.
- Establish the full-width foundation and mark every horizontal motif repeat.
- Work the lower structural section and deep geometric diamond border.
- Continue the stacked main diamond field while checking vertical alignment every 20–25 cm.
- Stop the main lace field after accounting for the measured height of the upper hanging band.
- Add the upper stabilizing section and the chosen rod channel, loops, or ring attachment.
- Finish both side edges with equal stitch counts and shape the lower scallops.
- Wash and block the curtain to the calculated dimensions, checking both diagonals before drying.
- Hang the panel for 24–48 hours, measure its settled length, and make any final hanging adjustment.
Conclusion
This ivory crochet lace curtain pattern combines vertically stacked diamonds, floral centers, open chain arches, structural divider columns, and a deep scalloped lower border. The critical step is not the individual lace stitch but the hanging swatch: use it to calculate both the number of repeats and the amount of vertical growth before making a floor-length panel. After completing the first curtain, record its blocked repeat dimensions so a matching second panel can be reproduced accurately. Share the finished window treatment on Pinterest or Instagram with #IvoryDiamondLaceCurtain. Would you keep the curtain floor-length as shown, or shorten the same diamond pattern into a café curtain?








