A maple leaf needs more than five points; the veins must divide those points into recognizable lobes. This crochet maple leaf coaster pattern builds a broad autumn leaf with a dominant center lobe, four supporting lobes, smaller edge points, raised vein lines, and an integral stem. Use firmly twisted cotton with a 3.5 mm hook for an intermediate project measuring approximately 15–18 cm, depending on yarn and tension.
What Makes This Crochet Maple Leaf Different
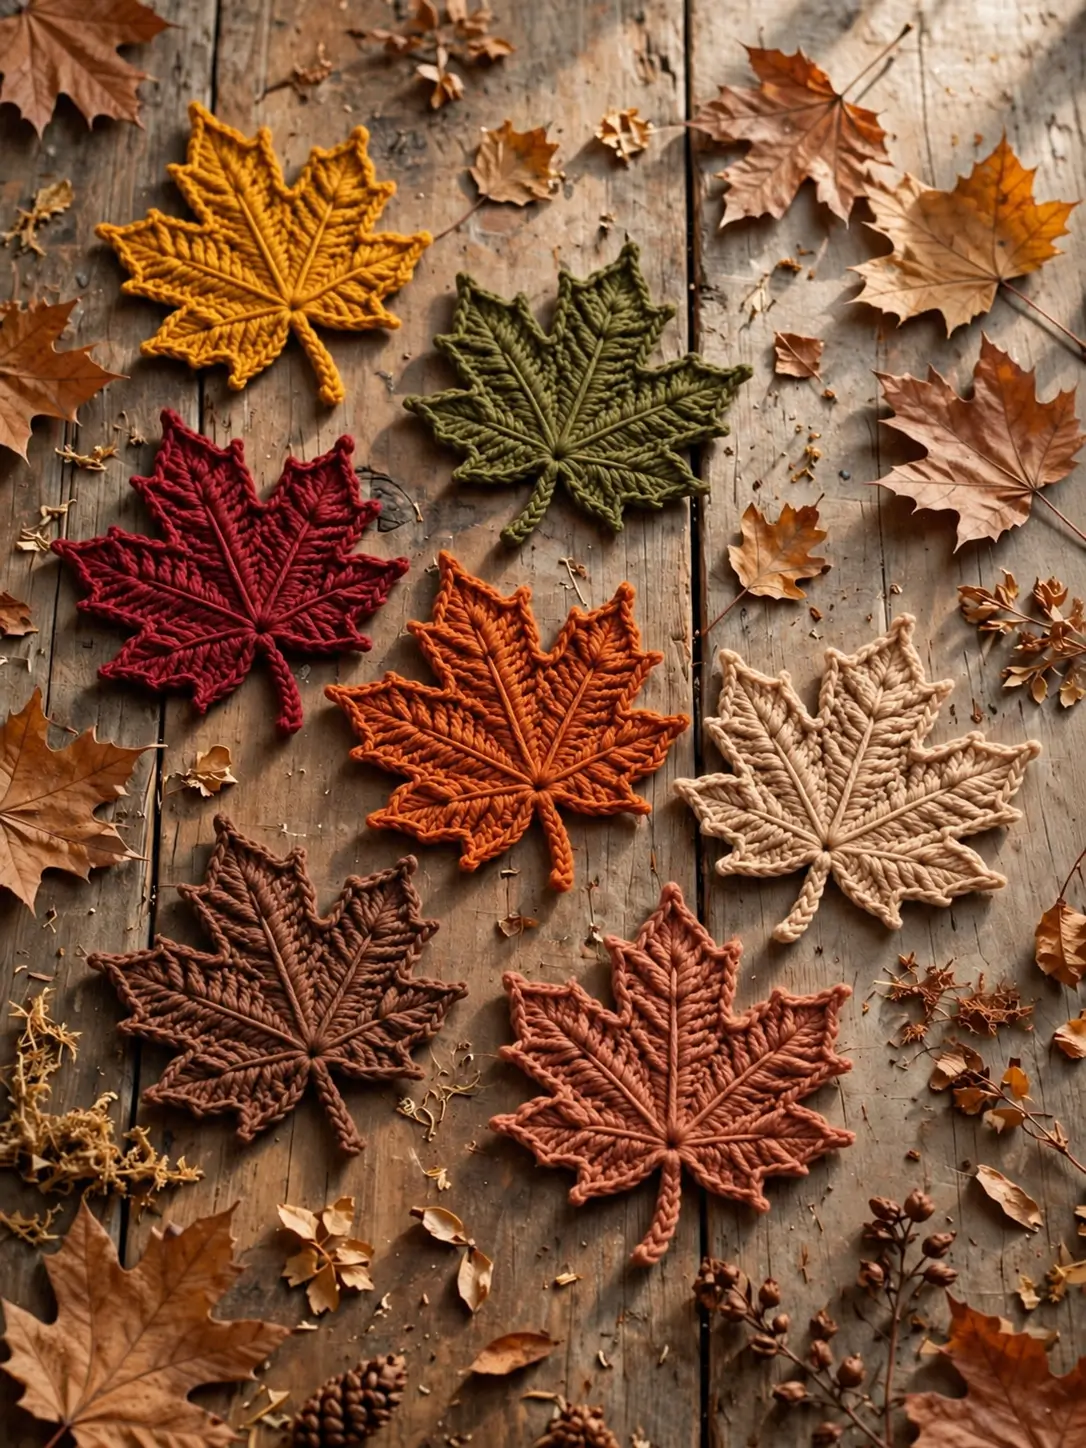
The photographed leaves depend on three structural decisions. First, the center lobe projects farther than the surrounding sections, creating the characteristic maple silhouette. Second, deep valleys separate the major lobes instead of allowing the perimeter to become a generic star. Third, raised lines radiate from the lower center toward every major point. Those ribs are particularly important in a textured crochet maple leaf because they divide a broad piece of fabric into visually distinct sections. The short stem continues directly from the lower center. A common mistake in a ribbed maple leaf crochet project is making the outer points prominent while leaving the internal veins flat. That creates the right outline but loses the strong botanical structure visible in the reference image.
Project Info at a Glance
| Skill Level | Construction | Published Size Reference | Hook | Best For |
|---|---|---|---|---|
| Intermediate | Flat motif with raised veins | Approx. 15.2 cm coaster benchmark | 3.5 mm target | Coasters, table decor, garlands, appliqués |
Materials and Tools
Yarn
- Worsted or firm DK cotton — approximately 20–35 m per leaf as a planning range; make one sample before calculating a full set.
- Mustard gold — for golden autumn leaves.
- Burgundy — for deep red leaves.
- Olive green — for green autumn leaves.
- Burnt orange — for orange leaves.
- Warm cream — for neutral leaves.
- Chocolate brown — for dark neutral leaves.
- Terracotta — for muted red-orange leaves.
Tools
- 3.5 mm crochet hook
- Yarn needle
- Scissors
- Locking stitch markers
- Tape measure
- Blocking mat
- Rustproof pins
Abbreviations
- MR — magic ring
- ch — chain
- sl st — slip stitch
- sc — single crochet
- hdc — half double crochet
- dc — double crochet
- tr — treble crochet
- dtr — double treble crochet
- BLO — back loop only
- st/sts — stitch/stitches
- RS — right side
- WS — wrong side
Pattern — Step by Step
The photographed leaf has unusually pronounced vein lines. A still image cannot establish whether those ridges were made with BLO short rows, post stitches, surface crochet, or another technique. This reconstruction therefore forms the leaf body first and adds raised surface-crochet veins afterward.
Leaf Center
Yarn: chosen leaf color.
R1: Make an MR. Work 12 dc into the ring. Join with sl st. (12)
R2: Work 2 hdc into every stitch around. Join with sl st. (24)
The 24-stitch base provides attachment positions for five unequal lobes. Mark the top-center position before beginning the outline.
Center Lobe
Join matching yarn at the marked position.
Work upward through successive attachment positions:
sc, hdc, dc, tr, dtr.
Ch 3. Sl st into the first chain to form the principal point.
Work down the opposite edge:
dtr, tr, dc, hdc, sc.
Anchor with sl st at the next valley.
The center lobe must remain the tallest section of the finished leaf.
Right Upper Lobe
Work:
sc, hdc, dc, tr.
Ch 3 and sl st into the first chain.
Continue:
tr, dc, hdc, sc.
Anchor with sl st.
This lobe should finish slightly shorter than the center section.
Right Lower Lobe
Work:
sc, hdc, dc.
Ch 3 and sl st into the first chain.
Continue:
dc, hdc, sc.
Anchor with sl st.
Keep this lobe broad and low rather than extending it to the same height as the upper point.
Left Lower Lobe
Mirror the right lower section:
sc, hdc, dc, ch 3 picot, dc, hdc, sc.
Anchor with sl st.
Left Upper Lobe
Work:
sc, hdc, dc, tr.
Ch 3 and sl st into the first chain.
Continue:
tr, dc, hdc, sc.
Anchor at the final valley.
Fasten off.
Check the silhouette before adding detail. One central point should dominate, the upper side lobes should form the second level, and the two lower lobes should remain visibly shorter.
Adding the Smaller Maple Points
The reference image contains smaller projections along the outer edges. These points create the serrated maple outline without competing with the five primary lobes.
Join matching yarn at the base of one lower lobe.
Work sc evenly along the perimeter.
At the midpoint of a long lobe edge, work:
ch 3, sl st in second ch from hook, sc in next ch.
Anchor into the next edge position.
Continue toward the major point.
Add one or two secondary points to each upper lobe.
Add one smaller point to each lower lobe.
Do not make the secondary projections as long as the five major points.
Raised Center Vein
Place the leaf RS facing upward.
Join matching yarn at the lower center.
Insert the hook approximately 5 mm farther toward the center lobe and pull a loop through the fabric.
Pull that loop directly through the loop already on the hook.
Continue working loose surface slip stitches toward the center point.
Stop approximately 5–8 mm before the outer edge.
Fasten off on the WS.
The finished ridge should sit on top of the fabric without pulling the center lobe inward.
Upper Side Veins
Join matching yarn at the same lower-center junction.
Work surface slip stitches diagonally toward the right upper lobe.
Stop before the pointed edge and fasten off.
Repeat toward the left upper lobe.
The three longest veins should now form a fan across the upper half of the maple leaf.
Lower Side Veins
Work one raised line from the center toward the right lower lobe.
Repeat toward the left lower lobe.
Keep both lines slightly shorter than the upper veins.
The leaf now has five principal raised lines radiating from one center junction.
Secondary Veins
The photograph shows dense texture between the major ribs rather than completely smooth lobe interiors.
Add short surface-crochet branches along the central and upper side veins.
Begin each branch near a primary ridge.
Work diagonally toward the perimeter.
Stop approximately 5–10 mm before the edge.
Space the branches consistently enough to create rhythm, but do not make every line identical.
If the leaf begins to cup, the surface stitches are too tight.
Crochet Maple Leaf Stem
Join matching yarn at the lower center of the leaf.
Ch 10.
Beginning in the second chain from the hook, work one sl st in every chain. (9 sl st)
Sl st into the leaf center to secure the stem.
Fasten off.
For a longer decorative leaf, begin with ch 12 and work 11 slip stitches back toward the body.
Making the Autumn Color Set
The reference image uses the same basic maple structure in several autumn colors rather than changing the construction from leaf to leaf.
For a seven-leaf set, make:
- 1 mustard gold leaf
- 1 burgundy leaf
- 1 olive green leaf
- 1 burnt orange leaf
- 1 warm cream leaf
- 1 chocolate brown leaf
- 1 terracotta leaf
Keep the hook, yarn category, and tension consistent if the motifs will be used together as coasters.
Blocking the Maple Leaf
Blocking determines whether the deep valleys remain visible.
Dampen the finished leaf according to the yarn-care instructions.
Place it RS upward on a blocking mat.
Pin the center lobe first.
Pin both upper side lobes at matching angles.
Position the lower lobes next.
Pin the stem last.
Check the overall width before the leaf dries.
Do not stretch the surface-crochet veins flat.
The ridges should remain visible after blocking.
Using the Leaves as Crochet Coasters
Cotton is the practical yarn choice when the motifs will sit beneath mugs because it creates a firm, washable fabric.
A finished width around 13–16 cm gives most mugs adequate coverage while leaving the maple silhouette visible.
Keep the leaf flat.
If the raised center becomes too bulky beneath a cup, reduce the surface-vein yarn tension or use a slightly thinner yarn for the vein work.
Test one blocked motif with the intended mug before producing the complete set.
Using the Leaves for a Garland
The same motifs can be converted into autumn bunting.
Crochet a long foundation chain in cream, brown, or a matching leaf shade.
Return along the chain with loose slip stitches to strengthen the cord.
Attach each maple leaf near the top of its center lobe rather than by the stem.
That attachment keeps the motif hanging upright.
Leave approximately 10–15 cm between large leaves for an open garland or reduce the spacing for a denser mantel arrangement.
Using the Leaves as Appliqués
Omit the long stem when attaching the motif permanently to another crochet project.
Leave a long sewing tail at the center instead.
Pin the blocked leaf to the target fabric.
Sew around the lower sections and major valleys while leaving the pointed tips slightly freer.
This attachment method retains some three-dimensional definition.
The motif can be applied to cushion covers, tote bags, blankets, wreath bases, or table linens.
Yarn Planning
Published maple-leaf designs vary substantially in yarn consumption because their dimensions and construction differ.
The most reliable method is to make one complete sample in the intended yarn.
Weigh the dry blocked leaf.
Multiply that number by the total number of motifs required.
Add approximately one additional motif’s worth of yarn when making a multileaf set.
This extra quantity covers gauge variation, longer stems, swatching, and finishing tails.
Assembly
- Crochet the 24-stitch center foundation and mark the intended top position.
- Form the dominant center lobe, followed by the two upper and two lower lobes.
- Check the five-point hierarchy before adding any smaller edge details.
- Crochet the secondary serrated points around the lobe edges.
- Work the long raised center vein from the lower junction toward the principal point.
- Add four diagonal primary veins, one toward each remaining major lobe.
- Add short secondary vein branches where extra texture is required.
- Crochet the narrow stem directly from the lower center of the motif.
- Block the leaf with the five principal points pinned separately and leave it until completely dry.
- Weave every tail into matching-color stitches on the WS without pulling the raised ribs flat.
The finished motif should lie flat while retaining visibly raised veins and sharply separated maple lobes.
7 Technical Tips
- Keep the central lobe at least one stitch-height level taller than the lower lobes. Equal-height points produce a generic star rather than a maple silhouette.
- Stop each raised vein about 5–8 mm before the perimeter. Running the ridge directly into the edging can distort the pointed tip.
- Remake any surface vein that shortens its lobe by more than 5 mm. Excessive surface-crochet tension causes the broad leaf to cup.
- Block matching coasters to within approximately 5 mm of the same width. Larger gauge differences become conspicuous when several colors are displayed together.
- Use a stitch marker at the top-center position before shaping the lobes. Losing that orientation can place the tallest point off-center and make the leaf look asymmetrical.
- Keep the stem around 3–5 cm long for coaster use. A substantially longer stem occupies unnecessary table space and catches more easily when a mug is moved.
- Weave each structural tail through at least 4 cm of matching stitches on the WS. Short tails near the center can loosen because several vein and stem attachments converge there.
Finishing
Place every blocked leaf on a flat surface before trimming the final yarn tails.
Compare the lobe angles and overall widths if the leaves form a coordinated set.
Correct any curled secondary points with light reblocking.
Check that the stem lies in line with the central vein.
For coasters, test the center with a flat-bottomed mug. The vessel should sit without rocking noticeably on the raised texture.
For garlands or appliqués, add attachment yarn only after blocking so the joining points do not interfere with shaping.
Conclusion
The defining feature of this crochet maple leaf coaster pattern is the relationship between the five main lobes and the raised veins running through them. Make one leaf first, block it to the target size, and check the center beneath a mug before repeating the design in additional colors. Keep the same hook and yarn category across the set so mustard, burgundy, olive, orange, cream, brown, and terracotta motifs finish at comparable dimensions. Share the completed autumn set on Pinterest and Instagram with #TexturedMapleLeafCrochet. Which of the seven photographed autumn colors would you use for the first maple leaf?