Introduction
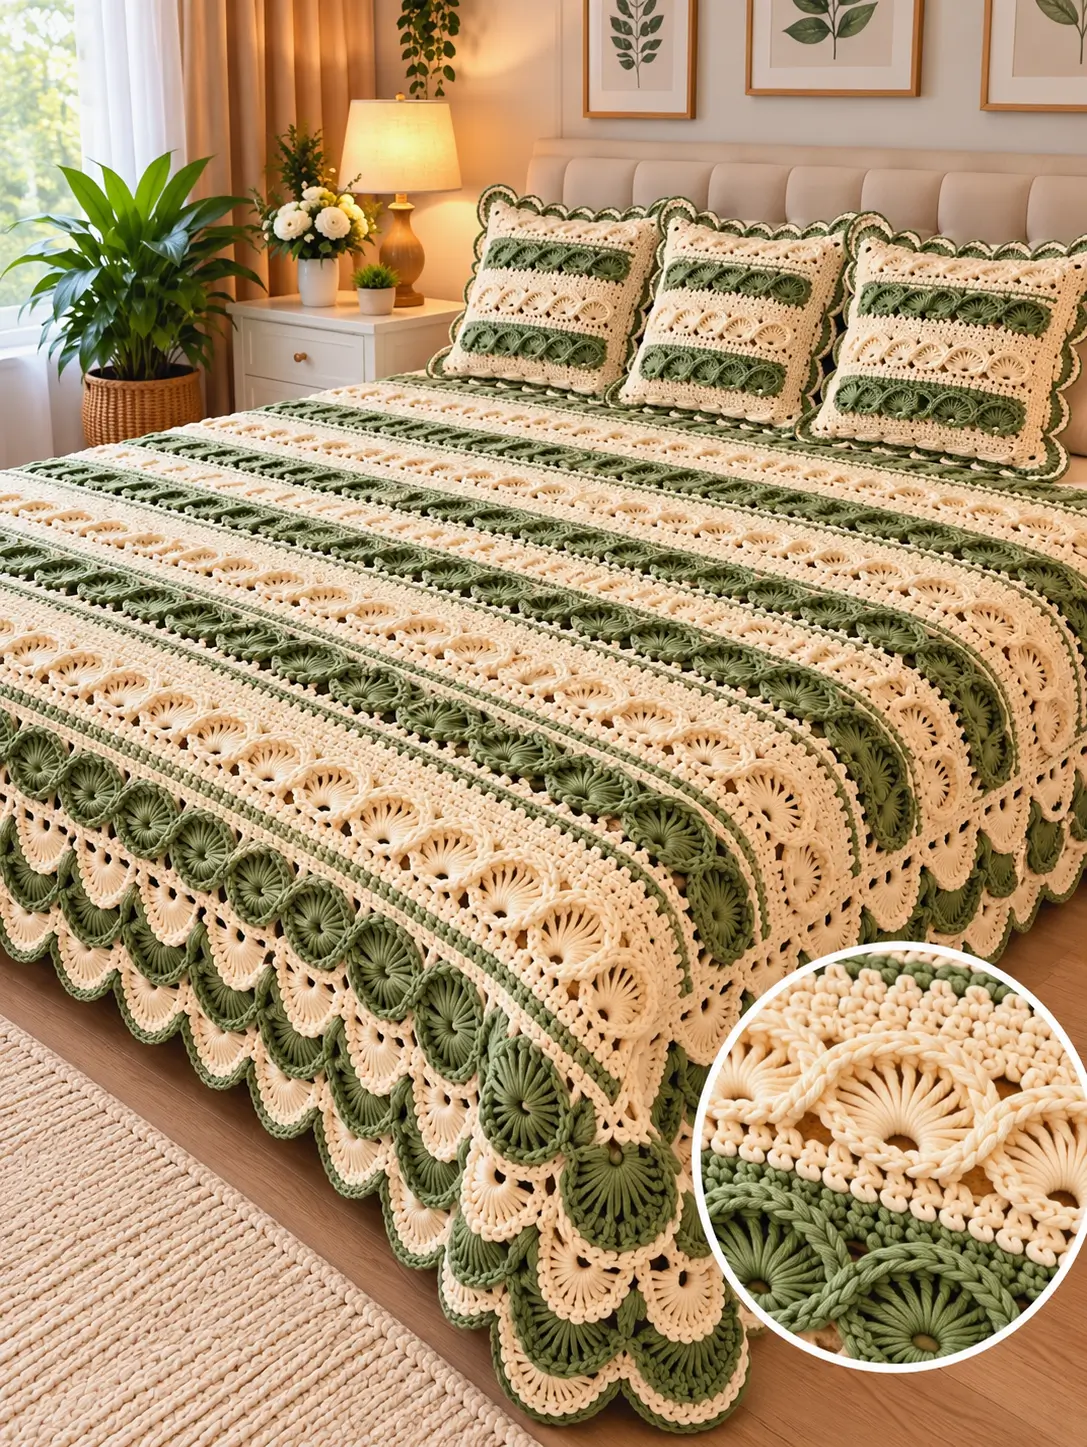
The overlapping green fan motifs along this bedspread’s lower edge require a different construction approach from ordinary flat shell blankets. This sage green and cream crochet bedspread pattern uses worsted-weight yarn, a proposed 5.5 mm hook, and repeating shell rows to create a coordinated bedroom set. Designed for intermediate crocheters, the adjustable construction accommodates larger mattresses while allowing matching pillow covers to be made from the same stitch sequence.
The Design: What Makes This Crochet Bedspread Different
Three structural elements define this design: alternating color bands, raised shell formations, and a prominent scalloped edge.
The green bands create visual separation between the wider ivory sections. Rather than changing color after every row, this adaptation groups several rows together to form more distinct horizontal stripes. The resulting arrangement helps the shell texture remain visible across a large surface.
The second feature is the fan-shaped stitch pattern. Each shell contains multiple double crochet stitches worked into one foundation point, creating a curved formation.
Finally, the border uses repeated shells to create a decorative finish. Unlike a plain single crochet edge, the scalloped crochet blanket border requires careful stitch distribution at corners.
A common mistake when making a two-tone crochet bedspread is adding too many stitches along the sides. This causes rippling and uneven edges, especially after blocking.
Project Info at a Glance
| Detail | Specification |
|---|---|
| Skill Level | Intermediate |
| Estimated Time | 60–100 hours (planning estimate) |
| Target Finished Size | 229 × 254 cm |
| Hook | 5.5 mm, subject to gauge |
| Yarn | Worsted weight #4 |
| Construction | Flat, turned rows |
| Colors | Ivory and sage green |
| Matching Pieces | Three square pillow covers |
| Pattern Type | Original photo-inspired adaptation |
The dimensions above are design targets. Actual size and working time depend on individual gauge, yarn, and the number of rows completed.
Materials and Tools
Yarn
Choose yarns with the same fiber content, thickness, and care instructions. Different yarn constructions can change the height and width of the shell formations.
- Ivory or warm cream: Worsted-weight #4 cotton-acrylic blend or suitable cotton yarn.
- Sage green: Matching worsted-weight #4 yarn, in a muted green that contrasts with ivory.
For purchasing, use the following preliminary planning allowance rather than treating it as a verified requirement.
| Component | Ivory Estimate | Green Estimate |
|---|---|---|
| Main bedspread | 1,800–2,600 g | 900–1,400 g |
| Three pillow covers | 450–750 g | 250–450 g |
| Total planning range | 2,250–3,350 g | 1,150–1,850 g |
These quantities are provisional budgeting ranges, not tested consumption figures. A measured swatch is necessary before buying the full supply.
Tools
- 5.5 mm crochet hook
- Tapestry needle for joining and weaving ends
- Locking stitch markers for identifying repeat boundaries
- Measuring tape for checking dimensions
- Scissors
- Blocking mats and rust-resistant pins
- Three 46 × 46 cm pillow inserts
- Optional fabric backing for pillow covers
Gauge and Sizing
Begin with a sample containing at least four shell repeats and ten rows. Wash and dry the sample according to the yarn label before measuring.
Measure the central section rather than the edges. Record the width of one shell repeat, the height of four rows, the dry weight of the sample, and any expansion after washing.
For example, if one repeat measures 5 cm and the target width is 220 cm, the calculation is 220 ÷ 5 = 44 repeats.
For the six-stitch repeat used below, the foundation calculation is (44 × 6) + 2 = 266 chains.
This is an illustrative calculation, not a tested gauge for the photographed bedspread.
For yarn estimation, divide the swatch weight by its finished area. Multiply that result by the planned fabric area, then add a separately swatched allowance for borders and pillows. Decorative shells may consume more yarn than plain rows.
Abbreviations — US Crochet Terms
| Abbreviation | Meaning |
|---|---|
| ch | Chain |
| sc | Single crochet |
| dc | Double crochet |
| sl st | Slip stitch |
| st / sts | Stitch / stitches |
| sp | Space |
| rep | Repeat |
| RS / WS | Right side / wrong side |
| BLO | Back loop only |
| FO | Fasten off |
Pattern — Step by Step
Pattern note: This is an original, simplified shell-stripe design inspired by the photograph. It does not reproduce the photographed long-loop fan motifs exactly. The instructions are untested and should be checked with a sample before making a full bedspread.
Part 1: Foundation Chain
Yarn: Ivory.
For the sample pattern, make 92 chains. This corresponds to 15 repeats using a multiple of six plus two.
For a wider bedspread, increase the number of repeats according to the measured gauge.
Foundation row: Work 1 sc into the second chain from the hook and each remaining chain. (91 sc)
Turn. Count the foundation carefully. A missing chain shifts every shell position in the next row.
Part 2: Shell Stitch Pattern
Yarn: Ivory and sage green.
The sample uses five-double-crochet shells separated by single crochet anchors.
Row 1: Ch 1, sc in the first st. *Skip 2 sts, work 5 dc in the next st, skip 2 sts, sc in the next st.* Repeat across until the last six-stitch group has been completed. Turn.
Row 2: Ch 3, work 2 dc in the first sc. *Sc in the center dc of the next shell, work 5 dc in the next sc.* Repeat across the interior. At the final shell, sc in its center dc and work 3 dc in the last sc. Turn.
Row 3: Ch 1, sc in the first dc. *Work 5 dc in the next sc, sc in the center dc of the following shell.* Repeat across the interior, ending with sc in the top of the turning chain. Turn.
Repeat Rows 2–3 to establish the shell texture. Count full shells and edge stitches separately, and test the sequence on the sample before scaling.
Part 3: Ivory and Sage Green Color Bands
Use the established two-row shell repeat while following this suggested color arrangement.
| Rows | Color |
|---|---|
| 1–6 | Ivory |
| 7–10 | Sage green |
| 11–16 | Ivory |
| 17–20 | Sage green |
| 21–26 | Ivory |
| 27–30 | Sage green |
Repeat the color sequence until the bedspread approaches the required length. Finish the main fabric with an ivory section, allowing for the additional border depth.
Change colors at the final yarn-over of the last stitch in the preceding row. Longer color sections are best managed with separate yarn ends. Weave ends through stitches of the same color.
Part 4: Preparing the Bedspread Border
Yarn: Ivory.
Round 1: Work sc evenly around the bedspread. Place 3 sc into each corner and join with a sl st.
On the top and bottom edges, work into the existing stitches. Along the row ends, distribute stitches according to the measured row height.
Round 2: Ch 1, sc around, placing 3 sc in each corner’s center stitch. Join.
Spread the bedspread on a flat surface. Rippling may indicate too many edge stitches; corners pulling inward may need more room.
Part 5: Scalloped Shell Border
Yarn: Sage green.
For a controlled scallop repeat, test the following pattern along an edge containing a multiple of six stitches.
Round 3: Attach green yarn. Ch 1, sc in the first st. *Skip 2 sts, work 5 dc in the next st, skip 2 sts, sc in the next st.* Repeat along the straight edge.
At each corner, work a larger shell of 7 dc into the designated corner space. Adjust adjacent spacing to keep the fabric flat. Join with a sl st.
Round 4: Attach ivory yarn at a corner. Work sc along the shell outlines, placing additional stitches only where needed to accommodate the curves. Work 3 sc into each corner point.
Fasten off and weave in the ends.
The photographed bedspread has several overlapping scallop layers. To approximate that depth, make separate scalloped strips and sew them beneath the primary border.
Part 6: Optional Layered Scalloped Trim
Make a narrow foundation strip long enough to match one edge of the bedspread.
Row 1: Ch a multiple of 6 + 2. Sc in the second chain and across.
Row 2: Work the shell repeat from Part 2.
Row 3: Work the alternating shell repeat.
Fasten off, leaving a sewing tail of approximately 30 cm.
Make additional strips for the remaining sides. Join them at the corners and attach beneath the main border, allowing approximately 2–4 cm of visible overlap.
Pin the trim before sewing to avoid uneven distribution.
Matching Crochet Pillow Covers
The image contains three matching square pillows. Each has ivory framing, green textured sections, and scalloped edging.
A removable cover makes washing easier because the insert can be taken out.
Part 7: Front Pillow Panel (Make 3)
Yarn: Ivory and sage green.
Use the same shell-stitch construction as the main bedspread. Begin with a foundation chain appropriate for a panel approximately 46 cm wide after blocking. Follow the six-stitch repeat.
- Ivory: first six rows.
- Sage green: next four rows.
- Ivory: next six rows.
- Sage green: next four rows.
Continue alternating until the panel is square. Finish with an ivory row.
Measure after blocking. Row height varies with yarn and tension. Make three identical panels.
Part 8: Back Pillow Panel (Make 3)
Yarn: Ivory.
For each back panel, make a square using plain single crochet or the same shell pattern. A plain backing provides stability and reduces visible gaps.
Work to the same finished width and height as the corresponding front panel. A fabric lining may be added behind the decorative front.
Fasten off and weave in the ends.
Part 9: Joining the Pillow Covers
Place the front and back panels together with wrong sides facing inward.
Attach ivory yarn at a corner and work sc through both layers along three sides. Leave the fourth side open for the insert.
For a removable closure, add a zipper or overlapping envelope-style backing rather than permanently joining the fourth side.
Work a narrow green shell edging around the visible perimeter, adjusting the stitch distribution at each corner. Repeat for all three pillows.
Assembly and Finishing
- Lay the main bedspread on a clean, flat surface and check its measurements.
- Block the central fabric to the planned rectangular shape.
- Confirm that the ivory and sage bands remain parallel.
- Inspect the border foundation for extra or missing stitches.
- Pin the green scalloped trim along the outer edges.
- Attach any additional scalloped layers beneath the primary border.
- Block all three pillow fronts to matching dimensions.
- Join the pillow fronts and backs, leaving suitable openings.
- Insert the pillows and complete the closures.
- Weave in remaining yarn tails, inspect all joins, and allow the pieces to dry fully.
The completed set consists of one decorative shell-stitch bedspread and three coordinated pillow covers.
7 Technical Tips for a Cleaner Finish
- Stitch marker placement: Place a marker at every tenth shell repeat on long rows. This helps identify a missed repeat before the next color band begins.
- Border rippling: Excess stitches along vertical edges can cause scallops to flare. Test the border on a 20 cm section before completing the perimeter.
- Shell crowding: If five double crochets form a tight cluster, test a hook 0.5 mm larger. Compare blocked shell widths before changing the entire project.
- Color transitions: Loose yarn ends can become visible through openwork. Weave each end through at least 5 cm of matching-color stitches, reversing direction once.
- Pillow dimensions: A front panel that exceeds the insert by several centimeters may sag. Measure the blocked panel against the actual insert before joining.
- Scallop alignment: Pin each trim strip at the corners and midpoint before sewing. This prevents uneven distribution along the edge.
- Fabric weight: Large cotton bedspreads can stretch under their own weight. Test a hanging swatch for 24 hours before finalizing border depth.
Washing and Maintenance
A large decorative bedspread requires more careful handling than a small crochet throw.
Check the yarn label before washing. Cotton-acrylic blends may have different temperature restrictions depending on the manufacturer.
For machine-washable yarn, use a gentle cycle and avoid overloading the machine. A saturated bedspread can become substantially heavier, placing strain on seams and decorative edges.
Dry the fabric flat where possible. Hanging a wet bedspread can distort the shell pattern and stretch the scallops.
Store the finished set folded rather than suspended from a hanger.
If the pillows contain removable inserts, wash the covers separately. Close zippers or other fasteners before laundering.
Frequently Asked Questions
Can this crochet bedspread be made in king size?
Yes. Measure the intended finished width, including the desired side drop, then calculate the required number of shell repeats using your blocked gauge. Increase the foundation chain in increments of six stitches.
Is cotton yarn suitable for a large bedspread?
Cotton provides stitch definition but can produce a heavy finished fabric. A cotton-acrylic blend may reduce weight while retaining a defined shell texture. Test drape and washing behavior before purchasing the full yarn quantity.
How can the scalloped border lie flat?
Begin with an evenly distributed single crochet foundation. Mark corners, work a small border sample, and adjust the stitch distribution if the edging curls or ripples.
Can the matching pillows be made without inserts?
The decorative panels can be completed independently, but functional pillow covers require inserts or another suitable filling system. A removable insert simplifies laundering.
Does this pattern reproduce the exact bedspread in the photograph?
No. These instructions describe a related shell-stitch design using the same general color arrangement and decorative principles. The photograph does not provide enough construction information to identify every original stitch.
Conclusion
This sage green and cream crochet bedspread pattern combines repeating shell stitches, controlled color sections, and decorative edging into a coordinated bedroom project. Accurate gauge measurements are essential when scaling the design to a larger mattress, particularly when using cotton or cotton-blend yarn.
Before purchasing the full yarn quantity, complete and weigh a blocked shell-stitch sample. Use those measurements to calculate the foundation chain, finished length, and expected material consumption.
Save the project to Pinterest for future reference, or share completed bedspread and pillow photos on Instagram using #SageGreenShellBedspread.
For the final design, would you use two layers of scalloped trim or three to match the depth shown in the photograph?