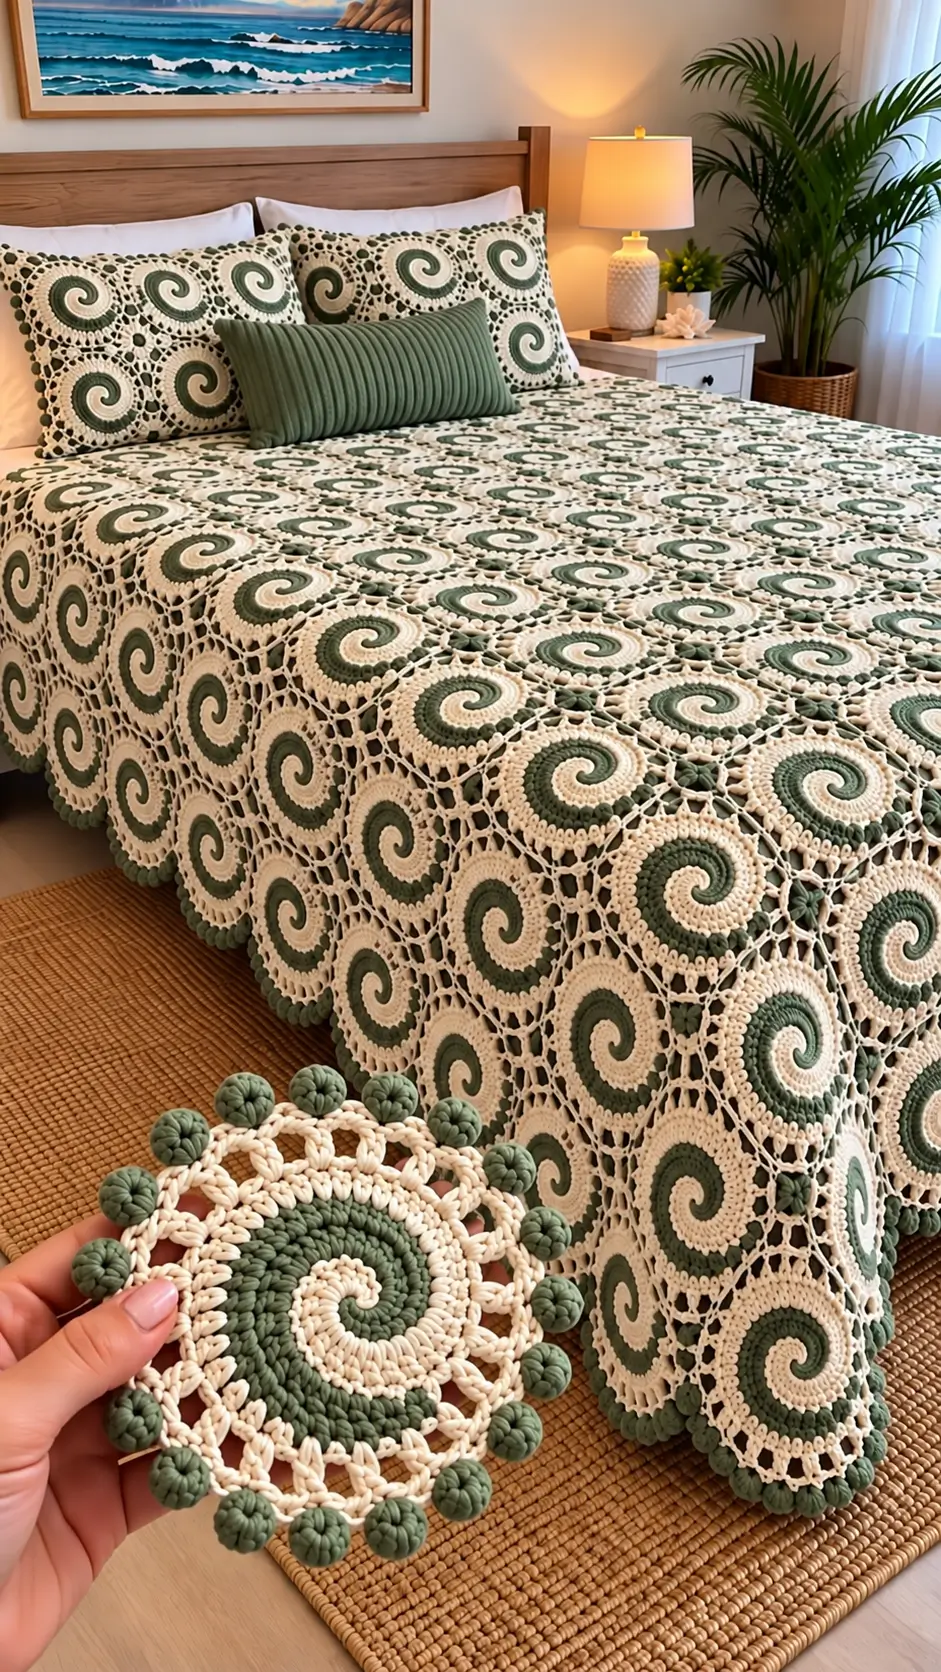
The cream spiral curls into sage green before sixteen raised bobbles mark the edge of each reconstructed medallion. This spiral crochet bedspread uses DK cotton, a 3.5 mm hook, and small openwork connectors to build a bed-sized panel. The intermediate construction requires two active yarn loops throughout the spiral center. Its modular format makes individual motifs removable for repairs without dismantling the entire cover.
The Design: What Makes This Spiral Bedspread Different
Three construction decisions distinguish this two-color crochet spiral from a standard striped circle. First, sage and cream each occupy half of the six-stitch starting ring, creating separate spiral arms rather than abrupt color changes at joined round boundaries. Both yarns remain attached through the thirty-six-stitch center.
Second, an ivory openwork frame converts the dense disc into a crochet medallion motif with sixteen evenly spaced attachment points. The number sixteen matters: four equally sized sectors permit north, east, south, and west alignment when motifs form a rectangular panel.
Third, five-double-crochet bobbles add the raised green perimeter visible in the photograph while preserving spaces for lace connections. A frequent mistake is attaching neighboring circles wherever their bobbles touch. That twists the grid and produces irregular openings; the connector points must instead follow the numbered arches.
Project Info at a Glance
| Skill Level | Time | Finished Size | Hook | Best For |
|---|---|---|---|---|
| Intermediate | Depends on motif count | Custom-sized | 3.5 mm | Bedspreads and pillow fronts |
A published comparison spiral throw measures 120 x 95 cm, but this does not establish the dimensions of the photographed cover. The 3.5 mm hook is based on a published DK cotton spiral tutorial. Measure one blocked sample before calculating the finished bedspread.
Materials and Tools
Yarn
- Sage green DK cotton yarn – for spiral centers and bobble edging.
- Warm cream DK cotton yarn – for spiral centers, lace frames, and joining.
- Optional sage green DK yarn – for a matching cushion cover.
James C. Brett It’s Pure Cotton DK is one documented yarn option for a two-color spiral sample. Exact quantities for this bedspread must be calculated from a completed motif. Using matching yarn weights and fiber content helps maintain consistent stitch dimensions.
Tools
- 3.5 mm crochet hook
- Locking stitch markers
- Yarn needle
- Scissors
- Measuring tape
- Digital kitchen scale
- Blocking pins and flat blocking mat
- Optional pillow inserts and fabric backing
Abbreviations
- MR: Magic ring
- sc: Single crochet
- inc: Increase, two single crochets in one stitch
- dec: Decrease
- sl st: Slip stitch
- ch: Chain
- hdc: Half double crochet
- dc: Double crochet
- BLO: Back loop only
- sp: Space
- sk: Skip
- st: Stitch
- RS: Right side
Bobble-5: Work five unfinished double crochets into one space, then pull through all six loops on the hook.
An invisible decrease works through the front loops of two neighboring stitches before completing one single crochet; it is not required in this flat motif.
Pattern – Step by Step
This photo-inspired pattern uses two continuous spiral arms, a cream lace frame, raised green bobbles, and four-point joining motifs. The calculated stitch counts should be checked on a physical sample before making a full bedspread.
Two-Color Spiral Center (Make One per Medallion)
Yarn: sage green A and cream B.
With A, form a magic ring. Keep both working yarn loops active throughout the spiral section. Complete the A half-round, hold its loop with a marker, then work the B half-round.
R1: With A work 3 sc into MR. With B work 3 sc into the same MR (6).
R2: With A, inc in each of the 3 B stitches. Repeat with B over the 3 A stitches (12).
R3: With A, (sc, inc) x3. Repeat with B (18).
R4: With A, (2 sc, inc) x3. Repeat with B (24).
R5: With A, (3 sc, inc) x3. Repeat with B (30).
R6: With A, (4 sc, inc) x3. Repeat with B (36).
Final count: 18 sage green stitches and 18 cream stitches.
Taper both arms with slip stitches into existing stitches, without adding to the single-crochet count. Fasten off both yarns, leaving approximately 15 cm tails.
Cream Foundation and Openwork Frame
Yarn: cream.
Join cream into any stitch around the outside of the spiral center.
R7: (Sc in next 5 sts, inc) x6 (42 sc).
R8: (Sc in next 6 sts, inc) x6 (48 sc).
R9: (Sc in next st, ch 3, sk next 2 sts) x16. Join with sl st (16 sc and 16 ch-3 spaces).
R10: Sl st into first ch-3 space. Work (2 dc, ch 2, 2 dc) in every ch-3 space. Join (64 dc and 16 ch-2 spaces).
R11: Sl st into first ch-2 space. Work (sc, ch 5) in each ch-2 space. Join (16 sc and 16 ch-5 spaces).
Fasten off cream with a 15 cm tail. Check that all sixteen lace arches remain evenly distributed before proceeding.
Sage Green Bobble Edge
Yarn: sage green.
R12: Join sage green in the first ch-5 space. Work (sc, Bobble-5, sc, ch 2) in each of sixteen ch-5 spaces. Join to first sc (32 sc, 16 bobbles, 16 ch-2 spaces).
Each bobble requires five unfinished double crochets closed together. The two-chain intervals create attachment spaces for the surrounding medallions and lace fillers.
Fasten off, leaving a 20 cm sewing tail for motifs placed inside the bedspread.
Number the sixteen ch-2 spaces clockwise. Spaces 1, 5, 9, and 13 identify north, east, south, and west. Join adjacent medallions through the corresponding three-space groups.
Four-Point Lace Gap Connector
Yarn: cream. Make one for each internal four-medallion intersection.
R1: 6 sc into MR (6).
R2: Inc x6 (12).
R3: (Sc, ch 4, sk next 2 sts) x4. Join (4 sc and 4 ch-4 spaces).
R4: Sl st into first ch-4 space. Work (sc, ch 5, sc) in each ch-4 space. Join (8 sc and 4 ch-5 spaces).
Fasten off with a 20 cm sewing tail. Attach each of the four connector points to the diagonal attachment spaces of surrounding medallions.
Do not add a four-point connector where fewer than four motifs meet at the outside edge.
Matching Spiral Pillow Shams (Make Two, Optional)
Use the same R1-R12 medallion pattern to construct matching pillow fronts. Arrange enough completed motifs to cover the measured pillow insert.
As an example, nine motifs arranged in three rows and three columns create one decorative front. Two such fronts require eighteen medallions, subject to actual blocked dimensions.
Join the motifs using the same three-point joining arrangement, adding cream lace connectors at the four-motif intersections.
Attach a fabric backing or a separately measured crochet panel. An envelope closure permits removal of the pillow insert without stretching the lace.
Optional Sage Ribbed Lumbar Cushion Cover
Yarn: sage green DK cotton.
Foundation: Ch 61.
Foundation row: Sc in second chain from hook and each remaining chain (60).
Rib row: Ch 1, sc BLO in each stitch, turn (60).
Remaining rows: Repeat the rib row until the rectangle fits around the measured cushion insert with approximately 5 cm of envelope overlap (60 stitches per row).
Fasten off with a 30 cm sewing tail. Fold the rectangle around the insert, overlap the back opening, and seam the sides.
Gauge, Dimensions, and Yarn Calculation
Make one finished medallion before calculating the total yarn requirement. Block it using the same process intended for the final bedspread.
Measure both its diameter and its center-to-center spacing when connected to a second motif. The second measurement determines how many motifs fit across the bed.
For example, if the joined motif pitch measures 15 cm, twelve columns and fourteen rows produce an approximate 180 x 210 cm layout before further border adjustments.
This arrangement requires:
- 168 complete medallions
- 143 internal four-point connectors
- Additional motifs for matching pillow fronts
These figures are illustrative calculations, not confirmed measurements from the photograph.
Weigh the green and cream yarn used in the sample motif separately. Multiply each weight by the planned motif count. Include the connector weight and reserve approximately 10-15% additional yarn for joining, finishing, and swatches.
Assembly
- Finish the spiral centers. Count 36 stitches in each completed center before adding the frame.
- Complete every medallion. Work the cream lace rounds and sixteen green bobbles.
- Arrange the pattern. Place every spiral facing the same direction for a consistent layout.
- Block the motifs. Match the measured center-to-center spacing across the batch.
- Join horizontal rows. Connect the corresponding three-space groups without pulling the bobbles inward.
- Connect vertical rows. Align the north and south connection points.
- Add lace fillers. Sew four-point connectors into internal intersections.
- Complete the edge. Leave external green bobbles exposed to create a scalloped border.
- Prepare matching accessories. Join pillow motifs and add the chosen backing or cushion closure.
- Finish the project. Weave in remaining ends, inspect connection points, and block the assembled bedspread.
The completed design forms a decorative spiral medallion bedspread with cream lace connections and a raised sage green scalloped edge.
7 Technical Tips
- Dropped working loops: Mark the inactive yarn loop whenever changing between the green and cream spiral arms. An unsecured loop can loosen several previously completed stitches.
- Incorrect center counts: R6 must contain exactly 36 single crochets, with eighteen stitches from each color. A missing increase can prevent the lace frame from dividing into sixteen equal sections.
- Center cupping: Place the center flat after R4 and R6. A pronounced upward curve may indicate excessive tension or misplaced increases.
- Uneven bobbles: Use five unfinished double crochets for every green bobble. Closing a four-double-crochet group produces a visibly smaller raised element.
- Different motif dimensions: Keep blocked joining pitches within approximately 5 mm of the approved sample. Larger differences can create puckering along seams.
- Rotated joining points: Mark compass spaces 1, 5, 9, and 13 before joining. Connecting a neighboring space shifts the diagonal arches away from the lace fillers.
- Loose yarn ends: Weave tails through at least 8 cm of stitch backs and reverse direction twice. A single straight pass may loosen when the cover is handled or washed.
Care and Practical Use
This openwork design is primarily a decorative bed covering rather than a dense insulating blanket. Its chain spaces and raised bobbles require careful handling.
Keep buttons, jewelry, and other snagging objects away from exposed lace connectors. Check the yarn manufacturer’s washing instructions, and test the cleaning process on one motif before treating the entire bedspread.
A fabric backing may be added if more coverage is needed. However, backing changes the weight and drape, so it should be tested before attachment.
Record the yarn brand, dye lot, hook size, blocked motif measurements, and yarn consumption. These values make it easier to reproduce the same result or replace a damaged medallion later.
Related Patterns
- Two-Colour Single Crochet Spiral – Dora Does – A tutorial showing simultaneous two-color spiral construction. [INTERNAL LINK NEEDED: two-color crochet spiral tutorial]
- Spirals Crochet Throw – Sian Brown – A published lace spiral throw with filler motifs and documented sizing. [INTERNAL LINK NEEDED: crochet lace bedspread patterns]
- Guru Guru Spirals Blanket – Fran Mori – A modular spiral blanket worked with DK yarn. [INTERNAL LINK NEEDED: crochet medallion blanket ideas]
- How to Crochet Bobbles – Yarnspirations – Instructions for raised crochet bobble stitches. [INTERNAL LINK NEEDED: crochet bobble stitch guide]
Conclusion
Complete and block one sage-and-cream medallion before selecting the final column and row counts. That measurement determines whether the decorative drop clears the floor and whether the same motif fits the matching shams. Keep the sixteen numbered edge spaces consistent, use cream connectors at internal four-motif crossings, and document yarn consumption by color rather than relying on another designer’s quantities.
This spiral crochet bedspread can then be scaled to a measured mattress and repaired by replacing individual units. Save the stitch-count diagram to Pinterest, or share a photograph of your blocked sample on Instagram with #SageSpiralBedspread. Which edge looks closer to the photograph: bobbles on every arch, or bobbles only on the exposed outer border?









