SEO META
Title: Sunflower Granny Square Crochet Backpack – Free Pattern
Description: Make a sunflower granny square crochet backpack with layered flowers, a drawstring, shaped flap, and striped shoulder straps. Free counted tutorial.
Keywords: sunflower crochet backpack, granny square backpack, crochet flower bag, free crochet bag pattern, drawstring backpack
Introduction
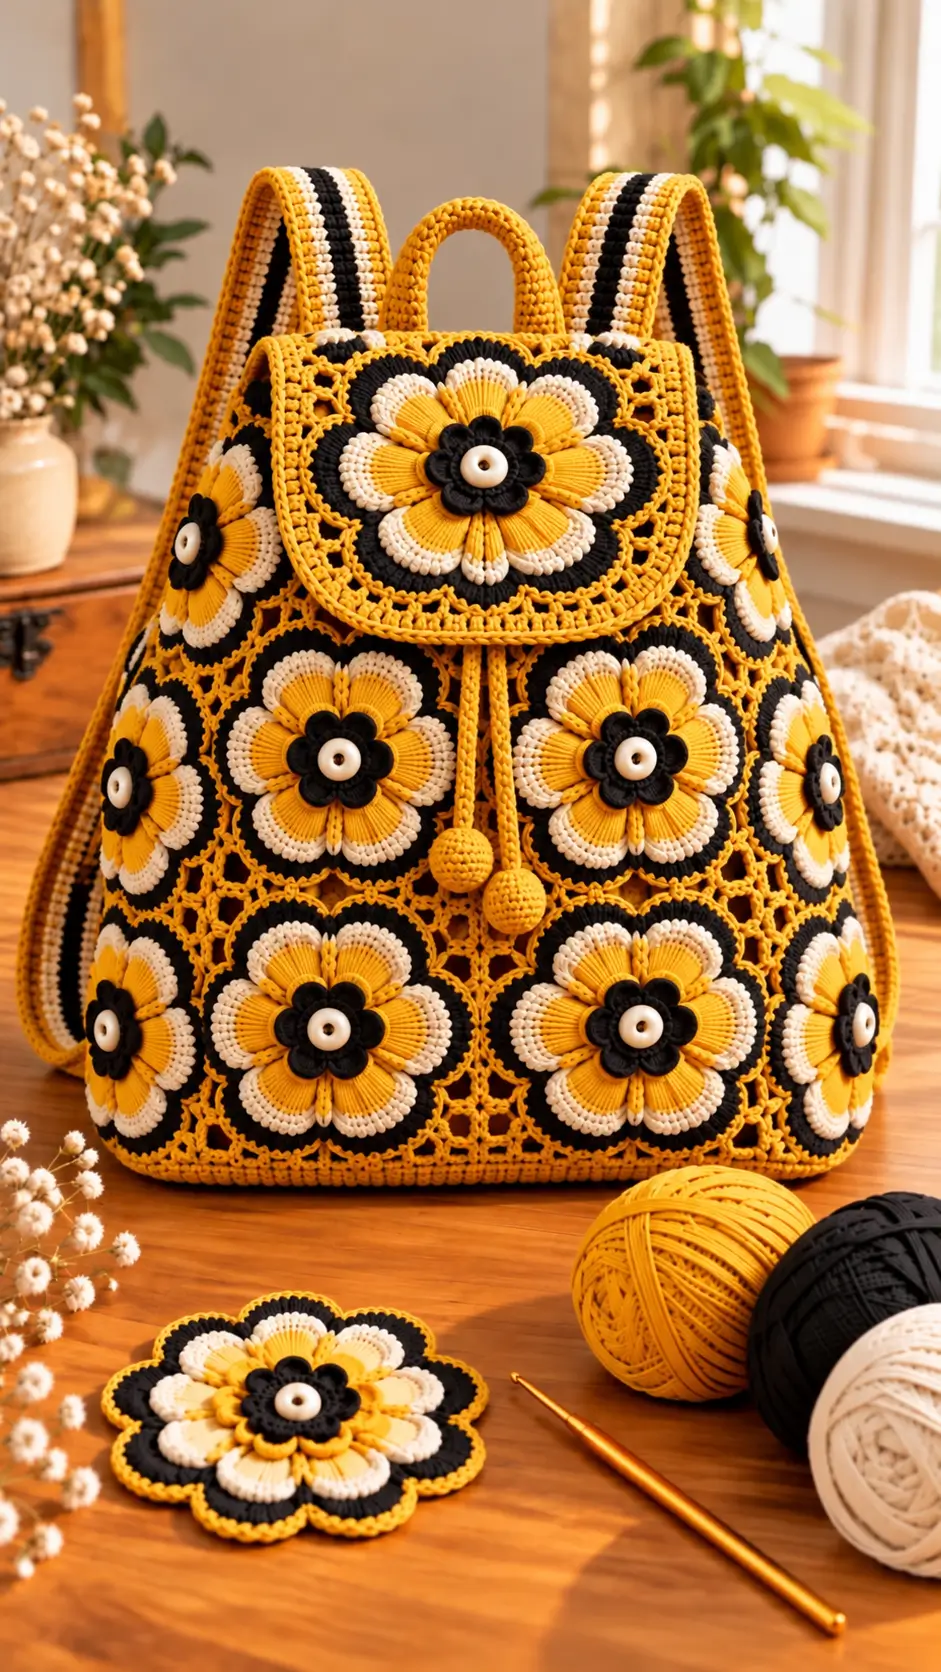
A sunflower with six cream-tipped petals inside a black outline calls for a different square than the usual four-corner floral motif. This sunflower granny square crochet backpack uses worsted cotton, a 4 mm hook, twelve mesh-backed flower squares, and a shaped flap. The target is approximately 30 cm high, with intermediate-level assembly. A cotton lining makes the openwork panels suitable for carrying small daily items without snagging them.
The Design: What Makes This Floral Backpack Different
The six-petal construction separates the flower from its mesh background. You can block every square to the same width before stitching the raised appliqué in place; the flower stays centered while the lace corners remain visible. The second decision is a twelve-square tube: two motifs across the front, two across the back, and one across each side, all stacked two high. This geometry leaves a defined 12 cm depth instead of creating a flat tote. Finally, a separately shaped flap covers the drawstring collar, while surface-stitched stripes add contrast to the load-bearing shoulder straps. A common error in a floral granny square backpack is joining unequal squares without blocking; the resulting side seam twists. This crochet sunflower bag pattern specifies a matching square gauge and a rectangular bottom so that the seams meet on four measured edges.
Project Info at a Glance
| Skill level | Time | Finished size | Hook | Best for |
|---|---|---|---|---|
| Intermediate | Not sample-timed | Target 30 cm H × 24 cm W × 12 cm D | 4.0 mm | Light everyday items; line before use |
Measurement status: These are calculated design targets, not tested finished measurements. Work one complete 12 × 12 cm square before purchasing all colors or committing to the base. The reference pattern published by Lion Brand uses worsted cotton and lists a larger, approximately 38 cm backpack; its gauge and size must not be substituted for this design.
Materials and Tools
Yarn
- Mustard yellow — worsted cotton (#4) — 300 g purchase allowance — Lion Brand 24/7 Cotton in a golden shade. This color covers mesh backgrounds, the base, collar, flap, handle, straps, drawstring, and balls.
- Black — worsted cotton (#4) — 200 g purchase allowance — Lion Brand 24/7 Cotton in black. Use for flower centers, scalloped outlines, small rosettes, and longitudinal strap stripes.
- Ivory or warm white — worsted cotton (#4) — 150 g purchase allowance — Lion Brand 24/7 Cotton in an ecru shade. Use for the light petal outlines and the side stripes on the straps.
These quantities are generous shopping allowances, not verified consumption of the bag in the image. A comparable Ravelry backpack lists 521–575 m total yarn, but these are different patterns and color distributions.
Tools
- Hook: 4.0 mm (US G/6); use a smaller hook only if the cotton fabric is excessively loose.
- Thirteen ivory decorative buttons or beads, 12–15 mm; these are proposed sizes, not measurements taken from the picture.
- Polyester stuffing, a small amount for the two cord-end balls.
- Tapestry needle, locking stitch markers, tape measure, scissors, and blocking pins.
- Optional cotton lining fabric, coordinating thread, and two narrow lengths of cotton webbing for the straps.
No safety eyes are needed. Secure small embellishments with stitching, and omit detachable buttons if the finished bag is intended for a child who might mouth them.
Abbreviations
US terms: MR = magic ring; sc = single crochet; inc = two sc in one stitch; dec = single-crochet two together; sl st = slip stitch; ch = chain; BLO = back loop only; hdc = half double crochet; dc = double crochet; tr = treble crochet; st = stitch; sp = space; RS = right side; WS = wrong side. A number in parentheses gives the count at the end of that round or row; chain spaces count as positions where stated.
Invisible decrease: Insert the hook through the front loops of the next two stitches, yarn over and draw through both front loops, then yarn over and complete one sc.
Pattern — Step by Step
Construction map: Crochet twelve identical flower squares and join them into a six-square circumference, two-square-high tube. The front uses four squares, the back uses four, and each side uses two; add the separate rectangular base, top collar, flap, two shoulder straps, handle, single drawstring, and two balls. Make one extra loose flower as an optional matching sample like the motif pictured on the table.
Target gauge: Aim for 20 sc and 20 sc rows over 10 × 10 cm of firm fabric, with the completed square blocked to 12 × 12 cm. Measure and change hook or square dimensions as needed; no physical sample has been tested. Work rounds continuously unless a section specifically says to join or turn, and mark the first stitch of each spiral round.
Mesh Square Background (Make 12)
Yarn: mustard — original 25-position filet-mesh construction.
Row 1: Ch 26, sc in the second chain and each chain across. Turn. (25 sc)
Row 2: Ch 4, counting as the first dc and first ch-1 space; skip the next sc, dc in the following sc. Repeat [ch 1, skip 1 sc, dc in next sc] to the end. Turn. (13 dc + 12 ch-1 spaces = 25 positions)
Rows 3–10: Ch 4, counting as a dc and ch-1; skip the next ch-1 space and dc in the next dc. Repeat [ch 1, skip next ch-1 space, dc in next dc] across. Turn after each row. (13 dc + 12 ch-1 spaces = 25 positions per row)
Row 11: Ch 1, sc in every dc and every ch-1 space across. (25 sc)
Round 12: Work 23 sc along the top between corners, 18 sc down the nine mesh-row ends on the first side (two per row), 23 sc across the foundation between corners, and 18 sc up the opposite side. Work 3 sc at each of the four corners. Join. (94 sc)
Round 13: With black, sc in every stitch of the previous border, except work 3 sc instead of 1 in the middle stitch of each corner group. Join. (102 sc)
Round 14: With mustard, repeat the same four corner increases and sc in every other stitch. Join, fasten off, and leave a 20 cm joining tail. (110 sc)
Block the square to 12 × 12 cm without stretching the mesh. If the sides bow, correct the tension before making eleven more.
Large Six-Petal Flower (Make 13)
Yarn: black, mustard and ivory — original six-repeat petal mathematics.
R1 (black): 6 sc in MR. (6)
R2: Inc × 6. (12)
R3: [Sc 1, inc] × 6. (18)
R4: [Sc 2, inc] × 6. (24)
R5 (mustard): [Sc 3, inc] × 6. (30)
R6: [Sc 4, inc] × 6. (36)
R7 (mustard): Repeat six times: skip 2 underlying sc, work [2 dc, 2 tr, 2 dc] in the next sc, skip 2 sc, sl st in the next sc. (6 shells of 6 stitches + 6 valley sl sts = 42 stitches)
R8 (ivory): Across each six-stitch shell work [sc, hdc, dc, dc, hdc, sc], then sl st into its valley stitch; repeat around. (36 petal stitches + 6 sl sts = 42)
R9 (black): Sc in each stitch, including each valley sl st. Join and leave a 25 cm tail. (42 sc)
Keep all six petal repeats identical. Sew twelve flowers to the twelve blocked square backgrounds, placing a flower centrally so that mustard mesh remains visible at the corners; reserve the thirteenth flower for the flap.
Black Flower-Center Rosette (Make 13)
Yarn: black — original scalloped overlay.
R1: 6 sc in MR. (6)
R2: Inc × 6. (12)
R3: [Sc 1, inc] × 6. (18)
R4: Repeat [sl st in next st, (hdc, dc, hdc) in next st, sl st in next st] six times. (6 raised lobes; 30 worked stitches)
Fasten off, leaving 20 cm for sewing. Position each rosette over the center of a large flower, then sew an ivory button through the rosette and underlying flower fabric. For a washable bag, stitch the button through a small lining reinforcement rather than relying on a loose yarn knot.
Rectangular Bottom Panel (Make 1)
Yarn: mustard — firm single crochet, original calculated dimensions.
Row 1: Ch 49, sc in the second chain from the hook and across. Turn. (48 sc)
Rows 2–24: Ch 1, turn, sc across. (48 sc each row)
Fasten off with a 50 cm sewing tail. At the target gauge, the panel measures approximately 24 × 12 cm. Mark 48 attachment positions on each long edge and 24 row-end positions on each short edge; their total of 144 aligns with the six 24-position lower motif edges. Add a washable, removable plastic canvas insert only after lining the panel.
Drawstring Collar (Work on Joined Body)
Yarn: mustard — marked continuous rounds.
R1: Pick up 24 sc evenly across the top of each of the six upper squares, taking one stitch through joined seams where needed. (144 sc)
R2–R5: Sc around. (144 sc each round)
R6: [Sc 4, ch 2, skip 2] × 24. (96 sc + 24 ch-2 spaces = 144 positions)
R7: Sc in every sc and 2 sc into every ch-2 space. (144 sc)
R8–R14: Sc around. (144 sc each round)
R15: With black, sl st in each stitch for a defined top edge. Join and fasten off. (144 sl sts)
The twenty-four eyelets form a continuous channel around the opening. Keep the collar uncinched while positioning the flap.
Shaped Flower Flap (Make 1)
Yarn: mustard with black edging — original rectangular-to-rounded flap shaping.
Row 1: Ch 49, sc across from the second chain. (48 sc)
Rows 2–22: Ch 1, turn, sc across. (48 sc per row)
Row 23: Ch 1, turn, dec at the first two stitches, sc in the middle, dec over the final two stitches. (46 sc)
Row 24: Repeat the two edge decreases. (44 sc)
Row 25: Repeat. (42 sc)
Row 26: Repeat. (40 sc)
Row 27: Repeat. (38 sc)
Round 28: Work a border of 46 sc along the top interior, 25 sc along each shaped side interior, 36 sc along the bottom interior, and 3 sc at each of four corners. Join. (144 sc)
Round 29 (black): Sc in each border stitch, replacing the center sc of each three-stitch corner with 3 sc. (152 sc)
Round 30 (mustard): Repeat these four corner increases. Join and leave a 50 cm attachment tail. (160 sc)
Sew the reserved large flower and rosette to the flap center. The flap should cover the front drawstring knot without being stitched over the collar opening.
Shoulder Straps (Make 2)
Yarn: mustard with black and ivory surface stripes — original flat-strip construction.
Row 1: Ch 10, sc in the second chain and each chain across. (9 sc)
Rows 2–150: Ch 1, turn, sc across. (9 sc per row)
Fasten off, leaving a 50 cm joining tail at each end. Check strap length against the intended wearer; the goal is roughly 70–75 cm, so add or omit full nine-stitch rows if the sample gauge differs. Work one black line of surface slip stitches down the center stitch column and one ivory line on each adjacent column. A narrow cotton-webbing strip sewn to the WS limits lengthwise stretch under weight.
Top Carrying Handle (Make 1)
Yarn: mustard — original nine-stitch strip.
Row 1: Ch 10; sc from the second chain across. (9 sc)
Rows 2–40: Ch 1, turn, sc across. (9 sc per row)
Fasten off with a 30 cm tail at each end. The handle forms a short arch above the back of the flap; attach both ends through several rows of backing fabric rather than a single open mesh chain.
Drawstring Cord (Make 1)
Yarn: mustard — measured chain with slip-stitch reinforcement.
Row 1: Ch 451. (451 chains)
Row 2: Sl st in the second chain from the hook and in each remaining chain. (450 sl sts)
Fasten off and check for approximately 110–120 cm of usable cord. Chain size varies with tension, so extend or shorten the foundation before working the slip stitches if necessary. Thread the cord in and out through all twenty-four collar openings, beginning and ending at the front center.
Round Drawstring Ends (Make 2)
Yarn: mustard — standard six-increase crochet-ball arithmetic.
R1: 6 sc in MR. (6)
R2: Inc × 6. (12)
R3: [Sc 1, inc] × 6. (18)
R4: [Sc 2, inc] × 6. (24)
R5: [Sc 3, inc] × 6. (30)
R6–R8: Sc around. (30 sc each round)
R9: [Sc 3, dec] × 6. (24)
R10: [Sc 2, dec] × 6. (18)
R11: [Sc 1, dec] × 6. (12)
R12: Dec × 6. (6)
Add a small amount of stuffing before R10, leaving room for the cord end. Cut a 20 cm tail, thread it through the remaining six front loops, and close. Sew one ball securely to each cord tip.
Optional Matching Loose Flower Sample (Make 1)
Yarn: black, mustard and ivory — repeat the large-flower instructions.
Work R1–R9 of the Large Six-Petal Flower, then R1–R4 of the Black Flower-Center Rosette. (42 outer stitches; 30 rosette stitches) Stitch together without attaching to a mesh square, producing the loose flower sample shown beside the hook in the reference photo. Fasten off and weave in both tails. This extra sample is decorative and is not part of the bag’s required thirteen flowers.
Assembly
- Block the components. Arrange twelve 12 cm squares in two horizontal rows of six, with flowers facing outward and corner grids matching.
- Join the body. Seam the squares side by side, then join the first and last columns into a tube; four motifs face front, four face back, and two sit on each side.
- Attach the bottom. Match the base’s 48 + 24 + 48 + 24 attachment positions to the six lower motif edges, and sew all four sides without stretching the mesh.
- Finish the top band. Work the fifteen collar rounds and check that twenty-four eyelets remain open after the border.
- Complete the face of each flower. Attach all thirteen black rosettes and ivory decorative centers, including the separate flap flower.
- Sew on the flap. Center its straight upper edge on the rear top of the bag, anchor it below the collar rim, and leave the rounded end free to fold forward.
- Fit the shoulder straps. Anchor upper ends to the back beneath the flap and lower ends near the two rear base corners; stitch through reinforced fabric.
- Attach the handle. Center it between the upper strap mounts and secure both ends through more than one structural stitch.
- Thread the drawstring and add balls. Start at front center, pass through all twenty-four eyelets, even the two ends, and secure one stuffed ball to each.
- Line and finish the bag. Sew a rectangular cotton lining to the interior beneath the eyelets, reinforce attachment points, and weave in every exposed tail.
The completed backpack has a two-layer flower surface, a shaped flap, a usable drawstring closure, and two reinforced carrying straps.
7 Technical Tips
- Stitch-marker drift: Mark every group of 24 stitches along the upper tube before working the 144-stitch collar. A missed square boundary shifts the drawstring eyelets toward one side.
- Overstuffed cord balls: Fill each ball lightly while it still has 18 stitches open. Dense stuffing pushes through the final six-stitch closure and changes the shape.
- Visible decreases: Work invisible decreases on rounds 9–12 of each drawstring ball. Ordinary decreases leave diagonal gaps that show the stuffing.
- Premature button placement: Pin every 12–15 mm flower-center button before sewing the lining. Adding buttons afterward can trap unreinforced thread against the interior bag fabric.
- Velvet tension failure: Velvet yarn can distort the open mesh and mask the six cream petal tips. Test a blocked 12 × 12 cm square before replacing the specified cotton.
- Uneven pinning: Pin the base to the tube at all four corners and the midpoint of each 48-stitch long edge. Sewing from one corner without these checkpoints can pull the base into a trapezoid.
- Short woven tails: Leave at least 12 cm for routine color-change ends and pass them back through several stitch paths. A tail secured only beneath one chain arch can slip free during washing.
Related Patterns
- Daisy Granny Square Backpack — a flower-motif backpack with full assembly guidance. Read the free daisy backpack tutorial. [INTERNAL LINK NEEDED: daisy crochet backpack]
- Granny Square Sunflower Bag — a free cotton-based sunflower square bag with join instructions. See the sunflower bag pattern. [INTERNAL LINK NEEDED: sunflower granny square bag]
- Sunflower Drawstring Backpack — an intermediate-level cotton backpack design documented by Lion Brand. View the designer pattern page. [INTERNAL LINK NEEDED: crochet drawstring bag]
- Granny Squares Crochet Backpack — a separate approach with a lining, flap, drawstring and assembly notes. Compare backpack construction methods. [INTERNAL LINK NEEDED: how to line a crochet bag]
Conclusion
Before putting the finished bag into use, measure its height, width and depth, then record your actual gauge and the grams remaining from each yarn color. Those figures will make a second backpack easier to size and will provide more reliable materials information than an unscaled photograph. Photograph the front motifs, striped rear straps, and open drawstring collar separately; these views document how the structure works. Share the finished result on Pinterest and Instagram with #SunflowerGrannyBackpack, along with your measured square size. For the next version of this sunflower granny square crochet backpack, would you keep the six-petal black-and-ivory flower centers or replace them with a simpler single-layer sunflower?









