Introduction
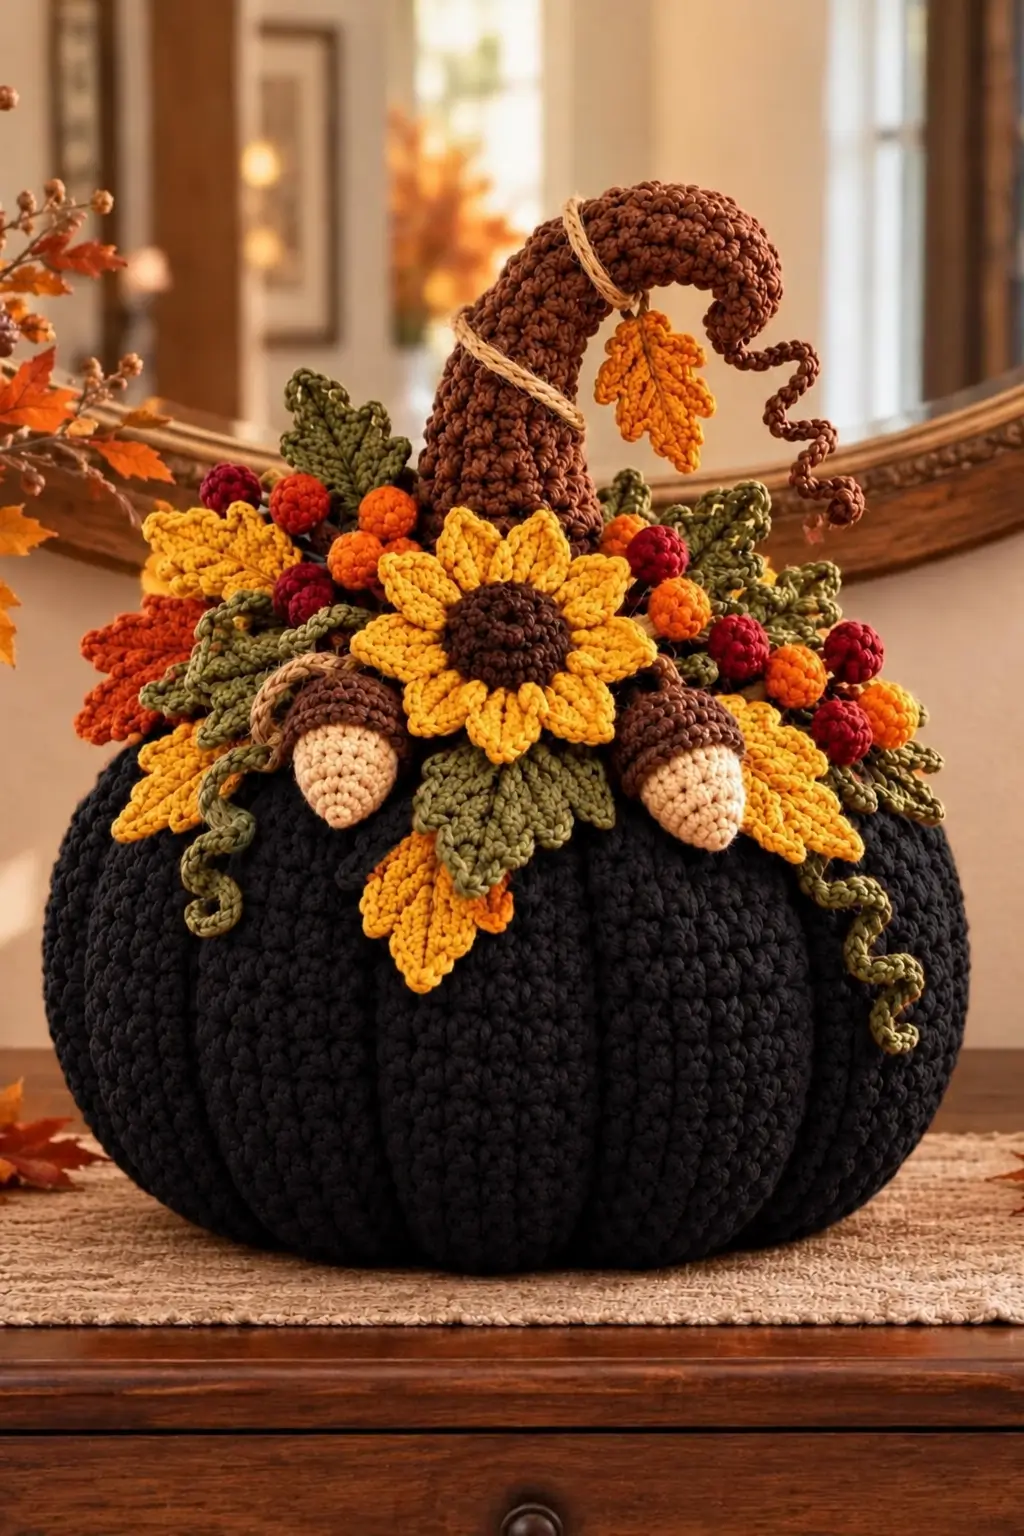
A black pumpkin topped by a hooked brown stem needs its sunflower, acorns, berries, and curling vines concentrated at the crown or the silhouette disappears under the foliage. This black crochet pumpkin pattern uses worsted yarn, a 5 mm hook, fiberfill, and separately crocheted autumn details. The large 42-stitch body is an intermediate decorative centerpiece designed for a table, mantel, entry display, or Thanksgiving arrangement.
The Design: What Makes This Harvest Pumpkin Different
The black body is deliberately restrained so the crown can carry most of the visual detail. Seven increase rounds produce a broad stuffed form, while external shaping strands divide it into deep pumpkin segments without complicated internal construction. Above the body, an oversized brown stem bends forward to establish height. The crochet pumpkin centerpiece then uses a sunflower as its central focal point, with olive leaves, berries and paired acorns arranged asymmetrically around it. Curling vines soften the boundary between the botanical crown and black pumpkin. One common mistake in a crochet pumpkin with flowers is attaching every accessory at the same height. That creates a horizontal band. Here, the sunflower sits forward, the leaves extend outward, and the stem rises behind both layers.
Project Information at a Glance
| Skill Level | Time | Published Size Reference | Hook | Best For |
|---|---|---|---|---|
| Intermediate | Multi-session project | Published pumpkins vary by construction and yarn | 5 mm | Fall centerpiece, mantel or Thanksgiving display |
The photographed pumpkin is substantially more elaborate than the small published references used for technical comparison. Its exact measurements cannot be recovered reliably from a single image, so the pattern below uses a large photo-inspired body rather than claiming an exact reproduction.
Materials and Tools
Yarn
- Black or charcoal worsted #4 yarn — pumpkin body; begin with at least 200 g for a large centerpiece.
- Chocolate-brown worsted #4 yarn — oversized stem, acorn caps and brown tendril.
- Olive-green worsted #4 yarn — leaves and curling vines.
- Sunflower-yellow worsted #4 yarn — sunflower petals and yellow foliage.
- Rust-orange worsted #4 yarn — berries and autumn leaves.
- Burgundy worsted #4 yarn — berry clusters.
- Cream worsted #4 yarn — acorn bodies.
- Dark-brown worsted #4 yarn — sunflower center.
- Natural tan yarn or cord — optional wraps around the stem.
Published worsted pumpkins use approximately 80–200 yards depending on size and construction. The 200 g starting quantity for black is a planning allowance for this larger photo-inspired body, not a published specification.
Tools
- 5 mm crochet hook
- Polyester fiberfill
- Large tapestry needle
- Long upholstery needle
- Locking stitch markers
- Scissors
- Flexible measuring tape
- Rustproof pins
Abbreviations
- MR — magic ring
- sc — single crochet
- inc — 2 sc in one stitch
- dec — invisible decrease
- hdc — half double crochet
- dc — double crochet
- tr — treble crochet
- sl st — slip stitch
- ch — chain
- BLO — back loop only
- st/sts — stitch/stitches
For an invisible decrease, insert the hook through the front loops of the next two stitches, yarn over, pull through both front loops, then complete the single crochet.
Pattern — Step by Step
Work the body in a continuous spiral unless stated otherwise. The botanical pieces are made separately and attached after the pumpkin has been stuffed and shaped.
Black Pumpkin Body
Yarn: black — standard six-stitch amigurumi expansion adapted for the photographed centerpiece.
R1: 6 sc in MR. (6)
R2: inc × 6. (12)
R3: (sc, inc) × 6. (18)
R4: (2 sc, inc) × 6. (24)
R5: (3 sc, inc) × 6. (30)
R6: (4 sc, inc) × 6. (36)
R7: (5 sc, inc) × 6. (42)
R8–R27: sc around. (42)
Begin stuffing around R20. Add small sections of fiberfill and distribute them toward the outside wall.
R28: (5 sc, dec) × 6. (36)
R29: (4 sc, dec) × 6. (30)
R30: (3 sc, dec) × 6. (24)
R31: (2 sc, dec) × 6. (18)
Add the remaining stuffing. The body should be firm but still compressible enough to accept shaping strands.
R32: (sc, dec) × 6. (12)
R33: dec × 6. (6)
Fasten off with a 35 cm tail. Thread through the six remaining front loops and close.
Pumpkin Segment Shaping
Cut eight lengths of black yarn approximately three times the pumpkin circumference.
Thread the first strand through a long needle.
Pass from the bottom center through the stuffed body and exit at the top center.
Bring the yarn down the outside and return through the bottom.
Pull until a visible groove forms.
Tie securely.
Repeat around the body to form eight approximately equal segments.
Work opposite grooves as pairs so the stuffing remains centered.
Oversized Curved Stem
Yarn: chocolate brown.
R1: 6 sc in MR. (6)
R2: inc × 6. (12)
R3: (sc, inc) × 6. (18)
R4: (2 sc, inc) × 6. (24)
R5–R10: sc around. (24)
R11: (2 sc, dec) × 6. (18)
R12–R24: sc around. (18)
Stuff gradually. Keep the upper third less firmly filled than the base.
R25: 6 sc, 6 sl st, 6 sc. (18 worked positions)
R26: 5 sc, 8 sl st, 5 sc. (18 worked positions)
R27: 4 sc, 10 sl st, 4 sc. (18 worked positions)
R28: sc around. (18)
R29: 4 sc, 10 sl st, 4 sc. (18 worked positions)
R30–R32: sc around. (18)
R33: (sc, dec) × 6. (12)
R34–R36: sc around. (12)
R37: dec × 6. (6)
Fasten off and close the tip.
Bend the lightly stuffed upper stem into a hook shape before attachment.
Natural Stem Wraps — Make 2
Yarn: natural tan.
Ch 45.
Fasten off.
Wrap the chain twice around the brown stem at two different heights.
Tack the ends into the brown fabric so the wraps cannot slide.
Sunflower Center
Yarn: dark brown.
R1: 6 sc in MR. (6)
R2: inc × 6. (12)
R3: (sc, inc) × 6. (18)
R4: (2 sc, inc) × 6. (24)
R5: sc around. (24)
Fasten off with a 30 cm sewing tail.
For additional texture, work small surface slip stitches randomly across the center.
Sunflower Petals — Make 12
Yarn: sunflower yellow.
Ch 9.
Starting in the second ch:
sl st, sc, hdc, dc, tr, dc, hdc, sc.
Ch 2 at the point.
Work down the opposite side of the foundation chain:
sc, hdc, dc, tr, dc, hdc, sc, sl st.
Fasten off with a 15 cm tail.
Make twelve matching petals.
Sunflower Assembly
Arrange six petals behind the brown center at equal intervals.
Place the remaining six between the first layer so their tips fill the gaps.
Sew all petal bases to the back of the center.
Leave the outer halves free so the flower retains dimension.
Large Olive Leaves — Make 6
Yarn: olive green.
Ch 16.
Starting in the second ch work:
sl st, sc, hdc, dc, dc, tr, tr, dc, dc, hdc, sc, sc, sl st.
At the tip work:
(sc, ch 2, sc)
Work the mirrored stitch sequence down the opposite side.
Join at the base.
Fasten off with a 20 cm sewing tail.
Serrated Olive Leaves — Make 4
Yarn: olive green.
Ch 14.
Work around both sides of the foundation chain using graduated sc, hdc, dc and tr stitches.
On the finishing round, create three points along each side by working:
(sc, ch 2, sc)
at evenly spaced positions.
Work 3 sc at the terminal point.
Fasten off.
Yellow Autumn Leaves — Make 5
Yarn: sunflower yellow.
Ch 15.
Starting in the second chain:
sc, hdc, dc, dc, tr, tr, dc, hdc, sc, sl st.
Work a ch-2 point.
Mirror the stitches along the second side.
Fasten off with a sewing tail.
Orange Autumn Leaves — Make 3
Yarn: rust orange.
Repeat the yellow leaf instructions.
For a broader lower lobe, work 2 dc in each of the two central stitches on both sides.
Fasten off with a 20 cm tail.
Hanging Orange Leaf
Yarn: rust orange.
Ch 13.
Starting in the second chain, work sc, hdc, dc, tr, tr, dc, hdc, sc toward the point.
Ch 2.
Mirror the sequence along the second side.
Fasten off.
Attach a 10–12 cm brown chain to the base so the leaf can hang from the upper stem.
Cream Acorn Bodies — Make 2
Yarn: cream.
R1: 6 sc in MR. (6)
R2: inc × 6. (12)
R3: (sc, inc) × 6. (18)
R4–R6: sc around. (18)
R7: (sc, dec) × 6. (12)
Stuff lightly.
R8: dec × 6. (6)
Fasten off and close.
Brown Acorn Caps — Make 2
Yarn: chocolate brown.
R1: 6 sc in MR. (6)
R2: inc × 6. (12)
R3: (sc, inc) × 6. (18)
R4: BLO sc around. (18)
R5: sc around. (18)
Fasten off with a long tail.
Place one cap over the broad end of each cream acorn and sew around R5.
Acorn Stems — Make 2
Join brown yarn to the top center of an acorn cap.
Ch 8.
Sl st back through the chain.
Fasten off.
Orange Berries — Make 6
Yarn: orange.
R1: 6 sc in MR. (6)
R2: inc × 6. (12)
R3–R4: sc around. (12)
Add a small amount of stuffing.
R5: dec × 6. (6)
Fasten off with a sewing tail.
Burgundy Berries — Make 7
Yarn: burgundy.
Repeat the orange berry instructions:
R1: 6 sc in MR. (6)
R2: inc × 6. (12)
R3–R4: sc around. (12)
R5: dec × 6. (6)
Stuff lightly before closing.
Green Curling Vines — Make 3
Yarn: olive green.
Ch 31.
Starting in the second chain, work 3 sc into each chain.
The repeated increases cause the strip to curl automatically.
Fasten off with a 20 cm attachment tail.
Long Brown Tendril
Yarn: chocolate brown.
Ch 36.
Starting in the second chain, work 2 sc into each of the first 10 chains, then 3 sc into each remaining chain.
Fasten off.
The change in increase rate produces a less uniform natural-looking curl.
Building the Botanical Crown
Attach the stem before any flowers or foliage.
Its broad base should sit at the pumpkin’s top center with the hook curving toward the front or slightly to one side.
Place the largest olive leaves around the stem base next.
Extend several tips beyond the edge of the crown so the foliage does not disappear beneath the sunflower.
Position the central sunflower in front of the stem.
Its brown center should sit approximately level with the lower third of the stem.
Add yellow and orange leaves behind the flower.
Place one acorn on either side of the sunflower, pointing downward.
Fill remaining spaces with berries before adding the curling vines.
Positioning the Berries
Do not distribute the orange and burgundy berries at perfectly regular intervals.
Group them in clusters of two or three.
Place one cluster near the left acorn and another above or beside the right acorn.
Add isolated berries only where a visible gap remains between foliage.
The berries should sit above some leaves and below others so the crown has several depth levels.
Attaching the Sunflower
Pin the sunflower in place before sewing.
Run the needle through the brown center and into the pumpkin crown at four or five points.
Do not stitch around the entire petal perimeter.
After the center is stable, tack only two or three lower petals to nearby leaves.
The remaining petals should stay free.
Attaching the Acorns
Position the acorns diagonally rather than vertically.
Sew through the brown caps and into the pumpkin or leaf foundation underneath.
Leave the cream bodies largely free.
This method keeps the acorns dimensional while preventing them from swinging forward.
Attaching the Vines
Secure only the base of each green curl.
Let the remaining spiral fall naturally over the black pumpkin.
If a vine crosses the sunflower, reposition it rather than sewing across the petals.
The long brown tendril can emerge from the upper stem and curl into open space.
Deepening the Pumpkin Ribs
The black body depends on shadow rather than color changes to reveal its segments.
If the first shaping pass produces shallow grooves, repeat each shaping strand once.
Insert the needle through the same top and bottom centers.
Follow the existing groove down the outside.
Pull gradually while watching the neighboring sections.
Stop when the groove is visible but before the stuffing creates hard bulges.
Making a Larger Pumpkin
The 42-stitch plateau produces the selected large amigurumi structure, but yarn thickness has a major effect on finished scale.
Using bulky yarn with a proportionally larger hook increases the dimensions without changing the stitch mathematics.
If additional worsted-weight circumference is required, continue from R7 with:
R8: (6 sc, inc) × 6. (48)
The decrease sequence must later reverse through 42, 36, 30, 24, 18, 12 and 6 stitches.
Lengthen the plateau proportionally so the body does not become flat and disk-shaped.
Assembly
- Stuff and close the black pumpkin body, then divide it into eight approximately equal vertical segments.
- Sew the wide base of the curved brown stem firmly into the top center of the pumpkin.
- Attach the large olive leaves around the stem, followed by the smaller serrated foliage.
- Position the sunflower at the front center and sew through its brown center while leaving most petals free.
- Place one acorn on each side of the sunflower and attach through the brown caps.
- Add the yellow and orange leaves behind the sunflower and between the olive foliage.
- Sew the orange and burgundy berries in irregular clusters across the crown.
- Attach the hanging orange leaf and brown tendril to the upper stem.
- Add the green curling vines around the outer crown and allow their lower sections to fall freely over the pumpkin.
- Weave all remaining tails beneath leaves or into matching sections and reshape the stem, petals, acorns and vines.
The completed centerpiece should have eight visible pumpkin segments, a hooked stem, one dominant sunflower, two hanging acorns, layered foliage, mixed berries and several freely curling tendrils.
7 Technical Tips
- Divide the pumpkin into eight grooves before adding the crown. A spacing error greater than about 2 cm at the equator becomes difficult to correct once leaves cover the top center.
- Keep the 42-stitch plateau consistent. Accidentally adding another six-stitch increase changes the circumference and makes the planned decrease sequence incompatible with the body.
- Do not overfill the upper stem. A firmly packed 18-stitch tube resists the asymmetric slip-stitch sections and produces a straight stem instead of the photographed hook.
- Leave at least half of each sunflower petal unattached. Sewing every petal flat removes the dimensional overlap and turns the flower into a rigid disk.
- Stuff berries with very small fiberfill pieces. A lump larger than approximately 1 cm can distort a 12-stitch berry and expose filling between stitches.
- Pin the complete crown before permanent sewing. Moving an acorn or flower by 2–3 cm can expose a gap that was previously hidden by overlapping leaves.
- Weave attachment tails away from the stem base. Concentrating dozens of ends in the central 3 cm area creates a hard crown and makes later needle passes difficult.
Yarn Planning
Published worsted pumpkin patterns vary considerably in consumption. A ribbed construction lists approximately 80–150 yards, while a four-size family uses roughly 100–200 yards depending on dimensions.
This black crochet pumpkin pattern contains substantially more components than those plain references. Weigh the completed black body before making the crown. Then weigh one leaf, one berry, one acorn and the sunflower separately.
Multiply each sample weight by its required quantity. Add the stem weight and approximately 15 percent for sewing tails, vines, shaping strands and gauge variation.
For the black body, buying an additional matching dye-lot skein is preferable to discovering a visible color shift halfway through a large centerpiece.
Choosing Yarn
A smooth worsted yarn gives the black segments and botanical details clear definition. Very fuzzy fibers reduce the visibility of the sunflower petals and leaf points.
Cotton produces crisp leaves and firm acorns but adds considerable weight to a centerpiece of this scale. Acrylic makes the pumpkin lighter and allows the stuffed body to recover more easily after storage.
A cotton-acrylic blend can be useful when the same yarn line offers all of the required autumn colors.
Keep the yarn thickness similar across the sunflower petals and leaves. A substantially thicker yellow yarn can make the flower disproportionately large compared with the crown.
Care and Storage
Follow the washing instructions supplied with the selected yarn.
Lift the finished centerpiece from underneath the black body rather than carrying it by the hooked stem.
For seasonal storage, use a container tall enough that the stem does not need to be folded sharply.
Place tissue or lightweight fabric around the sunflower and acorns if other decorations will share the container.
After storage, reshape the curling vines by winding them loosely around a crochet hook or pencil for several minutes.
Conclusion
This black crochet pumpkin pattern separates a complex harvest arrangement into manageable components: a 42-stitch stuffed body, eight shaping grooves, an oversized curved stem, sunflower, paired acorns, berries, leaves and curling vines. Crochet and shape the black pumpkin first, then pin the complete botanical crown before sewing any decorative piece permanently. That trial arrangement is the most useful next step because the flower and stem determine where every smaller component fits.
Save the finished centerpiece to Pinterest or share it on Instagram with #BlackHarvestCrochetPumpkin. For this specific design, would you keep the central sunflower bright yellow or change its petals to rust orange for a darker autumn palette?









