Introduction
A rose with four stacked petal tiers can rise several centimeters above its square, so the flower has to be built separately from the blanket foundation. This 3D rose crochet granny square blanket pattern combines cream panels, layered pink roses, olive leaves, small buds, and dusty-rose seams. Use DK yarn with a 4 mm hook and make one complete sample square before calculating a bedspread.
The Design: What Makes This 3D Rose Blanket Different
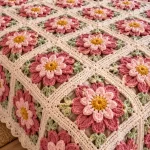
The photograph uses large cream squares as neutral frames for dimensional floral centers. Each primary motif contains a multilayer rose, several olive-green leaves, and smaller pink buds positioned around the flower. Darker pink joining lines separate the squares and turn the individual motifs into a visible grid.
Three structural decisions matter. First, the cream background stays relatively flat so the 3D crochet rose motif remains dominant. Second, the rose is made independently and attached through its center and lower petals; sewing every petal flat would remove the layered effect. Third, the leaves extend beyond the flower rather than disappearing beneath it. One frequent failure occurs when an oversized rose pulls the center of a floral crochet granny square inward, so motif diameter must be checked before assembly.
Project Info at a Glance
| Skill Level | Estimated Time | Sample Square | Hook | Best For |
|---|---|---|---|---|
| Intermediate to Advanced | 2–3 hours per decorated square | Approx. 20 × 20 cm target | 4.0 mm | Bedspreads, throws, decorative blankets |
The 20 cm measurement is a planning target for this photo-inspired version, not a measurement taken from the photographed blanket. Make and block one finished square before calculating the final layout.
Materials and Tools
Yarn
- Warm cream DK yarn — main square backgrounds and outer edging.
- Dusty rose DK yarn — square joining and decorative borders.
- Dark rose DK yarn — inner rose petals.
- Medium pink DK yarn — middle rose petals.
- Pale pink DK yarn — outer rose petals.
- Olive green DK yarn — leaves.
- Pink DK yarn — small flower buds.
Do not estimate a full bedspread’s yarn requirement from ordinary flat crochet. The layered flowers and leaves add substantial yarn consumption. Weigh one completely decorated square and multiply its yarn consumption by the planned number of motifs.
Tools
- 4.0 mm crochet hook
- Tapestry needle
- Scissors
- Locking stitch markers
- Blocking mats
- Rust-resistant pins
- Measuring tape
- Digital kitchen scale
Abbreviations
- MR – Magic Ring
- ch – Chain
- sl st – Slip Stitch
- sc – Single Crochet
- hdc – Half Double Crochet
- dc – Double Crochet
- tr – Treble Crochet
- st – Stitch
- sp – Space
- BLO – Back Loop Only
- FO – Fasten Off
An invisible decrease is worked through the front loops of two neighboring stitches before completing one single crochet; the main flat-square construction below does not require decreases.
Pattern – Step by Step
Make the cream background, rose, leaves, and buds separately. Block the background square before attaching dimensional pieces.
Cream Background Square
Yarn: warm cream.
R1: MR, ch 3, 2 dc, ch 2, [3 dc, ch 2] × 3. Join with sl st. (12 dc)
R2: Sl st to corner. Ch 3, 2 dc, ch 2, 3 dc in same corner; ch 1. In each remaining corner work (3 dc, ch 2, 3 dc), ch 1. Join. (24 dc)
R3: Sl st to corner. Work (3 dc, ch 2, 3 dc) in corner, ch 1, 3 dc in next side space, ch 1. Repeat around. Join. (36 dc)
R4: Work (3 dc, ch 2, 3 dc) in each corner. Work 3 dc in each side space with ch 1 between groups. Join. (48 dc)
R5: Repeat the established granny-square sequence. (60 dc)
R6: Repeat the established sequence. (72 dc)
R7: Repeat the established sequence. (84 dc)
R8: Repeat the established sequence. (96 dc)
Continue the same progression until the square approaches the target measurement. Each additional round adds 12 double crochet stitches.
Fasten off and block the square to an exact square shape before adding the flower.
Optional Solid Finishing Round
Yarn: cream.
Attach yarn in any corner.
Work sc evenly across each side. In every corner work:
(sc, ch 2, sc).
Join with a slip stitch.
This round gives the joining seam a firmer edge and reduces distortion when the heavy flower is attached.
Large Layered Crochet Rose
The photographed flower contains several overlapping petal tiers. The following construction uses a central base with progressively larger petal rounds.
Rose Center
Yarn: dark rose.
R1: 6 sc in MR. (6)
R2: inc × 6. (12)
R3: (1 sc, inc) × 6. (18)
Join with a slip stitch.
Inner Petal Tier
Work into the front loops.
Repeat around:
sl st in next st, 3 dc in next st, sl st in next st.
Allow the petals to overlap slightly toward the center.
Fasten off the dark rose yarn.
Second Petal Tier
Yarn: medium pink.
Attach yarn behind the first petal tier.
Create a foundation of chain spaces behind the existing petals:
[ch 4, sl st around the base between neighboring petals] repeat around.
Into each ch-4 space work:
sc, hdc, 3 dc, hdc, sc.
Repeat around.
These petals should sit behind the dark center.
Third Petal Tier
Yarn: medium pink or pale pink.
Create another set of loops behind the second tier:
[ch 5, sl st around the next available anchor] repeat around.
Into each ch-5 space work:
sc, hdc, dc, 3 tr, dc, hdc, sc.
Repeat around.
The third tier should extend beyond the previous petals.
Outer Petal Tier
Yarn: pale pink.
Create larger loops behind the third tier:
[ch 6, sl st around the next anchor] repeat around.
Into each loop work:
sc, hdc, 2 dc, 3 tr, 2 dc, hdc, sc.
Repeat around.
Fasten off, leaving a 30 cm tail for attaching the rose.
Do not press the rose flat during blocking. Shape the petals individually with your fingers.
Olive Crochet Leaves
Large Leaf (Make 6–8 Per Main Flower)
Yarn: olive green.
Ch 11.
Starting in the second chain from the hook, work:
sl st, sc, hdc, dc, 2 tr, dc, hdc, sc, sl st.
Ch 1.
Rotate the work and crochet along the opposite side of the foundation chain:
sl st, sc, hdc, dc, 2 tr, dc, hdc, sc, sl st.
Join at the tip.
Fasten off, leaving approximately 20 cm for sewing.
Raised Leaf Vein
Use a darker olive yarn or the same green.
Work surface slip stitches from the base of the leaf toward its tip.
Keep the surface stitches relaxed. A tight center vein causes the leaf to fold sharply.
Small Pink Bud
Bud (Make 4–8 Per Square as Desired)
Yarn: medium and pale pink.
R1: 6 sc in MR. (6)
R2: inc × 6. (12)
R3: 12 sc. (12)
R4: 12 sc. (12)
Add a very small amount of stuffing if a dimensional bud is required.
R5: (1 sc, dec) × 4. (8)
Fasten off, leaving a 20 cm tail.
Thread the tail through the remaining stitches and pull the opening partly closed.
Wrap a short strand of darker pink yarn around the lower portion to create a defined bud shape.
Small Bud Leaves
Yarn: olive green.
Ch 6.
Starting in the second chain work:
sl st, sc, hdc, sc, sl st.
Fasten off with a 15 cm sewing tail.
Make two small leaves for each prominent bud if you want the floral arrangement to resemble the side motifs in the photograph.
Arranging the Main Floral Motif
Place the blocked cream square on a flat surface.
Position the large rose exactly at the center.
Arrange three or four leaf pairs around the flower.
Rotate the leaves so their tips point toward the square’s corners and sides.
Add small buds farther from the rose.
The floral arrangement should remain inside the joining edge.
Leave at least 1.5–2 cm of clear fabric around the perimeter so neighboring flowers do not interfere with the seams.
Sewing the 3D Rose to the Square
Thread the long rose tail through a tapestry needle.
Sew the central underside of the flower securely to the cream square.
Add several attachment stitches beneath the lowest petal tier.
Do not sew through every outer petal.
The outer edges should remain free so the flower keeps its three-dimensional structure.
Turn the square over and inspect the reverse side.
Weave the sewing tail through the background stitches without pulling the center inward.
Sewing the Leaves
Position each leaf underneath the rose.
Sew along the center vein and lower edge.
Leave the outer leaf tip slightly free.
This gives the botanical elements more dimension while keeping them secure enough for a blanket.
Repeat until the floral arrangement is balanced around the center.
Attaching the Small Buds
Place the buds between the rose and the square perimeter.
Sew through the bottom of each bud several times.
Keep the attachment compact.
If the blanket will be used regularly rather than displayed decoratively, sew the buds more firmly and keep them relatively flat.
Dusty-Rose Border Around Each Square
Yarn: dusty rose.
Attach yarn in one corner of the completed cream square.
Work one round of single crochet evenly around the perimeter.
At each corner work:
(sc, ch 2, sc).
Join with a slip stitch.
Work a second round if a stronger pink frame is desired.
Count the stitches on every side.
All squares must have matching side counts before joining.
Planning the Bedspread Layout
The photograph shows a large grid of repeated floral squares.
The exact number depends on the mattress and the finished square measurement.
For example, if each blocked and bordered square measures 20 cm, a layout measuring five squares across and seven squares long produces a motif area of approximately 100 × 140 cm before additional borders.
A full bedspread requires considerably more squares.
Calculate the layout using:
Target width ÷ finished square width = number of squares across.
Target length ÷ finished square height = number of squares down.
Round upward when necessary, then recalculate the actual finished dimensions.
Joining the Floral Squares
Join the squares only after every background panel has been blocked to the same measurement.
A flat slip-stitch join in dusty rose works well because the photograph displays contrasting pink grid lines.
Joining Two Squares
Place two squares side by side with right sides facing upward.
Align the corner spaces.
Attach dusty-rose yarn through corresponding edge stitches.
Work slip stitches through matching loops along the complete seam.
Keep the yarn relaxed.
Fasten off at the opposite corner.
Building Rows
Join individual squares into complete horizontal strips first.
Check each strip on a flat surface.
Next, join the strips vertically.
Align every four-square intersection before completing the seam.
The pink joining lines should form an uninterrupted grid across the blanket.
Scalloped Outer Border
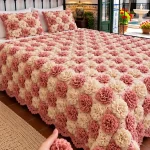
The photographed bedspread finishes with a cream-and-pink scalloped edge.
Foundation Border
Yarn: dusty rose.
Attach yarn at one corner.
Work sc evenly around the entire blanket.
At each corner work:
(sc, ch 2, sc).
Join and fasten off.
Cream Shell Round
Yarn: cream.
Attach yarn to the foundation border.
Repeat:
skip 2 sts, 7 dc in next st, skip 2 sts, sl st in next st.
Continue around the blanket, adjusting the spacing slightly near corners when necessary.
The shells should lie flat rather than overlap.
Pink Scallop Outline
Yarn: dusty rose.
Attach yarn at the beginning of a cream shell.
Work one relaxed slip stitch or single crochet into each stitch around the exposed edge of the shell.
Continue around the blanket.
Do not pull the pink edging tightly, or the cream shells will curl upward.
Assembly
- Make and block every cream background square to the same measurement.
- Crochet the layered pink roses and shape the individual petal tiers.
- Make the olive leaves and add their raised center veins.
- Crochet the small pink buds and any accompanying miniature leaves.
- Pin each floral arrangement to its square before sewing.
- Attach the rose through its center and lower petal tier.
- Sew the leaves and buds securely while keeping the square perimeter clear.
- Add an identical dusty-rose border to every completed square.
- Join the motifs into rows, then join the rows into the complete bedspread.
- Work the outer border, weave in all tails, and check every dimensional flower for secure attachment.
The completed bedspread should have a flat geometric foundation with raised floral elements centered inside clearly defined pink frames.
7 Technical Tips for a 3D Rose Crochet Blanket
- Control the rose diameter. A flower wider than roughly 70% of the background square can cover the joining area. Place the completed rose on an unassembled square before making the remaining flowers.
- Do not sew every petal down. Attaching all outer petal edges removes the dimensional effect. Secure the center and lowest tier while leaving the upper petal edges free.
- Match the border stitch counts. Different side counts create puckered joins even when the blocked squares measure the same. Count all four sides before assembly.
- Keep the leaves away from seams. Leave approximately 1.5–2 cm between leaf tips and the joining edge. Trapped leaves make the pink grid uneven and difficult to repair.
- Check flower weight before scaling up. Weigh one fully decorated square on a digital scale. A large bedspread containing dozens of dimensional roses can become substantially heavier than a flat granny-square blanket.
- Test the pink slip-stitch join. Tight joining stitches shorten the square edges and create ridges. The joined pair should remain flat without stretching the seam.
- Inspect every bud attachment. A dimensional bud secured at only one point can twist or detach during handling. Stitch through its base at several positions without flattening the top.
How to Calculate Yarn for the Bedspread
Complete one representative square before purchasing the full yarn quantity.
Weigh the cream background separately if possible.
Next, weigh the completed rose, leaves, buds, and pink border.
Record the total weight of one finished motif.
Multiply that amount by the number of squares required.
Calculate the joining and outer-border yarn separately.
For example, if one decorated square weighs 80 g and the planned blanket contains 48 squares, the motifs alone require approximately 3,840 g of yarn.
This is a mathematical example rather than a measured requirement for the photographed blanket.
Making a Smaller Floral Throw
A smaller throw can use the same motifs without changing the flower construction.
If the finished squares measure 20 cm, a layout of four squares across and five squares down contains 20 motifs and measures approximately 80 × 100 cm before the outer border.
For a larger sofa throw, use five squares across and seven down.
Make one complete row first and measure it after joining.
This reveals how much width the joining technique adds or removes.
Making a Full Bedspread
Measure the mattress width and length.
Add the desired side drop to both sides of the width.
Add the desired drop at the foot of the bed.
Divide those dimensions by the finished square measurement.
Because the dimensional roses add substantial weight, avoid planning an unnecessarily long drop without first weighing a sample section.
The photographed design extends over the mattress sides while leaving the white bed skirt visible below it.
Color Variations
The pink, cream, and olive combination emphasizes the botanical character of the design.
The same construction can be adapted to other palettes:
- Burgundy, blush, cream, and olive for deeper floral contrast.
- Peach, coral, ivory, and sage for a warmer version.
- Lavender, plum, cream, and eucalyptus green for a cooler palette.
- Dusty blue, white, and sage for a restrained floral design.
- Terracotta, beige, and dark olive for an earthy version.
Use at least two shades within the rose if you want the individual petal tiers to remain visible from a distance.
Blocking the Background Without Flattening the Flowers
Block the cream squares before floral assembly whenever possible.
This allows the background to be shaped without compressing the rose petals.
If the completed blanket needs reshaping later, concentrate on the seams and outer border.
Avoid pressing an iron directly onto the three-dimensional flowers.
Follow the yarn manufacturer’s care instructions for heat and moisture.
Reshape the petals manually after cleaning.
Care and Storage
A blanket with dimensional flowers requires more careful handling than a flat granny-square afghan.
Follow the yarn label’s washing instructions.
Support the blanket when wet because the added floral motifs increase its weight.
Check loose buds, petals, and leaves after washing.
Dry flat when required by the fiber.
For storage, fold the blanket loosely and avoid placing heavy objects over the roses.
If a flower becomes compressed, reshape its petal tiers individually rather than pulling on the entire motif.
Conclusion
The structure of this floral bedspread depends on three separate elements: consistent cream squares, layered roses, and a contrasting pink joining grid. Start with one complete sample rather than producing dozens of background panels immediately. Measure the blocked square, check the rose diameter, weigh the finished motif, and test one joined pair. Those four measurements determine the practical dimensions and yarn requirements for the larger project. Save this 3D rose crochet granny square blanket pattern to Pinterest and share your finished floral bedspread on Instagram using #3DRoseCrochetBlanket. For your version, would you keep the dark rose center shown here or make every petal tier the same pale pink?