Introduction
Oak leaves have rounded lobes and a branching central vein, two features that determine whether a crochet motif resembles an oak leaf rather than a maple leaf. This 3D oak leaf crochet blanket pattern uses overlapping leaf motifs in mustard yellow, olive green, and warm cream. Designed as a modular bedspread with matching pillow covers, the project requires intermediate crochet skills, careful measurement, and consistent assembly.
The Design: What Makes This Oak Leaf Blanket Different
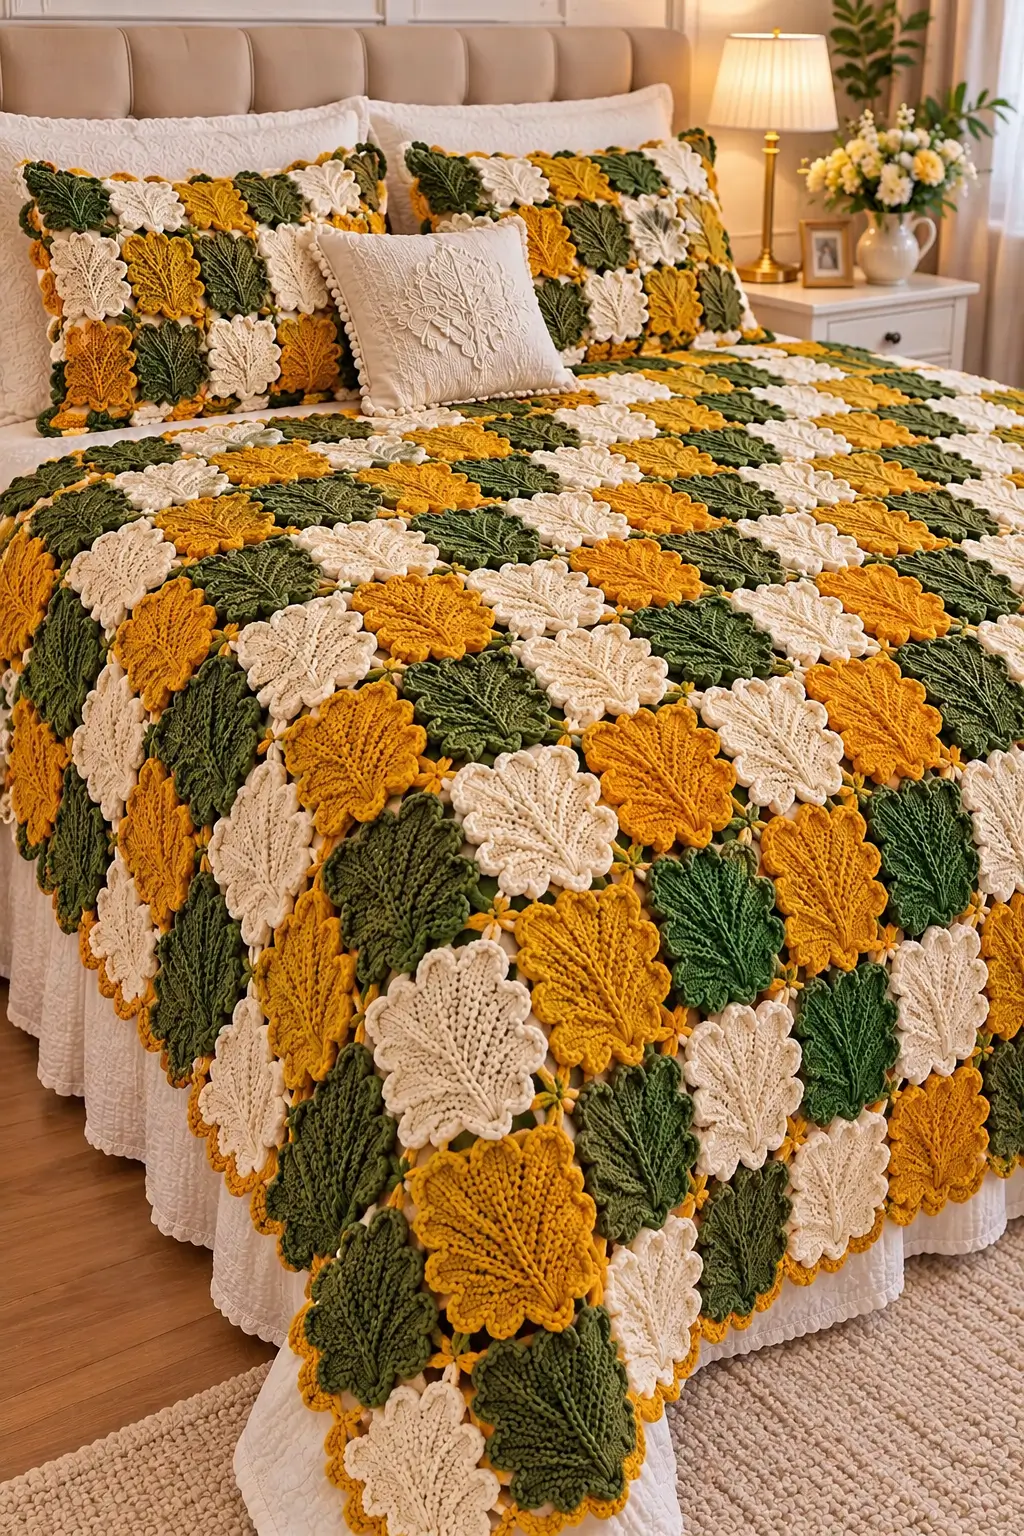
The photographed bedspread contains hundreds of dimensional oak-leaf motifs arranged in closely spaced, staggered rows. Each leaf has a broad lower section, rounded side lobes, a narrower upper tip, and a raised vein extending through its center.
Three structural details distinguish this design from a conventional crochet leaf blanket. First, the leaves overlap, concealing their attachment points and creating a continuous textured surface. Second, the three colors repeat across the bedspread without forming rigid horizontal stripes. Third, the motifs have raised veins and shaped edges, making them visibly different from ordinary flat appliqués.
The matching pillow covers repeat the same oak-leaf texture on a smaller scale.
A common construction error is attaching the leaves too close together. Excessive overlap creates bulky seams and prevents the individual lobes from remaining visible.
Project Information at a Glance
| Feature | Details |
|---|---|
| Skill Level | Intermediate to Advanced |
| Construction | Individual oak-leaf motifs attached in overlapping rows |
| Suggested Yarn | DK cotton or cotton-blend yarn |
| Reference Hook | 3.5 mm |
| Reference Leaf Size | Approximately 7.4 × 4.2 cm |
| Blanket Size | Custom, based on mattress measurements |
| Best For | Decorative bedspreads, throws, matching cushions |
The hook and leaf measurements above come from a published flat oak-leaf appliqué by Raffamusa Designs. The larger, raised motifs visible in the photograph may require a different hook, additional shaping, or a separate motif construction.
Materials and Tools
Yarn
Choose three yarn colors with the same weight and similar fiber content.
- Mustard yellow DK yarn: for approximately one-third of the oak-leaf motifs.
- Olive green DK yarn: for approximately one-third of the motifs.
- Warm cream DK yarn: for approximately one-third of the motifs.
- Joining yarn: matching olive, cream, or another color that blends into the reverse side.
- Optional backing yarn: for a separate crochet foundation panel.
The amount of yarn required cannot be determined reliably from the photograph. Make and weigh several finished leaves before purchasing the yarn for a complete bedspread.
Tools
- 3.5 mm crochet hook for the initial DK-yarn sample
- Tapestry needle
- Scissors
- Locking stitch markers
- Measuring tape
- Digital kitchen scale
- Blocking mats
- Rust-resistant pins
Crochet Abbreviations
- MR: Magic ring
- ch: Chain
- sl st: Slip stitch
- sc: Single crochet
- hdc: Half double crochet
- dc: Double crochet
- tr: Treble crochet
- inc: Increase
- st: Stitch
- sp: Space
- RS: Right side
- WS: Wrong side
- FO: Fasten off
All crochet terminology follows US conventions. An invisible decrease is worked through the front loops of two adjacent stitches, although the flat oak-leaf construction below does not require decreases.
Understanding the Oak Leaf Construction
An oak leaf differs from a maple leaf in the shape of its perimeter.
Maple leaves generally have pronounced pointed lobes. Oak leaves often have rounded or softly scalloped lobes arranged along a central axis.
The photographed motifs resemble stylized oak leaves with broad rounded projections and prominent raised veins.
Each decorative leaf can be divided into three structural elements:
- A central foundation that determines the leaf’s length.
- Side lobes that create the recognizable oak-leaf outline.
- A raised vein that gives the finished motif additional texture.
For a bedspread, the leaf must also have a secure attachment area. A motif that works well as a small appliqué may require reinforcement when repeated across a large blanket.
3D Oak Leaf Crochet Pattern – Step by Step
Pattern status: The following practice motif is an original simplified leaf shape intended for testing the color, texture, and overlap. It is not a stitch-tested reproduction of the elongated motifs in the photograph.
Step 1: Create the Central Foundation
Yarn: mustard yellow, olive green, or cream.
Ch 16.
Beginning in the second chain from the hook, work one single crochet into each chain.
Row 1: 15 sc. (15)
Ch 1 and turn.
Row 2: 15 sc. (15)
Fasten off, leaving a 20 cm tail.
This narrow strip establishes the central axis for a small experimental leaf.
For a larger motif, increase the foundation length proportionally and make a separate sample before changing the remaining construction.
Step 2: Establish the Leaf’s Lower Section
Attach matching yarn near the lower end of the foundation.
Work outward from the center using progressively taller stitches.
A practical shaping sequence is:
sc, hdc, dc, tr.
Return toward the central foundation using:
dc, hdc, sc.
This creates one rounded side projection.
Repeat on the opposite side of the foundation.
Keep the lower lobes broad but shorter than the central axis.
Step 3: Form the Middle Lobes
Move upward along the central foundation.
Attach yarn at the next planned lobe position.
Work another rounded projection using the same progression of stitch heights.
Increase the number of taller stitches if a wider lobe is required.
Repeat on the opposite side.
The middle lobes should establish the widest part of the leaf.
Compare both sides before continuing.
Step 4: Shape the Upper Lobes
Work smaller projections toward the upper portion of the foundation.
Use fewer tall stitches than in the middle section.
Gradually reduce the width of the leaf as the stitches approach the tip.
The upper section should taper rather than end abruptly.
Step 5: Complete the Leaf Tip
At the upper end of the foundation, work a short pointed or softly rounded extension.
For a narrow tip, use:
sc, hdc, dc, hdc, sc.
Join the final stitch to the opposite side of the foundation.
Fasten off.
Lay the leaf flat and check that its center line remains straight.
Creating Rounded Oak Leaf Lobes
The photographed leaves contain several rounded projections along their outer edges.
These projections should vary slightly in width.
Perfectly identical lobes can make the motif look mechanical rather than botanical.
Use half double crochet and double crochet stitches to create the smaller curves.
Reserve treble crochet for wider projections.
Where two lobes meet, use shorter stitches to create a visible indentation.
A slip stitch can define a particularly deep valley.
Avoid placing too many tall stitches into one attachment point, as this may cause the fabric to ripple.
Adding the Raised Central Vein
The raised vein is one of the most visible details in the reference photograph.
It runs from the base of each leaf toward its tip.
Surface crochet provides a practical method for adding this detail.
Central Vein Instructions
Place the leaf right side up.
Attach matching yarn at the lower center.
Insert the hook through the front surface of the fabric.
Draw the yarn through to form a loop.
Continue working surface slip stitches along the central axis.
Keep the stitches relaxed so they sit above the fabric without pulling it inward.
Stop approximately 5 mm before the tip.
Fasten off and secure the yarn on the reverse side.
Adding Branching Leaf Veins
The photographed motifs contain smaller lines branching from the central vein toward the lobes.
These can be added using surface slip stitches or embroidery.
Begin at the main central vein.
Work diagonally toward one side lobe.
Stop before reaching the outer edge.
Repeat for the remaining lobes.
Keep the branches shorter than the central vein.
For a more pronounced texture, use a slightly thicker strand of matching yarn.
Test this on one leaf first because additional yarn thickness may distort a small motif.
Making the Mustard Yellow Oak Leaves
Use mustard yellow yarn for the first group of motifs.
Complete the central foundation, rounded lobes, and raised veins.
Maintain the same hook size and stitch tension throughout the group.
Mustard yellow creates strong contrast against both olive green and cream.
In the photographed arrangement, yellow leaves appear throughout the bedspread rather than being restricted to a single section.
Making the Olive Green Oak Leaves
Use olive green yarn for the second group.
Follow the same construction method.
Keep the central vein visible by working it with consistent surface-stitch tension.
The olive motifs provide the darkest areas of the bedspread.
Position them between cream and mustard leaves to create a balanced distribution of color.
Making the Cream Oak Leaves
Use warm cream yarn for the third group.
Complete the same foundation and lobe arrangement.
Work the raised veins using matching cream yarn.
Because cream reveals stitch definition clearly, uneven lobe shaping may be more noticeable.
Check the symmetry of each leaf before fastening off.
The cream motifs provide contrast and prevent the darker colors from dominating the finished bedspread.
Creating the Three-Dimensional Effect
The photographed bedspread uses overlapping motifs rather than a completely flat surface.
Each leaf partially covers the attachment area of neighboring leaves.
To create this effect, arrange the motifs in staggered rows.
Attach the upper portion of each leaf to the supporting structure.
Leave part of the lower section unattached so it can project over the row beneath it.
Do not leave the entire motif loose. A large blanket requires secure attachment points to withstand handling and cleaning.
Test several attachment positions before joining the complete bedspread.
Choosing a Supporting Foundation
A separate backing panel is a practical option for a blanket made from overlapping motifs.
The backing provides a stable surface for attaching the leaves.
It also helps prevent gaps between the motifs from exposing the mattress underneath.
A simple single-crochet or half-double-crochet fabric can serve as the foundation.
Alternatively, the leaves may be joined directly through their attachment areas.
Direct joining reduces the need for a separate backing but requires a carefully tested arrangement.
For the photographed appearance, the supporting structure should remain mostly hidden beneath the overlapping leaves.
Planning the Bedspread Dimensions
Measure the mattress before calculating the number of motifs.
Record its width and length.
Decide how far the finished bedspread should extend over each side.
For example, a mattress measuring 160 cm wide with a 30 cm drop on both sides requires a finished width of approximately 220 cm.
The target length should include any additional drop at the foot of the bed.
These dimensions are planning examples, not measurements taken from the photograph.
Calculating the Number of Oak Leaves
Make at least six finished motifs before estimating the complete quantity.
Arrange them in two overlapping rows.
Measure the visible width and height of the sample arrangement.
The exposed area of each leaf is more important than its full measurement because neighboring motifs overlap.
For example, a leaf measuring 12 cm long may contribute only 8 cm of visible height after overlapping.
Divide the target blanket dimensions by the measured spacing of the completed sample arrangement.
Use the resulting figures to estimate the number of leaves per row and the number of rows.
Multiply those values to obtain an approximate motif count.
Add a small allowance for corners, edge adjustments, and replacement motifs.
Arranging the Three Colors
The reference bedspread distributes mustard yellow, olive green, and cream across the entire surface.
There are no large uninterrupted blocks of one color.
A repeating three-color arrangement provides a practical starting point.
For example:
- Row 1: Mustard, olive, cream.
- Row 2: Cream, mustard, olive.
- Row 3: Olive, cream, mustard.
Repeat the sequence while staggering the positions of neighboring rows.
Check the layout from a distance before sewing.
Adjust any areas where too many motifs of the same color appear together.
Joining the Oak Leaf Motifs
Place the backing panel on a flat surface.
Mark the planned attachment rows with removable stitch markers.
Begin at the lower edge of the bedspread and work upward.
Position the first row of leaves with their tips extending toward the bottom edge.
Sew each motif through its upper attachment area.
Place the next row above the first so the lower portions overlap the attachment stitches beneath them.
Continue toward the top of the bedspread.
Keep the visible spacing consistent.
At the sides, allow the motifs to follow the edge without crowding the corners.
Creating the Long Decorative Drape
The reference bedspread extends well beyond the mattress surface.
Its overlapping leaves hang over the sides and foot of the bed.
To create a similar drape, continue the leaf arrangement beyond the mattress dimensions.
Check the growing project on the intended bed periodically.
Allow the motifs to hang naturally.
Do not force the leaves into a rigid arrangement around the corners.
At the foot of the bed, stagger the rows so the individual leaf tips remain visible.
Excessive overlap can make the lower edge heavy and uneven.
Making Matching Oak Leaf Pillow Covers
The photograph includes two large pillows decorated with the same mustard, olive, and cream leaves.
For a matching pillow cover, begin with a flat rectangular crochet panel.
Measure the pillow insert before determining the panel dimensions.
Make enough oak-leaf motifs to cover the front.
Arrange them in staggered rows with their tips facing downward.
Sew the upper portions of the leaves to the front panel.
Keep the outer edge clear for joining the pillow front and back.
Use a flat crochet panel or suitable fabric for the reverse side.
Add an envelope opening or another removable closure.
The smaller decorative cushion visible in the center of the photograph uses a different leaf-embroidery design and is not part of the repeated oak-leaf motif construction.
Assembly and Finishing
- Measure the mattress and determine the desired finished bedspread dimensions.
- Make several sample oak leaves in mustard, olive, and cream.
- Add the central veins and branching details to the sample motifs.
- Block the samples and measure their finished dimensions.
- Arrange the samples in overlapping rows to establish the visible spacing.
- Calculate the approximate number of motifs required for the complete bedspread.
- Prepare the supporting foundation or test the direct-joining method.
- Attach the leaves in staggered rows, working from the lower edge upward.
- Complete the side drape and make the matching pillow covers.
- Weave in all yarn tails, inspect the attachment points, and measure the finished project.
The completed bedspread should display distinct overlapping oak leaves, consistent raised veins, and an evenly distributed three-color arrangement.
7 Technical Tips for Better Oak Leaf Blankets
- Keep the lobes rounded. Pointed projections can make the motifs resemble maple leaves. Use shorter stitches at the valleys and rounded groups of taller stitches along the outer edges.
- Measure the visible overlap. A 12 cm leaf may contribute only 8 cm of exposed height once attached. Calculate the blanket from the overlapping sample rather than the full dimensions of one motif.
- Control the raised-vein tension. Tight surface slip stitches can make the leaf curl along its center. Keep the vein relaxed against the underlying fabric.
- Check attachment strength. Sewing a leaf at only one point allows it to rotate during handling. Secure a short section near the upper center while leaving the lower lobes free.
- Prevent excessive corner bulk. Several overlapping leaves attached at the same corner create a thick cluster. Stagger the attachment positions and check the drape before sewing permanently.
- Weigh the completed sample. A bedspread containing hundreds of raised motifs can become substantially heavier than a flat blanket. Calculate yarn consumption from a finished sample that includes the backing and attachment stitches.
- Keep the color distribution balanced. Large groups of dark olive leaves can interrupt the three-color pattern. Photograph the planned arrangement before joining and adjust the placement if necessary.
Choosing the Best Yarn
DK cotton is a practical starting choice for decorative oak-leaf motifs because it provides visible stitch definition.
A cotton-acrylic blend may also work, depending on the desired weight and drape.
For a full bedspread, the total fabric weight deserves particular attention.
Dense cotton motifs attached to a separate backing can produce a heavy finished project.
Use the same yarn weight for all three colors.
Significant differences in thickness can cause the leaves to vary in size even when the stitch instructions remain identical.
Make a sample in each color before beginning mass production.
How to Make Larger Oak Leaf Motifs
Increasing the motif size can reduce the total number of leaves required.
However, a larger motif does not automatically produce the same visual density.
Test the proportions before committing to the full bedspread.
A larger leaf needs a longer central foundation, wider lobes, and a proportionally longer raised vein.
Simply adding stitches around the perimeter may create ruffling rather than controlled expansion.
For a larger version, develop one complete sample and record the exact stitch counts before repeating it.
How to Make a Smaller Oak Leaf Throw
A smaller throw uses the same arrangement with fewer motifs.
Determine the desired finished width and length.
Make an overlapping sample and measure the exposed spacing.
Use those measurements to calculate the number of leaves required.
Maintain the same three-color rotation.
A smaller project provides an opportunity to test the joining method before making a bed-sized version.
Adding a Decorative Border
The photographed blanket relies mainly on the individual leaf edges rather than a wide continuous border.
A narrow foundation border can still improve stability.
Work single crochet evenly around the supporting panel before attaching the final outer row of leaves.
At each corner, work enough stitches to keep the fabric flat.
Attach the outer motifs so their lobes extend slightly beyond the foundation edge.
This conceals the structural border while preserving the irregular leaf-shaped perimeter.
Blocking the Oak Leaves
Block each motif before assembly whenever the yarn allows it.
Place the leaf on a blocking mat.
Align the central vein vertically.
Pin the upper tip first.
Next, pin the rounded side lobes.
Adjust the valleys between the lobes without stretching them excessively.
Allow the leaf to dry completely before removing the pins.
For a matching set, compare the finished dimensions against one reference motif.
Care and Storage
Follow the washing instructions supplied with the yarn.
A large bedspread with raised motifs requires careful handling because the individual leaves can catch on other objects.
Check all attachment points before washing.
Support the blanket when wet to prevent stretching.
Dry flat when recommended for the selected fiber.
Avoid hanging a wet layered bedspread from a narrow line.
For storage, fold the blanket loosely and avoid compressing the raised veins beneath heavy objects.
Styling the Finished Bedspread
The mustard, olive, and cream palette works well with neutral bedding and warm wood furniture.
The reference photograph combines the leaf-covered bedspread with matching pillows and a cream decorative cushion.
To keep the oak-leaf texture visible, use simple bedding underneath.
Position the matching pillows upright so the leaf tips face downward.
Distribute the three colors across the pillow fronts using the same arrangement as the blanket.
A narrow cream bed skirt or plain neutral sheet can provide contrast beneath the decorative leaf edge.
Conclusion
The defining feature of this bedspread is its dense arrangement of overlapping oak leaves in mustard yellow, olive green, and warm cream. Each motif needs rounded lobes, a clear central vein, and an attachment area that remains hidden beneath the next row. Before making a full blanket, crochet several sample leaves, measure their visible overlap, and weigh the completed arrangement. Those measurements determine the practical motif count, yarn requirement, and finished dimensions. Save this 3D oak leaf crochet blanket pattern guide to Pinterest and share your completed project on Instagram using #3DOakLeafCrochetBlanket. Would you arrange the three colors randomly or repeat them in staggered rows as shown in the photograph?