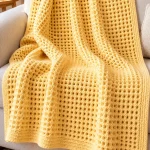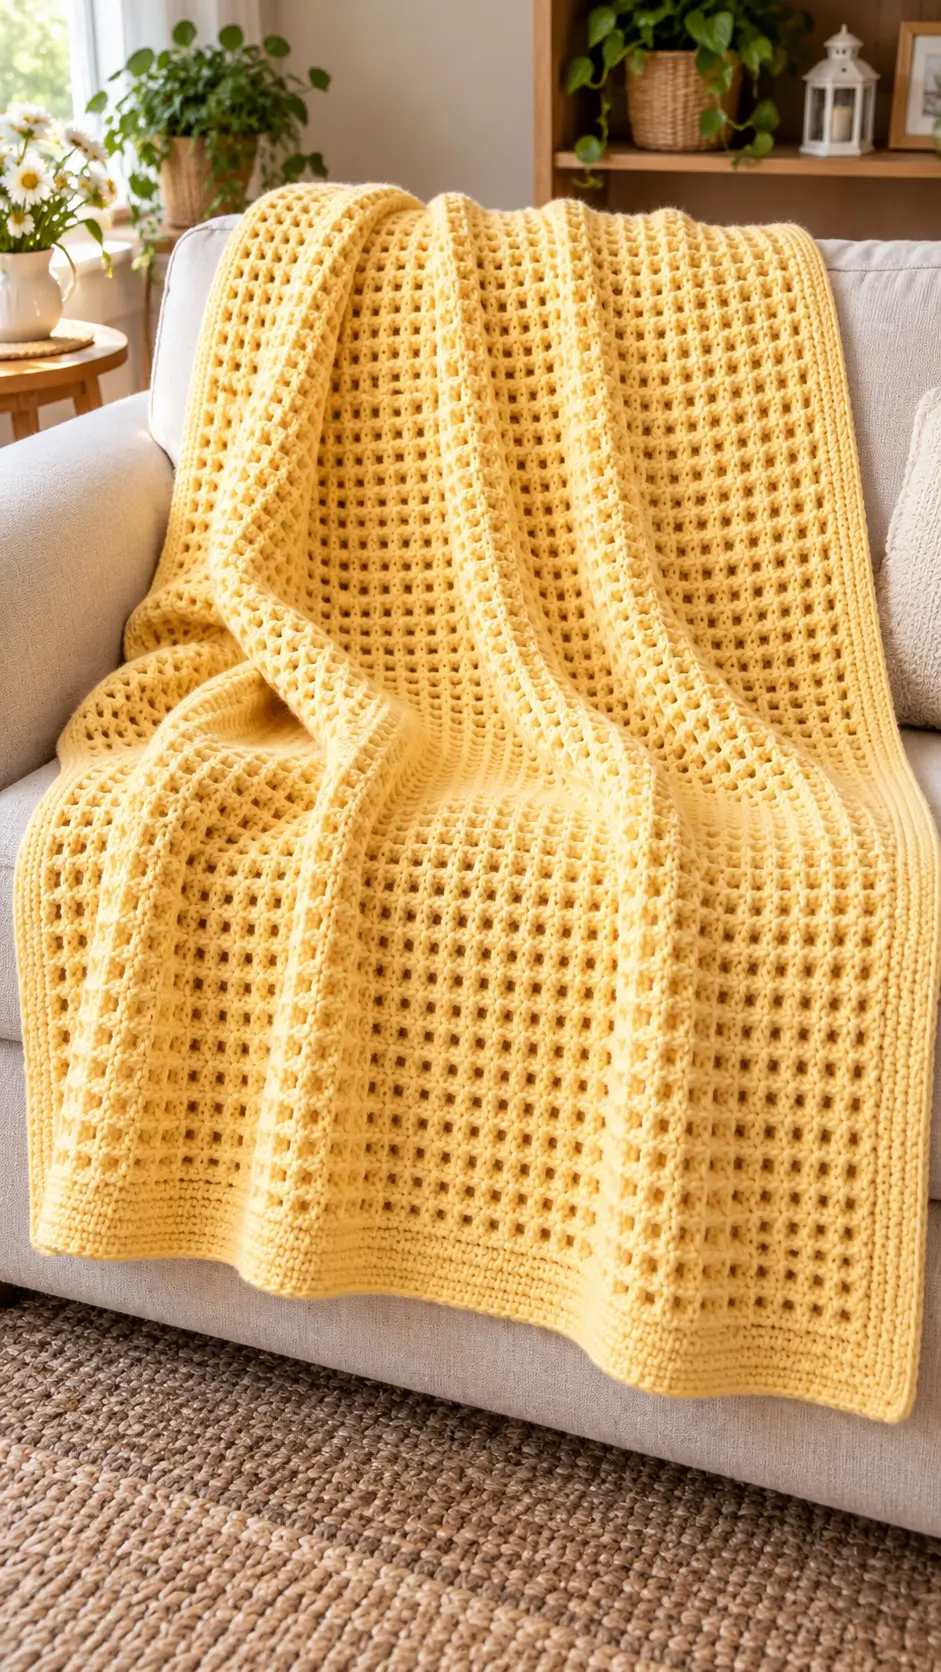
The butter-yellow crochet blanket combines an open square lattice with a substantial, closely worked border. This easy crochet blanket pattern recreates that construction using worsted-weight yarn, a 5.5 mm hook, and a repeating mesh stitch.
Designed for a finished size of approximately 120 × 150 cm, the project suits confident beginners familiar with double crochet, chains, and working into chain spaces. Its rectangular construction makes resizing practical without complicated shaping.
The Design: What Makes This Yellow Crochet Blanket Different
The blanket’s main feature is its repeating openwork texture. Small square openings form a consistent grid across the fabric, giving the blanket visual structure without requiring complex stitch combinations.
Three construction decisions define this design.
First, the body uses a repeating mesh stitch. The aligned double crochet stitches create a textured surface while maintaining predictable stitch placement.
Second, a solid foundation and finishing section frame the openwork. These dense rows help stabilize the fabric and reduce distortion along the short edges.
Third, a multi-round border provides additional weight around the perimeter. This crochet blanket with border construction also conceals minor variations in edge tension.
A common mistake with mesh blankets is accidentally adding stitches at the turning chain. Consistent edge placement matters more than crocheting quickly.
Project Info at a Glance
| Detail | Specification |
|---|---|
| Skill Level | Confident Beginner |
| Estimated Time | 20–30 Hours |
| Finished Size | Approximately 120 × 150 cm (target) |
| Crochet Hook | 5.5 mm (US I-9) |
| Yarn Weight | Medium / Worsted / Category 4 |
| Main Stitch | Double Crochet Mesh |
| Construction | Flat Rows with Border Rounds |
| Terminology | US Crochet Terms |
Note: This is an original pattern inspired by the reference photograph. Finished size, yarn consumption, and visual match have not been physically sample-tested.
Materials and Tools
Yarn
Choose a smooth, machine-washable worsted-weight yarn. Smooth yarn makes the square openings easier to see and keeps the border stitches defined.
- Butter Yellow Yarn: Category 4 worsted weight, approximately 1,200–1,600 g as a provisional purchasing estimate.
- Optional Reserve: 100 g of matching yarn for adjustments or a wider border.
- Suggested Fibers: Acrylic or cotton-acrylic blend.
The actual yarn quantity depends on gauge, fiber, and final dimensions. Calculate consumption from a sample before purchasing the full quantity.
Tools
- 5.5 mm crochet hook (US I-9)
- Tapestry needle
- Sharp scissors
- Locking stitch markers
- Measuring tape
- Digital kitchen scale
- Blocking mats and rustproof pins (optional)
Gauge
Make a sample using the mesh pattern before starting the full blanket. Work at least eight mesh repeats across and twelve rows high.
Measure the center of the sample after allowing the fabric to relax. Adjust the foundation chain to match your desired blanket width.
For a 120 cm wide blanket, subtract the intended border width from the overall measurement before calculating the mesh section.
Crochet Abbreviations
| Abbreviation | Meaning |
|---|---|
| ch | Chain |
| sc | Single Crochet |
| dc | Double Crochet |
| sl st | Slip Stitch |
| st / sts | Stitch / Stitches |
| sp | Space |
| sk | Skip |
| rep | Repeat |
| RS | Right Side |
| WS | Wrong Side |
| FO | Fasten Off |
All instructions use US crochet terminology.
Easy Crochet Blanket Pattern – Step by Step
Part 1: Foundation Chain
Use butter-yellow worsted-weight yarn and a 5.5 mm hook.
Foundation: Chain 160.
Do not pull the chains tightly. A compressed foundation can cause the bottom edge to draw inward.
If the foundation curls, try making the chain with a 6 mm hook before switching to the 5.5 mm hook for Row 1.
Part 2: Solid Bottom Band
Row 1: Sc in the second ch from the hook and in every remaining ch. Turn. (159 sc)
Row 2: Ch 1, sc in each st across. Turn. (159 sc)
Rows 3–8: Repeat Row 2. (159 sc per row)
At the end of Row 8, measure the width. The fabric should lie flat without visible pulling along either edge.
Place a stitch marker in the first and last stitch of each row to prevent accidental increases or decreases.
Part 3: Open Mesh Blanket Body
This section creates the square lattice texture.
Row 9: Ch 4 (counts as first dc and ch 1), sk next sc, *dc in next sc, ch 1, sk next sc*; repeat from * to * until one sc remains, dc in last sc. Turn. (80 dc, 79 ch-1 spaces)
Row 10: Ch 4 (counts as first dc and ch 1), sk first ch-1 sp, *dc in next dc, ch 1, sk next ch-1 sp*; repeat from * to * until the last dc remains, dc in last dc. Turn. (80 dc, 79 ch-1 spaces)
Rows 11–140: Repeat Row 10. (80 dc, 79 ch-1 spaces per row)
Every mesh row contains 80 double crochet stitches and 79 chain-one spaces.
The chain spaces remain open while the double crochet columns stay vertically aligned.
Stop repeating the mesh row when the blanket reaches your desired length, allowing room for the top band and border.
Part 4: Solid Top Band
Row 141: Ch 1, sc in first dc, *sc in next ch-1 sp, sc in next dc*; repeat across. Turn. (159 sc)
Row 142: Ch 1, sc in every st across. Turn. (159 sc)
Rows 143–148: Repeat Row 142. (159 sc per row)
The top band contains eight rows of single crochet, matching the bottom band.
Do not fasten off. Continue directly into the border.
Part 5: Crochet Blanket Border
A firm border frames the mesh and supports the edges. This version uses four rounds of single crochet, with optional additional rounds.
Border Round 1
Ch 1. Work 3 sc into the first corner, then sc evenly across the top edge.
Work 3 sc into the next corner and continue down the first side.
Along the row ends, place approximately one sc per single-crochet row and two sc per three double-crochet rows. Adjust the spacing to keep the side flat.
Continue around the bottom edge and opposite side. Work 3 sc in each corner and join with a sl st to the first sc.
Border Round 2
Ch 1, sc in each stitch around. At each corner, work 3 sc into the middle stitch of the previous corner group. Join with a sl st.
Border Round 3
Repeat Round 2, keeping each corner increase centered.
Border Round 4
Repeat Round 2. Join with a sl st, cut the yarn, and pull the tail through the final loop.
Leave a 15–20 cm yarn tail for weaving.
For a wider border, repeat the same round until the edging measures approximately 4–6 cm.
Part 6: Finishing and Blocking
Weave loose yarn ends into the solid border rather than leaving them exposed in the mesh.
Use a tapestry needle to run each tail through several stitches, reverse direction, and pass through another group of stitches.
Lay the blanket on a clean, flat surface and measure both diagonals. A significant difference indicates uneven stretching.
Follow the yarn manufacturer’s washing and drying instructions. Avoid excessive direct heat when working with acrylic yarn.
Allow the blanket to dry completely before measuring its final dimensions.
How to Adjust the Crochet Blanket Size
The mesh pattern can be resized by changing the foundation chain in multiples of two.
Foundation formula: 2 × desired mesh openings + 2.
For example, 79 mesh openings require a foundation chain of 160.
| Blanket Size | Foundation Chain | Suggested Length |
|---|---|---|
| Small Lap Blanket | 120 | 100 cm |
| Medium Throw | 160 | 150 cm |
| Large Throw | 200 | 180 cm |
| Oversized Blanket | 240 | 200 cm |
These are planning configurations rather than tested finished dimensions. The actual width depends on stitch gauge.
How to Calculate Yarn Requirements
Make a sample using your chosen yarn, then weigh it with a digital scale.
Estimated yarn weight = (blanket area ÷ swatch area) × swatch weight.
Calculate the border separately when possible, since solid stitches use more yarn per square centimeter than open mesh.
Add extra yarn for finishing and gauge differences.
7 Technical Tips for a Better Crochet Blanket
- Mark the edge stitches. Place locking stitch markers in the first and last working stitches of every row. Missing an edge stitch causes the blanket to narrow gradually.
- Check mesh alignment every 10 rows. Count the double crochet columns and chain spaces at regular intervals. A missing chain space shifts the grid.
- Control foundation-chain tension. If the lower edge measures more than 2 cm narrower than the following rows, remake the foundation with a hook 0.5 mm larger. This helps prevent a curved bottom edge.
- Keep double crochet height consistent. Tight final loops produce short stitches and compressed mesh openings. Compare neighboring stitches before continuing.
- Space side-border stitches carefully. Too many stitches create ruffles, while too few cause curling. Lay the blanket flat before beginning the next round.
- Check corner increases. Each rectangular corner needs extra stitches to turn without pulling. If a corner cups upward, inspect the three-stitch corner group.
- Weave tails through dense fabric. Leave approximately 15–20 cm for each yarn tail and weave it through the solid edging in more than one direction. Ends woven only through chain spaces can loosen during washing.
Common Crochet Blanket Problems and Fixes
Why Are the Mesh Holes Different Sizes?
Uneven chain tension is a common cause. Some crocheters work chains tightly but double crochets loosely, producing rectangular openings instead of consistent squares.
Make a small sample and compare the width of each chain space with the height of the neighboring double crochet.
Why Does the Blanket Become Wider?
Check the turning chain and final stitch placement. Accidentally working an extra double crochet at the edge adds width to affected rows.
Count the mesh columns. Every completed mesh row should contain 80 double crochets and 79 chain-one spaces in the standard version.
Why Is the Border Curling?
A border can curl when its stitch count does not match the perimeter’s natural length.
Inward curling usually indicates too few stitches. Outward rippling usually indicates too many.
Adjust the first border round before adding additional edging.
Can I Use Cotton Yarn?
Yes. Cotton provides clear stitch definition and is suitable for breathable blankets.
However, cotton may be heavier than acrylic and can stretch under its own weight. A cotton-acrylic blend is another option for a large throw.
Is This Crochet Blanket Suitable for Beginners?
The main body uses basic chains and double crochet stitches. Confident beginners who understand turning chains and stitch placement should be able to follow the construction.
The most demanding steps are maintaining consistent edges and spacing stitches around the border.
Related Crochet Patterns
- Easy Granny Square Blanket Pattern — A modular blanket assembled from repeated crochet squares. [INTERNAL LINK NEEDED]
- Beginner Crochet Baby Blanket — A smaller rectangular project using simple repeating stitches. [INTERNAL LINK NEEDED]
- Textured Waffle Stitch Blanket — A denser blanket using raised stitches for a three-dimensional surface. [INTERNAL LINK NEEDED]
- Simple Crochet Blanket Border Tutorial — Instructions for finishing rectangular blankets with stable corners. [INTERNAL LINK NEEDED]
Conclusion
This easy crochet blanket pattern combines a repeating open mesh with solid foundation rows and a structured border. The construction can be adapted to different blanket sizes by changing the foundation chain and number of repeated rows.
Before making the full throw, complete a gauge sample, calculate yarn requirements, and confirm the intended dimensions. That preparation helps prevent width changes and unexpected yarn shortages.
Save the pattern to a Pinterest crochet board or share your finished project on Instagram using #ButterYellowCrochetBlanket.
For the next variation, consider adding a contrasting border or increasing the width of the solid edging.
Would you keep the butter-yellow color shown in the reference photo, or choose another shade for the lattice design?