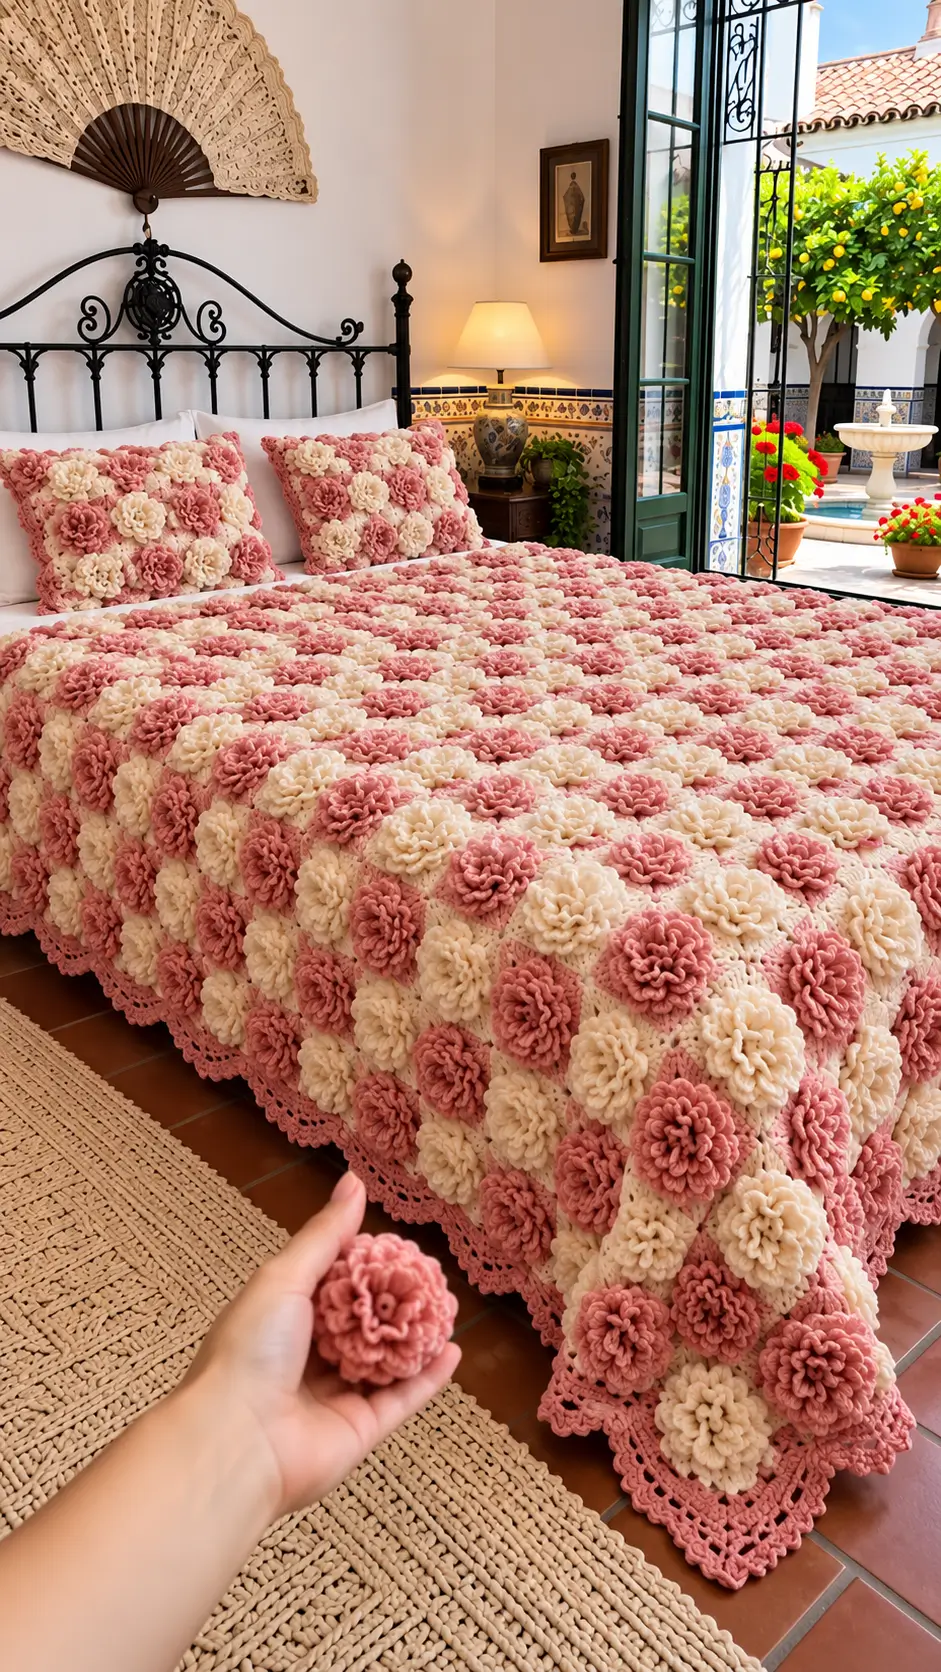
3D Carnation Flower Crochet Bedspread Pattern in Pink and Cream
Introduction
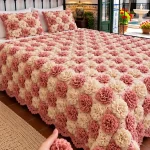
A carnation needs dozens of tight curls to look full, but those curls cannot be allowed to determine the dimensions of a bedspread. This 3D carnation flower crochet bedspread pattern separates dense dusty-pink and ivory flowers from a flat cream foundation. Using worsted-weight yarn and a 5.0–5.5 mm hook, the photo-inspired design creates a substantial bed covering with matching floral cushions and a deep pink lace border.
The Design: What Makes the Carnation Bedspread Different
The photographed surface is dominated by compact pom-pom flowers rather than conventional flat granny-square petals. Pink and ivory blooms alternate across a cream field, creating a checkerboard effect while keeping the palette limited. Each flower needs substantial relief, but the supporting fabric must remain comparatively flat.
The construction therefore uses two independent elements: a cream structural square and a separately crocheted carnation-style flower. The flower is sewn to the center only after the square reaches its final dimensions. This prevents the ruffled petals from changing gauge or distorting the joining edge. Medium-weight loop-stitch flowers can measure about 7.5 cm across, while worsted carnation constructions can reach roughly 8 cm depending on technique and hook size. For this bedspread, target a fuller 8–10 cm decorative bloom.
Project Info at a Glance
| Skill Level | Construction | Square Size | Flower Size | Hook |
|---|---|---|---|---|
| Intermediate | Flat cream squares with separate 3D flowers | Approx. 13–15 cm | Approx. 8–10 cm | 5.0–5.5 mm |
Materials and Tools
Yarn
- Dusty rose pink — worsted #4 — approximately 35–40% of total yarn
- Warm ivory — worsted #4 — approximately 35–40% of total yarn
- Foundation cream — worsted #4 — approximately 20–30% of total yarn
The photographed ivory flowers and cream background can be worked from the same yarn if a two-color version is preferred. Using a slightly warmer foundation cream makes the ivory flowers easier to distinguish.
Tools
- 5.0–5.5 mm crochet hook
- Worsted #4 yarn
- Yarn needle
- Scissors
- Locking stitch markers
- Tape measure
- Blocking mats
- Rust-resistant pins
- Digital scale for yarn calculations
Abbreviations
- MR — magic ring
- ch — chain
- sl st — slip stitch
- sc — single crochet
- hdc — half double crochet
- dc — double crochet
- tr — treble crochet
- BLO — back loop only
- sp — space
- st/sts — stitch/stitches
- FO — fasten off
Pattern — Step by Step
This is an original photo-inspired construction. The dense carnation is made separately from the square, so you can alter flower fullness without changing the dimensions of the bedspread.
3D Carnation Flower — Make in Pink or Ivory
The flower is made from a heavily ruffled strip that is rolled into a compact bloom. Rolled and looped constructions are effective for carnation-like crochet flowers because the repeated fabric naturally creates multiple petal layers.
Flower Foundation
Ch 41.
Row 1: Sc in second ch from hook and in every chain across. Turn. (40 sc)
Ruffle Row 1
Row 2: Ch 3.
Work 3 dc in every sc across.
Turn. (120 dc)
The strip should begin curling immediately.
Ruffle Row 2
Row 3: Ch 1.
Work 2 sc in every dc across. (240 sc)
FO, leaving approximately 40 cm of yarn for assembly.
Shaping the Carnation
Place the ruffled strip on a table.
Begin at one short end and roll the foundation edge into a compact spiral.
Keep the ruffled outer edge facing upward.
After every complete turn, pass the long yarn tail through the foundation edge with a yarn needle.
Continue rolling and stitching until the entire strip forms one circular flower.
The finished bloom should measure approximately 8–10 cm across with worsted yarn, depending on tension and hook size.
Controlling Flower Height
Target approximately 2.5–4 cm of relief.
If the center becomes too tall, roll the strip more loosely and allow later layers to spread outward.
If the flower is too flat, tighten the first two rotations but leave the outer layers relaxed.
Alternative Looped Carnation
For a flower closer to a pom-pom texture, use loop stitches instead of the second ruffle row.
After completing the 40-sc foundation, work one loop stitch into every stitch.
Use loops approximately 2.5–3 cm long.
Roll the strip and secure the foundation edge in the same manner.
This version uses less horizontal fabric but produces a shaggier flower.
Pink Carnations
Make approximately half of the required flowers in dusty rose.
Keep one completed flower as the master sample.
Measure its diameter and height before continuing production.
Ivory Carnations
Repeat the same pattern in warm ivory.
Do not change hook size between colors unless a swatch proves that the yarns have different gauges.
Pink and ivory flowers should remain within approximately 5 mm of one another in diameter.
Cream Foundation Square
With foundation cream, make a MR.
R1: Ch 3, which counts as the first dc. Work 2 dc into MR, ch 2. Work (3 dc, ch 2) three more times. Join. (4 groups of 3 dc)
Round 2
Sl st to the first corner.
Ch 3, 2 dc, ch 2, 3 dc in the same corner.
Ch 1.
In each remaining corner work:
(3 dc, ch 2, 3 dc), ch 1.
Join.
Round 3
Sl st to the first corner.
In each corner work:
(3 dc, ch 2, 3 dc).
In each side ch-1 space work:
3 dc.
Ch 1 between groups.
Join.
Round 4
Repeat the established granny-square structure.
Work:
(3 dc, ch 2, 3 dc)
in every corner.
Work 3 dc into every side ch-1 space with ch 1 between groups.
Join.
Solid Structural Frame
R5: Ch 1.
Sc in every stitch and ch-1 space around.
At each corner ch-2 space work:
(2 sc, ch 2, 2 sc).
Join.
Round 6
Ch 2.
Hdc in every stitch.
At each corner work:
(2 hdc, ch 2, 2 hdc).
Join.
Round 7
Ch 1.
Sc in every stitch.
At each corner work:
(sc, ch 2, sc).
Join and FO.
Target Square Size
Block the foundation square to approximately 13–15 cm.
The exact measurement is a project target. Continue alternating hdc and sc framing rounds if your square is smaller.
Every square in the bedspread must receive the same additional rounds.
Why the Square Is Smaller Than the Flower Spacing
The photographed design uses many closely positioned flowers rather than a small number of oversized motifs.
A 13–15 cm square creates a dense floral field once an 8–10 cm carnation is sewn into its center.
The remaining cream area provides enough room for joining without leaving large empty spaces between flowers.
Attaching the Carnation to the Square
Block the cream square before attaching the flower.
Mark its geometric center.
Position the rolled foundation of the carnation over the marker.
Using matching yarn, sew around a circle approximately 3–4 cm in diameter at the base of the flower.
Do not sew the outer ruffles to the square.
Testing the Flower Attachment
Lift the square by two opposite corners.
The flower should remain centered without tipping heavily toward one side.
If it moves, add several stitches around the base rather than stitching through the outer petals.
Master Motif Check
Before making the full bedspread, complete one entire motif.
Record:
- Square width
- Square height
- Both diagonals
- Flower diameter
- Flower height
- Total motif weight
Keep this motif beside the workspace as the production reference.
Checkerboard Color Arrangement
Alternate the flower colors across each row:
Pink → Ivory → Pink → Ivory.
Begin the next row with ivory:
Ivory → Pink → Ivory → Pink.
Continue alternating.
This produces the dense checkerboard floral surface visible in the reference.
Bedspread Layout
If the blocked square measures 14 cm, approximate motif-field dimensions are:
| Grid | Total Motifs | Approximate Size Before Border |
|---|---|---|
| 7 × 9 | 63 | 98 × 126 cm |
| 9 × 11 | 99 | 126 × 154 cm |
| 11 × 13 | 143 | 154 × 182 cm |
| 13 × 15 | 195 | 182 × 210 cm |
| 15 × 17 | 255 | 210 × 238 cm |
| 16 × 18 | 288 | 224 × 252 cm |
Add the outer lace border separately.
Planning the Mattress Drop
Measure the mattress and decide how far the bedspread should hang over the sides.
For a 160 cm mattress with a 30 cm drop on each side:
160 + 30 + 30 = 220 cm.
At 14 cm per motif:
220 ÷ 14 = approximately 15.7.
Sixteen columns produce approximately 224 cm before the outer border.
Estimating Yarn
Because this design contains hundreds of ruffled petals, weighing a finished motif is more accurate than estimating from stitch counts.
Suppose one complete square with flower weighs 55 g.
For 195 motifs:
55 × 195 = 10,725 g.
Add yarn for joining and the substantial lace border.
Then add approximately 10% for swatching, tension variation and repairs.
The 55 g figure is only a calculation example. Use the measured weight of your master motif.
Calculating Yarn by Color
Weigh the yarn before and after making one pink motif and one ivory motif.
Suppose a pink-flower motif uses:
- Dusty pink — 25 g
- Foundation cream — 30 g
and an ivory-flower motif uses:
- Ivory — 25 g
- Foundation cream — 30 g
Multiply each measured amount by the number of corresponding motifs.
Add the border yarn separately because the deep pink lace edge can consume a substantial additional quantity.
Making the Bedspread More Efficiently
Batch production reduces repeated color changes and measurement errors.
Make all cream foundation squares first.
Block them in groups to the master measurement.
Next make all pink flowers, followed by all ivory flowers.
Attach the flowers only after both sets have been checked for consistent diameter.
Joining the Foundation Squares
Join the squares before attaching the flowers if easier handling is required.
This is especially useful for a large bedspread because the finished carnations create considerable bulk.
Arrange all cream squares in the planned grid.
Use foundation cream for the seams.
Flat Slip-Stitch Join
Place two squares right sides upward.
Insert the hook through corresponding outer loops.
Work relaxed slip stitches from one corner to the next.
Stop after approximately 5 cm and lay the pieces flat.
The seam must not shorten either square.
Joining Complete Rows
Join all squares horizontally first.
Measure rows containing the same number of motifs.
Keep total row lengths within approximately 1 cm.
Then join the completed rows vertically.
Four-Square Intersections
Use one compact joining stitch through the corresponding corner spaces.
Avoid repeated stitches at the same intersection.
The floral surface is already highly textured, so the cream joining grid should remain comparatively flat.
Attaching Flowers After Joining
Place one carnation at the center of every joined square.
Alternate pink and ivory according to the checkerboard layout.
Sew each flower through its compact foundation only.
Keep the ruffled outer petals free.
Checking Flower Spacing
Measure from the center of one flower to the center of the next.
That distance should equal the blocked square dimension.
For 14 cm squares, flower centers should remain approximately 14 cm apart in both directions.
Bedspread Border — Foundation Round
Join foundation cream at one outer corner.
Work sc evenly around the entire bedspread.
At each corner work:
(2 sc, ch 2, 2 sc).
Join.
Border Round 2 — Cream
Ch 2.
Hdc in every stitch.
At each corner work:
(2 hdc, ch 2, 2 hdc).
Join.
Border Round 3 — Dusty Pink
Change to dusty pink.
Ch 1.
Sc in every stitch.
At each corner work:
(2 sc, ch 2, 2 sc).
Join.
Border Round 4 — Lace Foundation
Continue in dusty pink.
Sc in first stitch.
Repeat:
ch 4, skip 2 sts, sc in next st.
At each corner work one ch-6 arch.
Join.
Border Round 5 — Lace Fans
Sl st into the first ch-4 space.
Into each side space work:
(sc, hdc, 4 dc, hdc, sc).
Into each corner ch-6 space work:
(sc, hdc, 7 dc, hdc, sc).
Continue around.
Border Round 6 — Open Picot Edge
Work:
sc in next scallop tip, ch 3, sl st in first ch
to form a picot.
Work sc down to the space between scallops.
Repeat around.
At each corner make a slightly larger ch-4 picot.
FO.
Deeper Lace Border Option
The photographed bedspread uses a substantial pink edge. For more depth, add another openwork round before the final scallops.
Work:
sc in next space, ch 5, sc in next space.
Repeat around.
Use ch 7 at corners.
Then work the scallop round into those larger arches.
Matching Carnation Pillow
The pillow covers repeat the same alternating pink and ivory flowers on a cream base.
For a 45 cm cushion, make a cream foundation panel approximately 43–45 cm square.
Divide the front into a grid before attaching flowers.
Nine-Flower Pillow Layout
A practical arrangement is 3 × 3 flowers.
Alternate:
Pink — Ivory — Pink
Ivory — Pink — Ivory
Pink — Ivory — Pink
Center the flowers evenly across the panel.
Denser Pillow Layout
For the highly floral appearance shown in the reference, use a 4 × 4 arrangement of smaller carnations.
Reduce the flower foundation from ch 41 to approximately ch 31.
Make one sample first and target a flower diameter near 6–7 cm.
Plain Pillow Back
With foundation cream, chain to the required width.
Row 1: Hdc in third ch from hook and across.
Row 2: Ch 2, turn, hdc across.
Repeat Row 2 until the back matches the front.
FO.
Assembling the Pillow
Place front and back with wrong sides together.
Sc around three sides.
Insert the cushion form.
Close the fourth side or construct an envelope opening if the cover needs to be removable.
Alternative Flower Construction — Compact Ruffle
If the standard flower feels too heavy, begin with ch 31 instead of ch 41.
Work 30 sc in Row 1.
Work 3 dc in each stitch for Row 2.
For Row 3, work only 1 sc in each dc rather than two.
Roll and secure normally.
This creates a smaller, lighter carnation.
Extra-Full Carnation
For a stronger 3D effect, use the original ch-41 foundation.
After the 120-dc ruffle row, work:
(sc, ch 2, sc)
in every dc.
The added chain spaces increase edge volume without making the foundation longer.
Test one flower before applying this treatment to the full bedspread because yarn consumption increases sharply.
Two-Tone Carnation Option
Work the foundation and first ruffle row in dusty pink.
Change to ivory for the final ruffle row.
Roll the strip normally.
The ivory yarn will appear primarily at the petal edges.
Reverse Two-Tone Option
Use ivory for the foundation and first ruffle row.
Finish the outer ruffle in dusty pink.
This creates a cream flower with a pink-edged appearance while preserving the checkerboard palette.
Reducing Overall Weight
A full bedspread containing more than 150 dense flowers can become heavy.
Use a lighter worsted yarn or DK yarn if weight is a concern.
Make a complete motif with the new yarn before calculating dimensions.
Do not simply substitute thinner yarn while keeping the original grid count because both flower diameter and square size will change.
Using DK Yarn
DK yarn is also well suited to carnation-style crochet. Contemporary carnation patterns commonly use DK yarn with hooks around 4.0 mm.
For a DK version, begin by testing a 4.0 mm hook.
Increase the number of framing rounds on the foundation square until the desired motif size is reached.
Assembly
- Crochet one pink carnation and one ivory carnation, then compare their diameters and keep the difference within approximately 5 mm.
- Make one cream foundation square, block it to 13–15 cm and verify that both diagonal measurements remain within approximately 5 mm.
- Attach one test flower only through its compact rolled base and confirm that the outer ruffles remain completely free.
- Produce and block the remaining cream squares in batches, comparing every tenth square with the master motif.
- Arrange the squares into the required bedspread grid and join all horizontal rows with relaxed cream slip stitches.
- Join the completed rows vertically, keeping each four-square intersection compact and checking total row measurements as the bedspread grows.
- Attach the pink and ivory carnations in an alternating checkerboard arrangement with every flower centered on its square.
- Work the cream structural border around the complete motif field and correct any edge rippling before changing to dusty pink.
- Add the pink openwork, scallop and optional picot rounds, keeping all four corners symmetrical.
- Weave tails through dense foundation stitches, complete a light final blocking and reshape each carnation by hand after the bedspread is dry.
The completed bedspread should have a flat cream structural grid supporting alternating pink and ivory carnation heads, with the flowers remaining raised and independent from the joining seams.
7 Technical Tips
- Keep flower diameters within approximately 5 mm of the master bloom. A visibly smaller carnation creates an irregular checkerboard even when every foundation square is identical.
- Limit flower relief to roughly 2.5–4 cm. Taller blooms add unnecessary weight and are more likely to fold sideways during normal bed use.
- Sew through only the inner 3–4 cm of the rolled flower base. Catching the outer ruffles in the attachment stitches removes the pom-pom effect.
- Keep square diagonals within approximately 5 mm. Distorted foundation squares make the flower rows appear crooked after assembly.
- Test each slip-stitch seam after about 5 cm. A contracted seam can shorten a long bedspread row by several centimeters before the error becomes obvious.
- Check the first border round every 30–40 cm. Excess edge stitches create waves that become larger when the pink lace rounds are added.
- Weave structural tails through at least 6–8 cm of dense cream fabric. Do not hide joining ends inside the flowers because repeated movement can pull them through the ruffles.
Care and Final Blocking
Follow the care instructions for the selected yarn. A full-size flower bedspread can become extremely heavy when wet, so support the fabric across both arms rather than lifting it from one edge.
Lay the piece flat and align the cream grid first.
Shape the pink lace border next.
Allow the structural fabric to dry before arranging the flowers. Once dry, separate compressed ruffles with your fingers and restore each bloom to a rounded profile.
Do not place heavy blocking boards directly over the carnations.
Conclusion
The dense ruffled blooms define this 3D carnation flower crochet bedspread pattern, but the separate cream foundation is what keeps hundreds of flowers aligned across a usable blanket. Begin with one 13–15 cm square and two test carnations, record their blocked measurements and weigh the completed motif before calculating a full bedspread. Join the cream foundation first when working at large scale, then attach alternating dusty-pink and ivory flowers and finish with the deeper pink lace edge. Your next step is to crochet one ch-41 ruffled flower and measure its diameter after rolling. Save the project to Pinterest or share it on Instagram with #CarnationFlowerBedspread. Would you alternate pink and ivory exactly, or use two pink flowers for every ivory bloom?