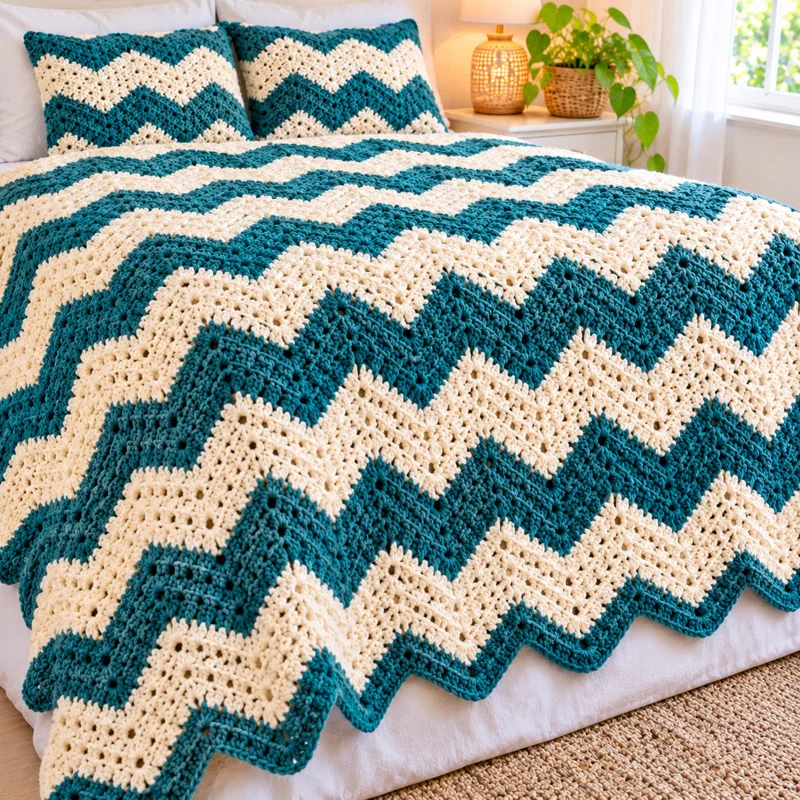
The alternating teal and cream zigzag bands give this crochet chevron blanket its distinctive geometric structure. The design combines raised stitch texture, openwork details, and sharply defined peaks and valleys. Made with worsted-weight yarn and a 5.5 mm crochet hook, this intermediate-level project produces a decorative blanket measuring approximately 150 × 180 cm, with optional matching pillow covers. The repeating pattern makes it practical to adjust the width for different bed sizes.
The Design: What Makes This Chevron Blanket Different
This teal and cream crochet blanket uses three structural elements: a repeating chevron foundation, alternating color bands, and textured stitch groups. Unlike a basic ripple blanket, the pictured design includes small openings that add definition between the raised stitches.
The peaks are formed with multiple stitches worked into one position, while the valleys use grouped decreases. Keeping these two elements aligned prevents the blanket from gradually drifting sideways.
The contrast between deep teal and warm cream makes each zigzag stripe visible without adding extra decorative borders. A matching pillow cover repeats the same stitch sequence on a smaller scale.
One common mistake when making a crochet zigzag blanket is accidentally increasing at the peaks without making the corresponding decreases at the valleys. This changes the stitch count and distorts the edges. Count every repeat before changing colors.
Pattern note: The instructions below are an original, simplified chevron interpretation of the photographed blanket, not an exact reconstruction of its openwork stitch pattern. Finished measurements and yarn quantities are estimates, not independently verified specifications.
Project Information at a Glance
| Detail | Information |
|---|---|
| Skill Level | Intermediate |
| Estimated Time | 25–40 hours |
| Finished Blanket Size | Approximately 150 × 180 cm |
| Crochet Hook | 5.5 mm |
| Yarn Weight | Worsted / Medium Weight 4 |
| Construction | Flat rows, turned after each row |
| Color Scheme | Deep teal and warm cream |
| Best For | Bedroom blankets, throws, and matching pillow sets |
Materials and Tools
Yarn
Choose a soft, washable worsted-weight yarn with consistent thickness. Acrylic or an acrylic-cotton blend is suitable for a blanket that will be used regularly.
- Deep teal worsted-weight yarn: approximately 1,000–1,200 g.
- Warm cream worsted-weight yarn: approximately 900–1,100 g.
- Optional pillow yarn: allow approximately 250–400 g per pillow cover, depending on dimensions and construction.
Suitable yarn ranges include Lion Brand Basic Stitch, Paintbox Yarns Simply Aran, and other washable medium-weight yarns. Check the recommended gauge and yardage on the yarn label before purchasing.
Tools
- 5.5 mm crochet hook
- Scissors
- Tapestry needle
- Stitch markers
- Measuring tape
- Blocking mats and rust-resistant pins
- Optional 45 × 45 cm pillow inserts
Crochet Abbreviations
- ch: Chain
- sc: Single crochet
- dc: Double crochet
- dc2tog: Double crochet two stitches together
- dc3tog: Double crochet three stitches together
- sl st: Slip stitch
- st: Stitch
- rep: Repeat
- RS: Right side
- WS: Wrong side
US crochet terminology is used throughout this pattern.
Gauge and Sizing
Before beginning the full blanket, make a chevron swatch containing at least two complete pattern repeats. Work several rows, wash the sample according to the yarn label, and let it dry flat.
Measure the finished width and height without stretching the fabric. The number of repeats needed for a 150 cm blanket depends on your actual gauge.
The instructions below use a foundation of 242 chains, which creates ten chevron repeats. The final width will depend on your yarn, hook, and tension.
Free Crochet Chevron Blanket Pattern
Step 1: Make the Foundation Chain
With deep teal yarn and a 5.5 mm crochet hook, chain 242.
The foundation follows a multiple of 24 + 2. Each repeat forms one complete zigzag section.
Keep the starting chain relaxed. If it is significantly tighter than your normal double crochet stitches, use a 6 mm hook for the foundation chain and switch back to 5.5 mm for the first row.
Step 2: Crochet the First Chevron Row
Row 1: Work 2 dc into the fourth chain from the hook. The skipped three chains count as the first dc. Work 1 dc in each of the next 9 chains.
Work dc3tog over the next 3 chains, then another dc3tog over the following 3 chains. Work 1 dc in each of the next 9 chains.
Work 3 dc in the next chain to create the peak.
Repeat the sequence of 9 dc, two dc3tog groups, 9 dc, and 3 dc in the next chain across the remaining repeats, adjusting the final peak to match the established edge.
Important: This row describes the chevron shaping concept rather than a fully tested stitch-for-stitch foundation. Work and verify a complete swatch before using it for a full-size blanket. Do not rely on the stated 242-chain count for a finished project until the edge stitches and repeat counts have been checked.
Step 3: Establish the Chevron Pattern
Turn the work and chain 3. The turning chain counts as the first double crochet.
Continue working double crochet stitches along the rising and falling sections of each chevron.
At each peak, place the required increases into the center peak stitch. At each valley, work grouped decreases to preserve the zigzag structure.
Keep the increases and decreases vertically aligned with the previous row. Use stitch markers to identify the peak and valley positions while learning the repeat.
Complete a minimum of six rows in deep teal to establish the first color band.
Step 4: Change to Cream Yarn
At the final stitch of the teal section, work the double crochet until two loops remain on the hook.
Drop the teal yarn, pull the cream yarn through the remaining loops, and complete the stitch with the new color.
Turn the blanket and continue the established chevron shaping with cream yarn.
Work six rows in cream, maintaining the same peak and valley positions.
For cleaner color transitions, change yarn on the last yarn-over of the final stitch rather than joining the new color after completing the row.
Step 5: Repeat the Color Stripes
Continue alternating six rows of teal and six rows of cream.
The photograph shows broad zigzag bands with relatively balanced color distribution. Keeping the stripe widths equal produces a similar overall arrangement.
For a more varied design, use the following stripe sequence:
- 6 rows deep teal
- 6 rows warm cream
- 8 rows deep teal
- 6 rows warm cream
- 6 rows deep teal
- 8 rows warm cream
Repeat the sequence until the blanket approaches the desired length. Finish with a teal band to frame the cream sections.
Step 6: Add Textured Stitch Details
The photographed blanket has a raised surface that differs from ordinary flat double crochet. You can introduce texture by replacing selected double crochet stitches with front post double crochet stitches on a sample.
To make a front post double crochet, yarn over, insert the hook from front to back and then front again around the post of the stitch below, and complete the double crochet.
Use textured stitches sparingly at first. They can change the row height and fabric width, particularly when placed close to the increases and decreases.
Do not substitute textured stitches into the peak or valley positions without checking the stitch count and shape.
Step 7: Create an Openwork Effect
The original image includes small openings between raised stitch groups. These can be recreated in a separate, tested variation by substituting chain spaces for selected stitches.
For example, a chain-one space followed by a skipped stitch can create a small opening. However, the number of stitches and chain spaces must remain consistent within each repeat.
Test this modification on the swatch before adding it to the blanket. Openwork substitutions can change the width of each chevron and may require a different foundation count.
Step 8: Finish the Final Row
When the blanket reaches the desired length, complete the final chevron row in deep teal.
Cut the yarn, leaving a tail approximately 15 cm long. Pull the tail through the final loop and tighten gently.
Weave the tail through several stitches on the wrong side of the blanket. Reverse direction at least once to reduce the risk of the end working loose.
How to Crochet Matching Chevron Pillow Covers
The two matching pillows in the image repeat the teal and cream chevron arrangement on a smaller surface. Their construction requires a tighter fit than the blanket because the covers must accommodate pillow inserts.
Step 1: Measure the Pillow Insert
For a standard 45 × 45 cm insert, plan a finished cover measuring approximately 43–45 cm across, depending on the stretch of the crochet fabric.
Make a separate gauge swatch using the same yarn and hook as the blanket. Calculate the number of complete chevron repeats needed to reach the required width.
Step 2: Crochet the Front Panel
Work the established chevron pattern in alternating teal and cream rows.
Arrange the colors so that at least two prominent cream zigzag bands cross the front of the pillow.
Continue until the panel reaches the required height. Because chevron edges are shaped, measure the panel at several points rather than using only the longest peak.
Step 3: Crochet the Back Panel
For a simple back panel, work a rectangle in single crochet or double crochet using the same yarn.
The back may be made as one piece for a permanently closed cover or as two overlapping pieces for an envelope opening.
If making an envelope closure, overlap the two back sections by approximately 8–10 cm.
Step 4: Join the Panels
Place the front and back panels together with the right sides facing outward.
Use single crochet stitches to join the edges, distributing the stitches evenly around the chevron points and valleys.
For an envelope cover, join all four sides while leaving the overlapping back sections free to open.
Insert the pillow form and check that the front panel sits flat without excessive stretching.
How to Adjust the Blanket Size
A crochet chevron blanket can be adapted for a sofa, single bed, double bed, or larger mattress. The most reliable method is to measure one complete chevron repeat in your finished swatch.
| Blanket Type | Approximate Target Size |
|---|---|
| Baby Blanket | 75 × 90 cm |
| Lap Blanket | 100 × 120 cm |
| Throw Blanket | 125 × 150 cm |
| Double Bed Blanket | 150 × 180 cm |
| Large Bed Blanket | 200 × 220 cm |
These are suggested project dimensions rather than fixed bedding standards.
To calculate the number of chevron repeats, divide the desired blanket width by the measured width of one repeat. Round to the nearest whole repeat, then calculate the foundation chain from the tested stitch multiple.
For the length, continue adding complete color bands until the required measurement is reached.
Seven Technical Tips for Better Chevron Crochet
- Mark every peak: Place a stitch marker at the center of each increase group. A misplaced increase can shift the zigzag alignment by one stitch per row.
- Check the valleys: Count both decrease groups before moving to the next rising section. Missing a decrease creates extra width and eventually causes the blanket to flare.
- Control foundation tension: Use a hook 0.5 mm larger for the starting chain if the lower edge pulls inward. A tight foundation can prevent the chevron points from opening to their intended width.
- Keep color bands consistent: Record the number of completed rows after each color change. Unequal row counts make matching stripes appear different in height.
- Watch textured stitches: Front post stitches may pull neighboring stitches closer together. Measure a 10 cm section after adding texture to detect narrowing.
- Block the finished blanket: Pin the chevron points into alignment without stretching the fabric beyond its natural dimensions. Excessive tension can flatten the raised stitch texture.
- Secure yarn tails: Leave at least 15 cm when cutting yarn at a color change. Short tails can work loose during repeated washing and handling.
Common Chevron Blanket Problems and Solutions
Why Are the Edges Becoming Uneven?
Uneven edges usually result from inconsistent increases or decreases. Count the stitches in each repeat and compare them with the previous row.
If the mistake occurred several rows earlier, unraveling to the incorrect row is generally more effective than attempting to hide the extra stitches.
Why Is the Blanket Curling?
Curling may result from a tight foundation chain, uneven tension, or an imbalance between increases and decreases.
Check the stitch count first. If the count is correct, try blocking the swatch and compare its dimensions before and after drying.
Why Do the Cream Stripes Look Wider?
Different yarn colors can behave slightly differently, even within the same yarn range. Changes in tension between color sections can also alter the apparent stripe width.
Measure row height across several stripes and maintain the same hook size throughout the project.
Can This Pattern Be Made with Chunky Yarn?
Yes, but chunky yarn changes the gauge, drape, and overall dimensions. Make a new swatch and recalculate the number of repeats before beginning.
A larger hook may also be needed to prevent the finished fabric from becoming excessively stiff.
Washing and Caring for a Crochet Chevron Blanket
Follow the washing instructions provided by the yarn manufacturer. For washable acrylic yarn, a gentle machine cycle may be appropriate, but this depends on the specific product.
Place the blanket in a large mesh laundry bag if the washing machine has a central agitator. Avoid washing it with garments containing zippers or hook-and-loop fasteners.
Dry flat when possible, supporting the weight of the wet fabric. Hanging a heavy wet blanket can stretch the chevron points and distort the edges.
Store the blanket folded rather than hanging it for extended periods.
Frequently Asked Questions
Is a Chevron Crochet Blanket Suitable for Beginners?
A basic chevron pattern is suitable for crocheters who already understand chains, double crochet stitches, increases, and decreases. The main challenge is maintaining accurate stitch counts across multiple repeats.
How Much Yarn Is Needed for a Chevron Blanket?
A large worsted-weight blanket may require approximately 1.9–2.3 kg of yarn, depending on stitch density, finished dimensions, and yarn construction. Weighing a completed swatch gives a more dependable estimate than relying on a generic quantity.
What Is the Best Hook Size for a Chevron Blanket?
A 5.5 mm hook is a reasonable starting point for many worsted-weight yarns. The final choice should produce a fabric with enough flexibility to drape without creating excessively large gaps.
Can I Use Different Colors?
Yes. The chevron structure works with two or more colors. For a design similar to the photographed blanket, choose two contrasting shades and maintain consistent stripe widths.
How Do I Keep the Zigzag Pattern Even?
Mark the peaks and valleys, count the stitches within each repeat, and check the total width regularly. Correcting mistakes early prevents cumulative distortion.
Conclusion
The teal and cream crochet chevron blanket combines geometric color placement with a repeating ripple structure. Accurate stitch counts, consistent decreases, and measured color changes are the main factors affecting the finished shape. The matching pillow covers extend the same visual pattern across the bedding set.
Before starting the full project, complete a two-repeat gauge swatch and verify the foundation and edge shaping. Use the measured results to calculate your final blanket width and yarn requirements. Save the design to Pinterest or share your finished project on Instagram using #TealCreamChevronBlanket.
Would you keep the teal and cream stripes equal in width, or make the teal bands wider for stronger contrast?









