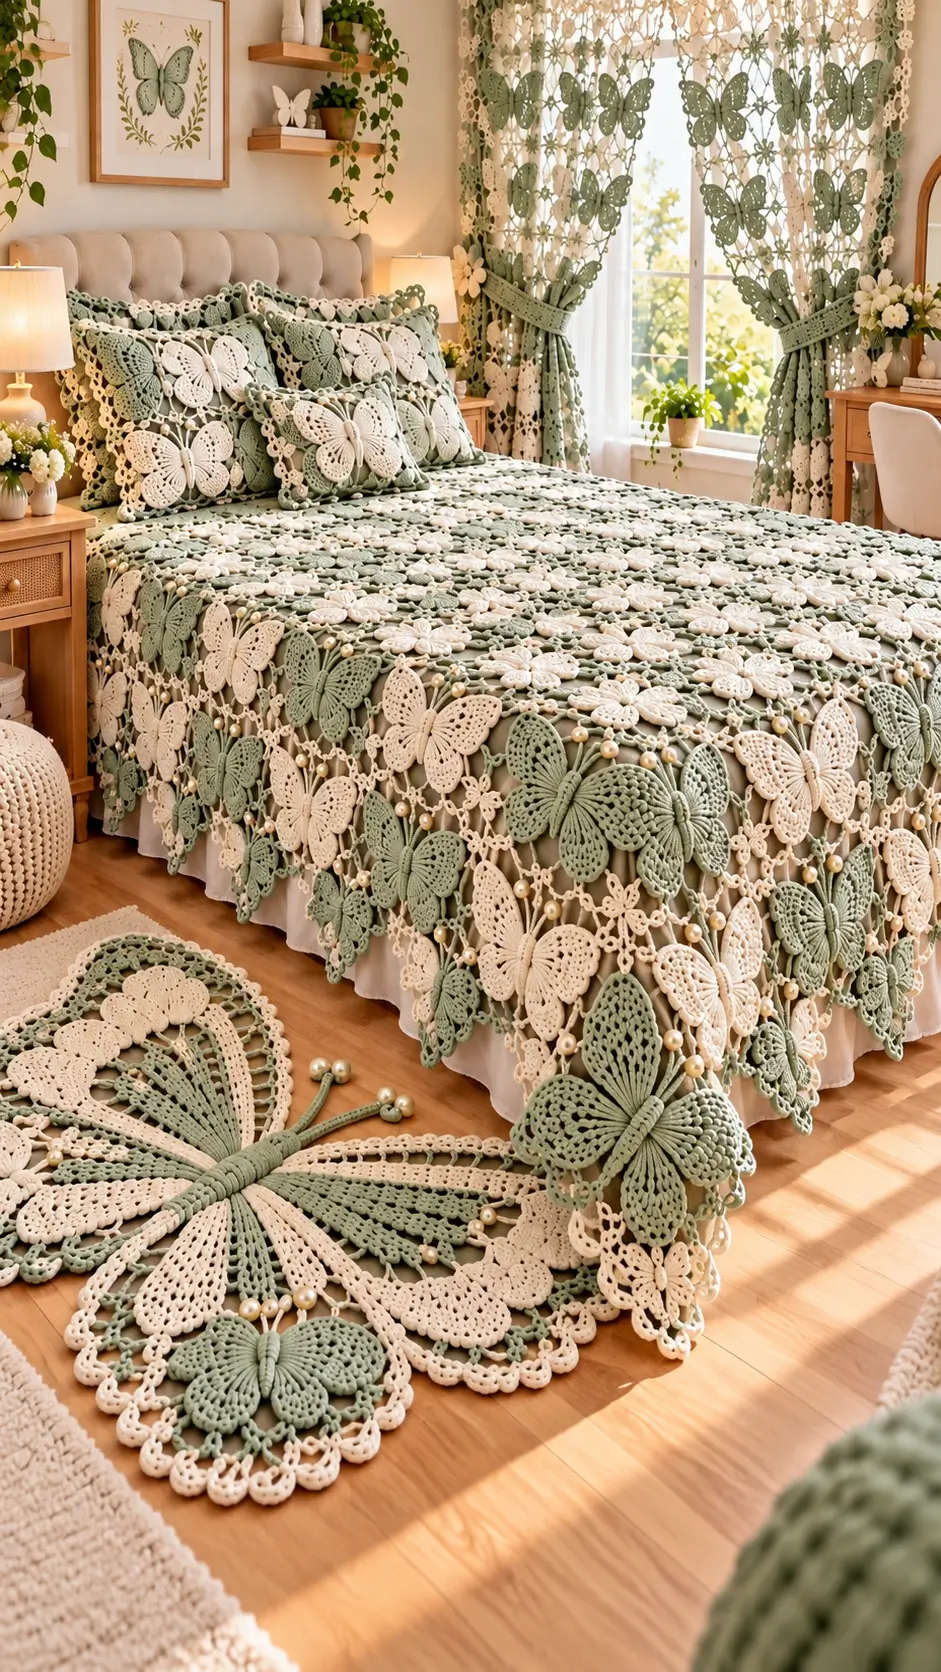
A butterfly’s four wings create the repeating geometry behind this sage-green and ivory crochet bedroom design. This butterfly crochet bedspread pattern guide explains how to build a decorative cover with openwork panels, dimensional butterfly motifs, floral connectors, and scalloped edges. The project suits intermediate crocheters familiar with lace stitches and motif joining. Matching pillow covers and curtain decorations can be made using the same techniques.
The Design: What Makes This Butterfly Bedspread Different
The pictured bedspread combines three distinct layers: a practical foundation, an open crochet network, and raised butterfly decorations. Separating these components makes the project easier to size and maintain. The foundation supports the weight of the motifs, while the openwork layer gives the surface its lace appearance.
Sage green and ivory alternate across the wings, producing contrast without changing the underlying construction. Large butterflies are concentrated around the hanging edges, where their silhouettes remain visible. Smaller flowers connect the surrounding spaces.
A frequent mistake in butterfly crochet blanket projects is joining every motif before checking the dimensions. The result may stretch unevenly or pull the corners inward. Make a measured sample first, then calculate the number of repeats needed for the finished bedspread.
Project Information at a Glance
| Skill Level | Time | Finished Size | Hook | Best For |
|---|---|---|---|---|
| Intermediate | Varies by bed size and motif count | Custom fitted | 3.5–4 mm, subject to gauge | Decorative bed coverings and coordinated bedroom textiles |
The measurements and yarn quantities below are planning estimates for an original interpretation, not verified specifications for the photographed item.
Materials and Tools
Yarn
- Sage green cotton or cotton-blend DK yarn: approximately 900–1,500 g for motifs and openwork.
- Ivory cotton or cotton-blend DK yarn: approximately 700–1,200 g for contrasting wings, flowers, and edging.
- Matching sewing thread: for securing appliqués to a fabric backing.
- Optional cotton backing fabric: sized to the mattress and desired overhang.
These quantities are preliminary budgeting allowances. The actual amount depends on stitch density, bed dimensions, the number of butterflies, and whether a backing is used.
Tools
- 3.5 mm or 4 mm crochet hook, selected after testing the yarn.
- Tapestry needle for sewing motifs and weaving ends.
- Stitch markers for tracking repeats.
- Measuring tape for checking width and drop.
- Rust-resistant blocking pins and mats for shaping the lace.
- Scissors and optional removable fabric clips.
Crochet Abbreviations
- MR — magic ring
- ch — chain
- sc — single crochet
- hdc — half double crochet
- dc — double crochet
- tr — treble crochet
- sl st — slip stitch
- inc — two single crochets in one stitch
- dec — single crochet decrease
- BLO — back loop only
- sp — space
- st — stitch
For an invisible decrease, work through the front loops of two adjacent stitches before completing one single crochet.
Butterfly Crochet Bedspread Pattern — Step by Step
This is a modular decorative construction inspired by the photograph. It does not claim to reproduce the exact lace chart shown in the image. Instructions use US crochet terminology. Chains used for turning are identified separately from stitch counts.
Step 1: Measure the Bed and Plan the Layout
Measure the mattress width and length, then decide how far the bedspread should hang over the sides. A bed measuring 150 × 200 cm with a 35 cm drop on three sides requires a planned covering of approximately 220 × 235 cm. Adjust for pillows, the headboard, and the chosen finishing method.
Draw a rectangular layout on paper. Mark the center field, outer border, and hanging panels. Reserve larger butterfly motifs for the visible edges and distribute smaller motifs across the upper surface.
Make one complete sample of each motif before committing to the layout. Wash and block the samples according to the yarn label. Record their finished dimensions after drying.
Step 2: Crochet the Openwork Foundation Panel
Use sage green DK yarn and the hook selected from your gauge sample. The following mesh repeat creates an airy panel suitable for attaching decorative butterflies.
Foundation: Chain a multiple of 3 plus 4, making the chain long enough for the required panel width.
Row 1: Dc in the 5th chain from the hook. Repeat (ch 2, skip 2 chains, dc in next chain) across. Turn.
Row 2: Ch 3, dc in the first dc, then repeat (ch 2, dc in next dc) across. Turn.
Rows 3 onward: Repeat Row 2 until the panel reaches the planned length.
Keep the chain spaces uniform. The panel should lie flat without being pulled tightly between stitches. Count the mesh openings at regular intervals and check that the sides remain parallel.
For a large bedspread, make several smaller panels rather than one heavy piece. Join them with slip stitches or a sewn seam, keeping the mesh columns aligned. A fabric backing is recommended if the bedspread will receive frequent use.
Step 3: Crochet the Butterfly Wings
Make butterflies in sage green and ivory. The following compact four-wing motif can be enlarged by changing the yarn weight or adding a separate decorative border.
Round 1: Make an MR. Work (ch 4, 3 tr, ch 4, sl st into ring) twice for the upper wings. Work (ch 3, 3 dc, ch 3, sl st into ring) twice for the lower wings. Pull the ring closed.
Finishing: Fasten off, leaving a 20 cm tail for attachment. Shape the two larger wings above the two smaller wings. The four wings share one central ring.
For more prominent motifs, crochet a separate outline using contrasting yarn. Work evenly around the wing edges with single crochet, adding extra stitches at outer curves as needed to prevent puckering. The border is adjusted by eye because its stitch count depends on the selected yarn and the tension of the first round.
The photographed butterflies have more intricate openwork than this simplified motif. To approach that effect, substitute a tested lace-butterfly chart and make the foundation mesh large enough to support its wings.
Step 4: Add the Butterfly Body and Antennae
Use ivory yarn for sage butterflies and sage yarn for ivory butterflies.
Body Row 1: Ch 11, sc in the second chain from the hook and each remaining chain (10).
Body Row 2: Ch 1, turn, sc in each stitch (10).
Fasten off with a 20 cm sewing tail. Position the narrow strip vertically over the wing center and stitch it into place. Leave the upper end slightly raised to define the head.
For antennae, attach two short lengths of yarn to the top of the body. Secure the ends on the reverse side. Avoid loose beads or detachable decorations if the textile will be accessible to young children.
Step 5: Make Small Crochet Flowers
The floral connectors break up the larger butterfly shapes and fill empty sections of the mesh.
Round 1: Work 6 sc in an MR (6). Join with a sl st.
Round 2: Repeat (ch 3, 2 dc in the next stitch, ch 3, sl st in the same stitch) six times, working one petal into each stitch of Round 1.
Fasten off with a 15 cm tail. Flatten the petals and block them before joining. Make enough flowers to cover the planned junctions between butterflies.
Use ivory for most flowers and introduce occasional sage flowers where additional contrast is needed. Keep the placement symmetrical across the central field.
Step 6: Create the Scalloped Border
The scalloped edge frames the bedspread and provides a transition between the flat upper surface and the hanging lace.
Round 1: Work sc evenly around the entire foundation, placing 3 sc in each corner. Join with a sl st.
Round 2: Ch 1, sc in each stitch, again working 3 sc at each corner. Join.
Round 3: Repeat (skip 2 stitches, 5 dc in next stitch, skip 2 stitches, sl st in next stitch) along each straight edge. Adjust the final repeat near each corner rather than forcing a partial shell.
Fasten off and weave in the ends. Block the border so the shells open evenly. If the outer edge begins to ripple, reduce the number of shells or use a smaller hook.
Step 7: Prepare Matching Pillow Decorations
The pictured pillows repeat the butterfly and flower shapes on sage-green crochet panels. Use the same mesh construction as the main bedspread, but size each panel to fit the front of the pillow cover.
Make one or three butterflies per pillow depending on the available surface. Arrange the motifs before stitching them down. Position the largest butterfly near the center and smaller flowers toward the corners.
Attach the crochet panel to a removable fabric pillow cover. Sew through stable sections of the mesh rather than pulling individual chain spaces tightly. Keep the closure accessible for laundering.
For a more dimensional result, stitch only the butterfly bodies to the fabric and leave the outer wing edges free. This technique is suitable for decorative pillows, but fully attached wings are more practical for frequently used bedding.
Step 8: Adapt the Motifs for Curtains
The curtains in the reference image contain repeated butterflies, floral lace, and sage-green tiebacks. A lightweight interpretation can be made by attaching crochet appliqués to an existing curtain panel.
Lay the curtain flat and mark the planned motif positions. Use a measuring tape to maintain even vertical spacing. Stitch butterflies and flowers through the curtain fabric with matching thread.
For a crocheted tieback, make a long strip of single crochet to the desired length, adding a fastening loop at one end. Test the tieback around the gathered curtain before sewing on the fastening button or hook.
A fully crocheted curtain requires a separate gauge calculation and additional yarn. Do not assume that a bedspread mesh will hang correctly as a window panel; the weight and stretch behave differently.
Step 9: Plan a Butterfly-Shaped Floor Mat
The floor accessory shown in the photograph is a large butterfly-shaped lace mat. It should be treated as a separate project rather than an extension of the bedspread.
Make a full-size paper template with two upper wings, two lower wings, and a central body. Crochet flat wing panels to fit the template, then join them along the body line. Use a firmer stitch density than the bedspread so the edges resist distortion.
Add a contrasting scalloped border after joining the panels. Block the mat to its intended outline. If the mat will be placed on a hard floor, use a suitable nonslip backing and secure it according to the backing manufacturer’s directions.
Decorative beads and long raised loops are not recommended for a mat that people will walk on because they can catch underfoot.
Assembly Instructions
- Wash and block one sample of every crochet motif, then record the final dimensions.
- Complete the openwork foundation and check its width and length against the layout.
- Join the foundation panels, keeping the seams flat and the mesh repeats aligned.
- Lay the foundation on a large flat surface and mark the central butterfly positions.
- Pin the butterfly bodies first, then arrange the wings without stretching the surrounding mesh.
- Sew each butterfly securely at its center and selected wing attachment points.
- Position the small flowers between motifs and attach them at their centers.
- Work the outer border and correct any sections that ripple or pull inward.
- Attach the finished lace to a backing if required, distributing the attachment stitches evenly.
- Weave in every remaining end, inspect the seams, and complete the final blocking.
The bedspread is complete when the panels lie flat, the motifs remain secure, and the finished dimensions match the planned layout.
7 Technical Tips for a Better Finish
- Mark every repeat. Place a stitch marker at intervals of ten mesh openings. A missing opening can otherwise shift the alignment of an entire panel.
- Measure after blocking. Compare each sample before and after washing. Even a 5% change in width can substantially affect a full-size bedspread.
- Control stitch tension. Uneven double-crochet height causes mesh panels to lean. Check the width every 15–20 rows and correct tension changes early.
- Keep butterfly wings balanced. Pin opposite wings at matching angles before sewing. Unequal attachment points can make the motif appear twisted.
- Test the border corners. Work three single crochets at each corner during the foundation edging. Too few corner stitches can pull the finished border inward.
- Support heavy decorations. Large butterflies may stretch delicate chain spaces. Anchor their bodies to a stable mesh junction or backing fabric instead of one unsupported chain.
- Secure loose ends. Weave yarn tails through several stitches and reverse direction once. Ends left inside open chain spaces may work loose during washing.
Care and Maintenance
Check the yarn label before washing the finished bedspread. Cotton and cotton-blend yarns vary in shrinkage, colorfastness, and permitted washing temperatures. Test a sample in the intended wash cycle before laundering the full piece.
A large lace bedspread can become heavy when wet. Support its weight during lifting and drying rather than allowing the fabric to hang from a narrow section. Dry flat when practical, reshaping the scallops and butterfly wings while the textile is damp.
Store the covering folded in a dry location. Avoid hanging it for extended periods because the openwork panels may lengthen under their own weight. Inspect decorative attachments periodically, especially around the edges where the bedspread is handled most often.
Conclusion
This butterfly crochet bedspread pattern guide provides a modular method for interpreting the sage-green and ivory bedroom design. The foundation mesh, butterfly appliqués, floral connectors, and scalloped edging can be adjusted independently to fit different bed sizes. Start by making one butterfly, one flower, and a 20 × 20 cm mesh sample. Block all three before calculating the final motif quantities.
Save the project layout on Pinterest and share completed work on Instagram using #ButterflyCrochetBedspread. Record the yarn weight, hook size, and blocked measurements so other makers can compare results. Would you arrange the largest sage-green butterflies along the hanging border or distribute them across the center of the bedspread?
Pattern References
The construction above is an original adaptation. For separately published butterfly motif techniques, consult A Crocheted Simplicity, Oui Crochet, and Hobbii. Their designs have different materials and dimensions and are not the source of the photographed bedspread.