Introduction
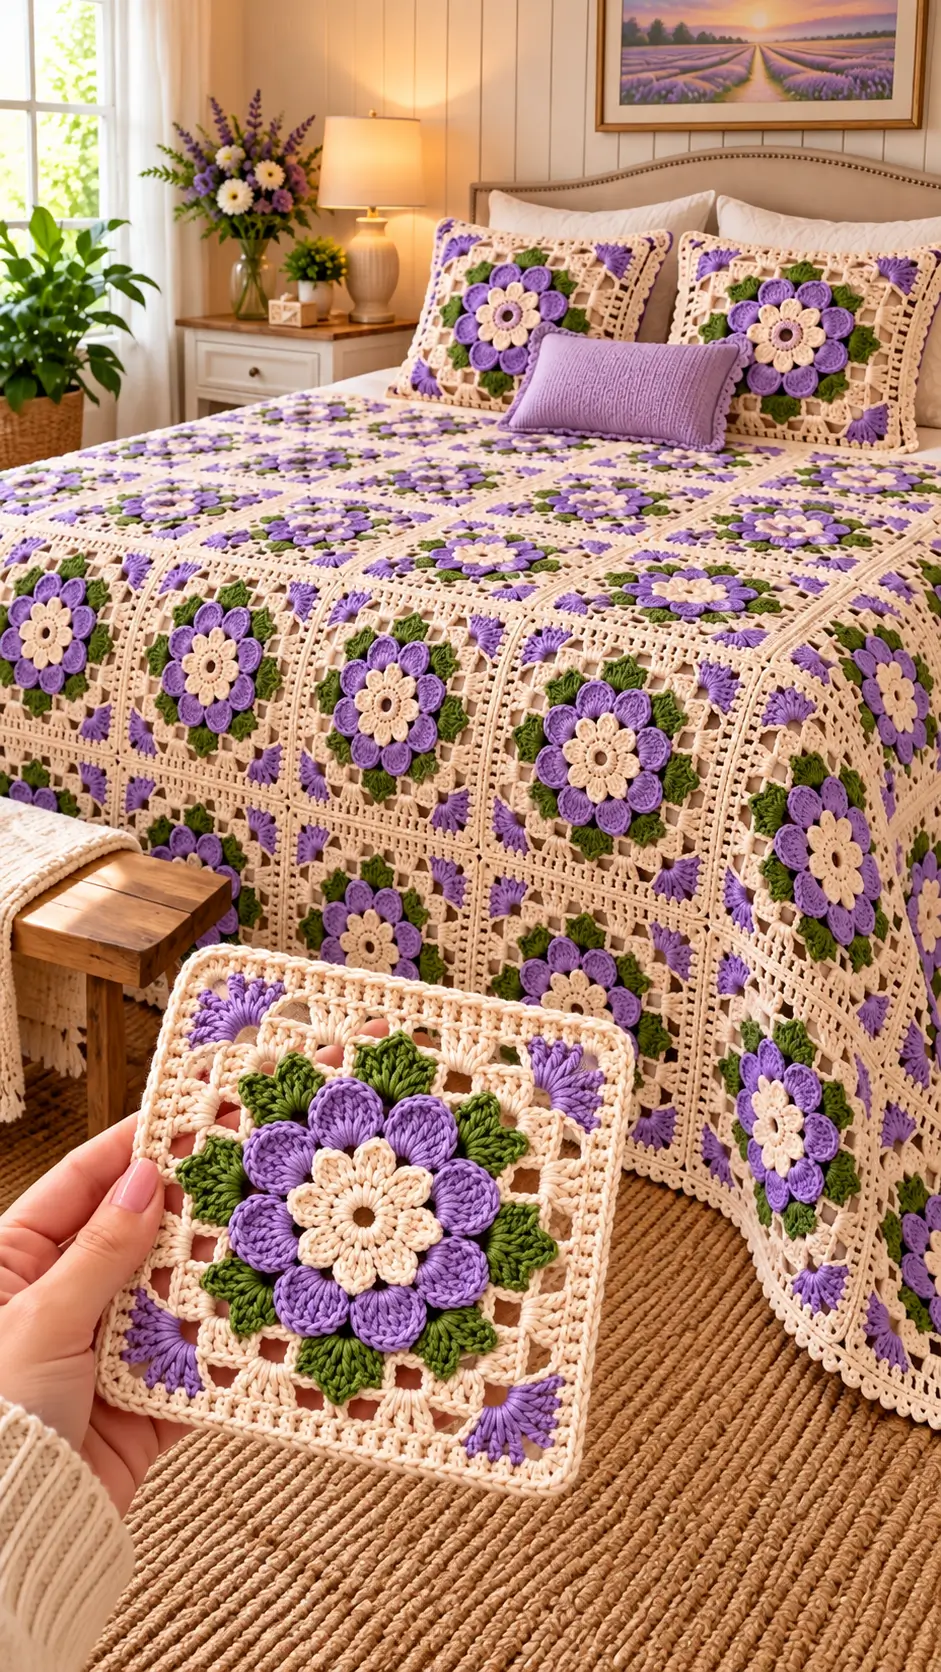
Eight raised lavender petals surround a smaller cream flower, while green leaves separate the blossoms from an ivory lattice. This lavender floral granny square crochet blanket pattern uses worsted-weight yarn, a 5 mm hook, and modular square construction to create a proposed 150 × 210 cm bedspread. Designed for intermediate crocheters, the project allows individual motifs to be made, measured, and joined without handling the entire blanket during construction.
The Design: What Makes This Lavender Flower Blanket Different
Three structural features distinguish this design from a conventional granny square blanket.
First, the flower has two distinct layers. A cream inner flower sits above larger purple petals, giving the motif depth without requiring separate appliqués for every petal.
Second, green leaves create a visual transition between the circular flower and square background. Their placement at four diagonal points also helps distribute the flower’s visual weight evenly.
Third, an open ivory lattice surrounds each motif. This keeps the finished purple crochet bedspread from becoming excessively dense, particularly when multiple squares are joined.
A common mistake with a raised petal crochet square is allowing the decorative flower to pull the foundation inward. The background should be worked with consistent tension, and each completed motif should be blocked to a common measurement before joining.
Project Info at a Glance
| Project Detail | Specification |
|---|---|
| Skill Level | Intermediate |
| Estimated Time | 60–90 hours |
| Target Finished Size | 150 × 210 cm |
| Hook Size | 5 mm |
| Target Square Size | 15 × 15 cm |
| Total Squares | 140 |
| Construction | Layered flower motifs and joined granny squares |
These measurements and time estimates are proposed design targets, not results from a tested sample.
Materials and Tools
Yarn
Choose smooth, washable worsted-weight yarn in four colors. Acrylic or cotton-acrylic blends are practical options for a bedspread because repeated motifs need consistent dimensions.
- Warm ivory / cream — worsted-weight yarn: Main square background, inner flowers, joining seams and border. Preliminary purchasing allowance: 1,800 g.
- Lavender purple — worsted-weight yarn: Outer flower petals and decorative corners. Preliminary purchasing allowance: 900 g.
- Olive green — worsted-weight yarn: Leaves around the flowers. Preliminary purchasing allowance: 450 g.
- Pale beige — worsted-weight yarn: Optional contrasting flower centers. Preliminary purchasing allowance: 150 g.
These are preliminary allowances, not measured yarn consumption. Complete one sample square, weigh the yarn used in each color, multiply by 140, and add approximately 10–15% for joining, borders, and waste. Matching pillow covers require additional yarn.
Tools
- 5 mm crochet hook, or the size needed to obtain the target measurement
- Tapestry needle for sewing motifs and weaving ends
- Locking stitch markers for identifying corners
- Scissors and measuring tape
- Blocking mat and rustproof pins
- Digital kitchen scale for measuring yarn consumption
Abbreviations — US Crochet Terms
| Abbreviation | Meaning |
|---|---|
| MR | Magic ring |
| ch | Chain |
| sc | Single crochet |
| hdc | Half double crochet |
| dc | Double crochet |
| tr | Treble crochet |
| sl st | Slip stitch |
| st | Stitch |
| sp | Space |
| inc | Two single crochets in one stitch |
| dec | Single crochet decrease |
| BLO | Back loop only |
| FO | Fasten off |
An invisible decrease works through the front loops of two adjacent stitches before completing one single crochet.
Special stitch — 5-dc popcorn: Work five double crochets in one stitch, remove the hook from the working loop, insert it through the first double crochet, replace the loop, and pull through to close the popcorn.
Pattern — Step by Step
This motif uses joined rounds rather than a continuous amigurumi spiral. Each flower is constructed first, followed by the leaves and square background.
This is a photo-inspired pattern draft. Complete and measure a prototype before producing the full set of squares.
Part 1: Cream Flower Center (Make 140)
Yarn: ivory or pale beige.
R1: Work 6 sc into MR. Join with sl st. (6)
R2: Ch 1, inc ×6. Join with sl st. (12)
R3: Ch 1, (sc, inc) ×6. Join. (18)
R4: Ch 1, (2 sc, inc) ×6. Join. (24)
R5: Ch 1, (3 sc, inc) ×6. Join. (30)
R6: Ch 1, (4 sc, inc) ×6. Join. (36)
Fasten off and leave a 15 cm yarn tail.
This six-round center creates a firm circular base. For a smaller inner flower, stop after R3 and treat the remaining construction as a separate sizing experiment.
Part 2: Small Cream Petals (Make 140 Sets)
Yarn: ivory.
Join yarn to any stitch on the outer edge of the flower center.
R1: Repeat (sl st in next st, skip next st, 5 dc in next st, skip next st, sl st in next st, sl st in next st) six times around the 36-stitch center.
This produces six cream petals, each separated by an anchoring section.
R2: Work one sl st into the back of each petal base, placing ch-2 bridges behind the petals to provide attachment points for the next layer. There should be six ch-2 bridges.
Fasten off, leaving a 15 cm tail.
Keep the petal layer facing upward. The rear bridges support the larger lavender flower.
Part 3: Lavender Outer Petals (Make 140 Sets)
Yarn: lavender purple.
Attach purple yarn to one of the six rear bridges.
R1: In each ch-2 bridge, work (sc, hdc, 3 dc, hdc, sc). Repeat across all six bridges.
R2: To create a fuller outer layer, work a second set of petal foundations behind the first layer using six evenly spaced ch-3 bridges. Anchor each bridge near the base of a previous petal.
R3: In each ch-3 bridge, work (sc, hdc, 5 dc, hdc, sc).
Fasten off and leave a 20 cm tail.
The sample construction produces six petals per layer. The reference photograph appears to have approximately eight larger purple petals. For a closer visual match, redesign the petal foundations to provide eight evenly spaced attachment points and test that variation before making the blanket.
Part 4: Green Leaves (Make 4 per Square)
Yarn: olive green.
Each leaf is worked separately and sewn behind the lavender flower.
R1: Ch 9. (9 chains)
R2: Beginning in the second chain from the hook, work sc, hdc, dc, tr, tr, dc, hdc, sc along one side of the foundation chain. (8 stitches)
R3: Ch 1, rotate the work, and repeat the same sequence along the opposite side of the foundation chain. (8 stitches)
R4: Work 1 sc into the tip and sl st into the base to finish the pointed leaf shape.
Fasten off, leaving a 20 cm sewing tail.
Position four leaves diagonally behind the flower. Their pointed tips should extend toward the square corners, while their bases remain concealed beneath the petals.
For greater botanical detail, embroider a central vein using green yarn and a tapestry needle.
Part 5: Ivory Granny Square Background (Make 140)
Yarn: warm ivory.
This separate openwork square foundation supports the flower and leaves. It is not worked directly into the petal stitches.
R1: Ch 4 and join into a ring. Ch 3 (counts as dc), work 2 dc, ch 2. Repeat (3 dc, ch 2) three more times. Join to the top of beginning ch 3. (12 dc, four ch-2 corners)
R2: Sl st to first corner. Work (3 dc, ch 2, 3 dc) in each corner space, with ch 1 between corners. Join. (24 dc, four ch-2 corners, four ch-1 side spaces)
R3: Work (3 dc, ch 2, 3 dc) in each corner. Work 3 dc into each side ch-1 space, placing ch 1 between granny clusters. Join. (36 dc)
R4: Repeat the granny-square expansion, adding one 3-dc cluster to each side. (48 dc)
R5: Repeat the expansion. (60 dc)
R6: Repeat the expansion. (72 dc)
R7: Repeat the expansion. (84 dc)
R8: Work one sc in each dc and each ch-1 side space, with (sc, ch 2, sc) in each corner ch-2 space. Join and fasten off.
For R3–R7, the double-crochet totals exclude corner chains and side-space chains. Count the final single-crochet edging separately, including the chain spaces.
Block the square to the proposed 15 × 15 cm measurement. If the result is substantially larger or smaller, adjust the granny rounds or hook size before producing additional squares.
Part 6: Purple Corner Accents (Optional, Make 4 per Square)
Yarn: lavender purple.
The reference photograph shows small purple details near the corners of many squares.
Attach yarn to a corner ch-2 space of the ivory background.
R1: Work 5 dc into the corner space. (5)
R2: Ch 1, turn, work 2 sc into the first stitch, sc into the next three stitches, and 2 sc into the last stitch. (7)
Fasten off with a 15 cm tail. Stitch the accent flat against the corner area without covering the joining loops.
Repeat for the remaining corners.
Part 7: Attaching the Flower Motif
Place the cream and lavender flower assembly in the center of the ivory square.
Arrange the four green leaves behind the purple petals at approximately 45°, 135°, 225°, and 315° around the center.
Pin the flower and leaves in position. Sew around the bases of the petals rather than their raised outer edges, allowing the petals to retain their three-dimensional shape.
Secure each leaf at its base and along the central vein. Avoid stitching the entire leaf flat against the square.
Check the reverse side for loose yarn loops before moving to the next motif.
Part 8: Joining the Granny Squares
For a proposed 150 × 210 cm blanket, arrange 140 squares in ten columns and fourteen rows.
Use a mattress stitch or flat slip-stitch join with ivory yarn. Align corner spaces before joining each edge, and avoid pulling the seam tighter than the square itself.
Join ten squares into each horizontal row, then connect all fourteen rows. Count the rows before adding the perimeter border.
The finished dimensions depend on the blocked motif size and joining method. Ten 15 cm squares give a nominal width of 150 cm, while fourteen give a nominal length of 210 cm, before border adjustments.
Part 9: Outer Blanket Border
Yarn: warm ivory.
R1: Work sc evenly around the entire joined blanket. Place (sc, ch 2, sc) at each outer corner.
R2: Work dc into each sc, with (2 dc, ch 2, 2 dc) at each corner.
R3: Work one sc into each dc, placing three sc in each corner space.
R4: Optional decorative edging: repeat (sl st, skip one stitch, 5 dc in next stitch, skip one stitch) along each side, adjusting the repeat near corners.
Fasten off and weave in the remaining yarn ends.
Matching Lavender Floral Pillow Covers
The photograph includes two large floral cushions behind a smaller rectangular lavender pillow.
For a matching square cushion, make nine floral motifs and arrange them in a 3 × 3 layout. At a blocked size of 15 cm per square, the panel measures approximately 45 × 45 cm before seams and borders.
Create a second panel using plain ivory granny squares, or use fabric for the reverse. Join three sides, insert a suitable cushion pad, and close the fourth side using a removable fastening if desired.
For the rectangular pillow, a plain textured crochet panel can be worked separately in lavender yarn. A simple ribbed stitch or back-loop single crochet pattern provides contrast without competing with the raised flowers.
The cushion covers use the same color palette but do not need the same motif density as the bedspread.
Assembly — 10 Steps
- Complete one cream flower center and confirm that it lies flat.
- Add the inner cream petals and lavender outer layers.
- Crochet four green leaves for the sample motif.
- Make one ivory background square and measure it.
- Attach the flower and leaves to the square, then block the complete sample.
- Calculate yarn consumption from the weighed sample and purchase the remaining materials.
- Produce the required number of matching floral squares.
- Arrange the squares into ten columns and fourteen rows, checking orientation.
- Join the rows and work the outer border.
- Weave in all remaining yarn ends, wash according to the yarn label, and block the completed blanket.
The assembled bedspread consists of repeated raised floral motifs attached to joined ivory granny square foundations.
7 Technical Tips for a More Accurate Blanket
- Mark every corner. Place a locking marker in each ch-2 corner space because missing one corner can distort the square into a trapezoid. Recount the four corners after every background round.
- Measure each sample square. A difference of 5 mm per motif can create a 5 cm width difference across ten columns. Block all squares to the same dimensions before joining.
- Control flower thickness. Raised petals that are sewn down too tightly lose their relief. Stitch only the bases and allow the outer petal edges to remain free.
- Keep leaf placement consistent. Four leaves should sit at approximately 90° intervals around the flower. Mark their positions before sewing to prevent uneven visual spacing.
- Check hook tension. If the ivory background curls inward, the hook may be too small or the flower attachment too tight. Compare the background square before and after attaching the motif.
- Pin before joining. Align the corners of neighboring squares and place a pin near each midpoint. This prevents stretched seams and mismatched granny clusters.
- Secure yarn tails properly. Weave each tail through several stitches in at least two directions. Loose tails can become visible through the openwork background after washing.
Conclusion
This lavender floral granny square crochet blanket pattern combines layered flower construction, green leaf details, and ivory openwork backgrounds in a modular bedspread design. The proposed 140-square layout provides a starting point for a larger bedroom project, while smaller arrangements can be adapted for throws or matching cushions.
Before making the full blanket, complete one square, measure its blocked dimensions, and record the yarn used in each color. This establishes a reliable basis for material purchasing and final sizing.
Share a finished square or completed bedspread on Pinterest and Instagram using #LavenderFloralGrannySquare.
For this particular design, would you keep the green leaves behind every lavender flower, or alternate them with plain ivory squares?









