Introduction
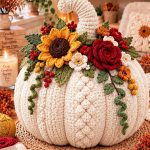
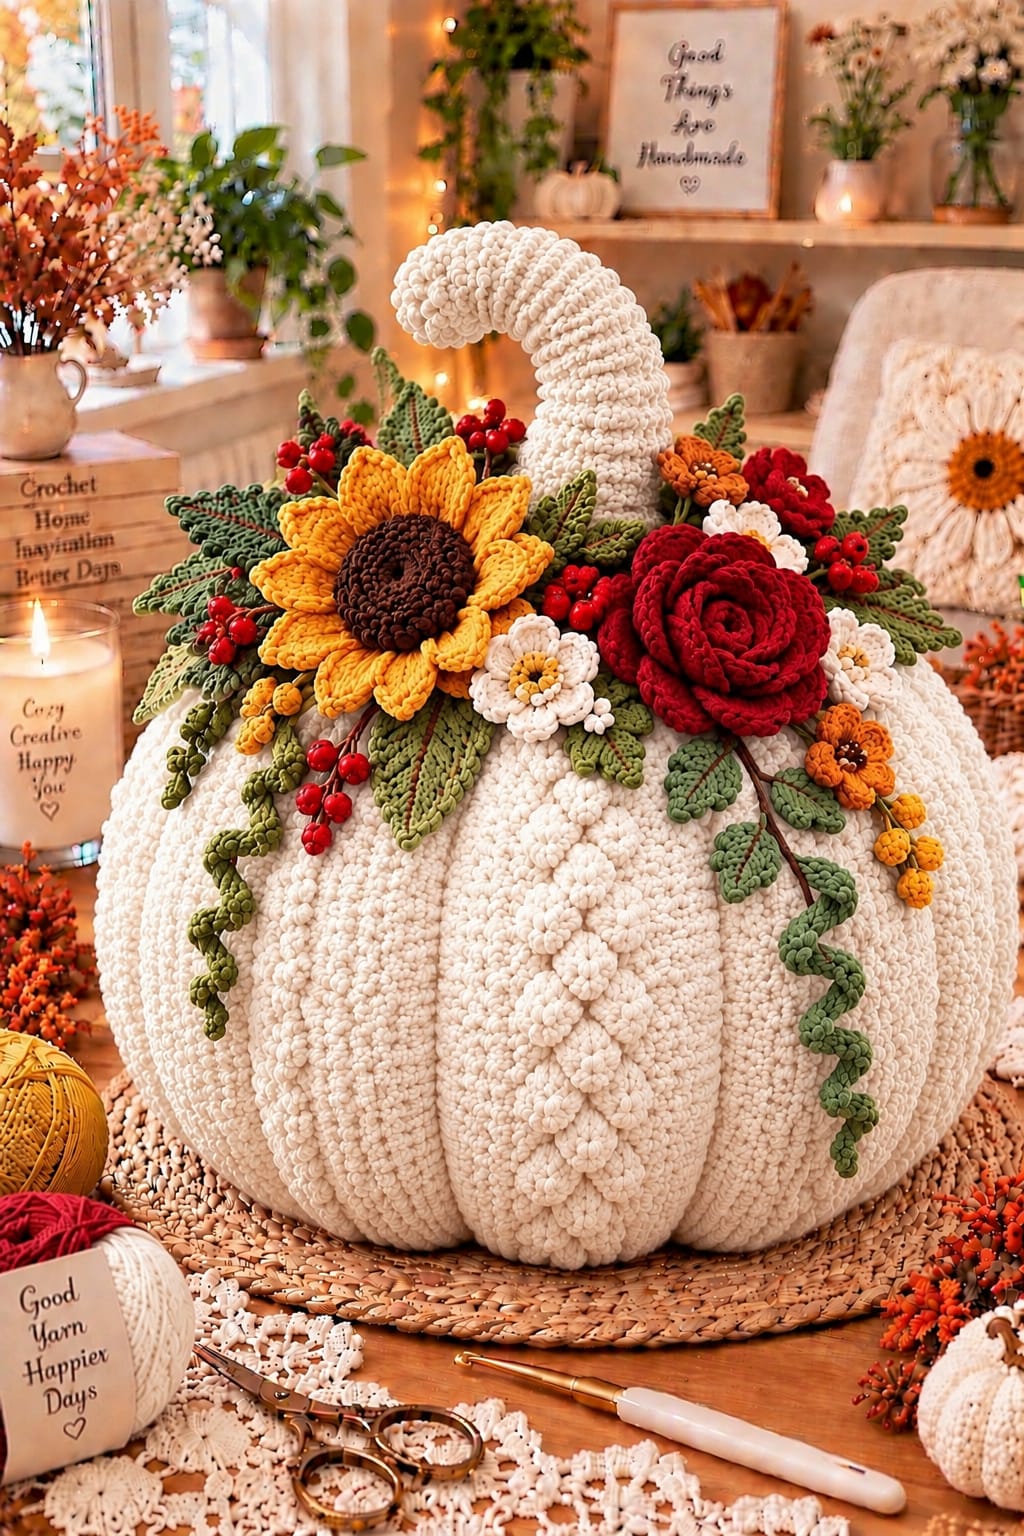
An ivory pumpkin this large needs deep vertical channels to keep the pale body from visually merging into one oversized sphere. This giant white crochet pumpkin pattern combines a sculpted ribbed pumpkin, tall curved stem, yellow sunflower, burgundy rose, cream flowers, berries, botanical leaves and curling vines. The photo-adapted design uses bulky yarn for the body and finer yarn for the floral work, producing an approximately 40–45 cm wide autumn centerpiece.
The Design: What Makes This White Crochet Pumpkin Different
The pumpkin body is intentionally broader than it is tall. Deep compression lines divide that body into substantial lobes, while raised crochet details emphasize selected ribs without covering the ivory surface. The tall stem repeats the body color rather than introducing brown, making the floral crown the primary color transition.
The botanical arrangement is asymmetrical. A large sunflower establishes the left side, and a layered burgundy rose provides similar visual mass on the right. Olive and sage leaves spread horizontally beneath them. Red berries, cream blossoms and orange flowers fill smaller openings, while two long corkscrew vines pull the foliage downward.
Overstuffing is the main construction problem. A rigid center prevents the shaping strands from creating deep valleys, so the outer circumference should be firm while the core remains compressible.
Project Info at a Glance
| Skill Level | Construction | Approx. Finished Size | Hooks | Best For |
|---|---|---|---|---|
| Intermediate / Advanced | Stuffed ribbed body with applied crochet flowers | 40–45 cm wide; 50–55 cm high with stem | 8 mm body; 3.5–5 mm details | Fall centerpiece, mantel or entry display |
Finished dimensions are estimates for reproducing the proportions visible in the photograph. Yarn construction, stuffing density and personal gauge can alter the measurements.
Materials and Tools
Yarn
- Warm ivory super-bulky yarn — approximately 700–950 g for the pumpkin and curved stem.
- Golden yellow worsted yarn — approximately 50–70 g for the sunflower and small buds.
- Dark brown worsted yarn — approximately 20–30 g for the sunflower center.
- Deep burgundy worsted yarn — approximately 70–100 g for the large rose and smaller flowers.
- Cream worsted yarn — approximately 30–50 g for secondary blossoms.
- Olive green worsted yarn — approximately 60–90 g for foliage and vines.
- Sage green worsted yarn — approximately 40–60 g for secondary leaves.
- Bright red yarn — approximately 20–30 g for berries.
Tools
- 8 mm crochet hook for the pumpkin and stem
- 5 mm crochet hook for the sunflower
- 4 mm crochet hook for the rose and foliage
- 3.5 mm crochet hook for small flowers and berries
- Polyester fiberfill — approximately 1–1.5 kg depending on density
- Long upholstery or doll needle
- Yarn needles
- Locking stitch markers
- Scissors
- Tape measure
Abbreviations
- MR — magic ring
- ch — chain
- sl st — slip stitch
- sc — single crochet
- hdc — half double crochet
- dc — double crochet
- tr — treble crochet
- inc — increase
- dec — decrease
- BLO — back loop only
- st / sts — stitch / stitches
An invisible decrease is worked through the front loops of the next two stitches before completing one single crochet through both loops; it reduces the visible gap produced by a standard decrease.
Giant White Crochet Pumpkin Pattern
The pumpkin body is constructed as a large ribbed rectangle. Its first and last rows are joined to form a tube, then the bottom and crown are gathered. External shaping strands compress the stuffed form into deep lobes.
Ivory Ribbed Pumpkin Body
Yarn: warm ivory super bulky.
Foundation: Ch 43.
Row 1: Hdc in second ch from hook and across. Turn. (42)
Row 2: Ch 1, hdc BLO in each st across. Turn. (42)
Rows 3–84: Repeat Row 2. (42)
Check the stitch count every eight to ten rows. A missed stitch gradually changes the edge angle and produces a diagonal seam when the body is joined.
The completed panel should be considerably longer than it is tall.
Joining the Body
Fold the rectangle so the first and final rows meet.
Sl st through corresponding loops across the seam.
Keep the join flexible enough to stretch with the neighboring ribs.
Fasten off with a 120 cm tail.
Gathering the Bottom
Thread the long ivory tail through a large needle.
Pass the needle through the ends of the ribbed rows around one opening.
Pull the yarn gradually rather than closing the hole in one movement.
Once the opening is approximately 2–3 cm wide, cross the center several times with the needle.
Pull closed and secure firmly.
This becomes the underside of the pumpkin.
Stuffing the Giant Pumpkin
Place fiberfill around the circumference first.
Fill every ribbed section evenly, rotating the pumpkin after each large handful.
Build a firm outer wall while keeping the middle approximately 15–20 percent softer than the sides.
Push additional filling into any flat areas.
Stop periodically and place the pumpkin on its intended base. The lower surface should flatten only enough to keep the centerpiece stable.
Gathering the Crown
Thread a long ivory strand through the row ends around the open crown.
Pull until the opening measures approximately 7–8 cm.
Do not close it completely.
The stem base will enter this opening after the body has been sculpted.
Sculpting the Pumpkin Lobes
The photograph shows strong vertical segmentation. Use eight shaping lines for a similar proportion.
Mark eight evenly spaced positions around the crown.
Cut eight long strands of strong ivory yarn.
Thread the first strand through the bottom center and bring it out at the crown.
Run the strand down an existing rib valley on the outside.
Pass through the bottom and return to the crown.
Pull until the first channel becomes clearly visible.
Secure temporarily.
Shape the opposite side next. Continue working opposite channels in pairs until all eight have been formed.
Compare lobe widths before tying permanent knots.
Raised Ivory Floral Rib
One front lobe in the reference design carries a vertical line of small dimensional motifs. These decorations should remain the same ivory color as the pumpkin so they add texture without interrupting the body color.
Small Ivory Flower — Make 10
R1: 6 sc in MR. Join. (6)
R2: In each stitch work sl st, ch 2, 2 hdc, ch 2, sl st.
Fasten off with a 15 cm sewing tail.
Arrange the flowers down one raised rib, leaving approximately 1–2 cm between neighboring motifs.
Sew only through their centers.
Tall Curved Ivory Stem
The stem is deliberately oversized. Its wide lower section balances the scale of the pumpkin, while the narrower upper portion creates the long curved profile.
Yarn: warm ivory super bulky.
R1: 6 sc in MR. (6)
R2: Inc ×6. (12)
R3: (1 sc, inc) ×6. (18)
R4: BLO sc around. (18)
R5–R12: Sc around. (18)
R13: (1 sc, dec) ×6. (12)
R14–R30: Sc around. (12)
Stuff the lower section firmly.
R31: (2 sc, dec) ×3. (9)
R32–R45: Sc around. (9)
Reduce the stuffing density gradually.
R46: (1 sc, dec) ×3. (6)
R47–R54: Sc around. (6)
Fasten off and close.
Shape the curve across the upper third. Avoid creating one sharp fold.
Attaching the Stem
Insert approximately 8–10 cm of the lower stem into the crown opening.
Add fiberfill around the stem base until there are no hollow areas.
Tighten the crown gathering strand.
Pass a long needle through the stem base and pumpkin body at several angles.
Test the attachment before adding flowers. The stem should remain stable when the pumpkin is gently rotated.
Large Crochet Sunflower
Make 1.
Brown Center
R1: 6 sc in MR. (6)
R2: Inc ×6. (12)
R3: (1 sc, inc) ×6. (18)
R4: (2 sc, inc) ×6. (24)
R5: (3 sc, inc) ×6. (30)
R6: (4 sc, inc) ×6. (36)
R7: Sc around. (36)
Fasten off.
Inner Yellow Petals
Join golden yellow yarn.
Petal: Ch 10.
Beginning in second ch from hook work:
Sl st, sc, hdc, dc, tr, tr, dc, hdc, sc.
Sl st into the next suitable center stitch.
Repeat evenly around.
Outer Yellow Petals
Join yellow yarn behind the first layer.
Ch 11 for each petal.
Work:
Sl st, sc, hdc, dc, tr, tr, tr, dc, hdc, sc.
Position each outer petal between two inner petals.
Fasten off with a 50 cm sewing tail.
Large Burgundy Rose
Make 1.
Rose Center
R1: 6 sc in MR. Join. (6)
R2: Inc ×6. Join. (12)
First Petal Layer
Create six ch-3 spaces.
In each space work:
Sc, hdc, 3 dc, hdc, sc.
Second Petal Layer
Create six ch-5 spaces behind the first petals.
In each space work:
Sc, hdc, 2 dc, 3 tr, 2 dc, hdc, sc.
Third Petal Layer
Create eight ch-6 spaces.
In each space work:
Sc, hdc, 3 dc, 4 tr, 3 dc, hdc, sc.
Outer Petal Layer
Create ten ch-7 spaces behind the previous layer.
In each space work:
Sc, hdc, 3 dc, 5 tr, 3 dc, hdc, sc.
Fasten off with a 60 cm tail.
Shape the center petals upward and spread the final layer outward.
Cream Flowers — Make 4 to 6
R1: 10 sc in MR. Join. (10)
R2: *Ch 3, skip 1 st, sl st in next.* Repeat around to create five loops.
R3: In each loop work sc, hdc, 3 dc, hdc, sc.
Fasten off with a 20 cm tail.
Add a compact golden-yellow center with several embroidery stitches.
Small Orange Flowers — Make 3 to 5
R1: 6 sc in MR. Join. (6)
R2: In each st work sl st, ch 3, 2 dc, ch 3, sl st.
Fasten off with a sewing tail.
Embroider a small brown center.
Large Olive Leaves — Make 10
Foundation: Ch 19.
Starting in second ch from hook work:
Sl st, sc, hdc, dc, dc, tr, tr, tr, tr, dc, dc, hdc, hdc, sc, sc, sl st.
At the tip work ch 3, sl st in first ch.
Rotate the work.
Mirror the stitch sequence along the opposite side of the foundation chain.
Fasten off with a 30 cm tail.
Leaf Veins
Surface-stitch a darker olive or brown strand from the base to the tip.
Add three or four diagonal vein stitches on each side.
Keep the embroidery tension loose enough for the leaf to remain flat.
Sage Leaves — Make 8
Foundation: Ch 13.
Starting in second ch work:
Sl st, sc, hdc, dc, tr, tr, dc, dc, hdc, sc, sc, sl st.
At the tip work a ch-2 picot.
Rotate and mirror the sequence along the opposite side.
Fasten off with a long sewing tail.
Red Crochet Berries — Make 24
R1: 6 sc in MR. (6)
R2: Inc ×6. (12)
R3: Sc around. (12)
Add a small amount of fiberfill.
R4: Dec ×6. (6)
Fasten off and close.
Leave approximately 15 cm for sewing.
Making Berry Clusters
Arrange three or four red berries into each cluster.
Sew their bases together.
Add short brown or dark green yarn stems if the cluster will extend beyond the surrounding leaves.
Prepare approximately six clusters.
Olive Corkscrew Vine — Make 2
Foundation: Ch 55.
Starting in second ch from hook, work 3 sc in each chain.
The fabric will curl as the stitches accumulate.
Fasten off with a 30 cm tail.
Sage Corkscrew Vine — Make 1
Foundation: Ch 60.
Starting in second ch, alternate 2 sc and 3 sc in each chain.
This produces a slightly longer, more open curl.
Fasten off with a long tail.
Planning the Floral Crown
Do not sew the flowers individually as soon as they are completed. Finish the major pieces first and test the complete arrangement with pins.
Position the sunflower on the left side of the stem.
Place the burgundy rose on the right, slightly lower than the sunflower center.
Insert large olive leaves behind both flowers so their pointed tips create a broad horizontal crown.
Add cream blossoms between the two focal flowers.
Use sage leaves to fill smaller gaps.
Place orange flowers toward the outer edges and red berry clusters near the upper foliage.
The crown should be widest close to the pumpkin surface and narrower near the stem.
Assembly
- Complete the ivory ribbed body, gather its bottom, stuff it evenly and sculpt eight deep vertical lobes with long shaping strands.
- Crochet the tall ivory stem, stuff its lower section firmly, form the upper curve and secure the lower 8–10 cm inside the pumpkin crown.
- Pin the sunflower to the left of the stem and the burgundy rose to the right without covering the central stem attachment.
- Arrange the large olive leaves behind both flowers, followed by the smaller sage leaves and cream blossoms.
- Add orange flowers and berry clusters to open spaces while keeping the floral arrangement asymmetrical.
- Sew the leaves to the pumpkin first so their bases remain hidden beneath the major flowers.
- Attach the sunflower through its brown center and secure the burgundy rose through the lowest petal layer at several points.
- Sew the corkscrew vines beneath the floral crown and allow them to fall across separate pumpkin lobes.
- Attach the small ivory texture flowers vertically along one front rib, keeping the neighboring shaping valleys visible.
- Weave in all remaining tails, redistribute any compressed stuffing and check the stem, sunflower and rose for movement before display.
The completed pumpkin should remain stable at its base while the stem and floral crown rise above the body without pulling the upper lobes out of shape.
How to Attach the Heavy Flowers
The sunflower and rose require more attachment points than the smaller motifs.
For the sunflower, sew through the brown center at four to six positions. Add hidden stitches through the bases of two opposite petals if the flower tips forward.
Attach the rose through the lowest petal layer at six to eight positions.
Do not stitch the upper petals flat.
After attaching each flower, lift the pumpkin several centimeters from underneath and set it down again. Recheck the flower position because a loosely attached motif may shift during movement.
Creating Deeper Pumpkin Ribs
If the lobes appear too shallow, first check the stuffing rather than immediately pulling harder on the shaping strands.
Move fiberfill away from the central core.
Massage it toward the outer portions of each lobe.
Tighten opposite shaping strands in small increments.
Aim for consistent depth across all eight channels.
Excessive compression can pull the bottom center upward and make the pumpkin unstable, so stop once the valleys remain visible from several viewing angles.
Adjusting the Size
For a medium pumpkin, begin with approximately 33–35 chains and work 62–68 ribbed rows.
For the large photographed proportion, use the 42-stitch body and approximately 84 rows.
An extra-large version can begin with 48 stitches, but the circumference must also be increased proportionally.
Do not increase only the foundation chain. A taller panel without sufficient circumference produces an upright oval.
Measure the first completed pumpkin before scaling the flowers because the sunflower and rose should remain proportional to the finished body.
Making a Shorter Stem
The dramatic curved stem is a major feature of this version, but it can be shortened for a shelf with limited clearance.
Work R1–R30 as written.
Skip approximately eight to twelve rounds from the narrow upper section.
Finish with the final decrease and six-stitch tip.
Maintain at least 8 cm of firm lower stem inside the crown regardless of the visible stem height.
Alternative Floral Arrangements
The ivory body supports several autumn palettes.
Replace burgundy with rust for a lower-contrast arrangement. Mustard, terracotta and olive create a more restricted harvest palette.
For a neutral version, use cream roses, beige flowers and sage foliage while retaining a dark brown sunflower center.
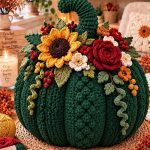
A winter adaptation can replace the sunflower with a poinsettia and increase the red berry clusters.
When changing colors, maintain one large flower on each side of the stem. The arrangement depends more on balanced flower scale than on a specific shade combination.
7 Technical Tips for a Giant White Crochet Pumpkin
- Count all 42 body stitches regularly. Losing one stitch in the ribbed panel creates a tapered edge and prevents the first and final rows from matching cleanly.
- Keep the core 15–20 percent softer than the outer lobes. Excess central stuffing blocks the compression required for deep vertical channels.
- Mark eight shaping positions before tightening yarn. A spacing error of several centimeters can produce visibly unequal lobes on a pumpkin this large.
- Insert 8–10 cm of the stem into the crown. A shallow attachment cannot reliably support the long curved upper section.
- Sew the rose at six to eight lower-petal points. Attaching only its center permits the heavy outer petals to rotate downward.
- Keep long vines in separate valleys. Two curls placed on the same lobe hide the rib structure and create unnecessary visual weight on one side.
- Leave 1–2 cm between the raised ivory flowers. Crowding the small motifs turns the front rib into a solid strip instead of a sequence of individual details.
Care and Storage
Lift the centerpiece from underneath with both hands. The stem and floral crown are decorative structures rather than carrying handles.
Spot-clean the body according to the yarn manufacturer’s care instructions. A fully saturated pumpkin of this size can become difficult to support evenly while wet.
During storage, leave clearance around the curved stem and major flowers.
Do not place heavy seasonal decorations on top of the sunflower or rose.
If a lobe becomes compressed, redistribute its stuffing by hand and retighten the corresponding shaping strand only if required.
Conclusion
Construct the ivory body first and use its final proportions to control every decorative element added afterward. Eight evenly spaced shaping channels give the oversized pumpkin its structure, while a firmly anchored curved stem supports the botanical crown. Position the sunflower and burgundy rose before adding foliage, berries and smaller flowers, then reserve the long vines for separate front lobes. The raised ivory flower trail can be added last so its spacing follows the finished rib. Save this giant white crochet pumpkin pattern to Pinterest and share the completed centerpiece on Instagram with #WhiteFloralCrochetPumpkin. Would you keep the stem ivory or crochet it in olive green for stronger contrast?